Extended Page Title
Step 5 - Register the CI Sync On-Premise Multi-Source Agent and Setup Source Connections via the CI Sync SaaS/Web User Interface
Task List
|
Task # |
Task |
Performed by |
|---|---|---|
|
1 |
Use the CI Sync Agent Config Utility to register the CI Sync Agent with your CI Sync SaaS Instance |
Infrastructure SME
|
|
2 |
Use the CI Sync Agent Config Utility to test the connection values and register the CI Sync Agent with your CI Sync SaaS Instance |
Infrastructure SME
|
|
3 |
Use the CI Sync Agent Config Utility to setup Source System Connections |
Infrastructure SME
|
Task 1: Use the CI Sync Agent Config Utility to register the CI Sync Agent with your CI Sync SaaS Instance
Perform the following steps on the server where the CI Sync Agent was installed (referred to as the “CI Sync Agent Server”).
-
The CI Sync Agent Config Utility will have automatically loaded if you have just completed S4 - Install the On-Prem Multi-Source Agent.
-
If the Config Utility is not running then locate and run from the Start Menu (i.e. run the “CISynchronizerAgent Config Utility” program).
-
If you have installed CISync Agent On-Prem version 3.4.7 or newer, you'll find proxy settings in the Advanced tab. If your environment requires you to use a proxy server, expand and follow the instructions to set the proxy settings before continuing.
Click to expand the instructions to use proxy settings
-
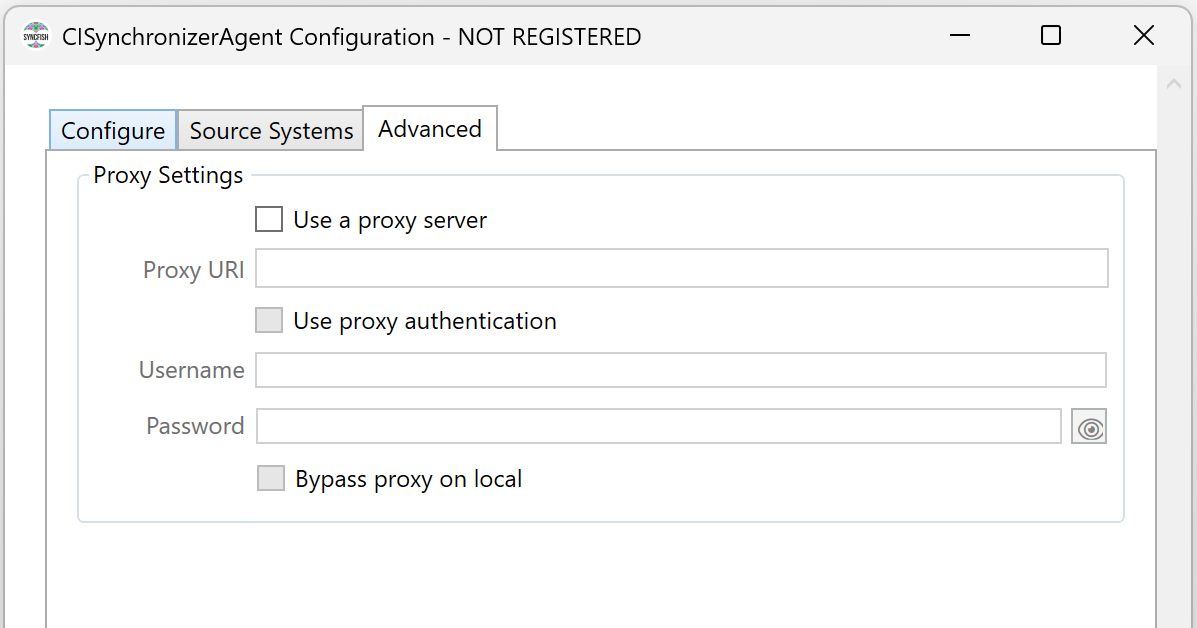
Using the CI Sync Configuration Utility, navigate to the Advanced Tab (as shown below) to enter the relevant values.
-
The table below explains each field and the required value for the screen above.
|
# |
Field Name on the Advanced Tab |
Value you need to enter |
|
1 |
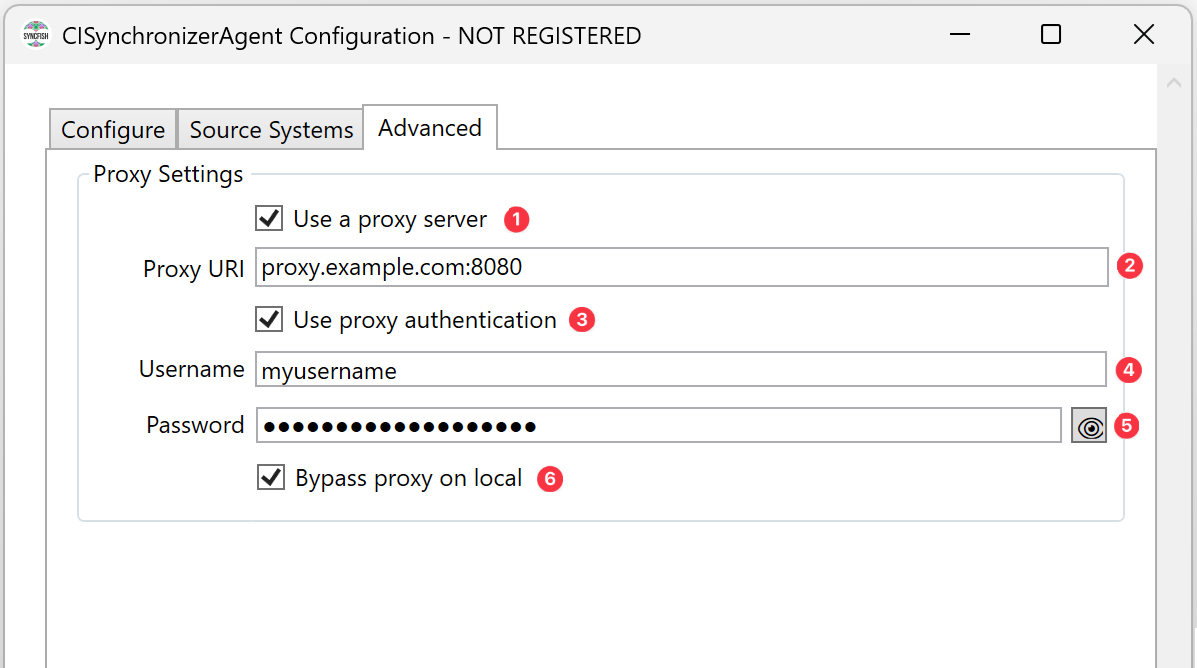
Use proxy server Note: This checkbox will determine if CI Sync On-Prem will use the proxy settings for all HTTP requests. |
Check the box if you want to use a proxy server |
|
2 |
Proxy URI Note: Specifies your proxy server name or the IP address of the proxy server, followed by ':' and the port number your proxy server is listening on. |
Example using the proxy server name:
Example using the proxy server IP address:
|
|
3 |
Use proxy authentication Note: This checkbox will determine if your proxy server mandates authentication. |
Check the box if your proxy server will require authentication. |
|
4 |
Username Note: Username is only required if ‘Use proxy authentication’ has been checked. |
Username to authenticate against your proxy server. |
|
5 |
Password Note: Password is only required if ‘Use proxy authentication’ has been checked. |
Password to authenticate against your proxy server. |
|
6 |
Bypass proxy on local Note: This checkbox will determine if requests to your local network will not use the proxy server. |
Check the box if you do not want to use the proxy server for local network requests. |
-
Finally, after entering your proxy settings, click "Update" to validate and save them before moving on to the next step.
-
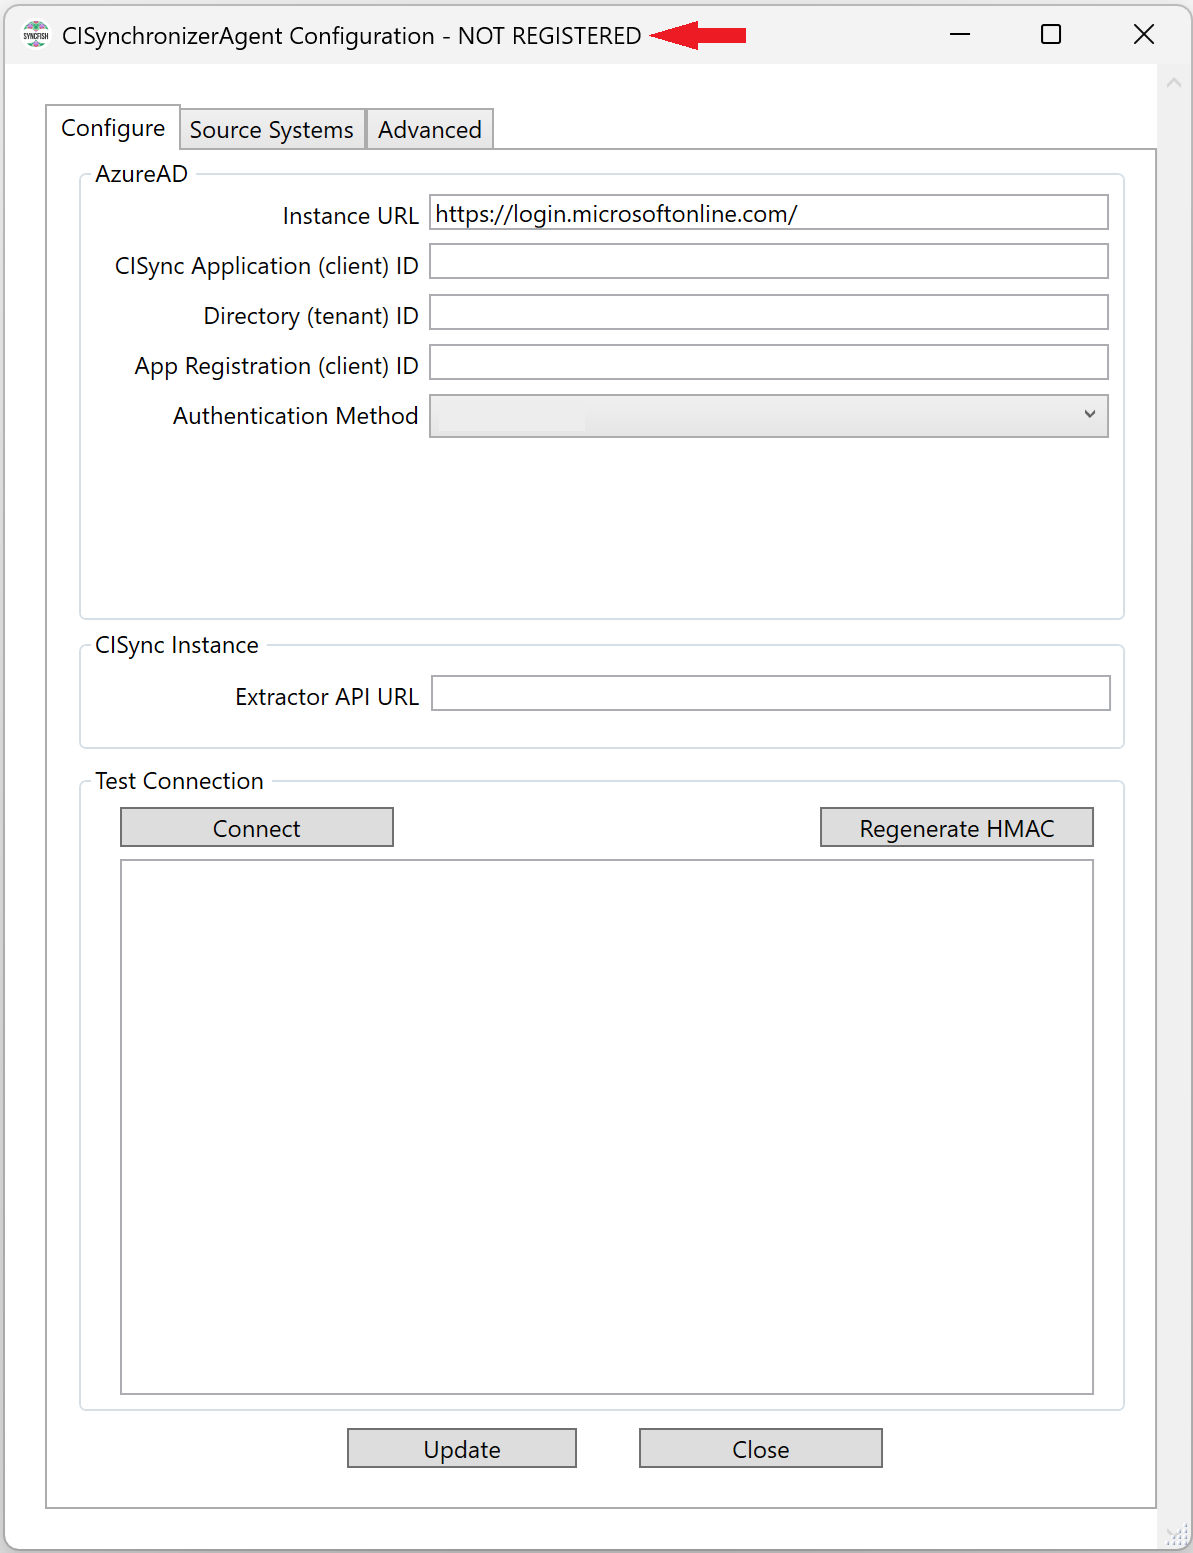
The CI Sync Agent (i.e. the Windows Service) needs to be registered if this is the first time you have run the Config Utility. The CI Sync Agent will be registered with your customer specific CI Sync SaaS instance.
-
You can identify the registration status by the “NOT REGISTERED” text at the top of the form.
-
Follow the guidance on the subsequent pages to enter the additional values on the above form.
Two sets of instructions are provided below. The instructions you use will depend on the authentication method you have chosen. Your options are:
-
Client Secret Authentication, or
-
Certificate Based Authentication.
If in doubt, talk with your Azure AD/Entra ID Admin who performed S3 - Create an Entra ID App Registration for CI Sync Agent Authentication.
Option 1: Client Secret Authentication
Expand the instructions below if you are using a Client Secret Authenticaiton between the CI Sync Agent and your Entra ID.
Click to expand the instructions for Option 1
-
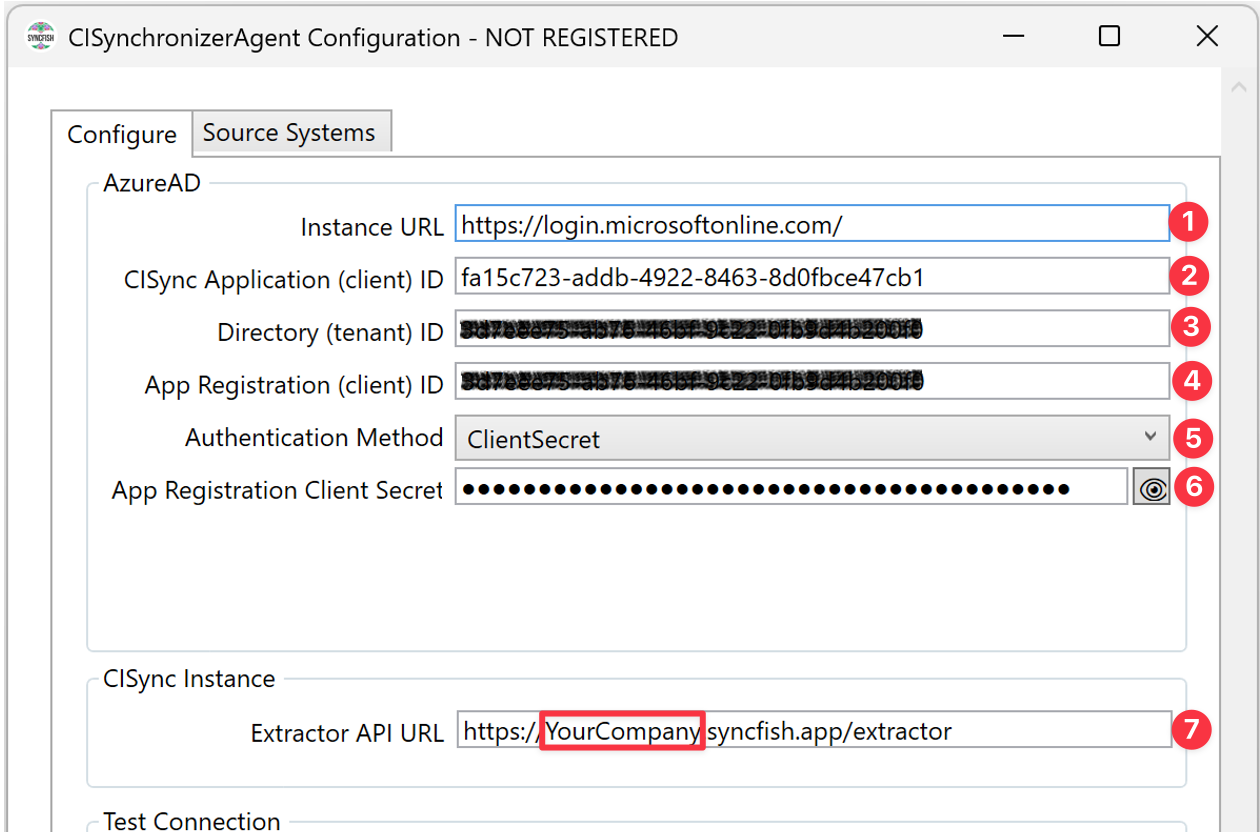
Using the CI Sync Configuration Utility, navigate to the Configure Tab (as shown below) to enter the relevant values.
-
The table below explains each field and the required value for the screen above.
|
# |
Field Name on the Configure Tab |
Value you need to enter |
|
1 |
Instance URL Note: This is the URL to the directory provider. In all cases use the value shown in the next column. |
|
|
2 |
CISync Application (client) ID Note: This is a static value provided by Syncfish. In all cases use the value shown in the next column. |
fa15c723-addb-4922-8463-8d0fbce47cb1 |
|
3 |
Directory (tenant) ID Note: This is your Azure Active Directory Tenancy ID (the same one you provided to Syncfish when your CI Sync SaaS instance was being provisioned. |
This value was captured during S3 - Create an Entra ID App Registration for CI Sync Agent Authentication. See the screen shot below for quick reference, or click here to skip back to the specific task where this value was captured. 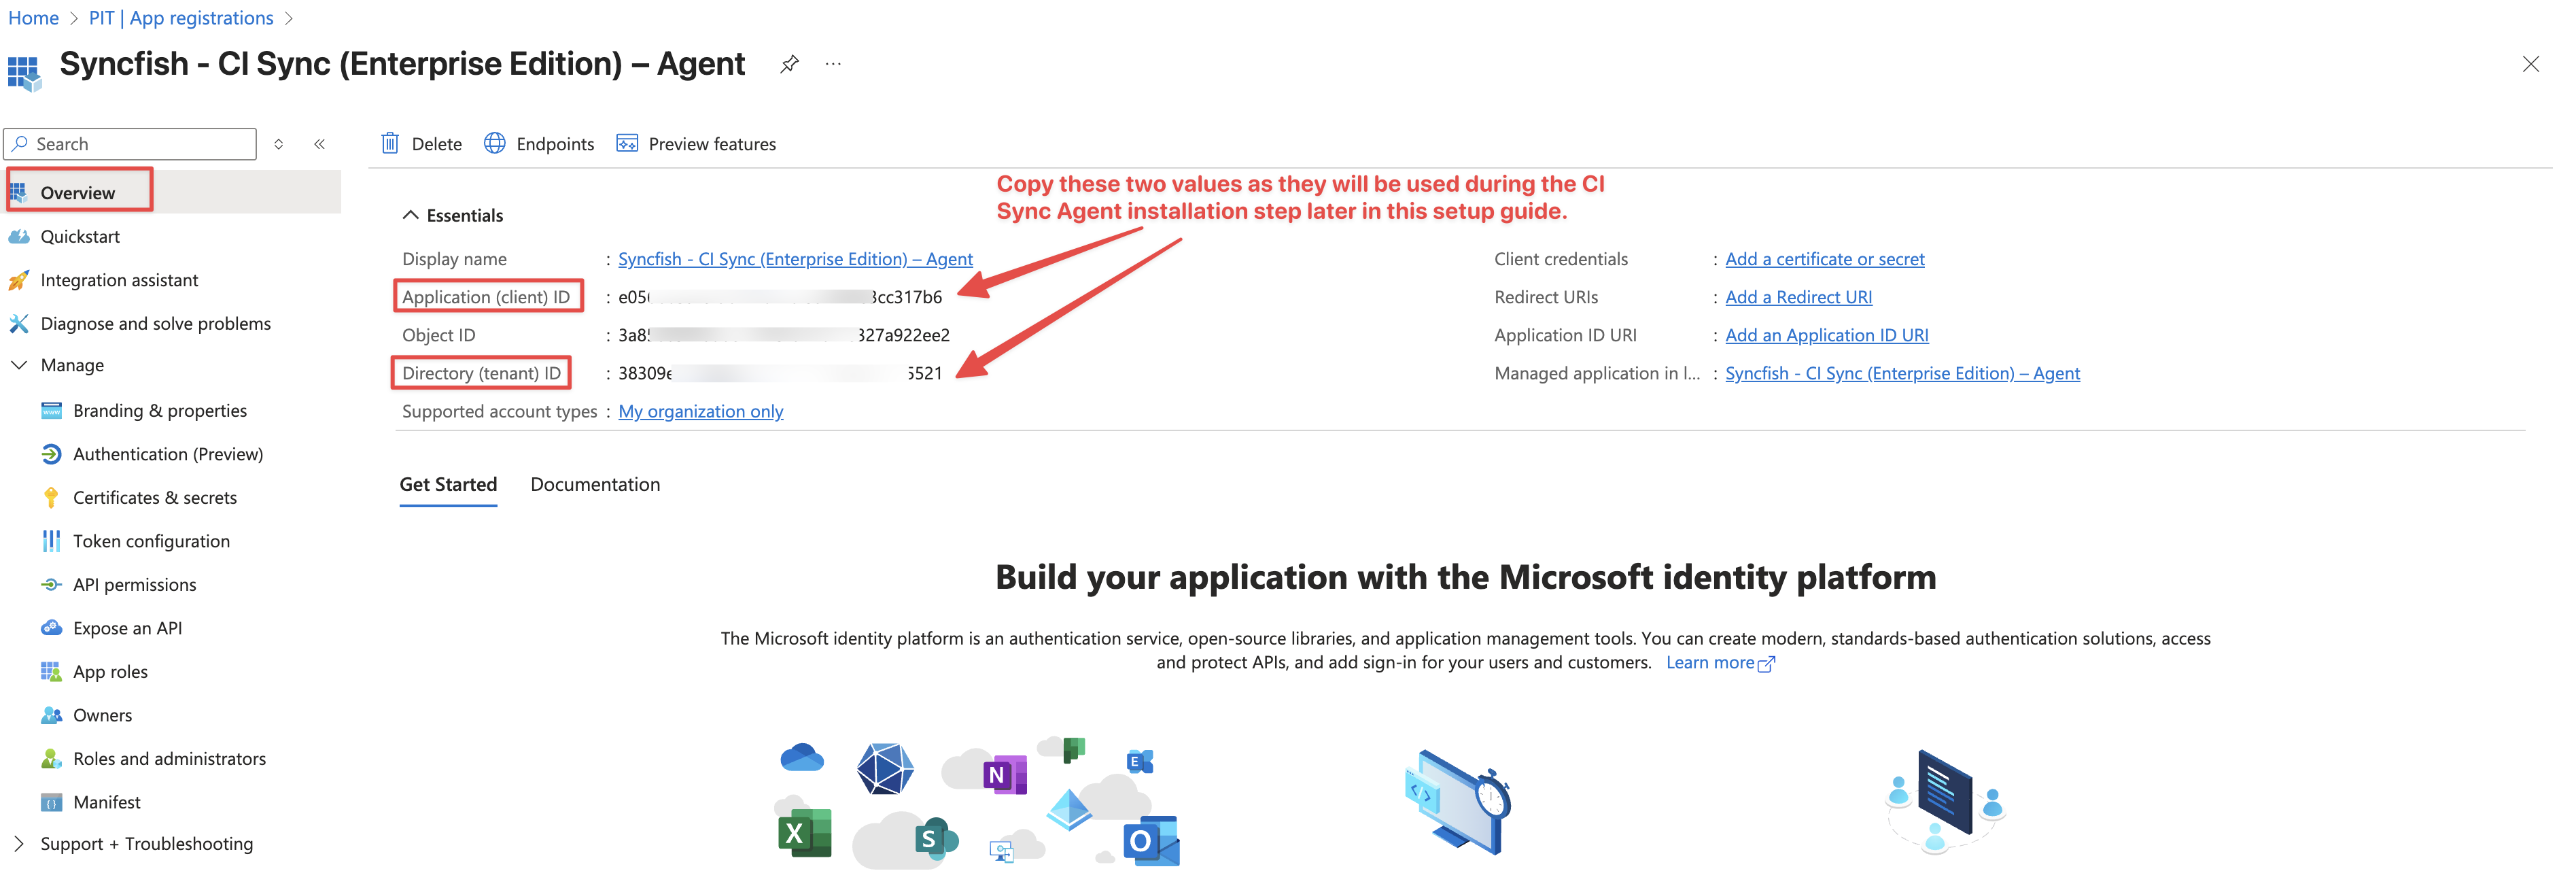
|
|
4 |
App Registration (client) ID Note: Enter the client ID of the App Registration in your Azure AD you created during Step 3 – Create an AAD App Registration for CI Sync Agent Authentication. |
This value was captured during S3 - Create an Entra ID App Registration for CI Sync Agent Authentication. See the screen shot below for quick reference, or click here to skip back to the specific task where this value was captured.
|
|
5 |
Authentication Method |
Select ClientSecret |
|
6 |
App Registration Client Secret Note: Enter the Value field (NOT the Secret ID) for the CI Sync Agent you recorded when creating the Azure AD App Registration for the Agent. |
This value was captured during S3 - Create an Entra ID App Registration for CI Sync Agent Authentication. See the screen shot below for quick reference, or click here to skip back to the specific task where this value was captured.
|
|
7 |
Extractor API URL Note: This is your customer specific CI Sync API URL (i.e. the “Extractor API” URL) sent to you by Syncfish. |
This is your company specific CI Sync URL with an /extractor suffix. That is: https://YourCo.syncfish.app/extractor |
Secrets entered into the CI Sync Agent Configuration Utility are stored in the Windows Credential Store.
-
You can skip over the Option 2 (Certificate Based Authentication) instructions and proceed to Task 2 further below.
Option 2: Certificate Based Authentication
Expand the instructions below if you are using a Certificate Based Authenticaiton between the CI Sync Agent and your Entra ID.
Informational Note
This section assumes the organization has a certificate management solution in place and the certificate related to this activity (which was also used for the AAD App Registration object creation) is available to the Windows Server being used to install/run the CI Sync Agent (i.e. the Windows Service).
Click to expand the instructions for Option 2
-
Import the Digital Certificate into the Windows Local Machine Certificate Store. It is recommended you do not import into the Current User Certificate Store (see informational notes below).
Informational Notes
-
The Digital Certificate referred to above is the provided to you by your AAD Admin (i.e. the Admin who generated the Digital Certificate). Click here to skip back to the specific task where the Certificate was generated in AAD/Entra ID.
-
When importing the certificate, it is recommended you import to the Local Machine Certificate Store. If you import it to the Current User you will almost certainly strike errors when the CI Sync Agent user account (i.e. the user account used by the Windows Service) tries to access the certificate.
-
Only consider importing to the Current User Certificate if you are running the CI Sync Config Utility with “Run As” in the context of the CI Sync Agent user account (i.e. the user account used by the Windows Service).
-
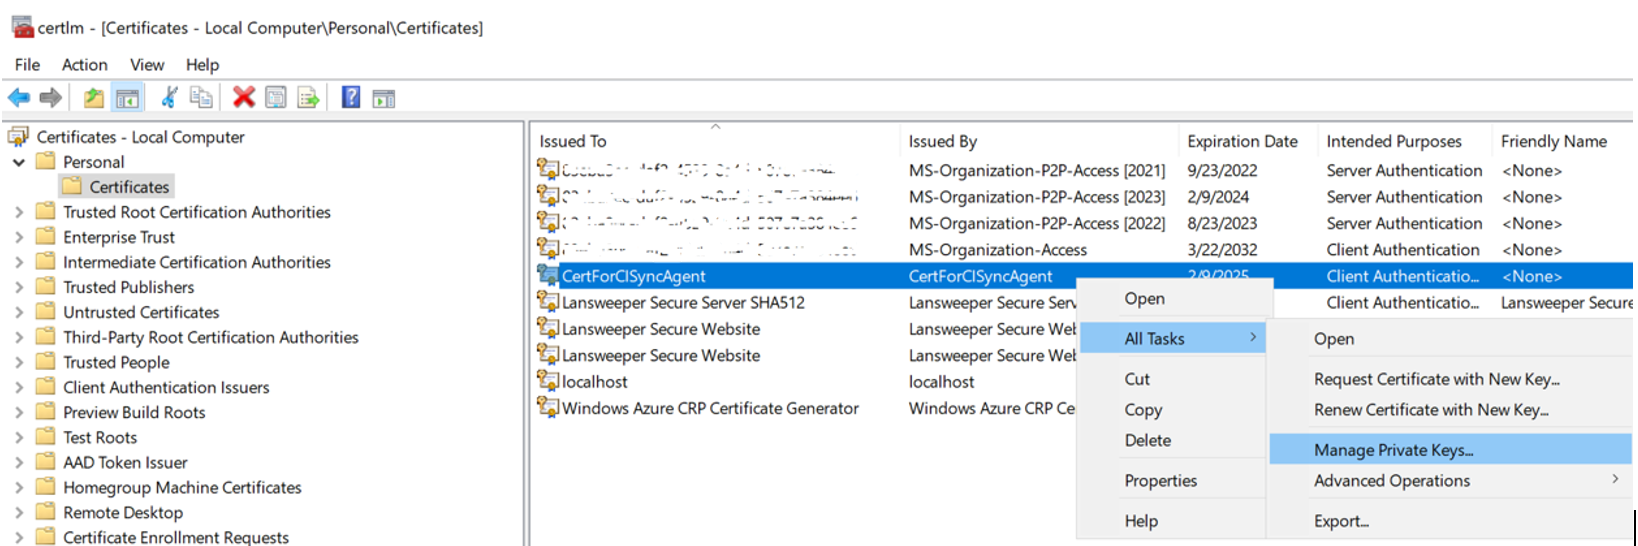
Ensure the CI Sync Agent user account (i.e. the user account used by the Windows Service) has sufficient permissions to read the Digital Certificate you imported. The following steps explain how to check/set the right permissions.
-
Open Microsoft Management Console.
-
Navigate to Certificates - Local Computer → Personal → Certificates
-
Right-click on the relevant certificate (the one you imported) and select All Tasks → Manage Private Keys
-
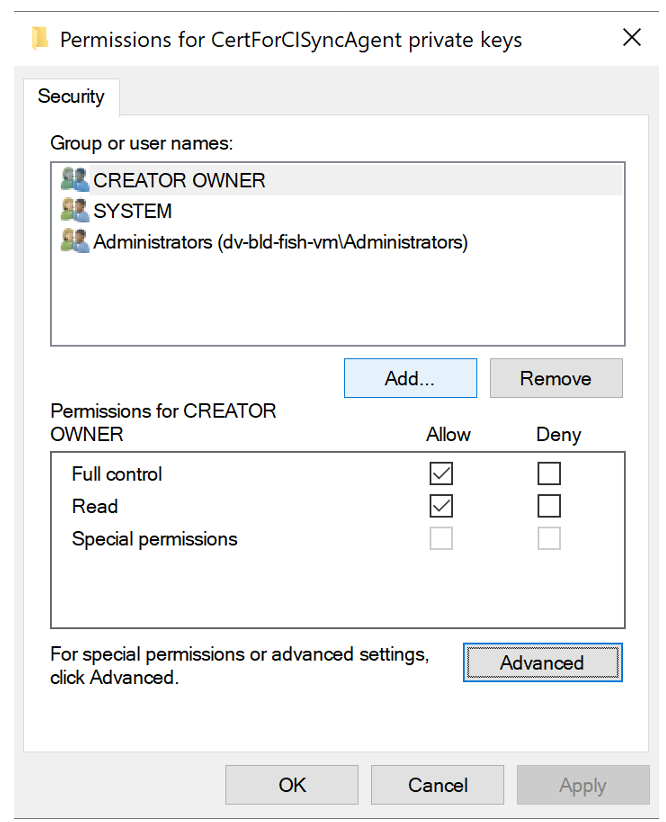
On the permissions window, click the Add button.
-
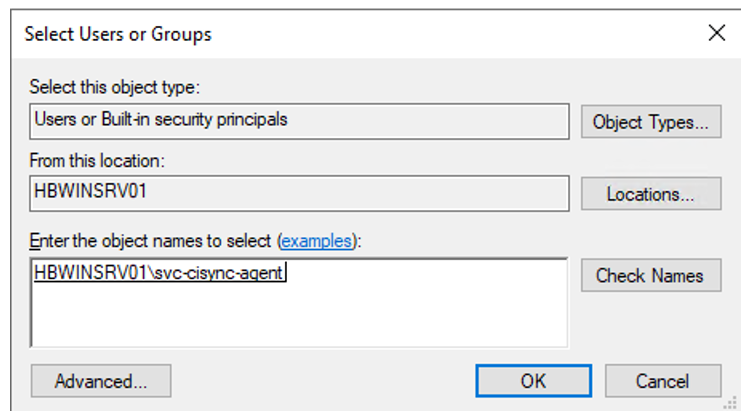
Search for Users, locate the CI Sync Agent User (e.g. svc-cisync-agent), press Check Names, then press the OK button.
-
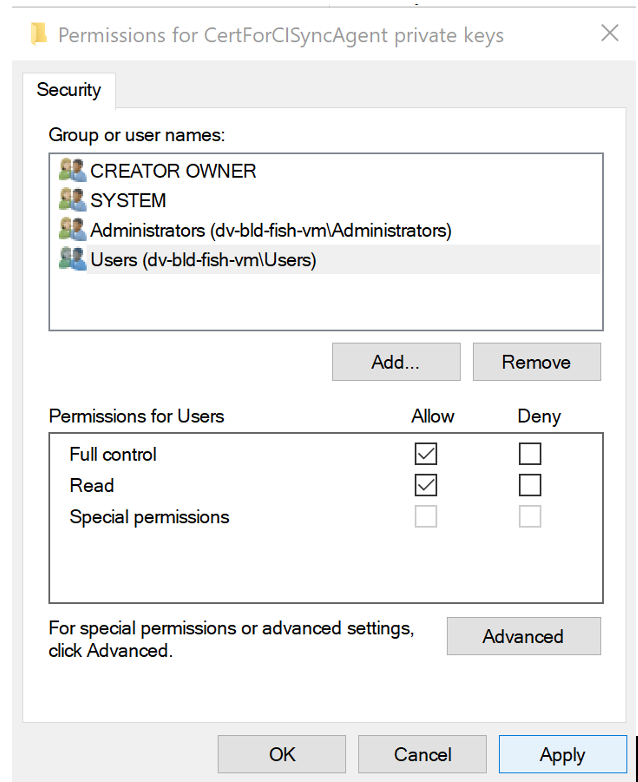
Back on the permissions window, make sure Full control and Read are ticked. Then click Apply and then Ok.
-
Next, open the CI Sync Configuration Utility
-
Navigate to the Configure Tab (as shown below) to enter the relevant values.
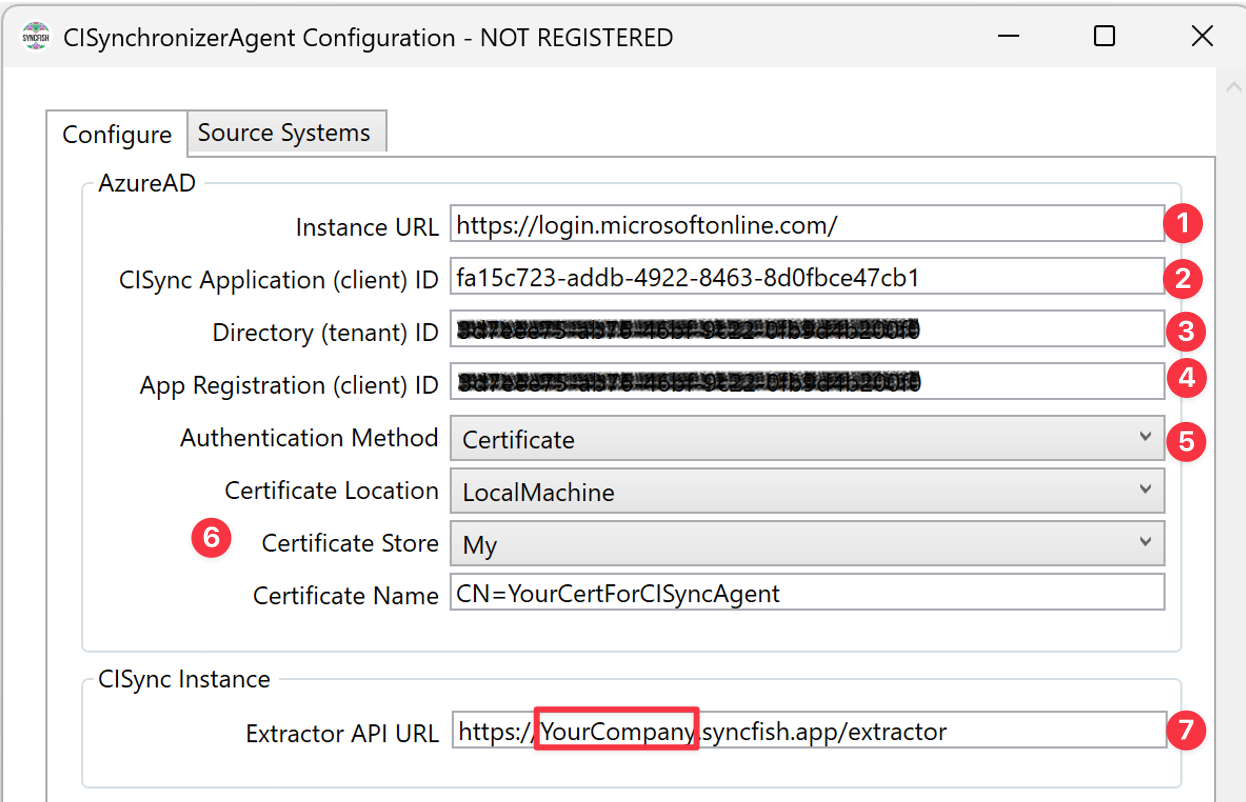
-
The table below explains each field and the required value for the screen above.
|
# |
Field Name on the Configure Tab |
Value you need to enter |
|
1 |
Instance URL Note: This is the URL to the directory provider. In all cases use the value shown in the next column. |
|
|
2 |
CISync Application (client) ID Note: This is a static value provided by Syncfish. In all cases use the value shown in the next column. |
fa15c723-addb-4922-8463-8d0fbce47cb1 |
|
3 |
Directory (tenant) ID Note: This is your Azure Active Directory Tenancy ID (the same one you provided to Syncfish when your CI Sync SaaS instance was being provisioned. |
This value was captured during S3 - Create an Entra ID App Registration for CI Sync Agent Authentication. See the screen shot below for quick reference, or click here to skip back to the specific task where this value was captured.
|
|
4 |
App Registration (client) ID Note: Enter the client ID of the App Registration in your Azure AD you created during Step 3 – Create an AAD App Registration for CI Sync Agent Authentication. |
This value was captured during S3 - Create an Entra ID App Registration for CI Sync Agent Authentication. See the screen shot below for quick reference, or click here to skip back to the specific task where this value was captured.
|
|
5 |
Authentication Method |
Select Certificate |
|
6 |
Certificate Location
|
Options: LocalMachine, CurrentUser Recommendation: It is strongly recommended you use LocalMachine, as the current user account (the person installing/running the CI Sync Agent Config Utility) is not the same as the CI Sync Agent user account (i.e. the user account used by the Windows Service). If you have saved the certificate in the CurrentUser context, rather than the LocalMachine context (of the Windows Certificate Store) it will cause an error when the CI Sync Agent user account (i.e. the user account used by the Windows Service) tries (and fails) to read the certificate from the Windows Certificate Store. |
|
Certificate Store |
Options: AddressBook, AuthRoot, CertificateAuthority, My, Root, TrustedPeople, TrustedPublisher The Certificate Store selections are a standard set of values provided by the Microsoft and correspond to the folders in the certificate store. Recommendation: It is recommended this value be set to the “My” store (this translates to the “Personal/Certificates” path in the Windows Certificate Store). |
|
|
Certificate Name |
Enter the subject of the certificate related to the CI Sync Agent authentication to the App Registration object. |
|
|
7 |
Extractor API URL Note: This is your customer specific CI Sync API URL (i.e. the “Extractor API” URL) sent to you by Syncfish. |
This is your company specific CI Sync URL with an /extractor suffix. That is: https://YourCo.syncfish.app/extractor |
-
You can now proceed to Task 2 below.
Task 2: Use the CI Sync Agent Config Utility to test the connection values and register the CI Sync Agent with your CI Sync SaaS Instance
-
After entering the various values (described above in Task 5a)
-
Click the Connect button under the “Test Connection” heading.
-
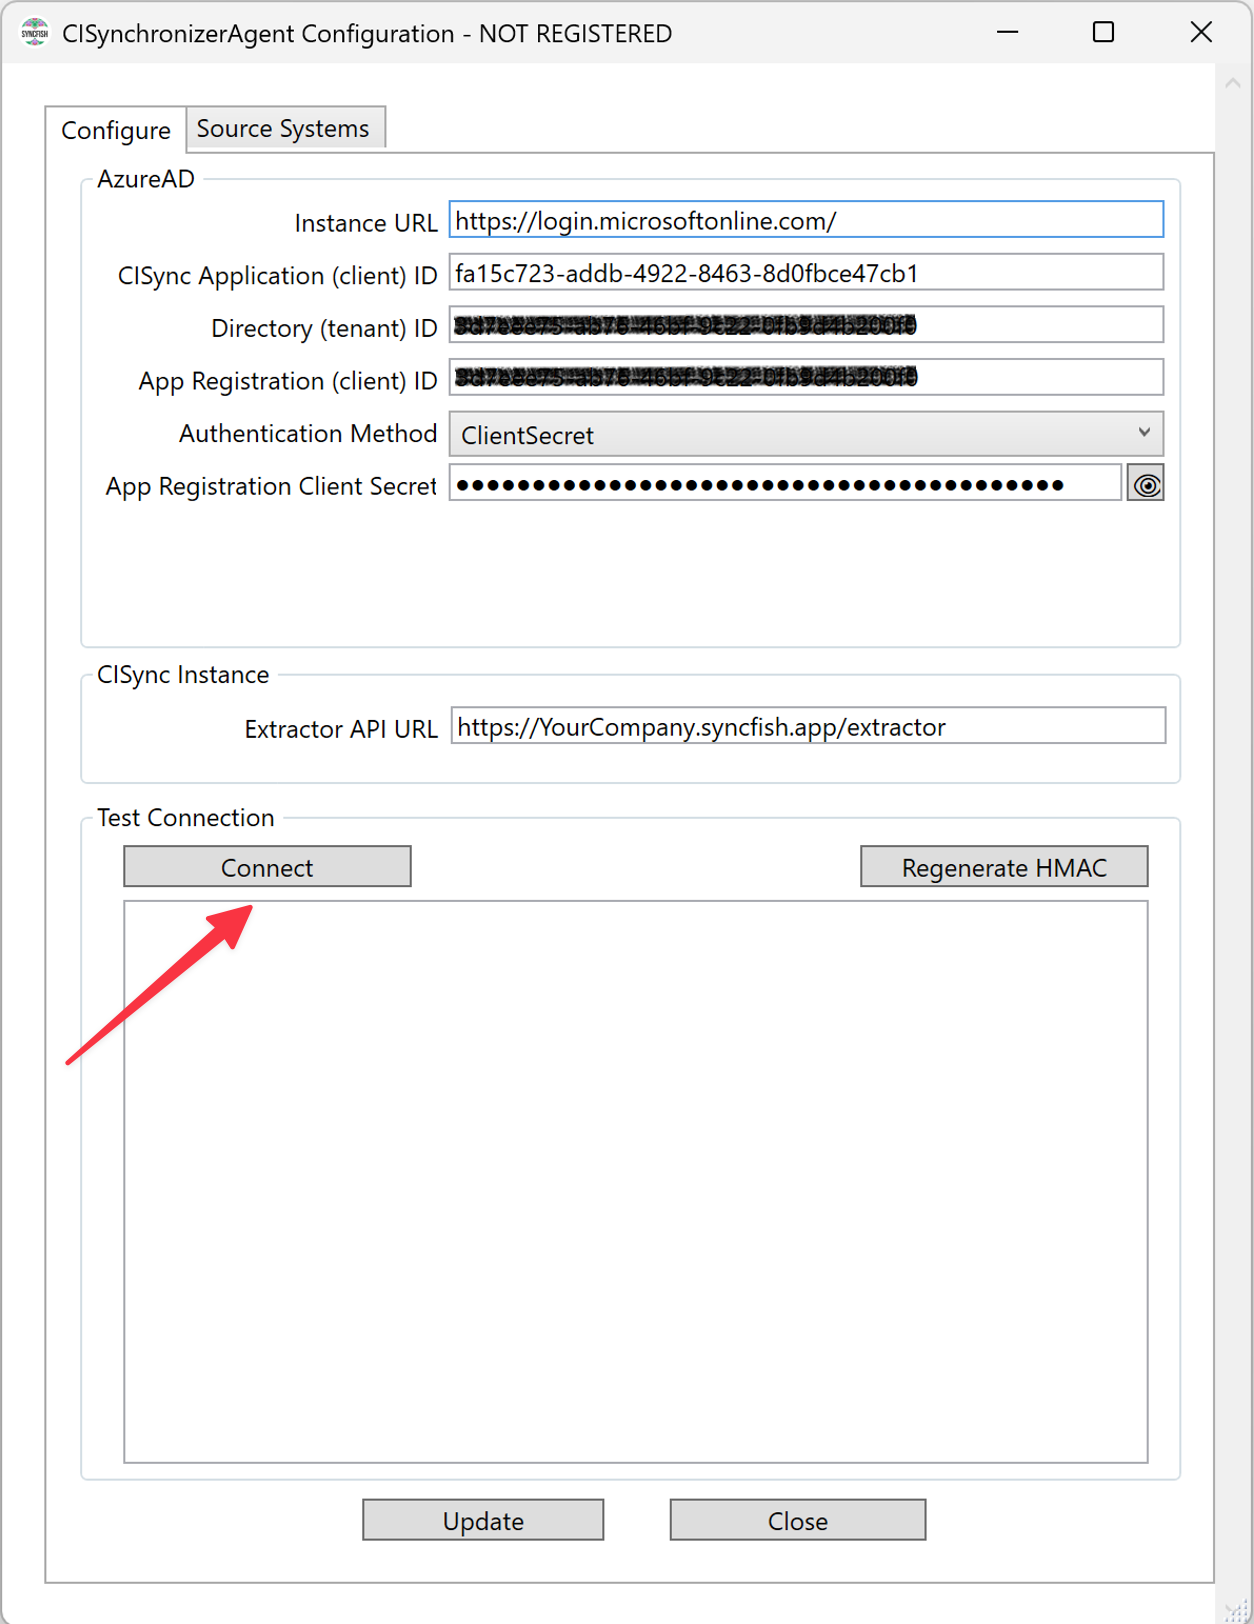
-
Once Connect is clicked, the HMAC Shared Secret dialogue is displayed.
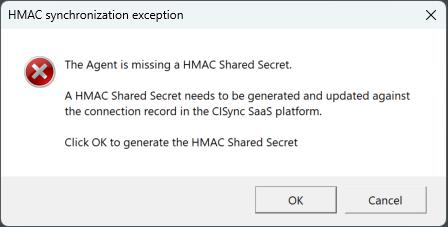
Once OK is clicked in the previous dialogue box, a new window should appear displaying a newly generated HMAC shared secret as well as a hyperlink to the agent connection in your CI Sync SaaS instance.
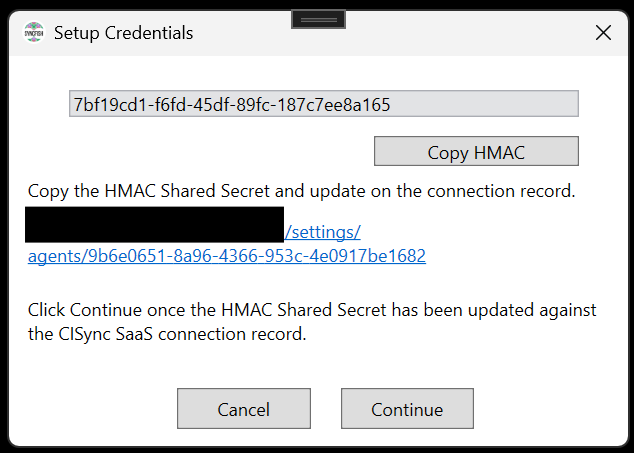
-
Copy the HMAC shared secret, generated by the configuration tool, and login to your CI Sync SaaS instance at https://YourCo.syncfish.app
-
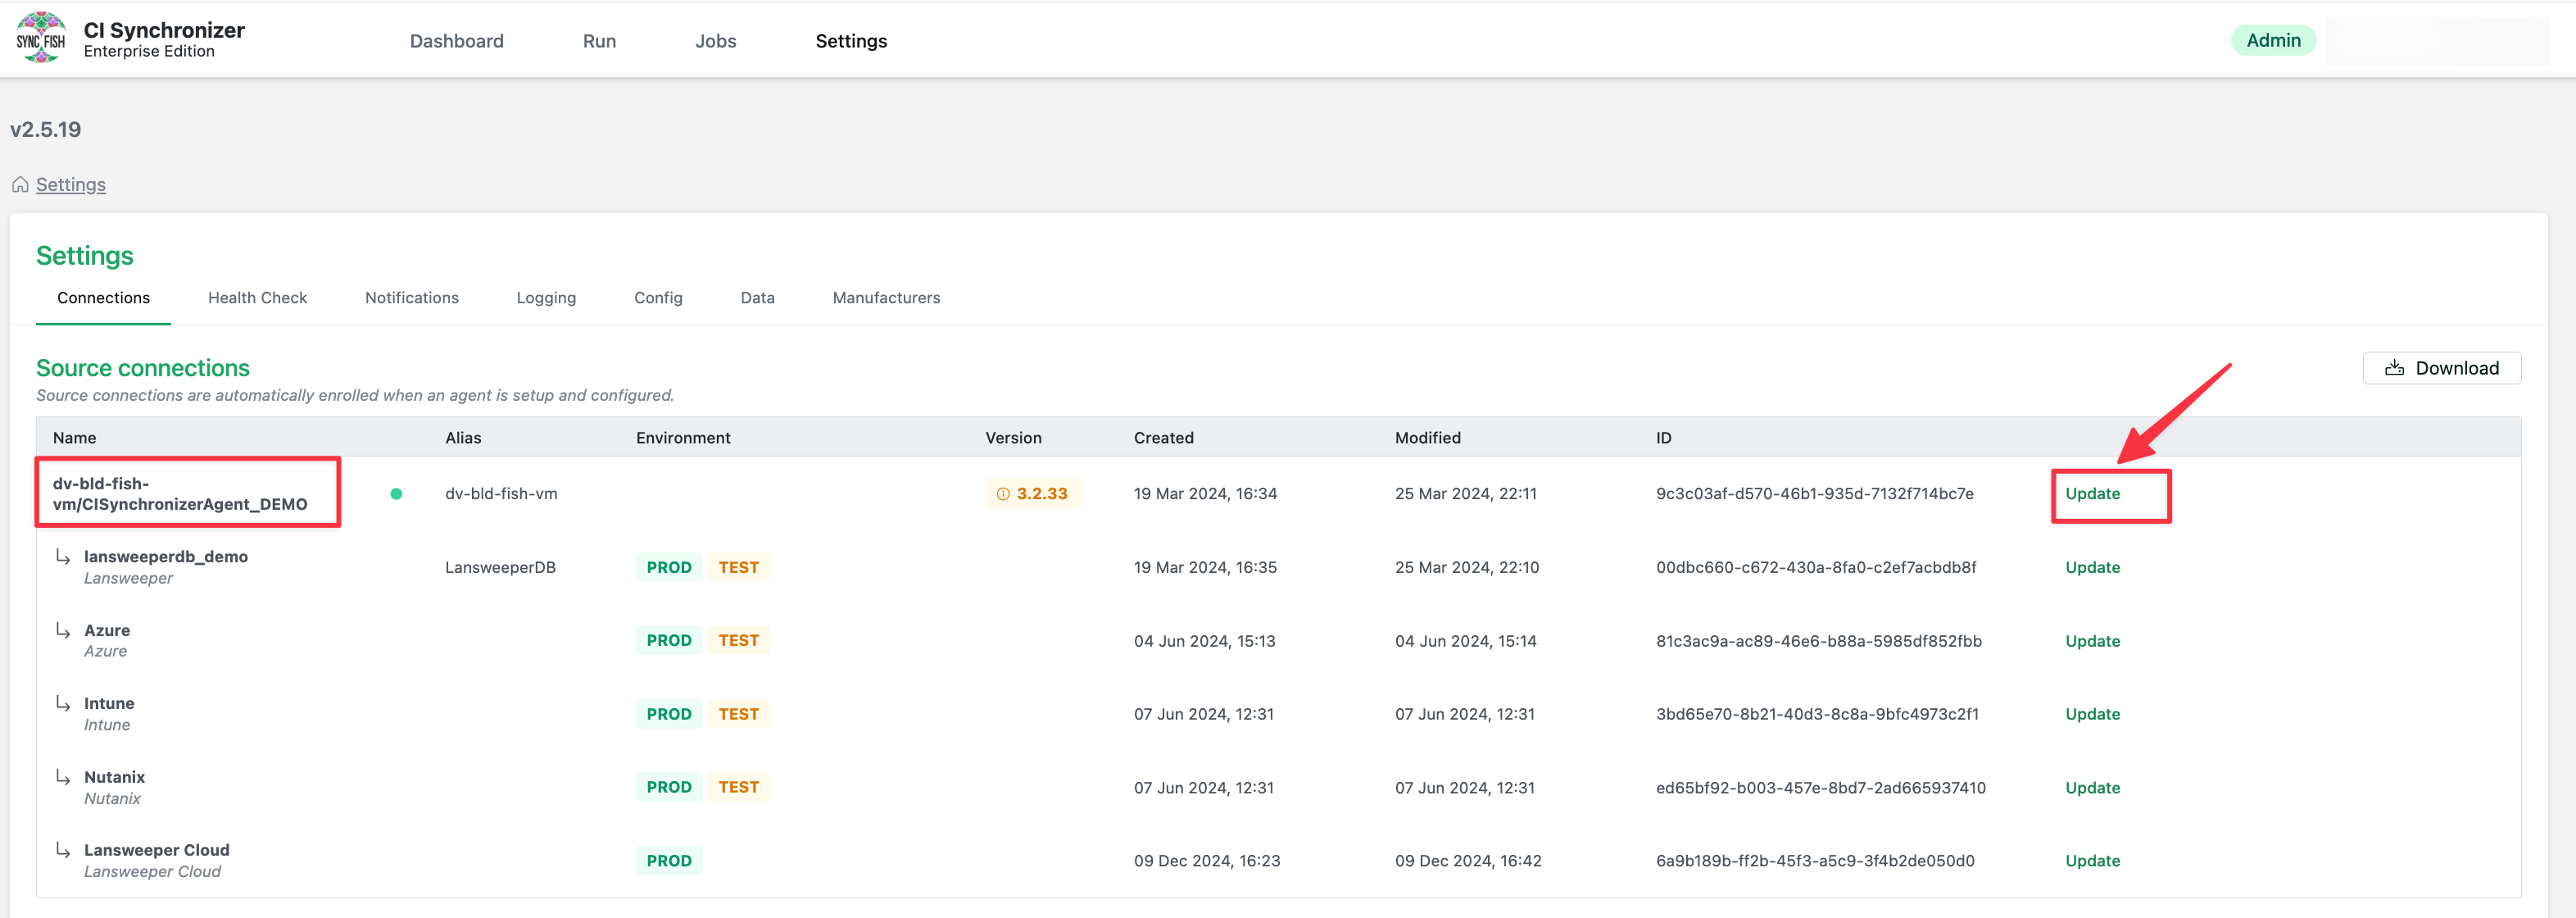
In the CI Sync UI, navigate to Settings > Connections.
-
Under the Source Connections heading locate the entry for your CI Sync Agent (the Agent appears at the top of the tree).
-
Click the Update hyperlink (on the right hand side of the screen).
-
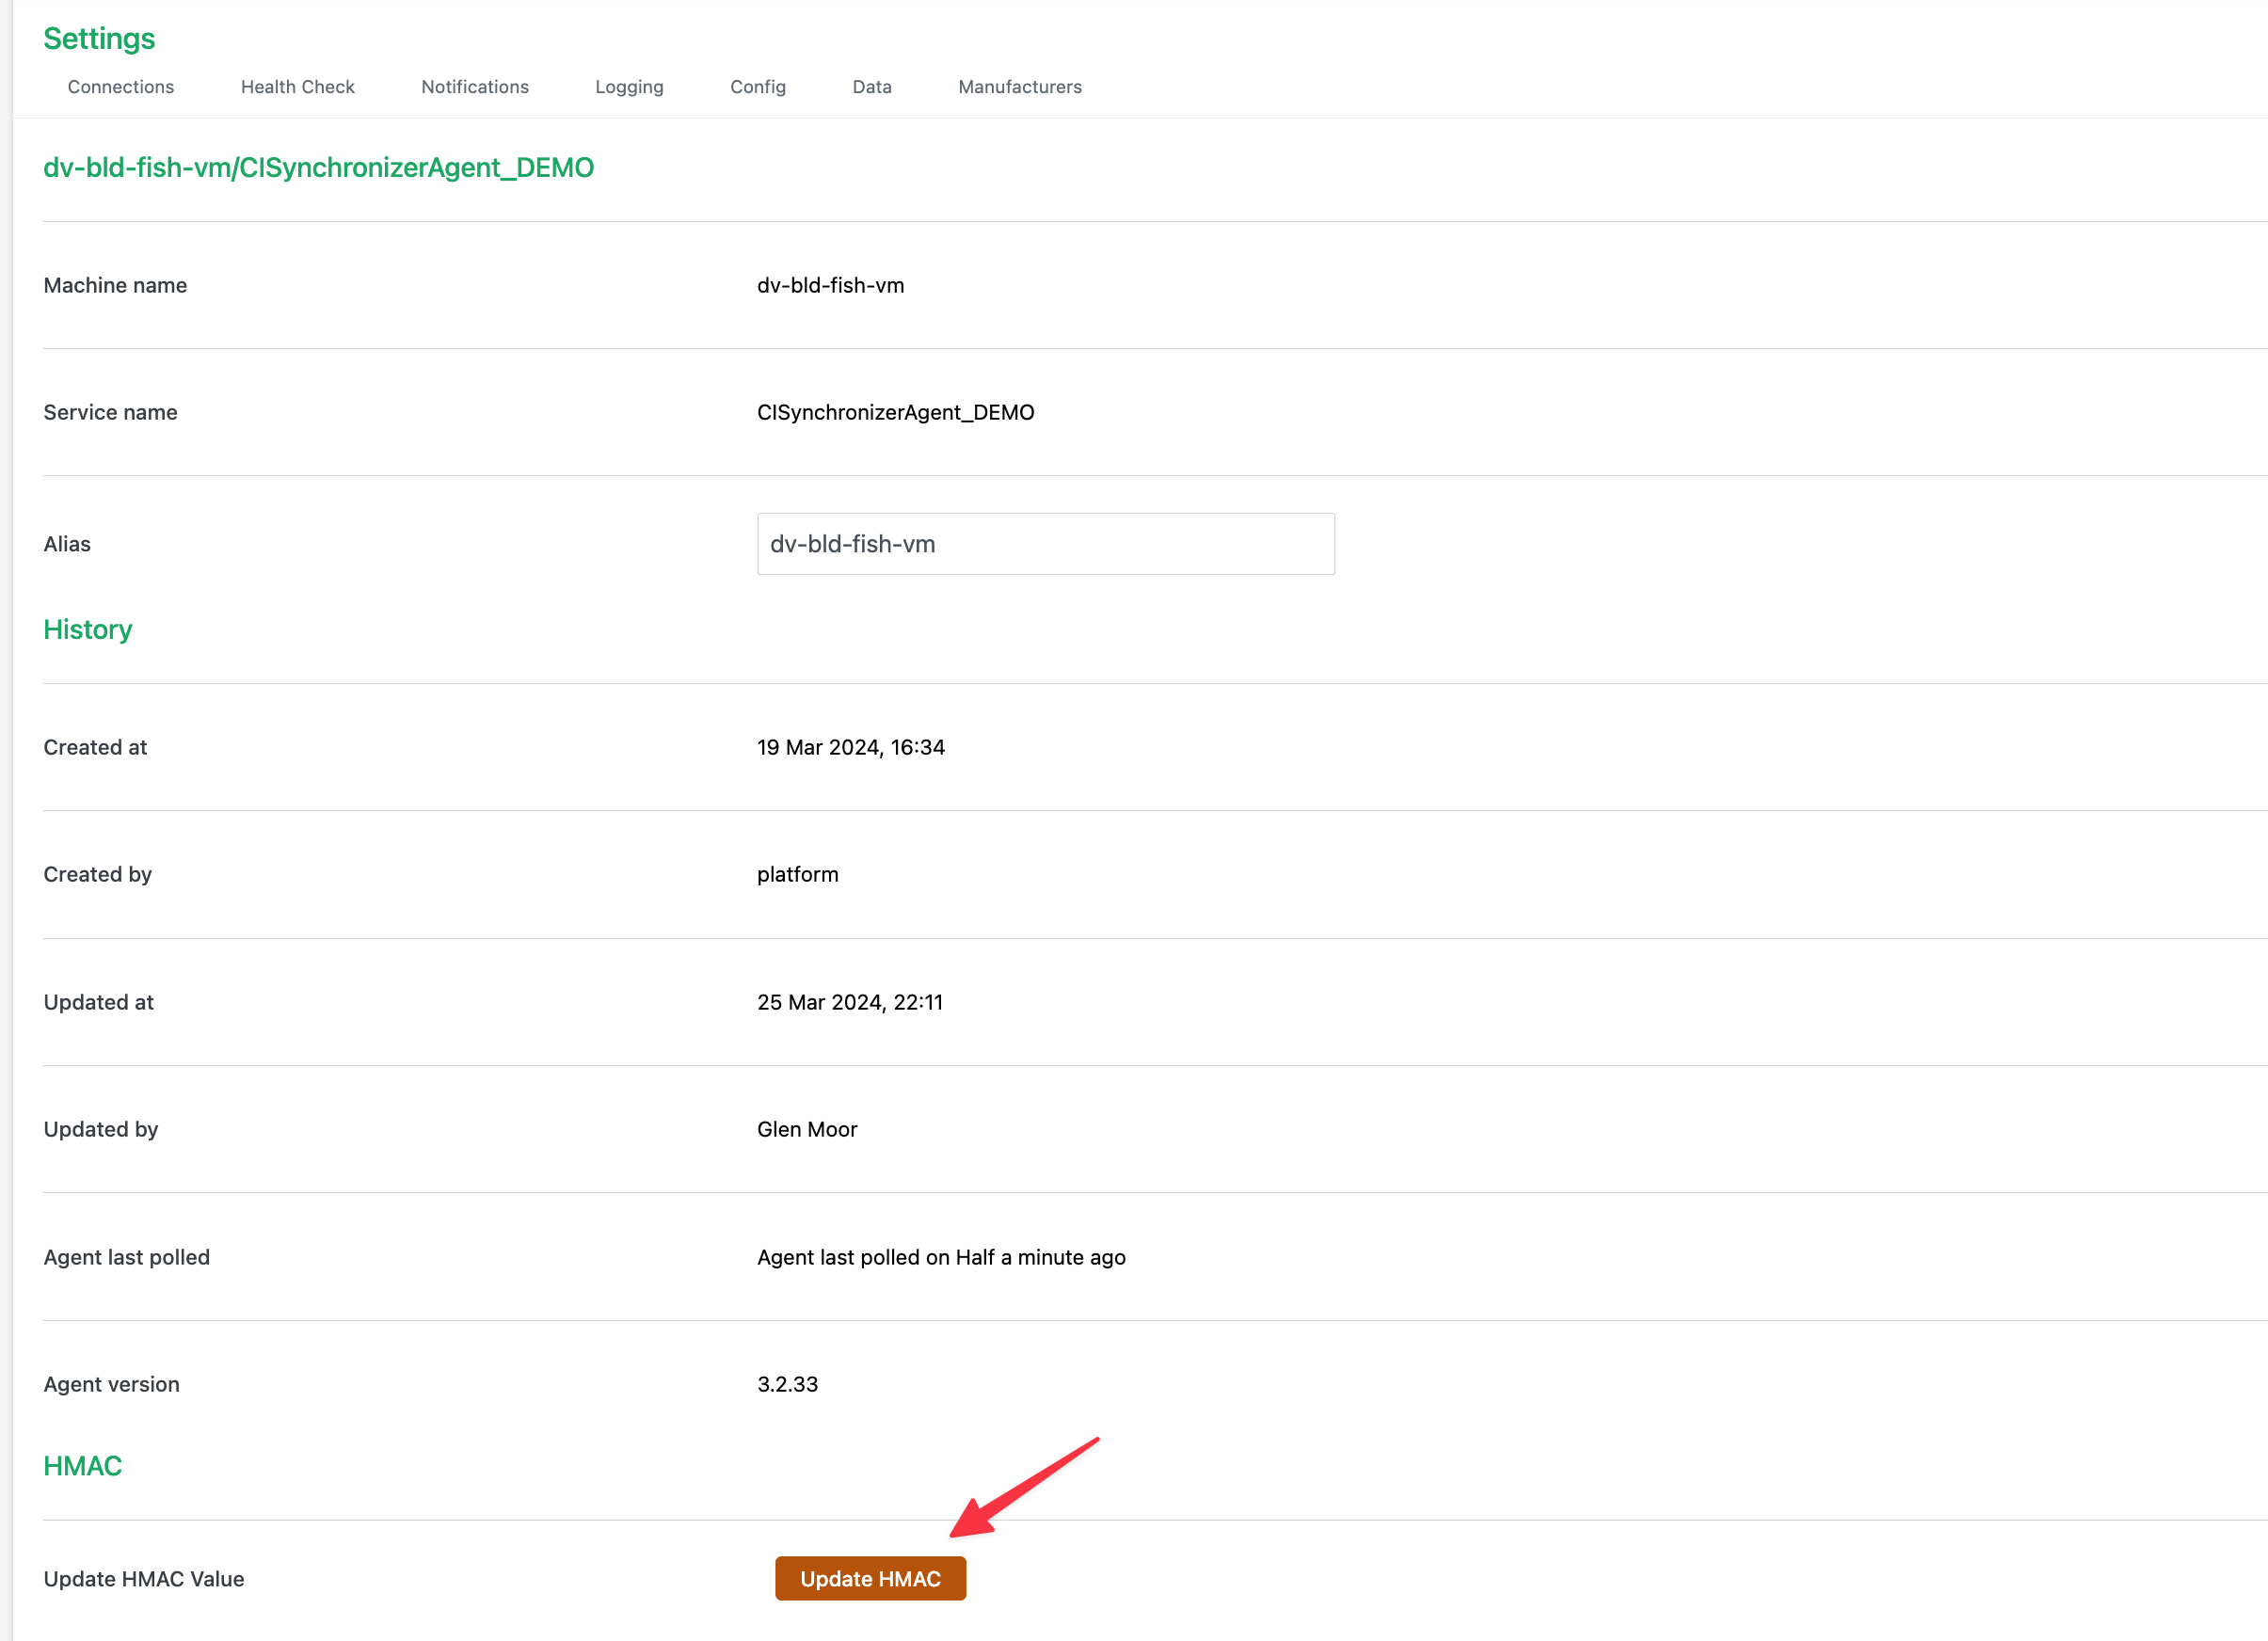
Scroll to the bottom and click Update HMAC.
-
Paste the HMAC shared secret into the
Update HMAC Valuefield in the agent connection page and click the Update HMAC button.
.png?cb=89d0b93abe68cb9e7e4c6440a34e4937)
-
Once the value has been updated in the CI Sync SaaS application return to the CI Sync Agent Config Utility and click Continue. The HMAC shared secret and connection to the platform should be validated.
-
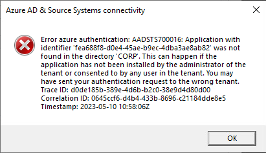
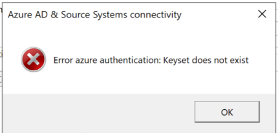
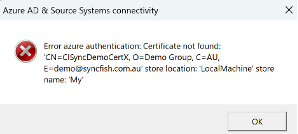
If the connection test fails an error message dialog will be displayed containing details of the error. Expand the section below to for common errors and trouble shooting advice.
Click to expand trouble shooting information
|
# |
Screen Shot |
Applicable Authentication Method and Possible Cause |
|
1 |
|
Applicable Authentication Method
Possible Cause
|
|
2 |
|
Applicable Authentication Method
Possible Cause
|
|
3 |
|
Applicable Authentication Method
Possible Cause
|
|
4 |

|
Applicable Authentication Method
Possible Cause
|
In most cases an error here will be one of the following:
-
The server running the CI Sync Agent (the Windows Service) does not have HTTPS outbound access to the Internet.
-
One of the values entered on the Configure Tab is incorrect (e.g. the details for the App Registration object in AAD are not correct).
-
There is a mismatch in the format of the Certificate Name entered into the CI Sync Config Utility vs the actual name of the Certificate in the Windows Certificate Store.
For additional troubleshooting assistance
-
Hit the Syncfish Knowledge Base here: CI Sync Knowledge Base
-
Visit the Syncfish Support Portal Home page here and use the “Log a Ticket” link.
-
Email the Syncfish Support Mailbox.
-
Reach out to your Syncfish contact person.
-
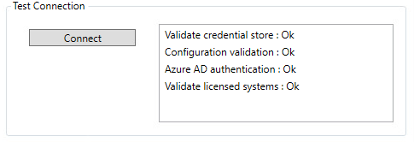
If the Agent successfully authenticates to your customer specific CI Sync SaaS instance the Test Connection result will look as shown below.
-
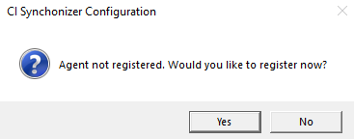
Click Yes to register the CI Sync Agent with your customer specific CI Sync SaaS instance.
-
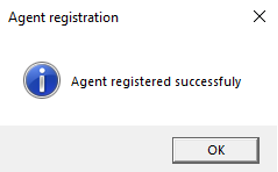
Click OK to the agent being registered successfully.
Optional Task
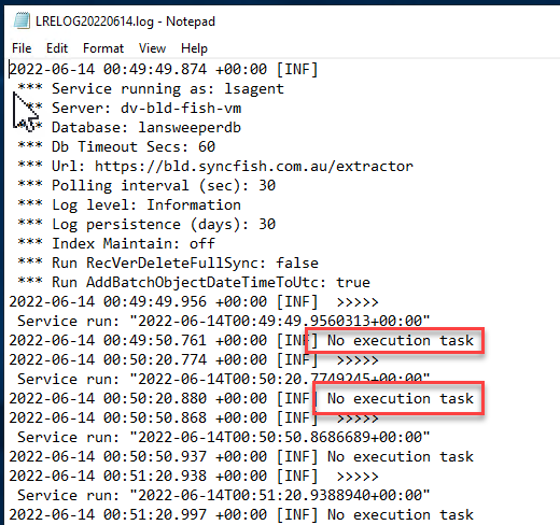
Optionally, view the View the CI Sync Agent log file content as an initial check there are no errors:
-
Open the latest CI Sync Agent log file in the folder:
C:\Program Files\Syncfish\CISynchronizerAgent\service\logs -
If you see “No execution task” in the logs and no related ERROR logs the Agent is successfully communicating with your CI Sync SaaS instance
Log files are organised by day eg: LRELOG20220615.log = logs for the 15th June 2022.
Task 3: Use the CI Sync Agent Config Utility to setup Source System Connections
The CI Sync Agent technology allows you to sync from multiple different source systems in a single agent. Each Source System is represented in the CI Sync Agent as a Source System Connection. Source Systems include products such as Lansweeper, SCCM, Intune, Azure and so on.
Each source system (i.e. source system product) implements its own authentication technology and requirements. Therefore, the steps to setup a Source System Connection using the CI Sync Agent Config Utility are different for each system source.
Please now skip to the relevant page listed below for instructions on using the CI Sync Agent Config Utility to create one or more Source System Connections within the CI Sync Agent.
|
Source System |
Instructions Page Link |
|
AWS |
This connector has been ported to the CI Sync SaaS Agent |
|
Azure |
This connector has been ported to the CI Sync SaaS Agent |
|
BeyondEdge SD-LAN |
|
|
Extreme IQ On-Prem |
|
|
Intune |
This connector has been ported to the CI Sync SaaS Agent |
|
JAMF |
This connector has been ported to the CI Sync SaaS Agent |
|
Lansweeper On-Prem |
|
|
Lansweeper Cloud |
This connector has been ported to the CI Sync SaaS Agent |
|
LeanIX |
|
|
Microsoft 365 |
This connector has been ported to the CI Sync SaaS Agent |
|
Microsoft Defender for Cloud Apps |
|
|
Microsoft Defender for Endpoint |
|
|
Nutanix |
|
|
Omnissa Workspace ONE |
|
|
Palo Alto SD-WAN |
|
|
SolarWinds Orion |
|
|
SCCM |
|
|
VMWare SD-WAN |
|
|
VMWare vSphere |
After completing the tasks in the relevant Appendix, return here have your ServiceNow SME proceed with S6 - Configure your ServiceNow for CI Sync.
For Sources Systems ported to the CI Sync SaaS Agent:
-
Please contact Syncfish for information about adopting the CI Sync SaaS Agent.
-
Please checkout this documentation branch for further information on the CI Sync SaaS Agent and all supported connectors. Please visitCI Sync with SaaS Agent