Extended Page Title
Step 7 - Add your ServiceNow Instance as a Destination Connection for CI Sync via the CI Sync Web UI
Task List
|
Task # |
Task |
Performed by |
|---|---|---|
|
1 |
Add a ServiceNow Destination Connection and confirm both ServiceNow and your Source System Connection/s are visible and active |
CI Sync Admin |
|
2 |
Execute a Reference Data Read Test |
CI Sync Admin |
|
3 |
Execute Mock Sync Insert, Update, Delete Test |
CI Sync Admin |
Important Information about Non-Production vs Production Synchronization
-
The tasks in this section are applicable to either a Non-Production or Production ServiceNow CMDB.
-
Data sync’d into a CMDB can have a significant implication on the business processes and workflows that depend on the underlying CMDB. Therefore, customers should throughly test and validate the results of sync’ing into a Non-Production CMDB before considering any form of sync’ing into a Production CMDB.
-
Before sync’ing to production we recommend you inform the Syncfish Team. This ensures Syncfish are aware in case you need extra assistance and also means Syncfish can advise how to check whether any specific CI Sync configuration settings need to be promoted from your CI Sync Test Config to your CI Sync Prod Config.
Task 1: Add a ServiceNow Destination Connection in CI Sync
-
Login to your CI Sync SaaS application user interface using your company specific URL and with your user account in the same AAD tenancy that the CI Sync SaaS application was registered in. The URL will be in the format of: https://YourCo.syncfish.app
-
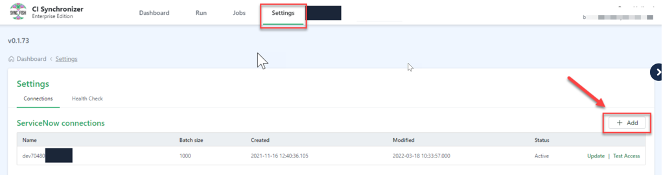
Go to the Settings page and under the ServiceNow Connections heading, click the [+ Add] button
-
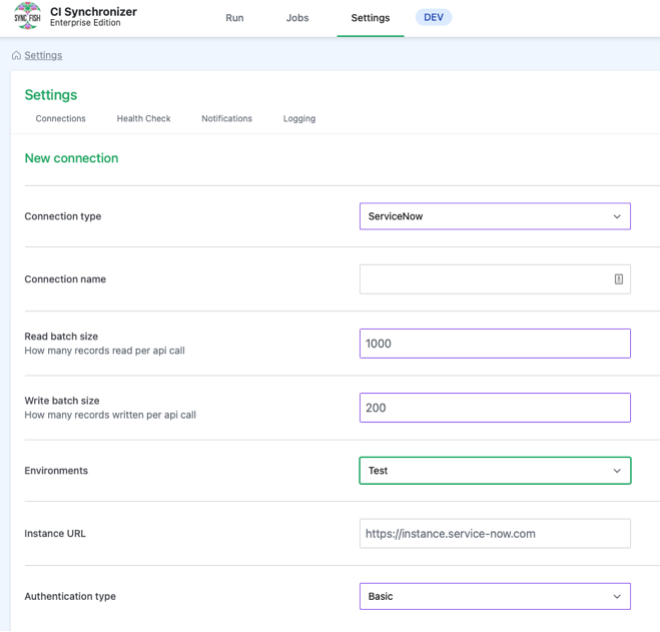
Update the fields as follows:
-
Enter a friendly name into the Connection name field.
-
Leave the default Read Batch size of 1000
-
Leave the default Write Batch size of 200
-
Select the relevant value for the Environment related to this connection. The options are:
-
Test
-
Production
-
-
Informational Note
The Connection Name and Environment values entered here control the Destinations you see on the “Run” page in the CI Sync User Interface where you are setting up a CI Sync job.
-
Continue to update the fields as follows:
-
Enter the Instance URL for the ServiceNow instance. e.g. https://yourinstance.service-now.com
-
Guidance Note
-
If this connection is for your TEST ServiceNow instance, enter the non-production ServiceNow instance URL.
-
If this connection is for your PROD ServiceNow instance, enter the production ServiceNow instance URL.
-
Select the Authentication type as one of the following
-
Basic
-
OAuth
-
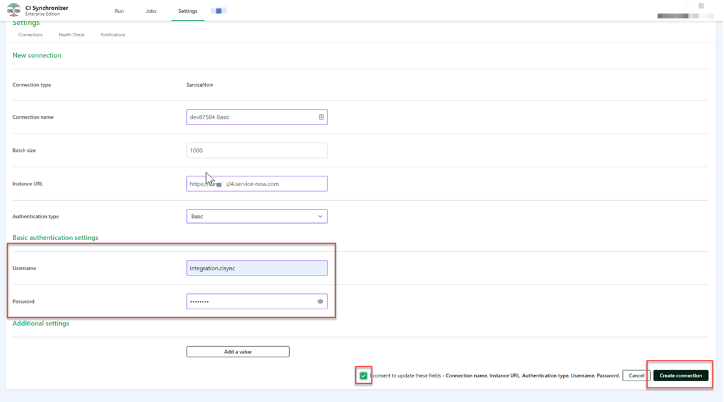
Click to expand the instructions for Basic Authentication
-
Enter username, password
Gudiance Note
This relates to the ServiceNow user (and Basic Auth details) setup during Task 3: Create a User Account (to be used by your CI Sync SaaS instance) within S6 - Configure your ServiceNow for CI Sync.
-
Tick the “I consent…” checkbox
-
Click “Create connection”
Click to expand the instructions for OAuth Authentication
-
Enter username, password, client id and client secret
Gudiance Note
This relates to the ServiceNow user (and OAuth details) setup during Task 5: (Optional) Configure OAuth Authencitation on the CI Sync User Account withinS6 - Configure your ServiceNow for CI Sync.

-
Tick the “I consent…” checkbox
-
Click “Create connection”
-
Go back to the Settings page
-
Confirm you have a green light against your newly created ServiceNow connection (for destination system access).
-
Also confirm you have a green light against the CI Sync Agent (for source system/s access).

-
If you don’t see green against your ServiceNow connection, then
-
Recheck the connection settings for ServiceNow in the CI Sync UI.
-
Recheck the authentication details are correct on the ServiceNow end.
-
-
If you don’t see green against your CI Sync Agent, then
-
Verify the VM which hosts the CI Sync Agent is up and running.
-
Verify the CI Sync Agent itself (i.e. the windows service) is running.
-
Verify the VM which hosts CI Sync Agent has https access to the CI Sync Extractor API of your company specific instance of the CI Sync SaaS application. This can be done by RDP’ing to the VM, opening a browser and accessing the CI Sync Extractor API URL.
-
Also verify the VM does not have any proxy policies or local firewall applications blocking access to the CI Sync Extractor API URL.
-
Information Note
The Extractor API URL is simply your company specific CI Sync URL with an /extractor suffix. For example, the URL will be similar to: https://YourCo.syncfish.app/extractor
-
After you have green lights on the source and destination connections:
-
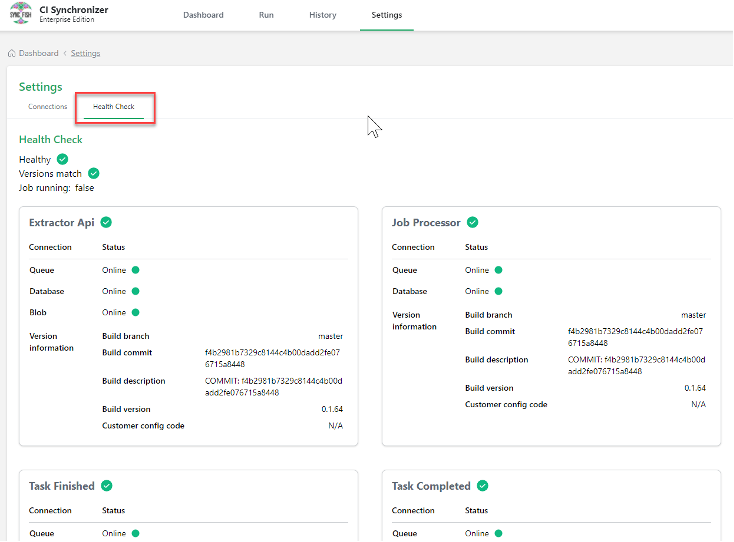
Click on the Health Check heading and ensure you have green lights/ticks against the various sections on the page.
-
If any of the indicators are not green, please contact the Syncfish Support team.
-
Task 7b: Execute a Reference Data Read Test
Context Note
During this task you will confirm the ServiceNow user account (i.e. the account you created during Task 3: Create a User Account (to be used by your CI Sync SaaS instance) withinS6 - Configure your ServiceNow for CI Sync) has sufficient permissions to read from the various ServiceNow tables.
-
Login to your CI Sync SaaS application user interface, then:
-
Go to the Settings page
-
Locate the specific ServiceNow connection under the Destination Connections heading
-
Click the Test Access link.
-

-
Do the following on the Access and Permissions Test Access page
-
Select a source system from the dropdown list
-
Click the Run button. This will execute a reference data (or what CI Sync calls a “SearchKey Config”) read test.
-
Even though you are running the Access and Permissions test against a given destination system, you are indeed selecting a Source System from the dropdown. The reason being, it is the source system recordsets that ultimately influence which ServiceNow tables CI Sync needs to read from.

-
If you have red lights:
-
There is likely to be a permission issue with the ServiceNow user account being used by CI Sync (i.e. the account is unable to read the various CMDB CI tables). In this case:
-
Recheck the roles/permissions assigned to the user account within ServiceNow.
-
Check for custom ACLs related to the ServiceNow tables in scope for CI Sync.
-
If you can’t resolve the issue, then contact Syncfish Support.
-
-
You can still proceed to the subsequent Mock Sync Insert, Update, Delete Tests to develop a complete picture of access/permissions issues needing resolution.
-
-
If you have all green lights, then the ServiceNow user account (i.e. the account configured in the CI Sync SaaS application) has sufficient permissions to read the various tables in scope for CI Sync.
Task 7c: Execute Mock Sync Insert, Update, Delete Test
Context Note
In this step you will trigger a “dummy” sync of CIs into the ServiceNow CMDB. CI Sync will attempt to insert, update and delete a single record into each of the ServiceNow tables in scope for CI Sync.
-
Remain on the Access and Permissions Test page described above in Task 7b.
-
On the right hand side of the page (under the info note titled “Sync Config Test”), click the “Confirm & Run” button.

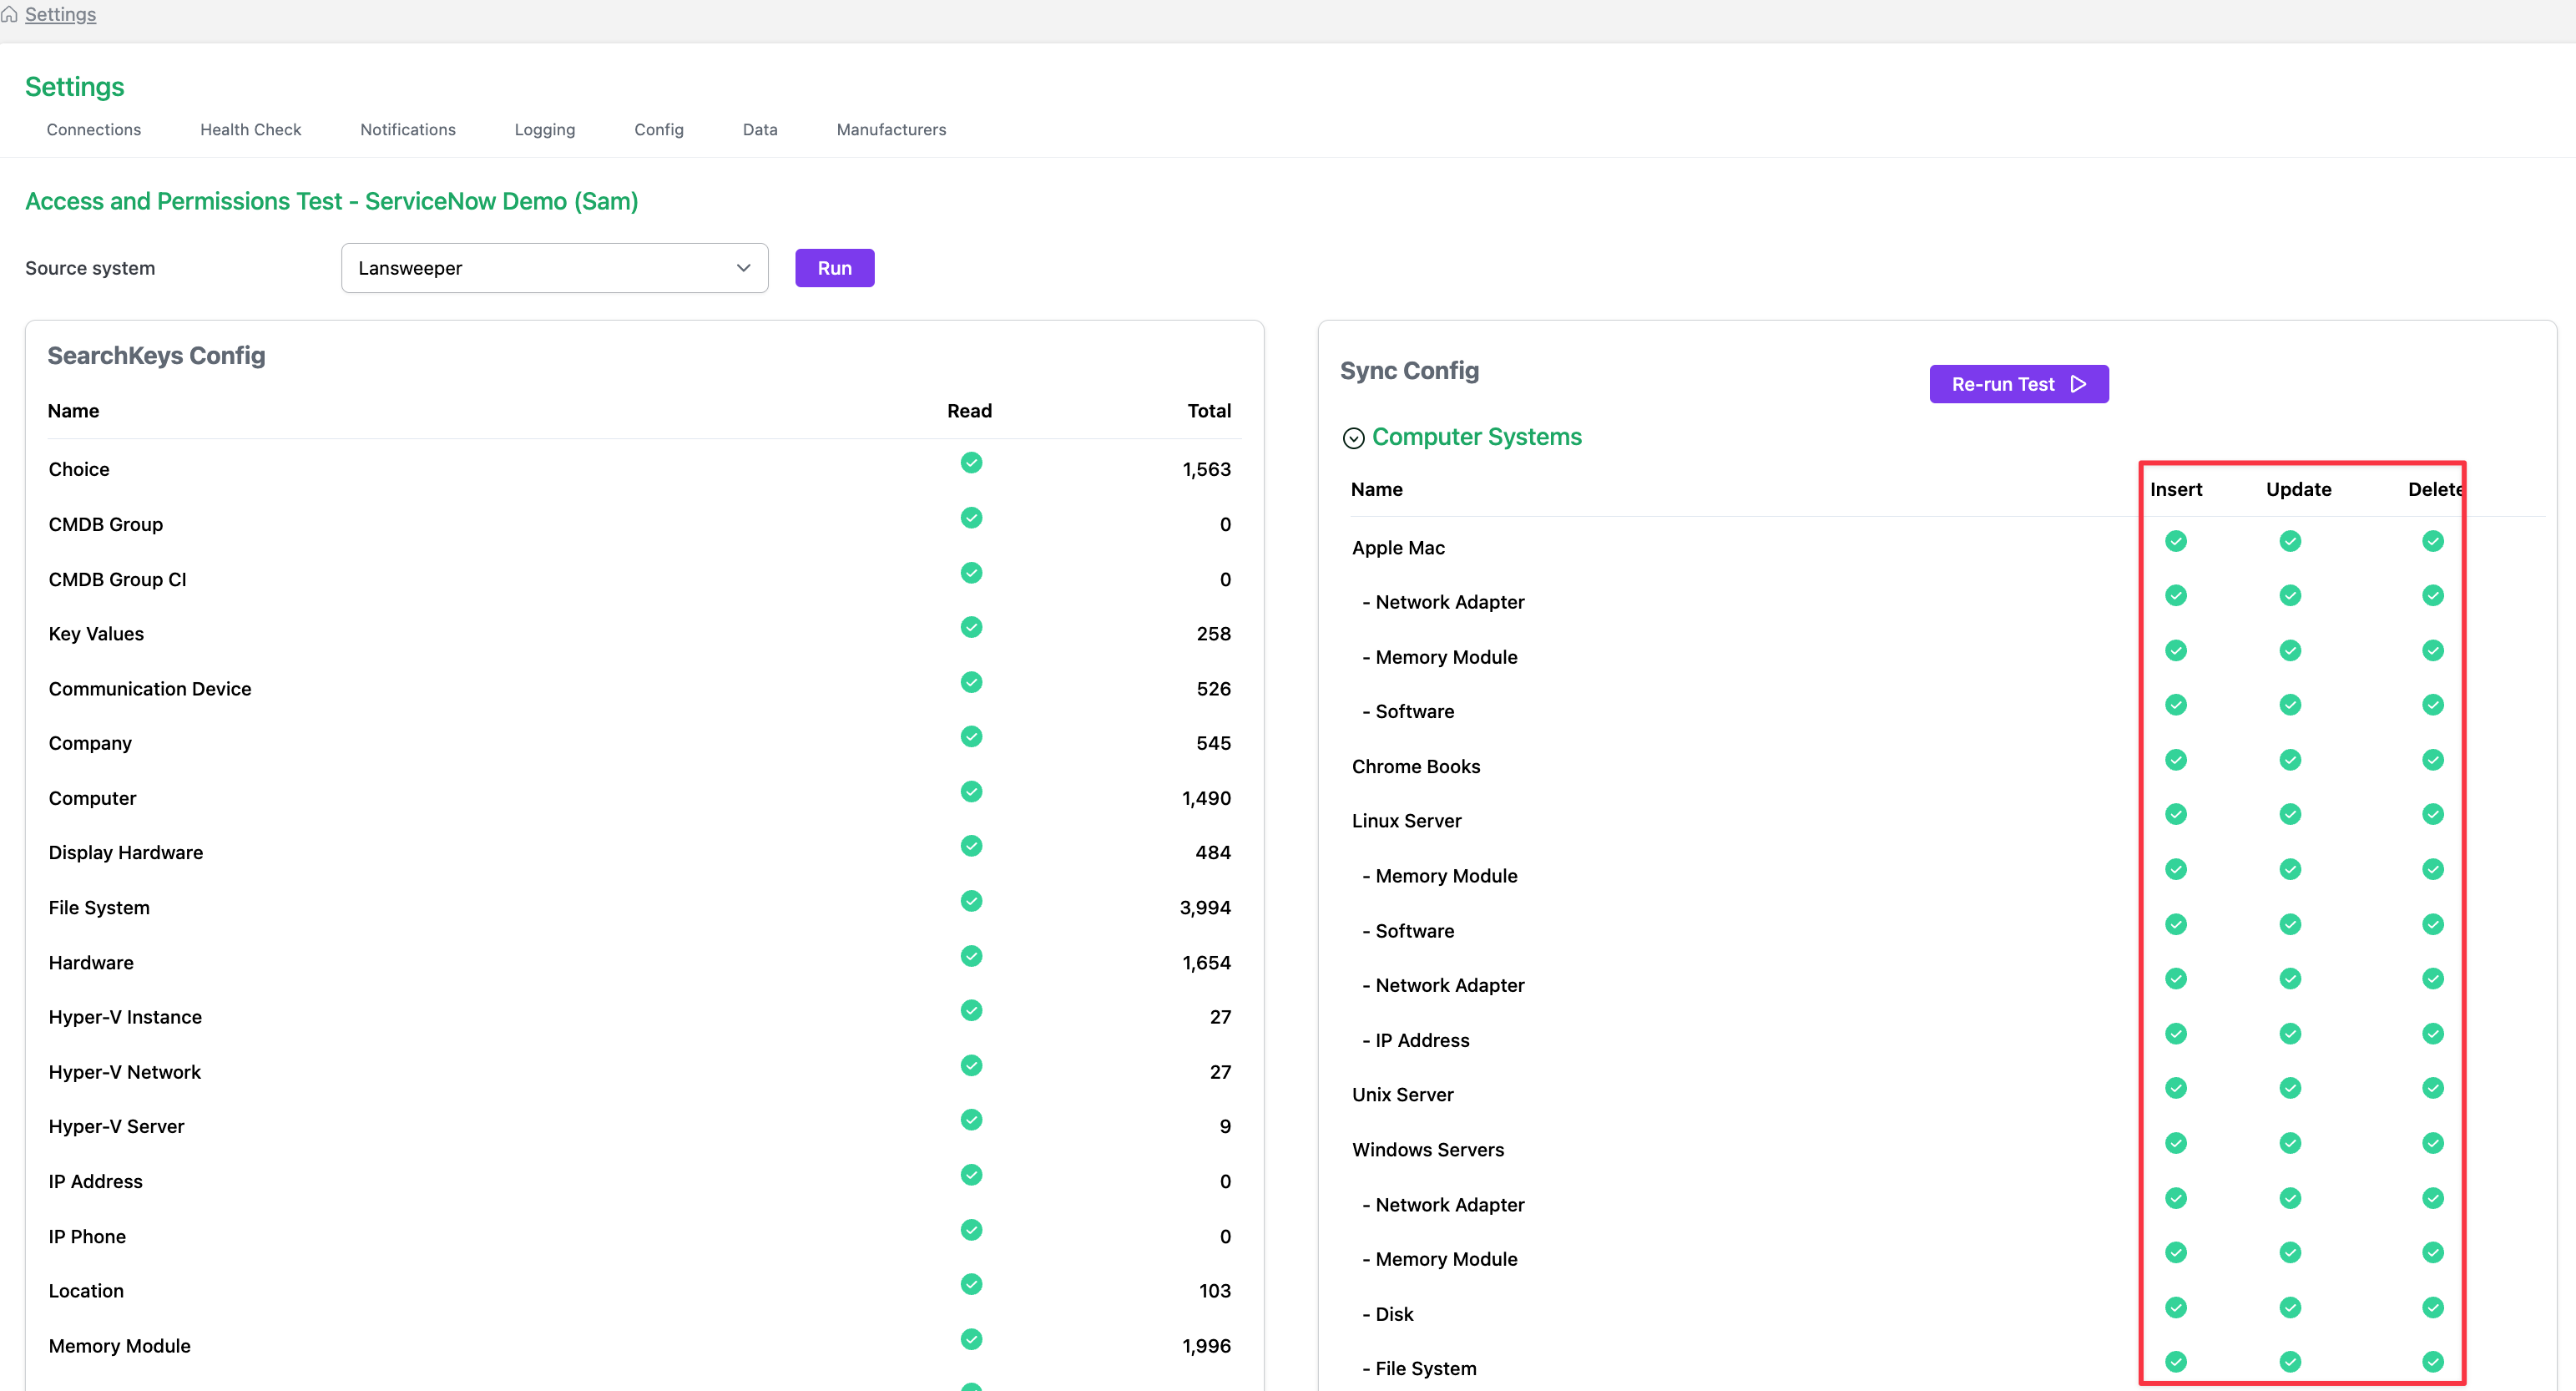
-
The test will execute and a results screen similar to one below will be returned (i.e. the right hand side of the screen will show the results under the “Sync Config” heading).
-
If you have red lights:
-
There is likely to be a permission issue with the ServiceNow user account being used by CI Sync (i.e. the account is unable to read the various CMDB CI tables). In this case:
-
Recheck the roles/permissions assigned to the user account within ServiceNow.
-
Check for custom ACLs related to the ServiceNow tables in scope for CI Sync.
-
If you can’t resolve the issue, then contact Syncfish Support.
-
-
Also, it’s best not to proceed with an initial synchronization of assets into your ServiceNow CMDB until the failed tests are resolved (see also Information Note below for exceptions).
-
You may see red light (failed tests) against one or more “Asset Group Link” related tests for a Lansweeper source system. This relates to additional permissions required in ServiceNow for these record types.
In Syncfish experience Asset Groups Links are not widely used by Lansweeper/CI Sync customers.
If you have a requirement to use/sync Lansweeper Asset Group Links (which are treated as a relationship type in ServiceNow) please contact Syncfish support and we will explain the extra permissions needed in ServiceNow.
-
If you have all green lights, you are ready to go with an initial synchronization of Lansweeper assets into your ServiceNow CMDB. In this case you can proceed to S8 - Run a small first Sync (then run more).