Extended Page Title
Step 3 - Create an Entra ID App Registration for CI Sync Agent Authentication
Task List
|
Task # |
Task |
Performed by |
|---|---|---|
|
1 |
Decide which credential type your organization will use for authentication between the CI Sync Agent against the App Registration that represents the CI Sync Agent |
Azure Admin |
|
2
|
(Option 1) Create the App Registration object in your AAD using a Client Secret credential and provide details about the App Registration to the SME performing the CI Sync Agent installation |
Azure Admin |
|
2
|
(Option 2) Create the App Registration object in your AAD using a Certificate credential and provide details about the App Registration to the SME performing the CI Sync Agent installation |
Azure Admin |
Task 1: Decide which credential type your organization will use for authentication between the CI Sync Agent against the App Registration that represents the CI Sync Agent
CI Sync supports the following credential types for authentication between the CI Sync Agent and the App Registration:
-
Client Secret, or
-
Certificate
Deciding which credential type to use is an organisational decision (often based on your Cyber Security requirements and/or Azure AD administration requirements).
Two sets of instructions are provided below. The instructions you use will depend on the authentication method you are using. Your options are:
-
Client Secret Authentication, or
-
Certificate Based Authentication.
Task 2 (Option 1): Create the App Registration using a Client Secret credential
Expand the instructions below if you are using a Client Secret Authenticaiton between the CI Sync Agent and your Entra ID.
Click to expand the instructions for Option 1
-
In the Azure Portal, navigate to Azure Active Directory -> App Registrations and click New Registration
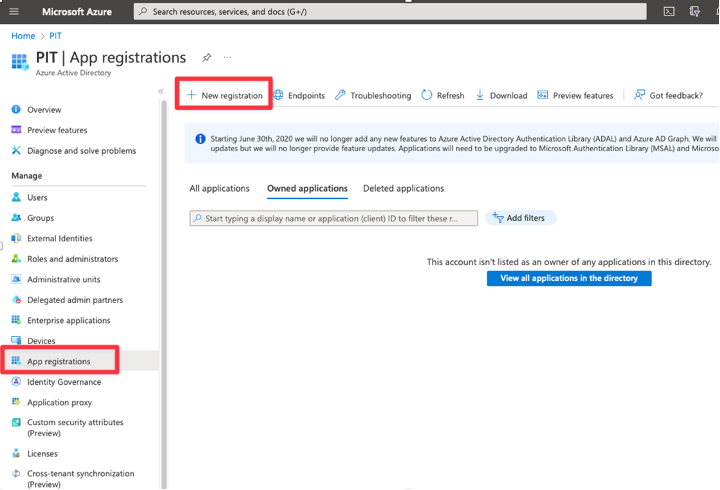
Guidance Notes
Syncfish recommend using “Syncfish - CI Sync – Agent”.
If you use another name, then it is highly recommended to include “Agent” in the name to help distinguish this registration from the CI Sync SaaS application Enterprise App registration as AAD will show both in the same list on some forms.
-
On the Register an application form complete as follows:
-
Enter the Name
-
Under Supported account types select “Accounts in this organizational directory only ({Your Domain/Tenant Name} only - Single tenant)”
-
Click Register
-

-
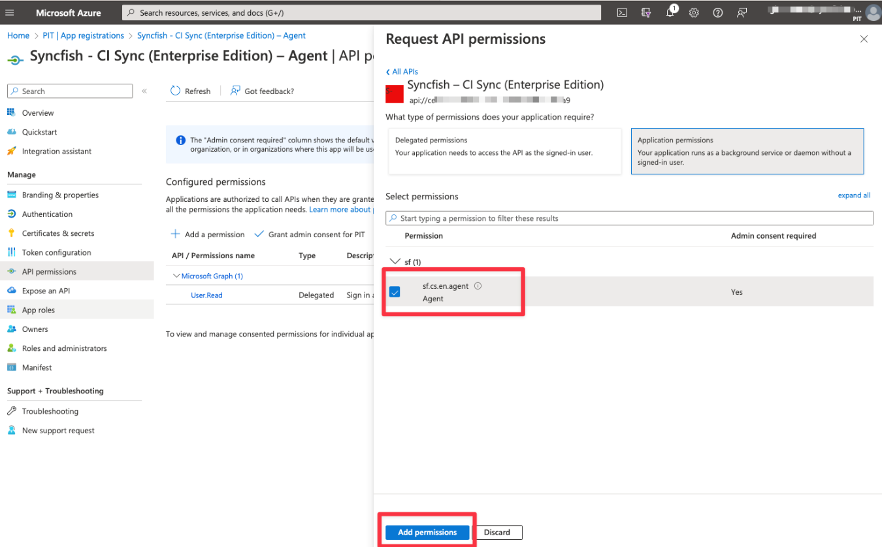
Navigate to API permissions and click Add Permission
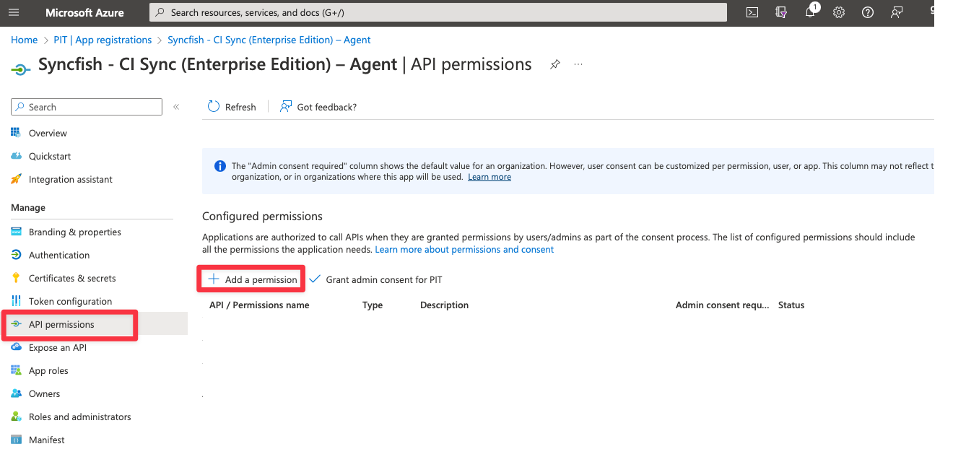
-
Navigate to APIs my organization uses and search for Syncfish, and then select the Syncfish - CI Sync entry.

In the list you are selecting the CI Sync Enterprise Application that was enrolled during S2 - Enrol CI Sync SaaS to your Entra ID.
-
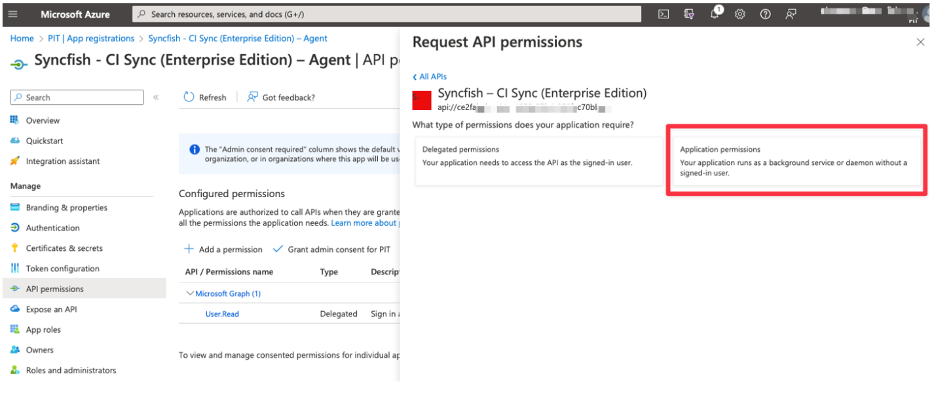
Select the “Application permissions” button
-
Tick the checkbox for sf.cs.en.agent Agent and click the Add permissions button

-
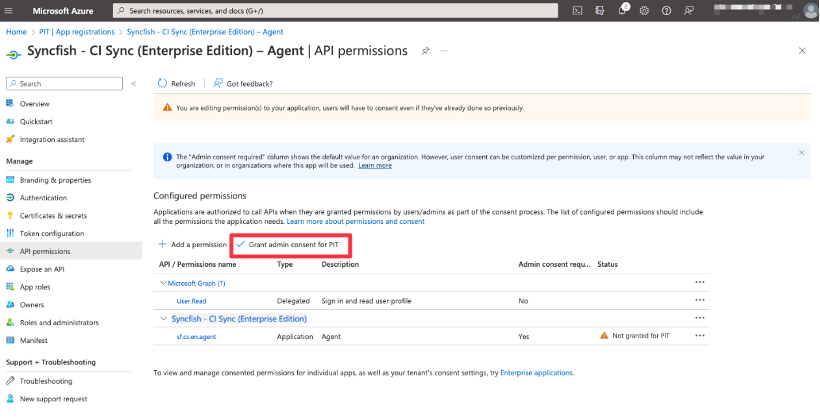
Back on the main screen for “API permissions”, click the button to “Grant admin consent for {Your Domain/Tenant Name}”

-
Click Yes to confirm
-
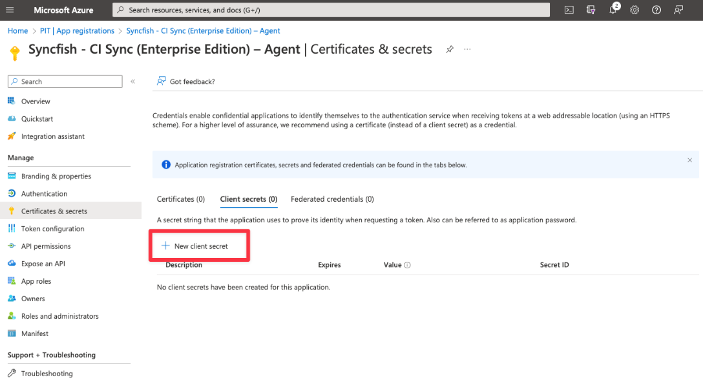
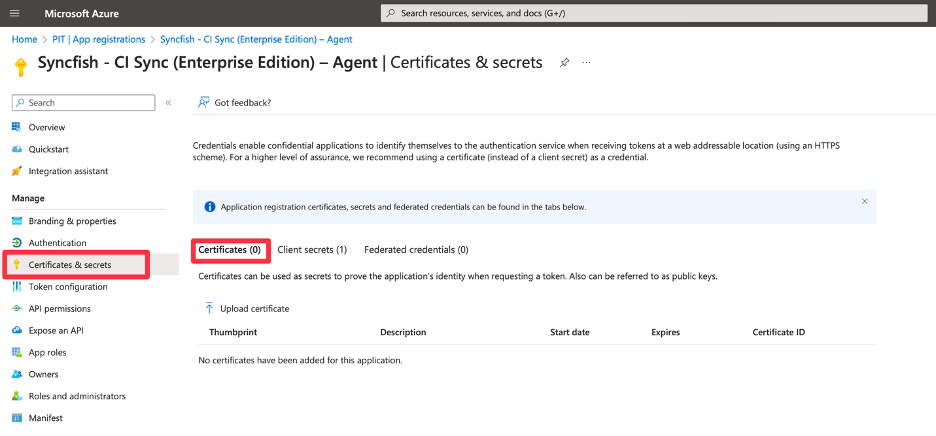
Using the left-hand menu, navigate and select Certificates & secrets. Select client “Client secrets (0)” in the middle of the form.

-
Click the “New client secret” button.
-
Enter a unique Description for the secret associated with the CI Sync Agent App Registration.
-
Then, select a suitable Expires duration based on your organisational policy. Finally click the Add button.
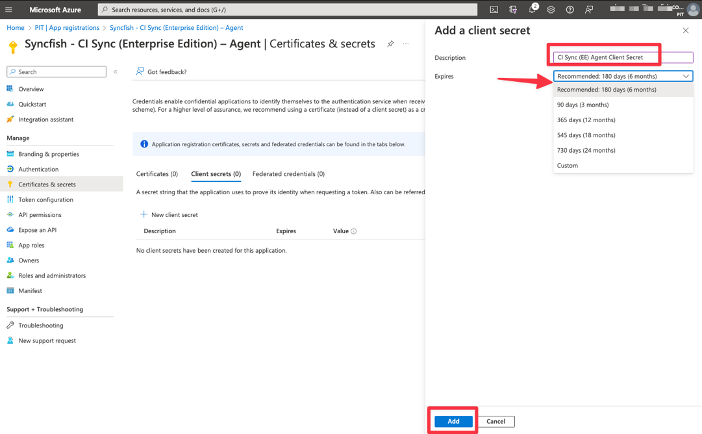
It is recommended you set a reminder prior to the expiry date of the Secret (i.e. a reminder to regenerate and update the Secret in the CI Sync Agent configuration. The use of the secret will be clearer once you have read the section on “Install the CI Sync Agent”.
The steps to regenerate the secret and update the secret in the CI Sync Agent are explained in the Syncfish Knowledge Base Article How-to - Update an Expired Client Secret for the App Registration that represents the CI Sync Agent.
-
The form now displays the generated secret value (shown in the Value field).
-
Use the copy option to make a copy of value in the Value field.
-

Data Capture Note
-
The Value is only available while you remain on this screen. You must make a copy of the Value before leaving this form.
-
Make sure you copy the “Value” and NOT the “Secret ID”.
Make sure the secret is stored securely and in a way that can be shared with the CI Sync Admin so they can use it when the follow the instructions later on during S5 - Register the Multi-Source Agent & Setup Source Connections.
-
Return to the Overview page for the App Registration.
-
Use the copy option to make a copy of the “Application (client) ID” value.
-

Data Capture Summary
As a reminder, you should have captured the following information when completing the above steps.
-
The Secret Value (from Step 13 above). This is the Client Secret value.
-
The Application (client) ID (from Step 14 directly above).
-
The Directory (tenant) ID (also from Step 14 directly above).
Make sure the secret is stored securely and in a way that can be shared with the CI Sync Admin so they can use it when the follow the instructions later on during S5 - Register the Multi-Source Agent & Setup Source Connections.
At this point Task 2 (Option 1) is complete. Please proceed to the follow steps (both are typically performed by an Infrastructure SME):
Task 2 (Option 2): Create the App Registration using a Certificate credential
Expand the instructions below if you are using a Certificate Based Authenticaiton between the CI Sync Agent and your Entra ID.
Click to expand the instructions for Option 2
-
In the Azure Portal, navigate to Azure Active Directory -> App Registrations and click New Registration

Syncfish recommend using “Syncfish - CI Sync – Agent”.
If you use another name, then it is highly recommended to include “Agent” in the name to help distinguish this registration from the CI Sync SaaS application Enterprise Application registration as AAD will show both in the same list on some forms.
-
On the Register an application form complete as follows:
-
Enter the Name
-
Under Supported account types select “Accounts in this organizational directory only ({Your Domain/Tenant Name} only - Single tenant)”
-
Click Register
-

-
Navigate to API permissions and click Add Permission

-
Navigate to APIs my organization uses and search for Syncfish, and then select the Syncfish - CI Sync entry.
Guidance Note
In the list you are selecting the CI Sync Enterprise Application that was enrolled during S2 - Enrol CI Sync SaaS to your Entra ID earlier in this guide.

-
Select the “Application permissions” button

-
Tick the checkbox for sf.cs.en.agent Agent and click the Add permissions button
-
Back on the main screen for “API permissions”, click the button to “Grant admin consent for {Your Domain/Tenant Name}”
-
Click Yes to confirm
-
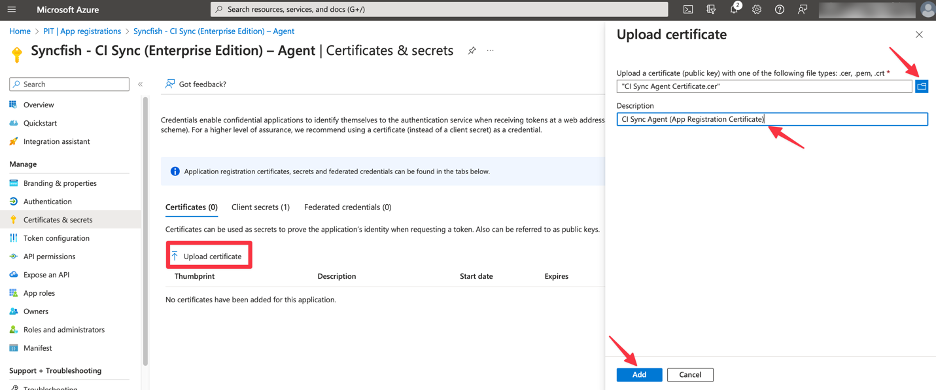
Using the left-hand menu, navigate and select Certificates & secrets. Select client “Certificates (0)” in the middle of the form.
-
Click the “Upload certificate” button. Then use the file uploader to import the certificate (public key) file in one of the supported formats. Enter a description and then select the Add button.
-
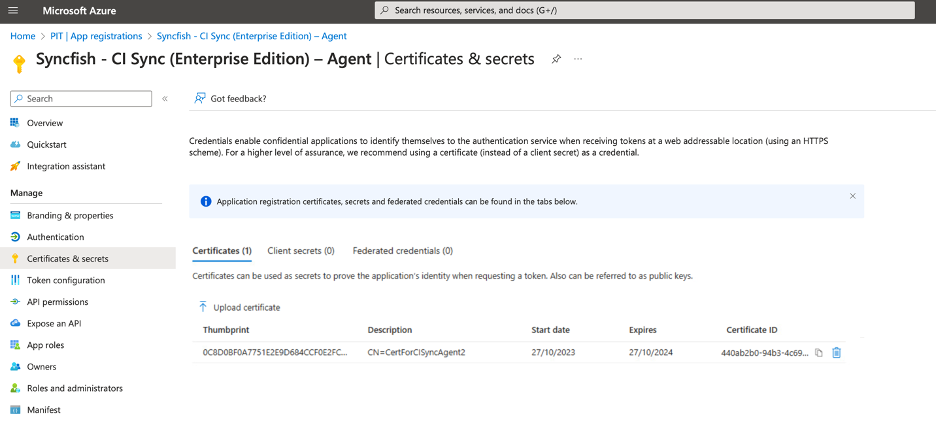
The certificate should now be displayed in the Certificates list for this App Registration.
-
Return to the Overview page for the App Registration.
-
Use the copy option to make a copy of the “Application (client) ID” value.
-
Data Capture Summary
As a reminder, you should have captured the following information when completing the above steps.
-
The Application (client) ID (from Step 12 directly above).
-
The Directory (tenant) ID (also from Step 12 directly above).
Make sure the secret is stored securely and in a way that can be shared with the CI Sync Admin so they can use it when the follow the instructions later on during S5 - Register the Multi-Source Agent & Setup Source Connections.
At this point Task 2 (Option 2) is complete. Please proceed to the follow steps (both are typically performed by an Infrastructure SME):