Task List
|
Task # |
Task |
Performed by |
|---|---|---|
|
1 |
Prepare Defender for Endpoint for use with CI Sync |
Azure Admin |
|
1b |
(Optional): Grant Additional Permissions to the App Registration to enrich Defender Device Data from Entra ID |
Azure Admin |
|
2 |
Understand the CI Sync RecVer Database |
SQL DBA
|
|
3
|
Create a Source System Connection using the CI Sync Agent Config Utility with a SQL RecVer DB |
Infrastructure SME
|
|
3
|
Or, Create a Source System Connection using the CI Sync Agent Config Utility with a MongoDB RecVer DB (if supported) |
Infrastructure SME
|
|
4 |
Finalise Settings in the CI Sync SaaS UI |
CI Sync Admin |
|
5 |
Perform Updates in ServiceNow (if required) |
ServiceNow Admin |
|
6 |
Understand the data CI Sync sends to ServiceNow from Defender for Endpoint |
ServiceNow Admin
|
|
7 |
Do Not Synchronize Installed Software from two different source systems |
CI Sync Admin |
Task 1: Prepare Defender for Endpoint for use with CI Sync
Context Notes
In Azure ADD (AAD) an App Registration is used to define a Service Principal for the purpose of authenticating a source application to a destination system/application.
The App Registration created in this section relates to the Defender for Endpoint Source Connection created within the CI Sync Agent.
This Defender for Endpoint specific App Registration is different (and unrelated) to the App Registration for the CI Sync Agent itself that was create in S3 - Create an Entra ID App Registration for CI Sync Agent Authentication)
-
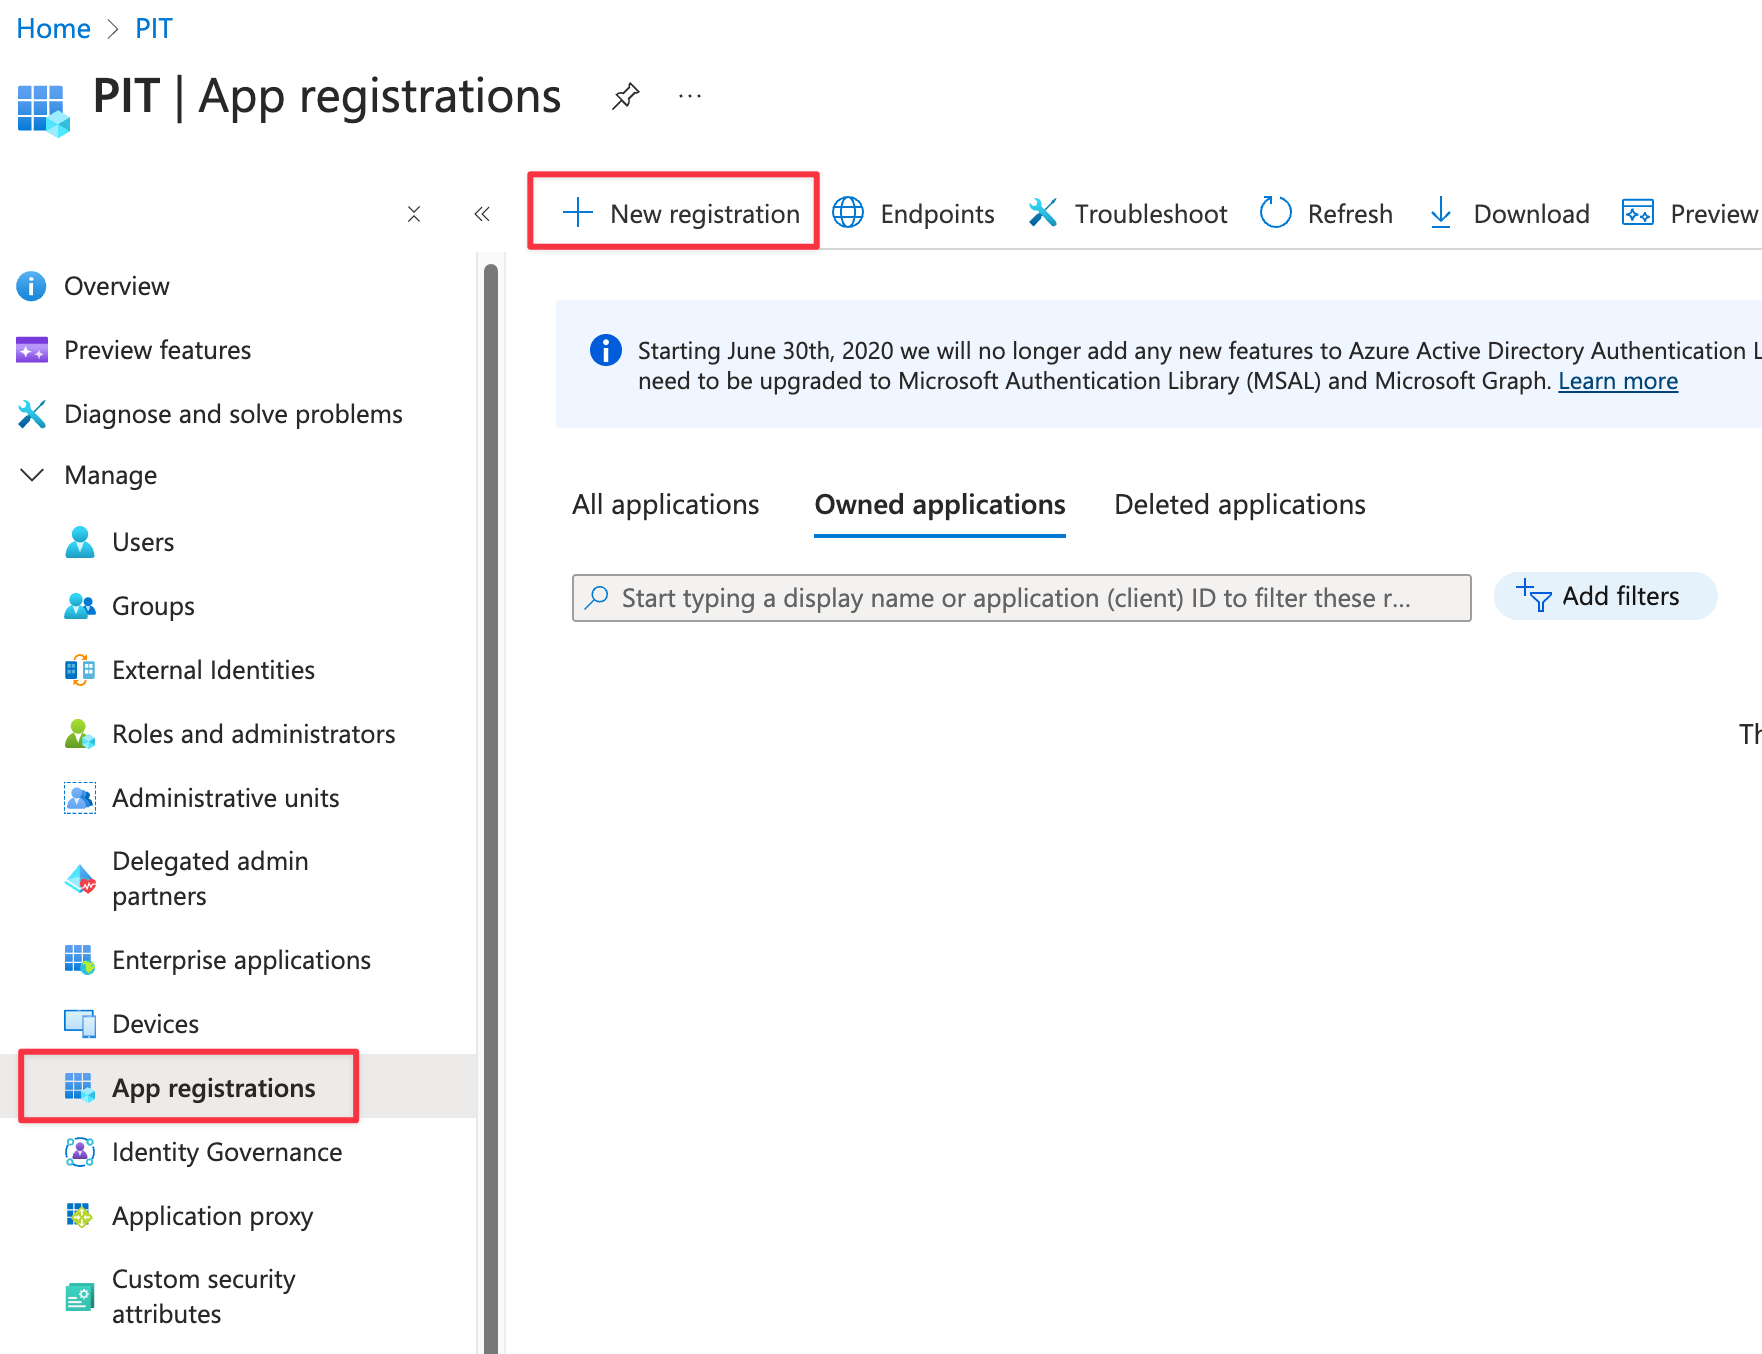
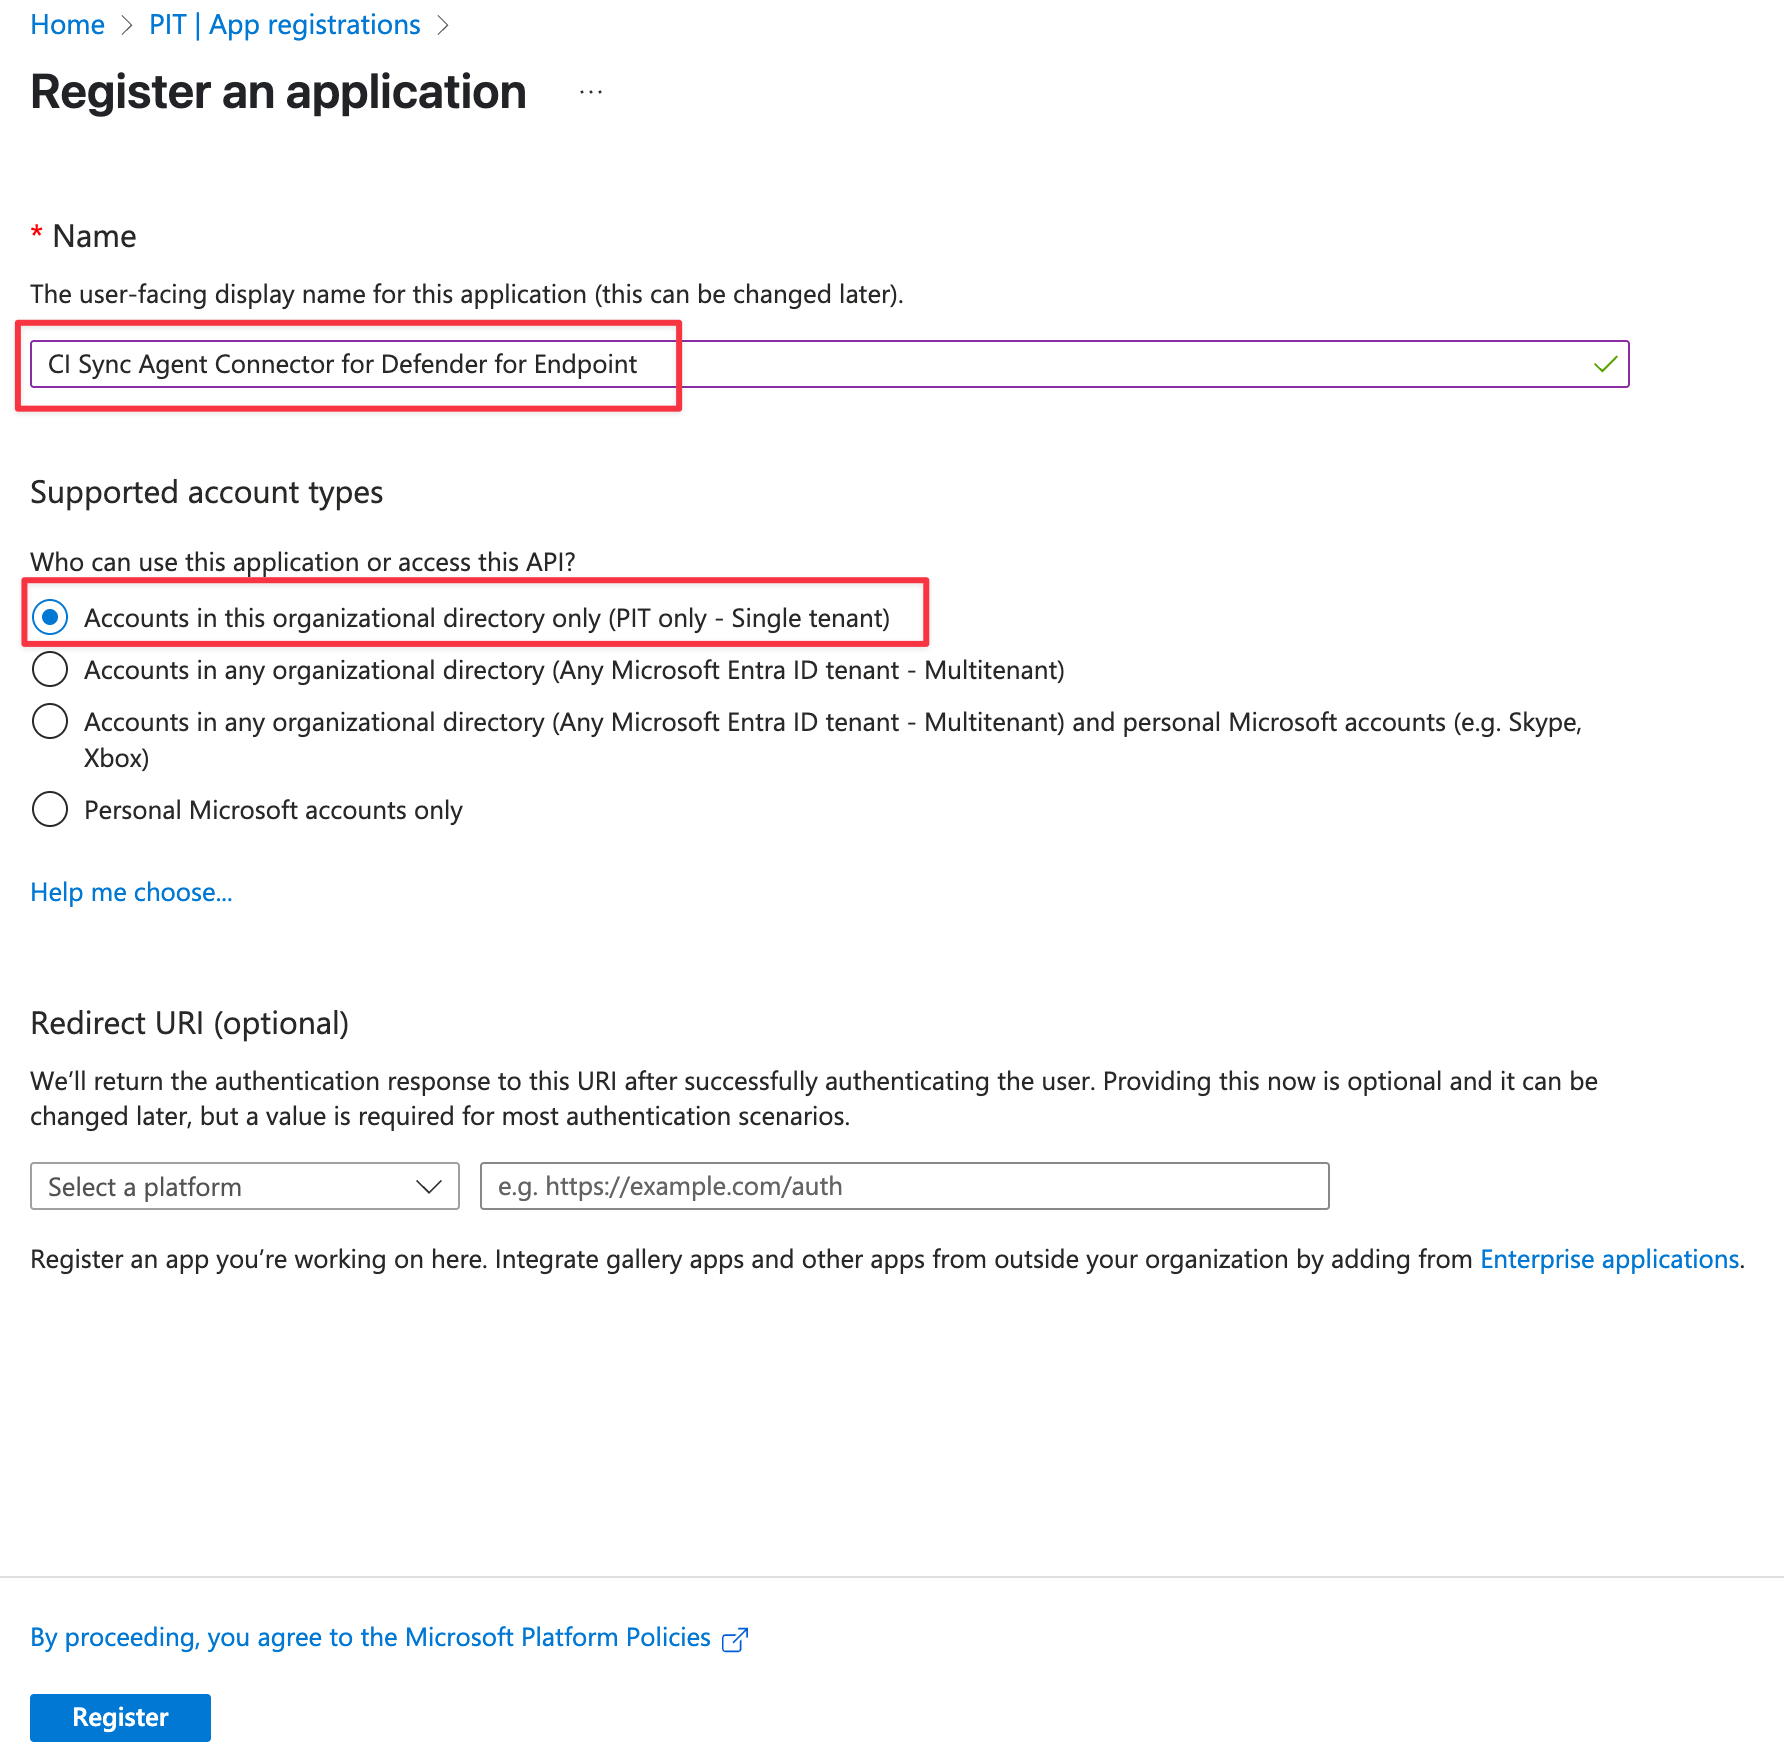
In the Azure Portal, navigate to Azure Active Directory -> App Registrations and click New Registration
-
On the Register an application form complete as follows:
-
Enter the Name (Note: Syncfish recommend using “CI Sync Agent Connector for Defender for Endpoint”)
-
Under Supported account types select “Accounts in this organizational directory only ({Your Domain/Tenant Name} only - Single tenant)”
-
Click Register
-
-
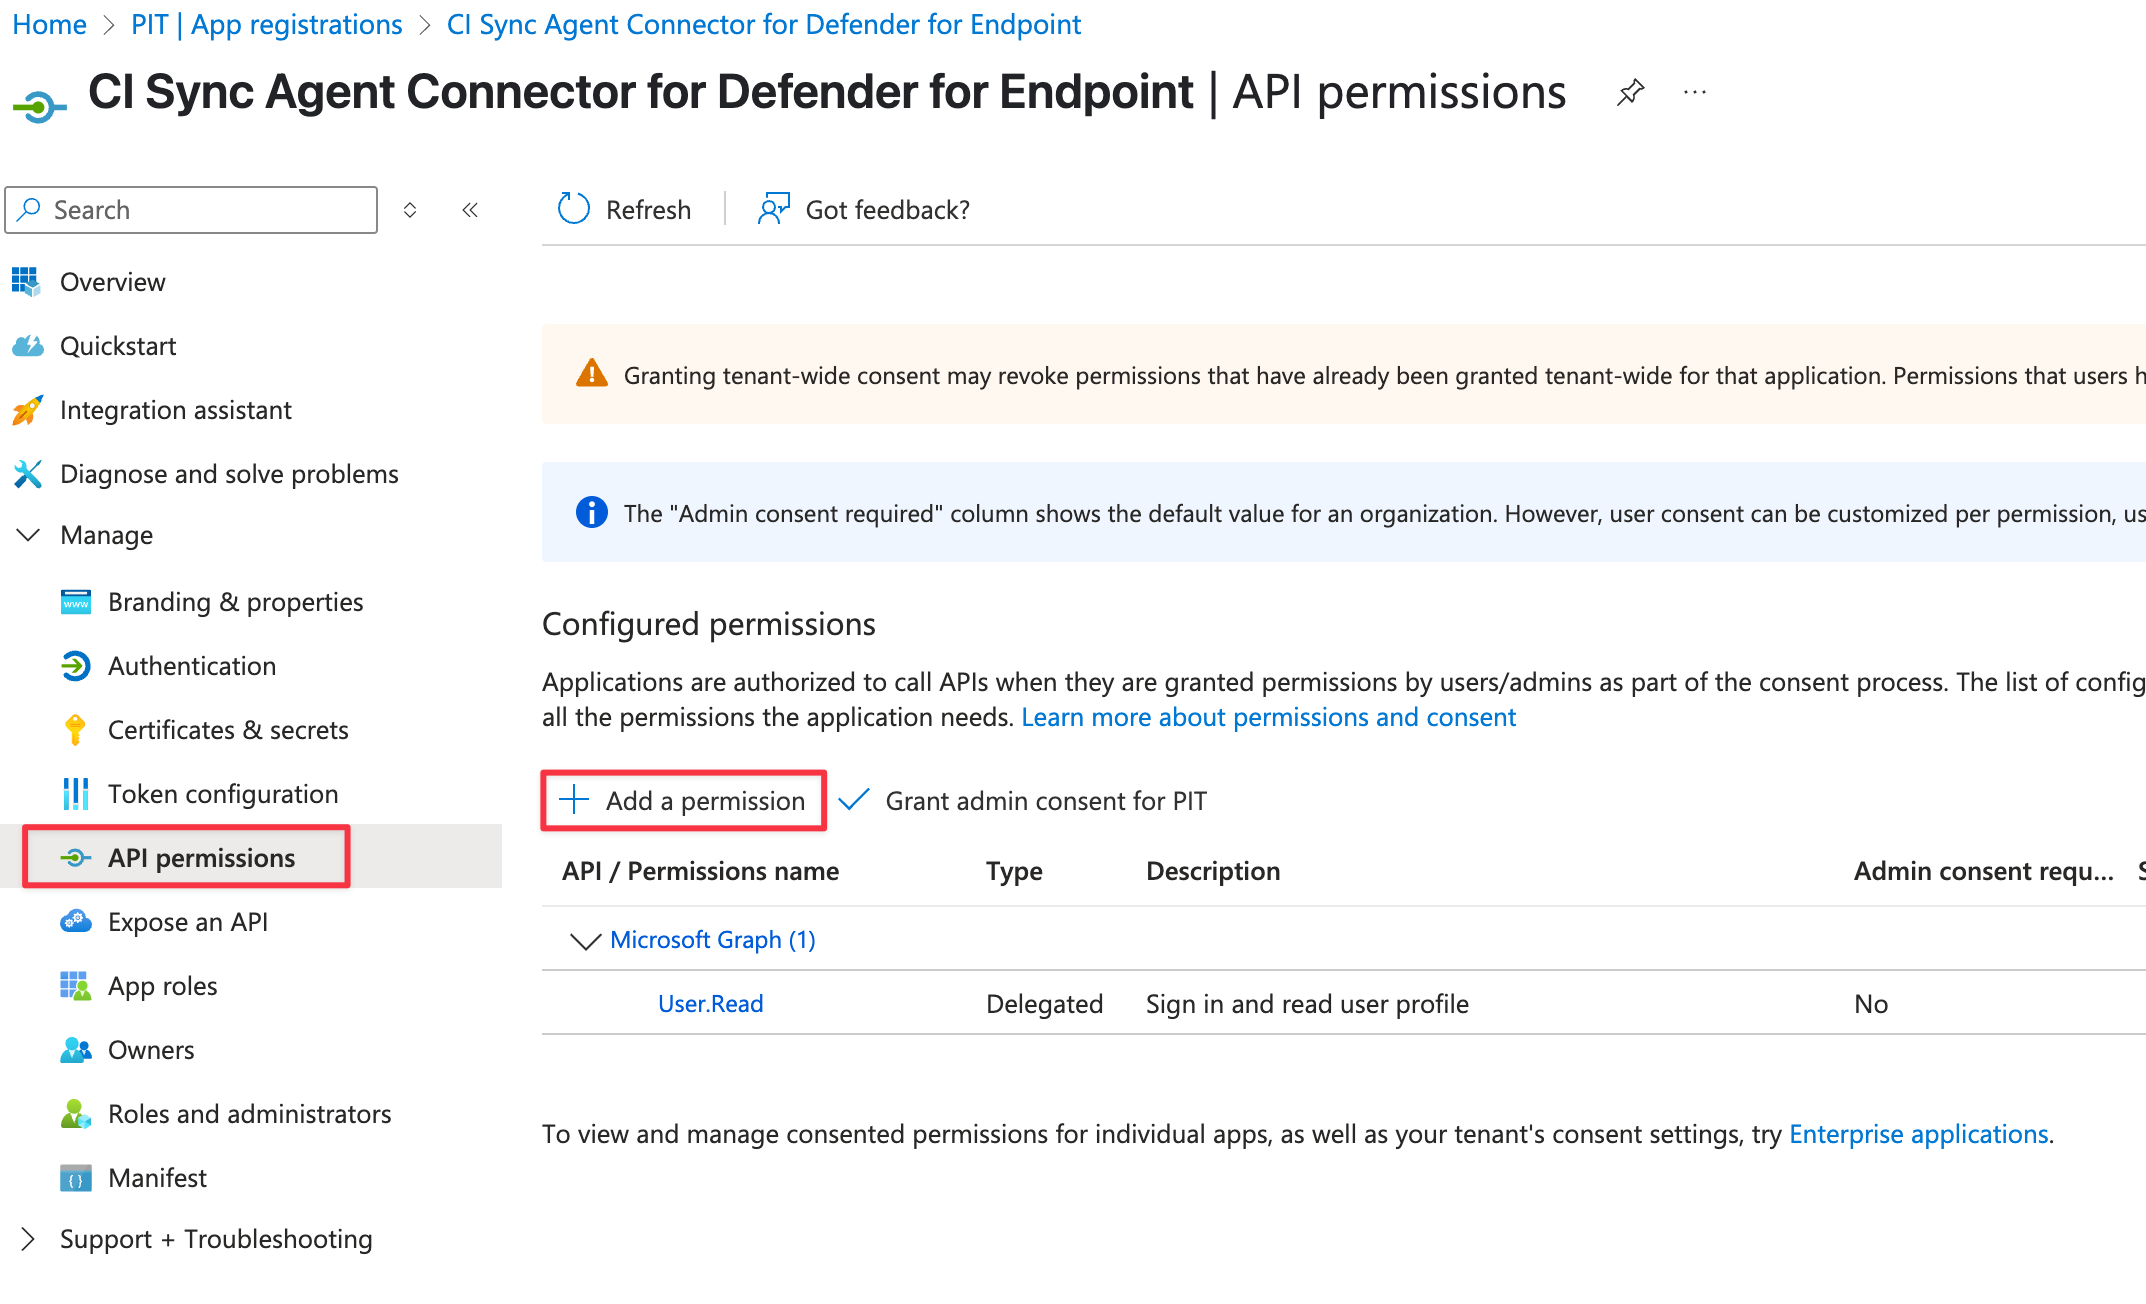
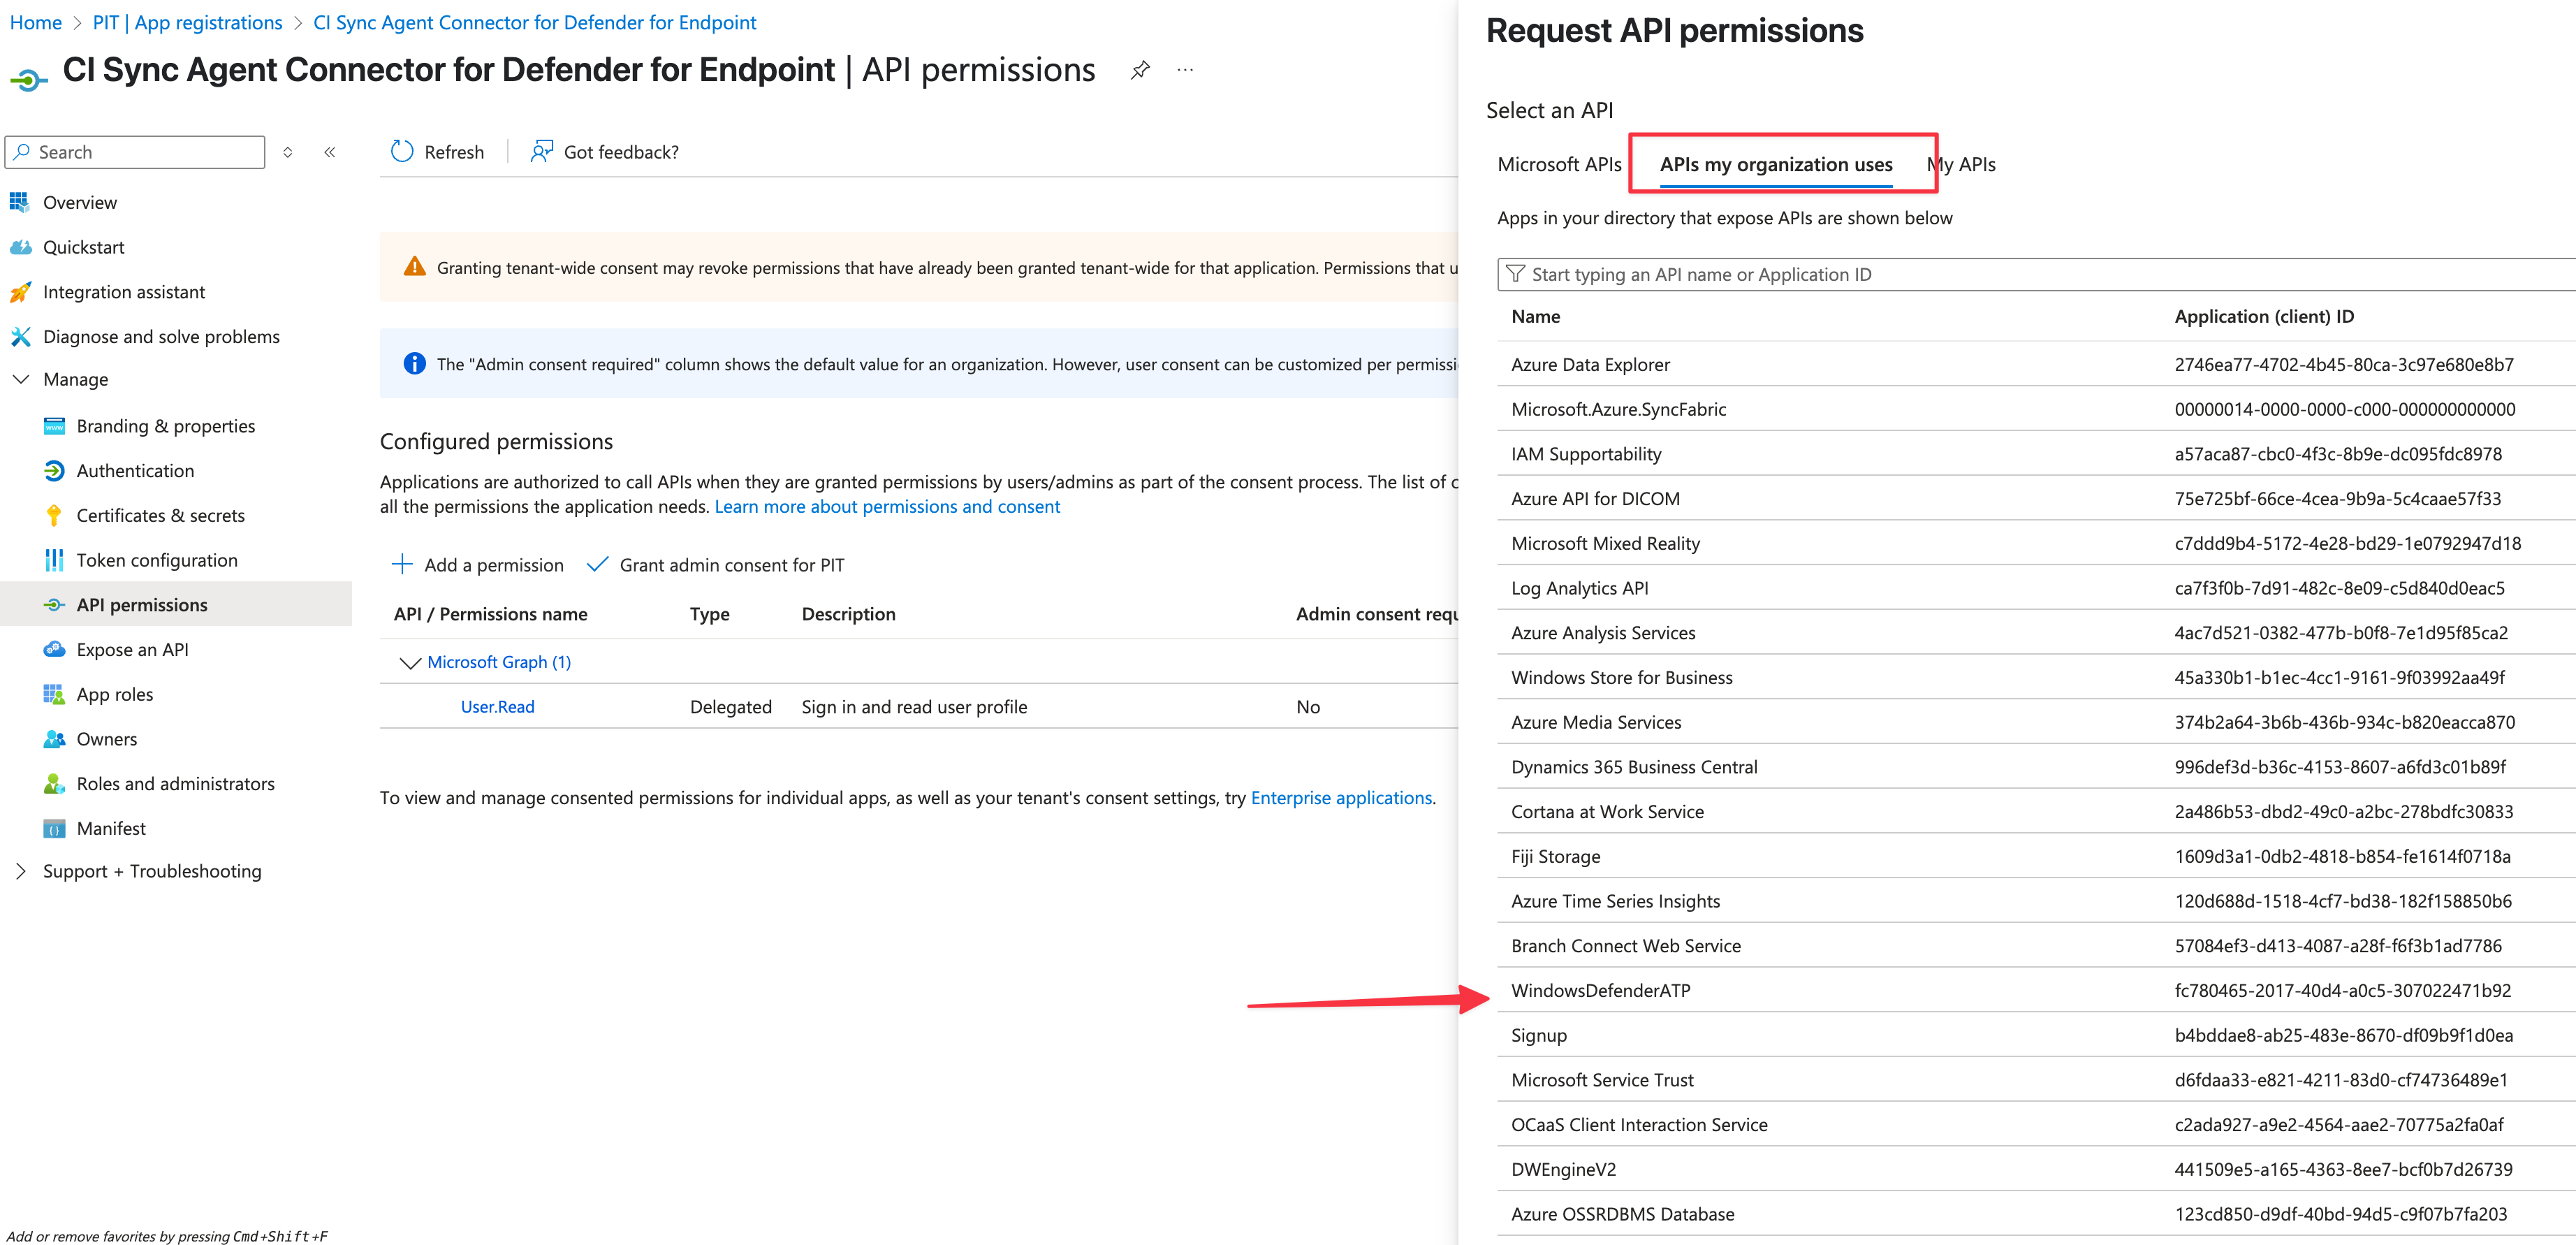
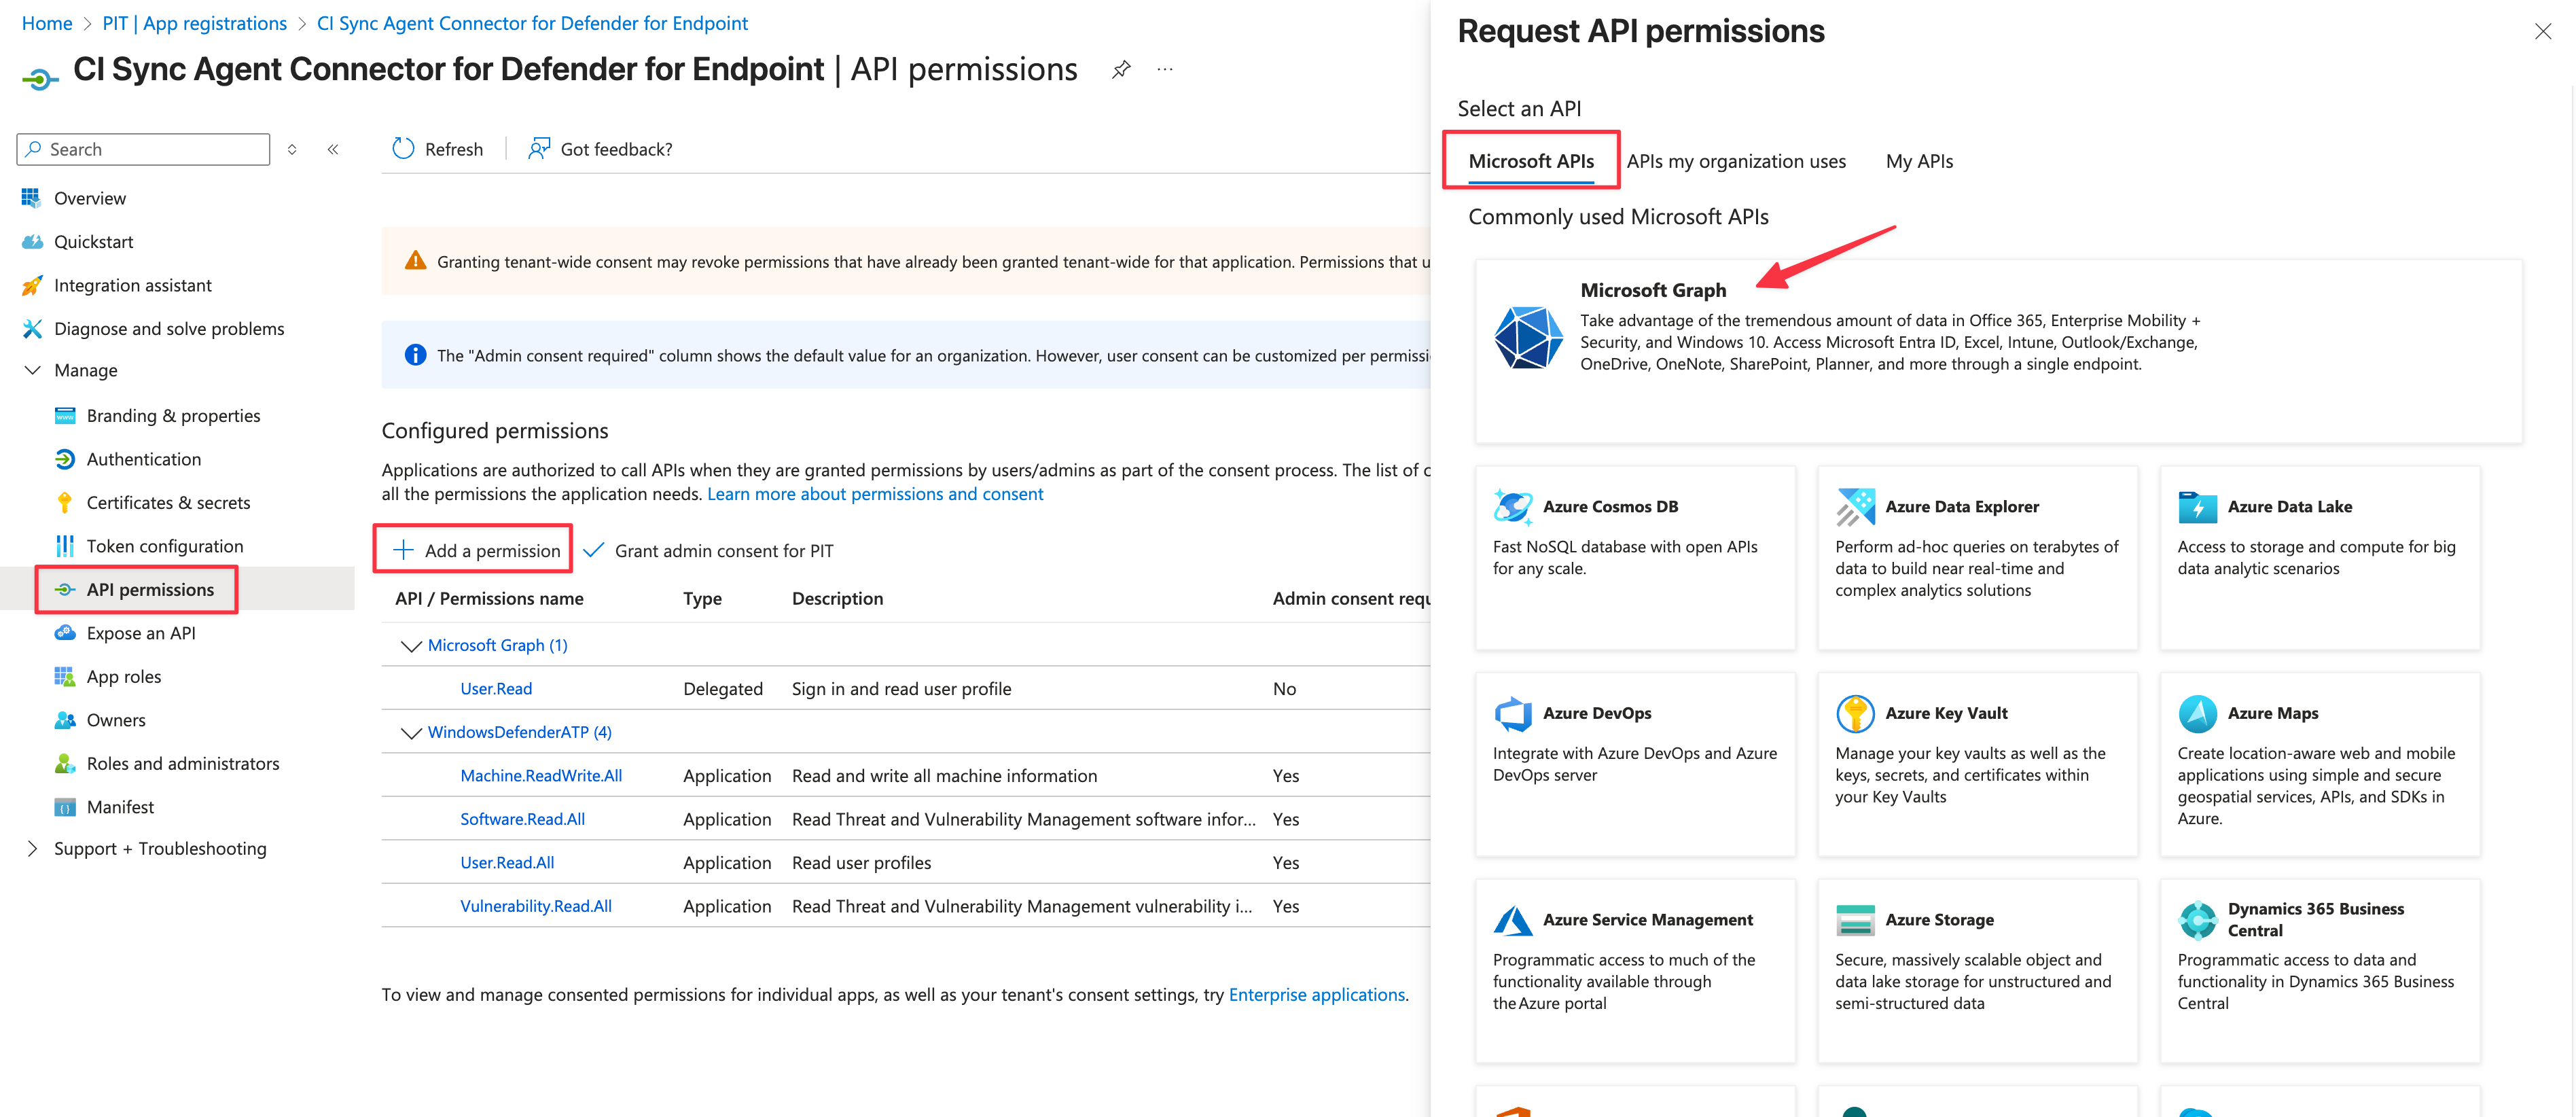
Navigate to API permissions and click Add Permission
-
Click on APIs my organization uses, then select WindowsDefenderATP
-
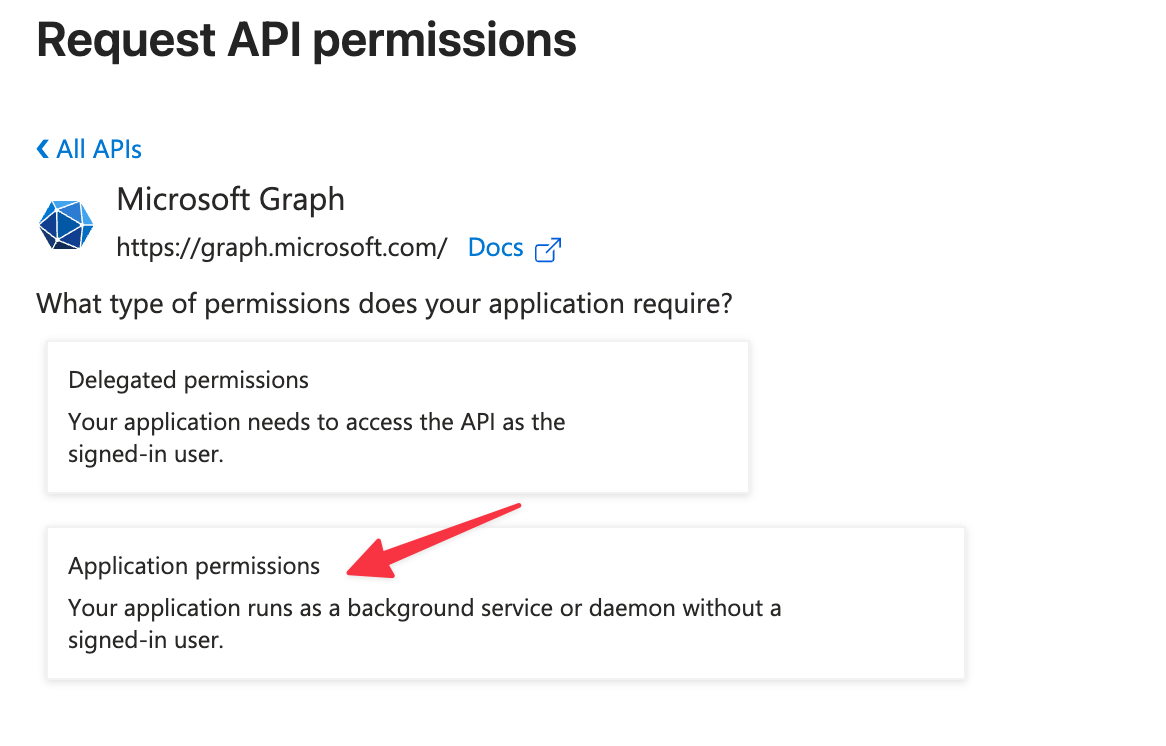
Click on Application permissions
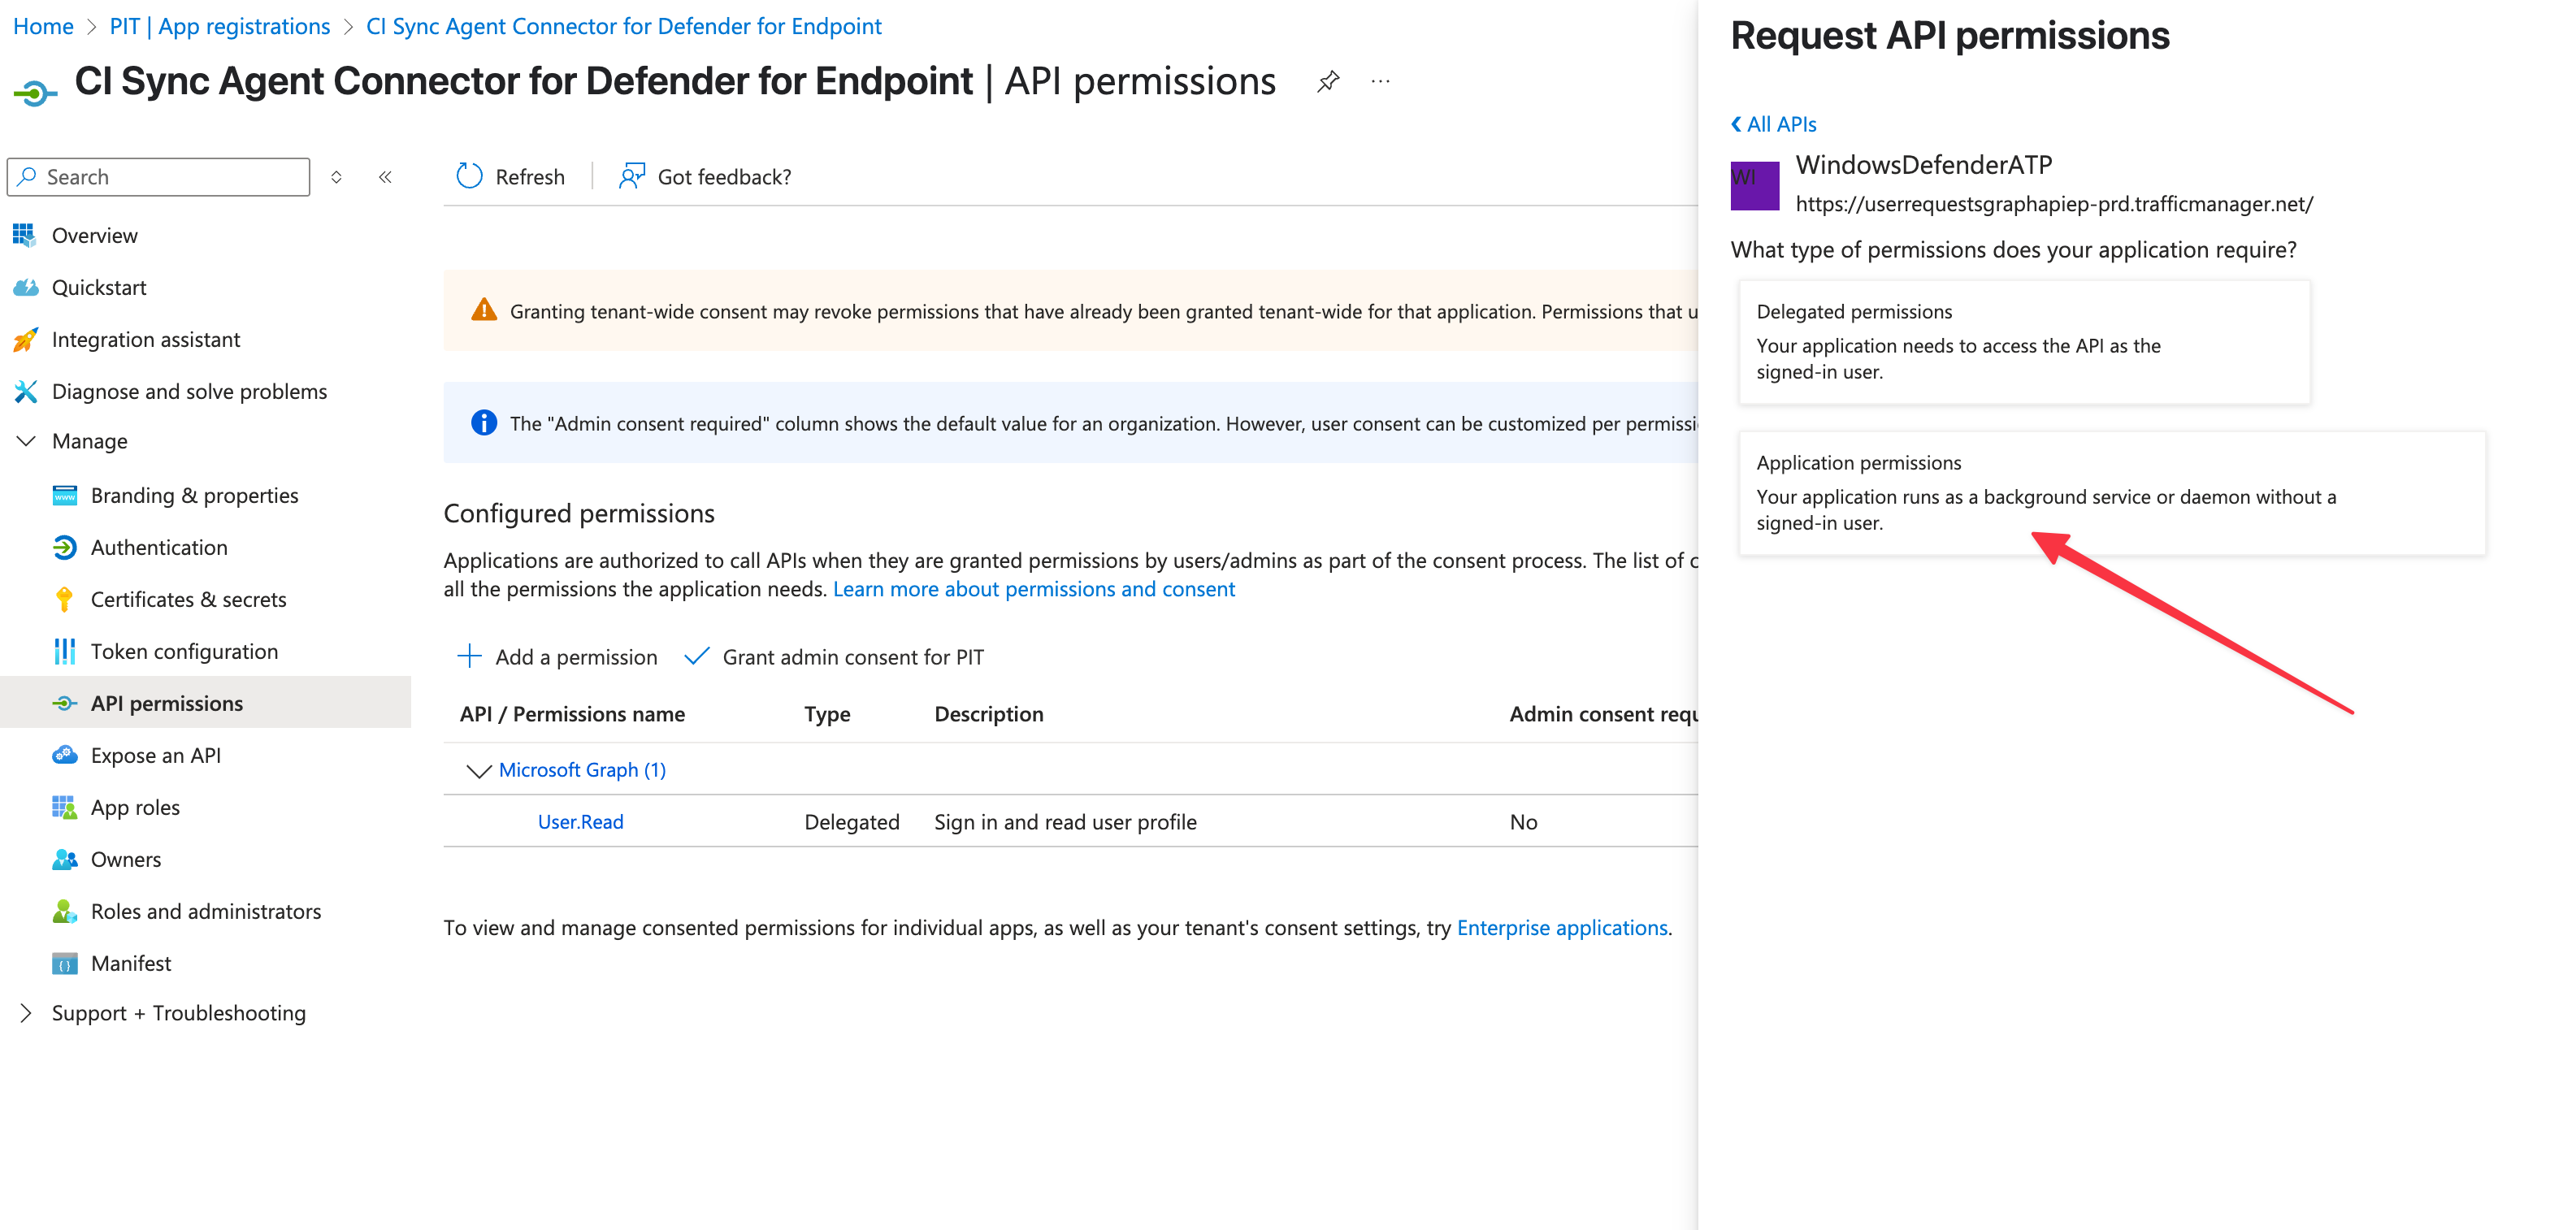
-
In the Select permissions filter, location and select each of the following:
-
Machine.Read.All
-
Software.Read.All
-
Vulnerability.Read.All
-
User.Read.All
-
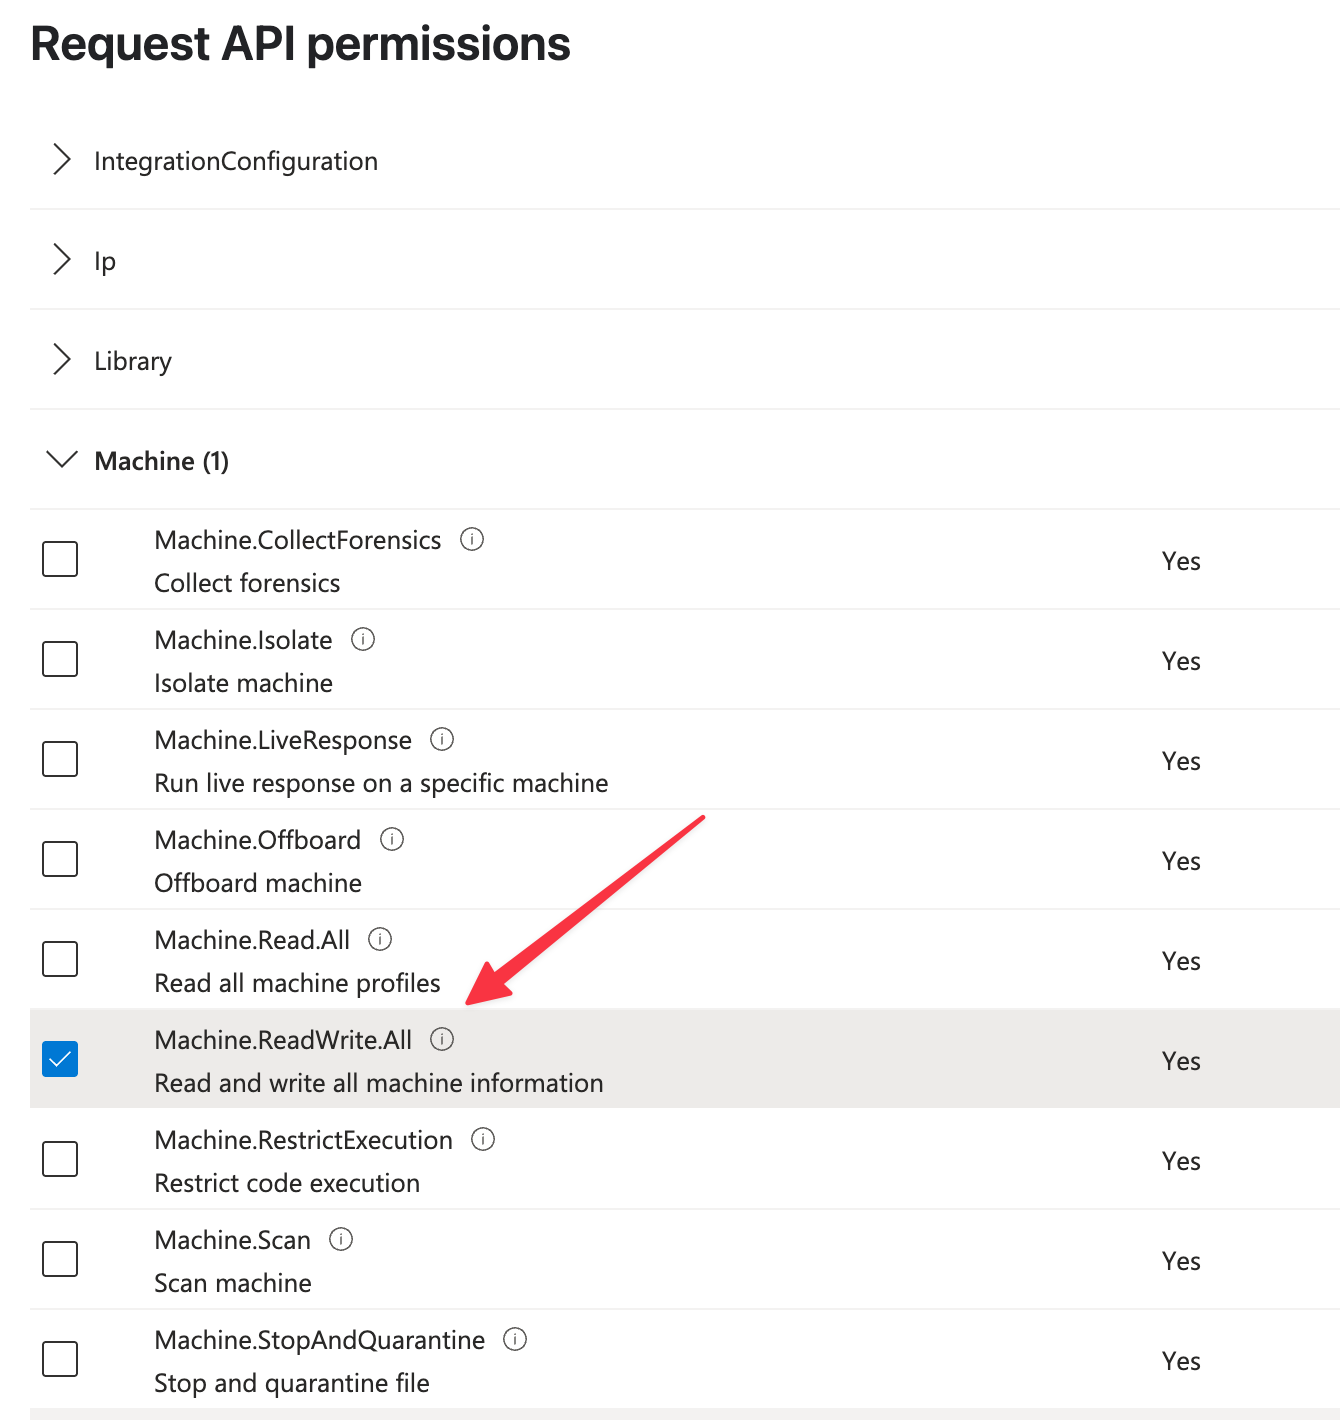
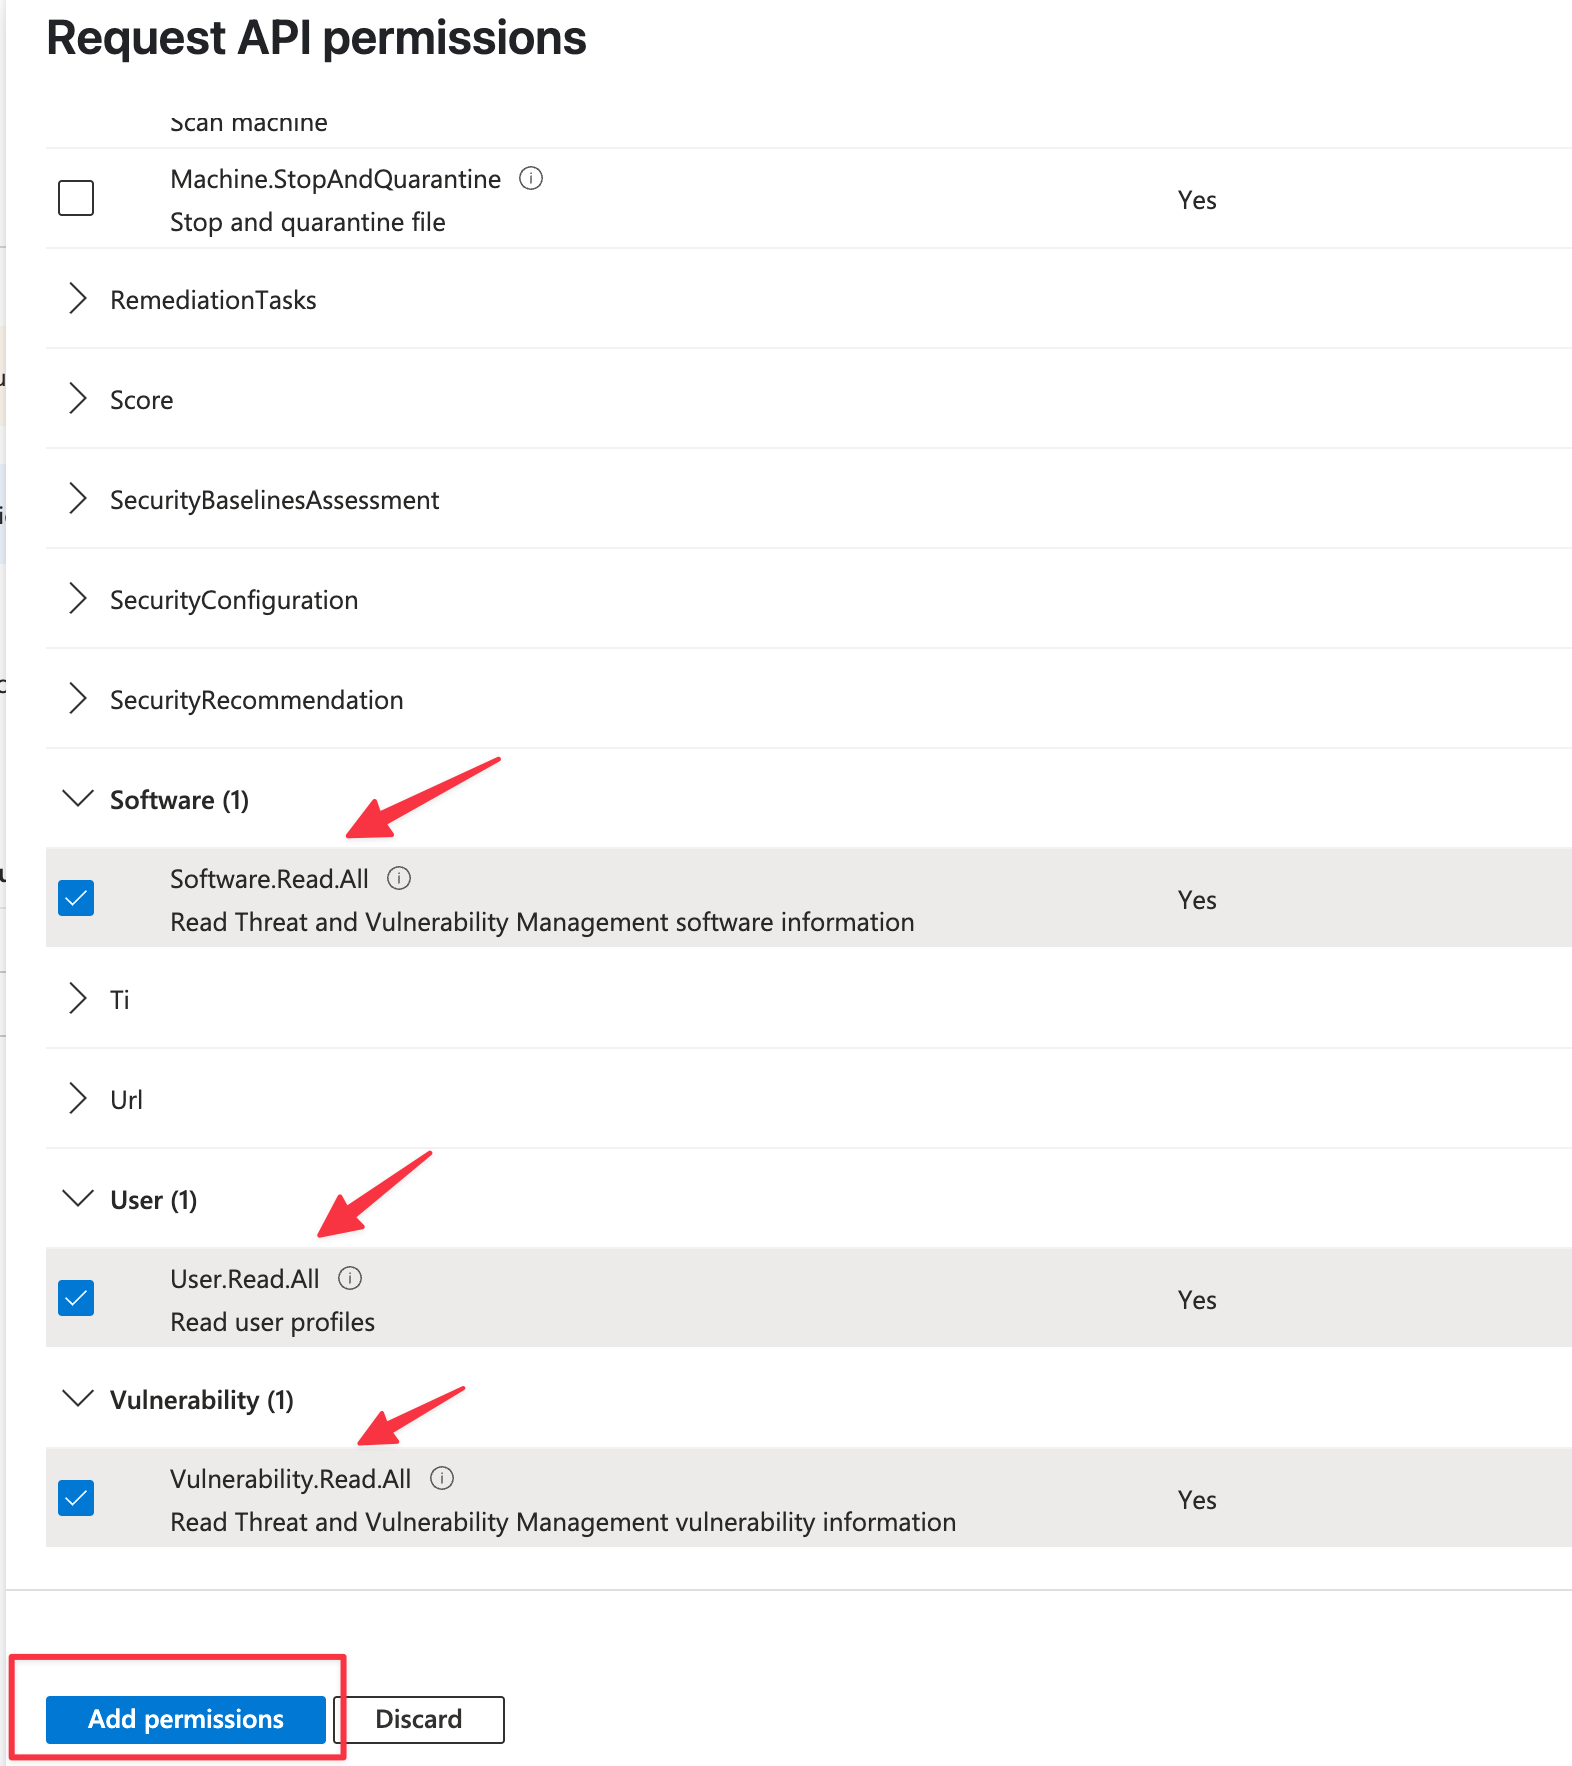
-
Finally, click the Add permission button
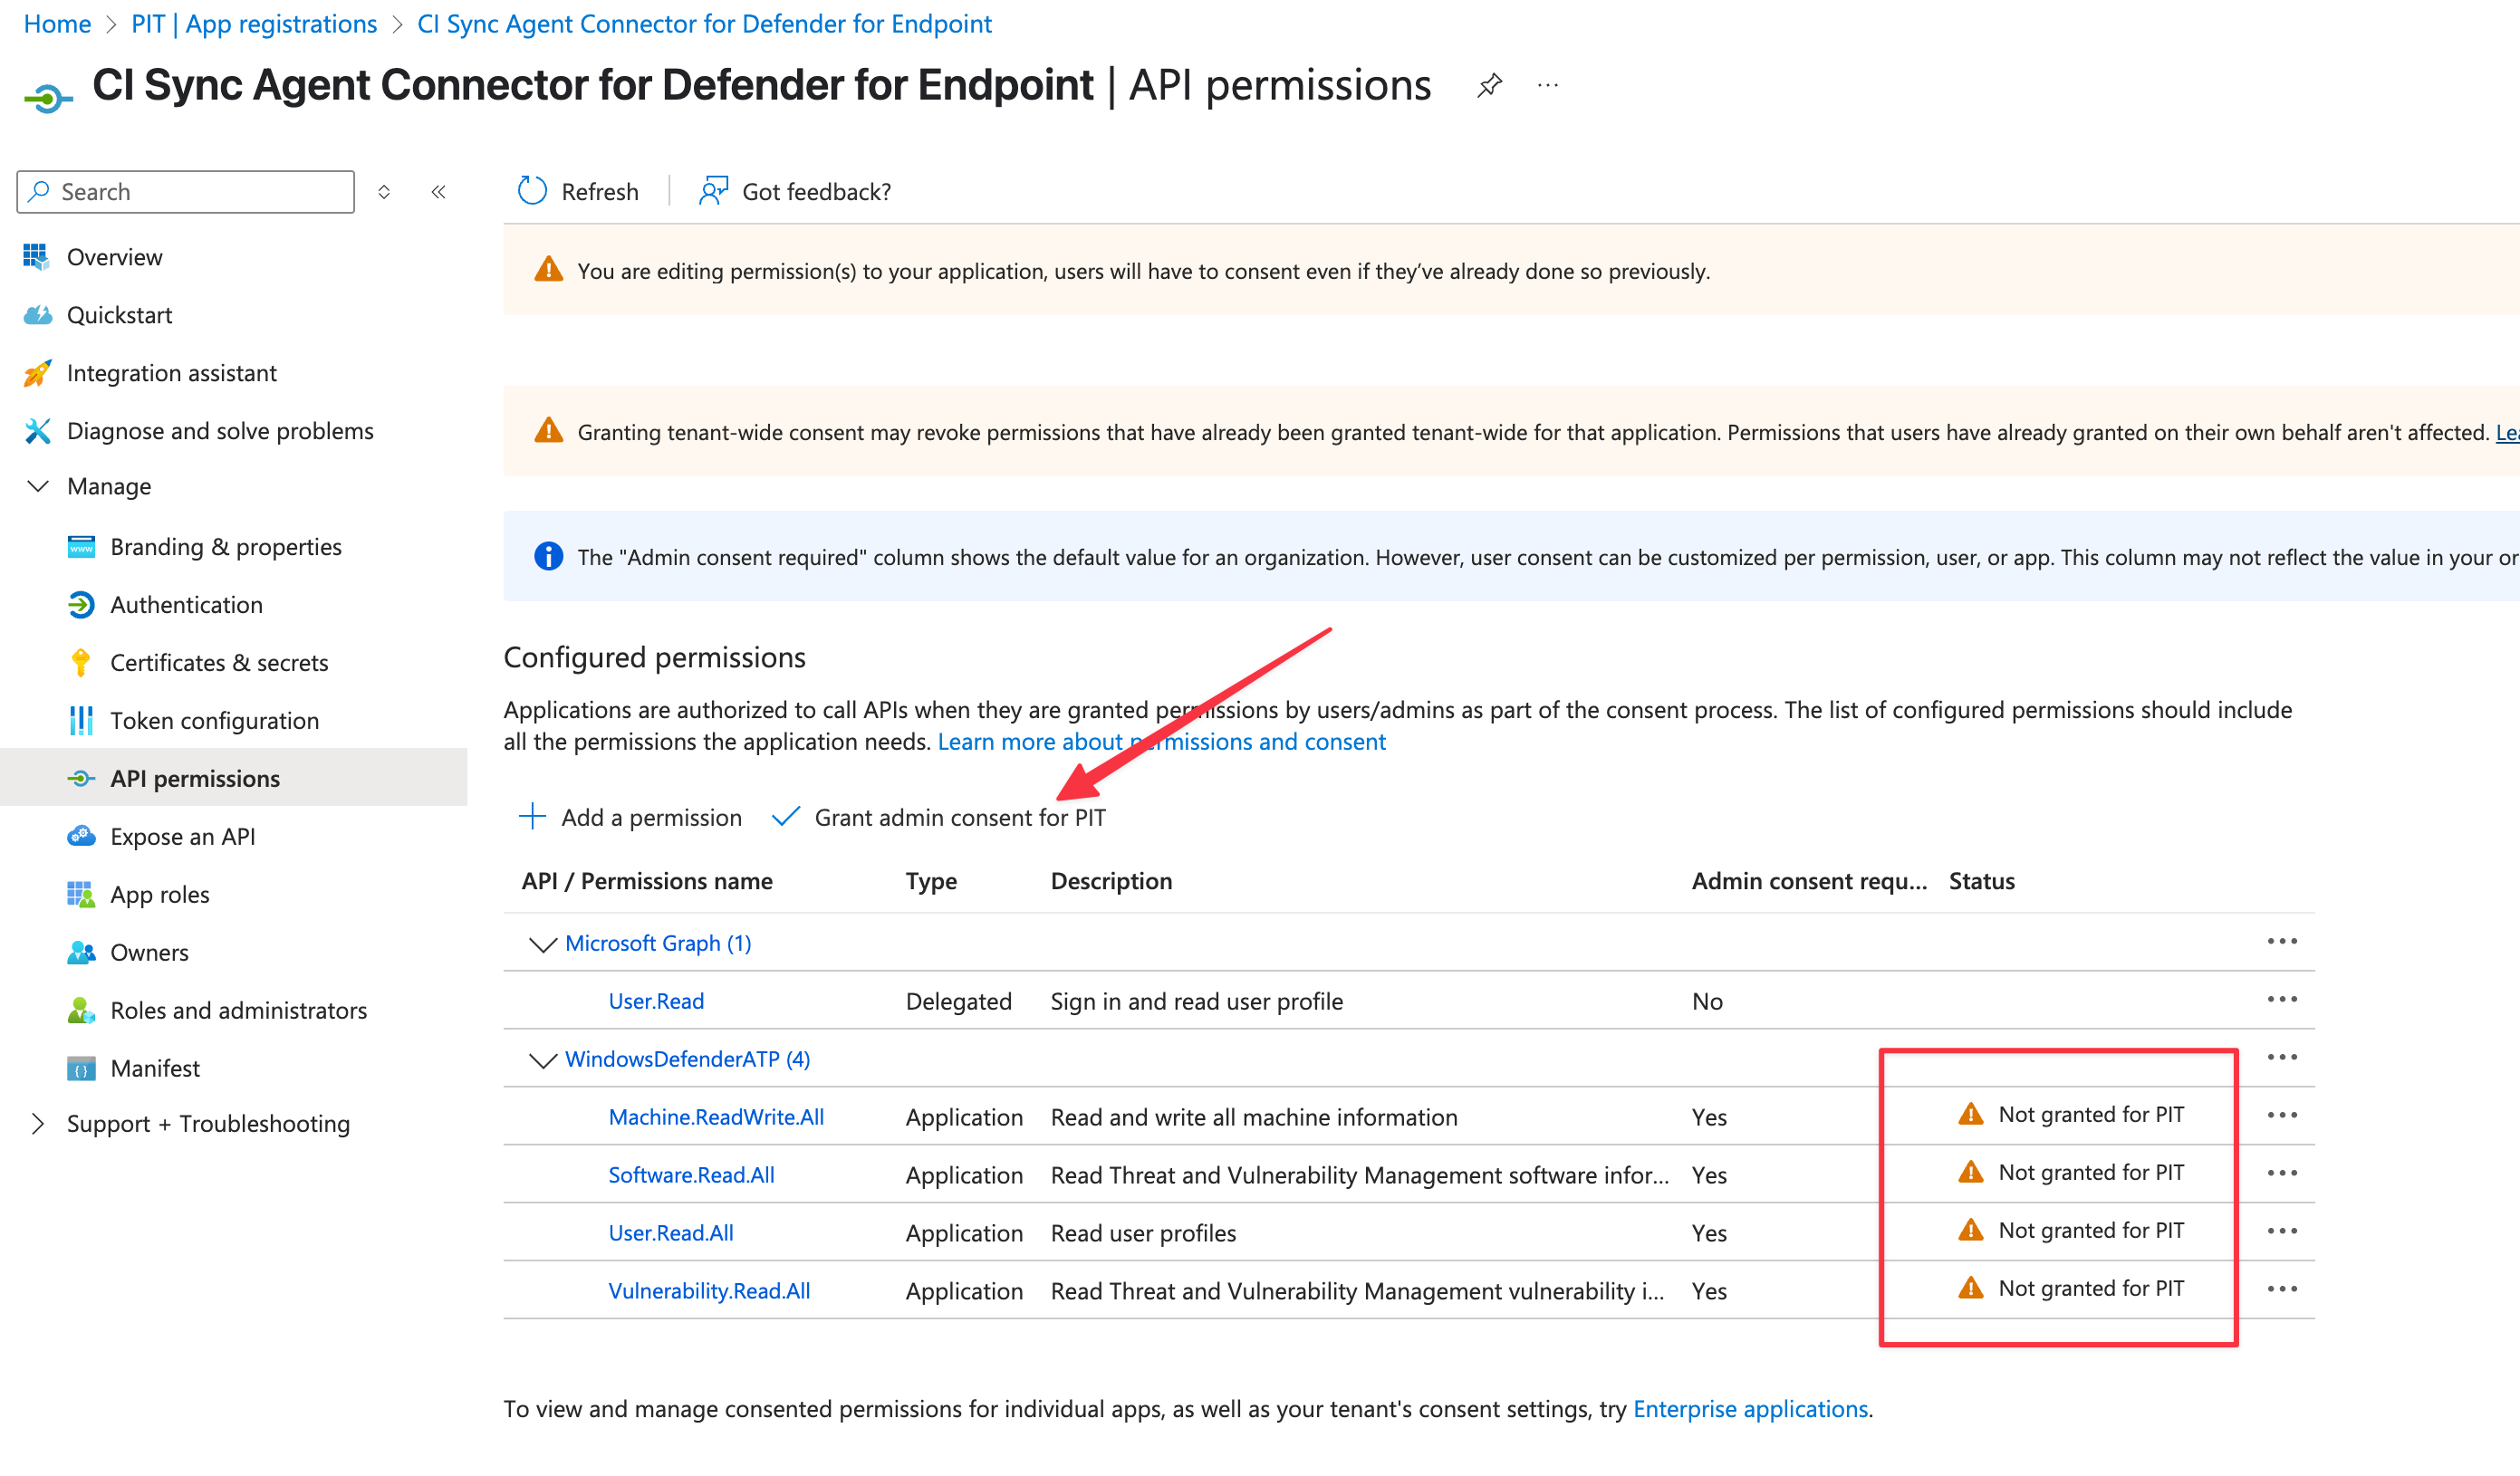
-
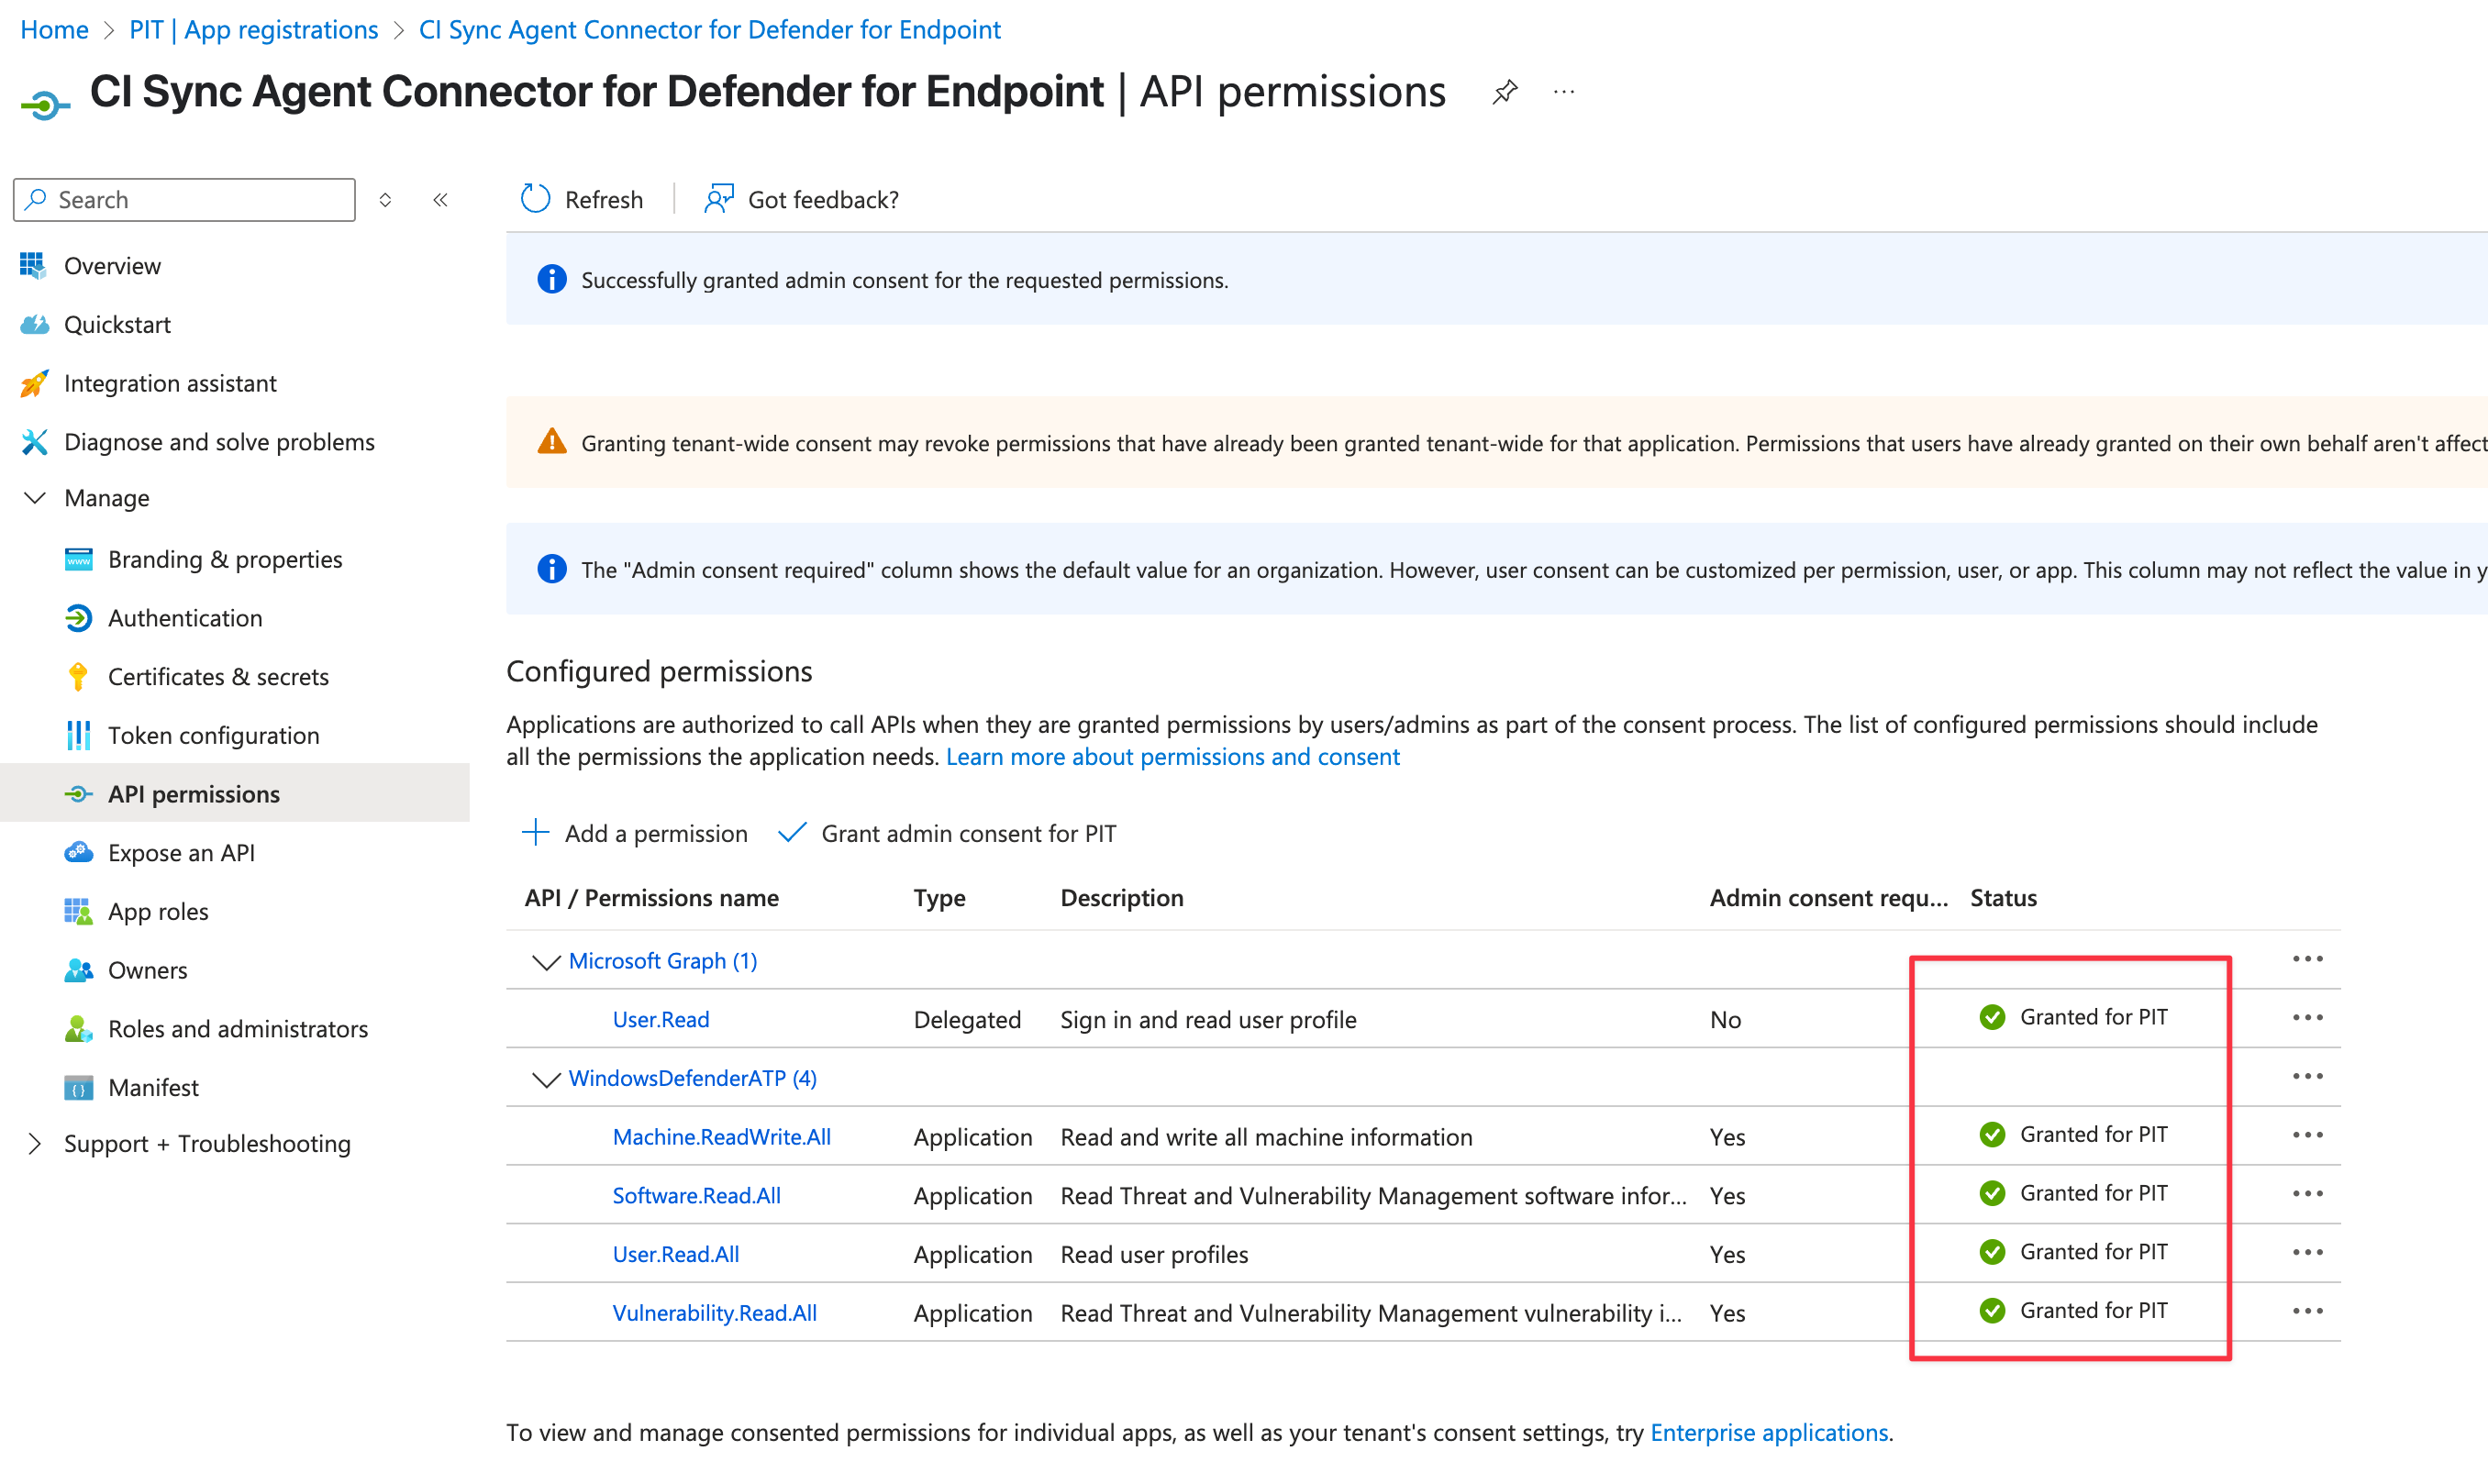
You should now be back on the API Permissions form showing the list of permissions you selected (see screen shot below to validate you have selected the required permissions).
-
Now, Click Grant admin consent for {Your Domain Name}
-
-
Click Yes to confirm granting Admin Consent. The resulting screen should look as shown below.
-
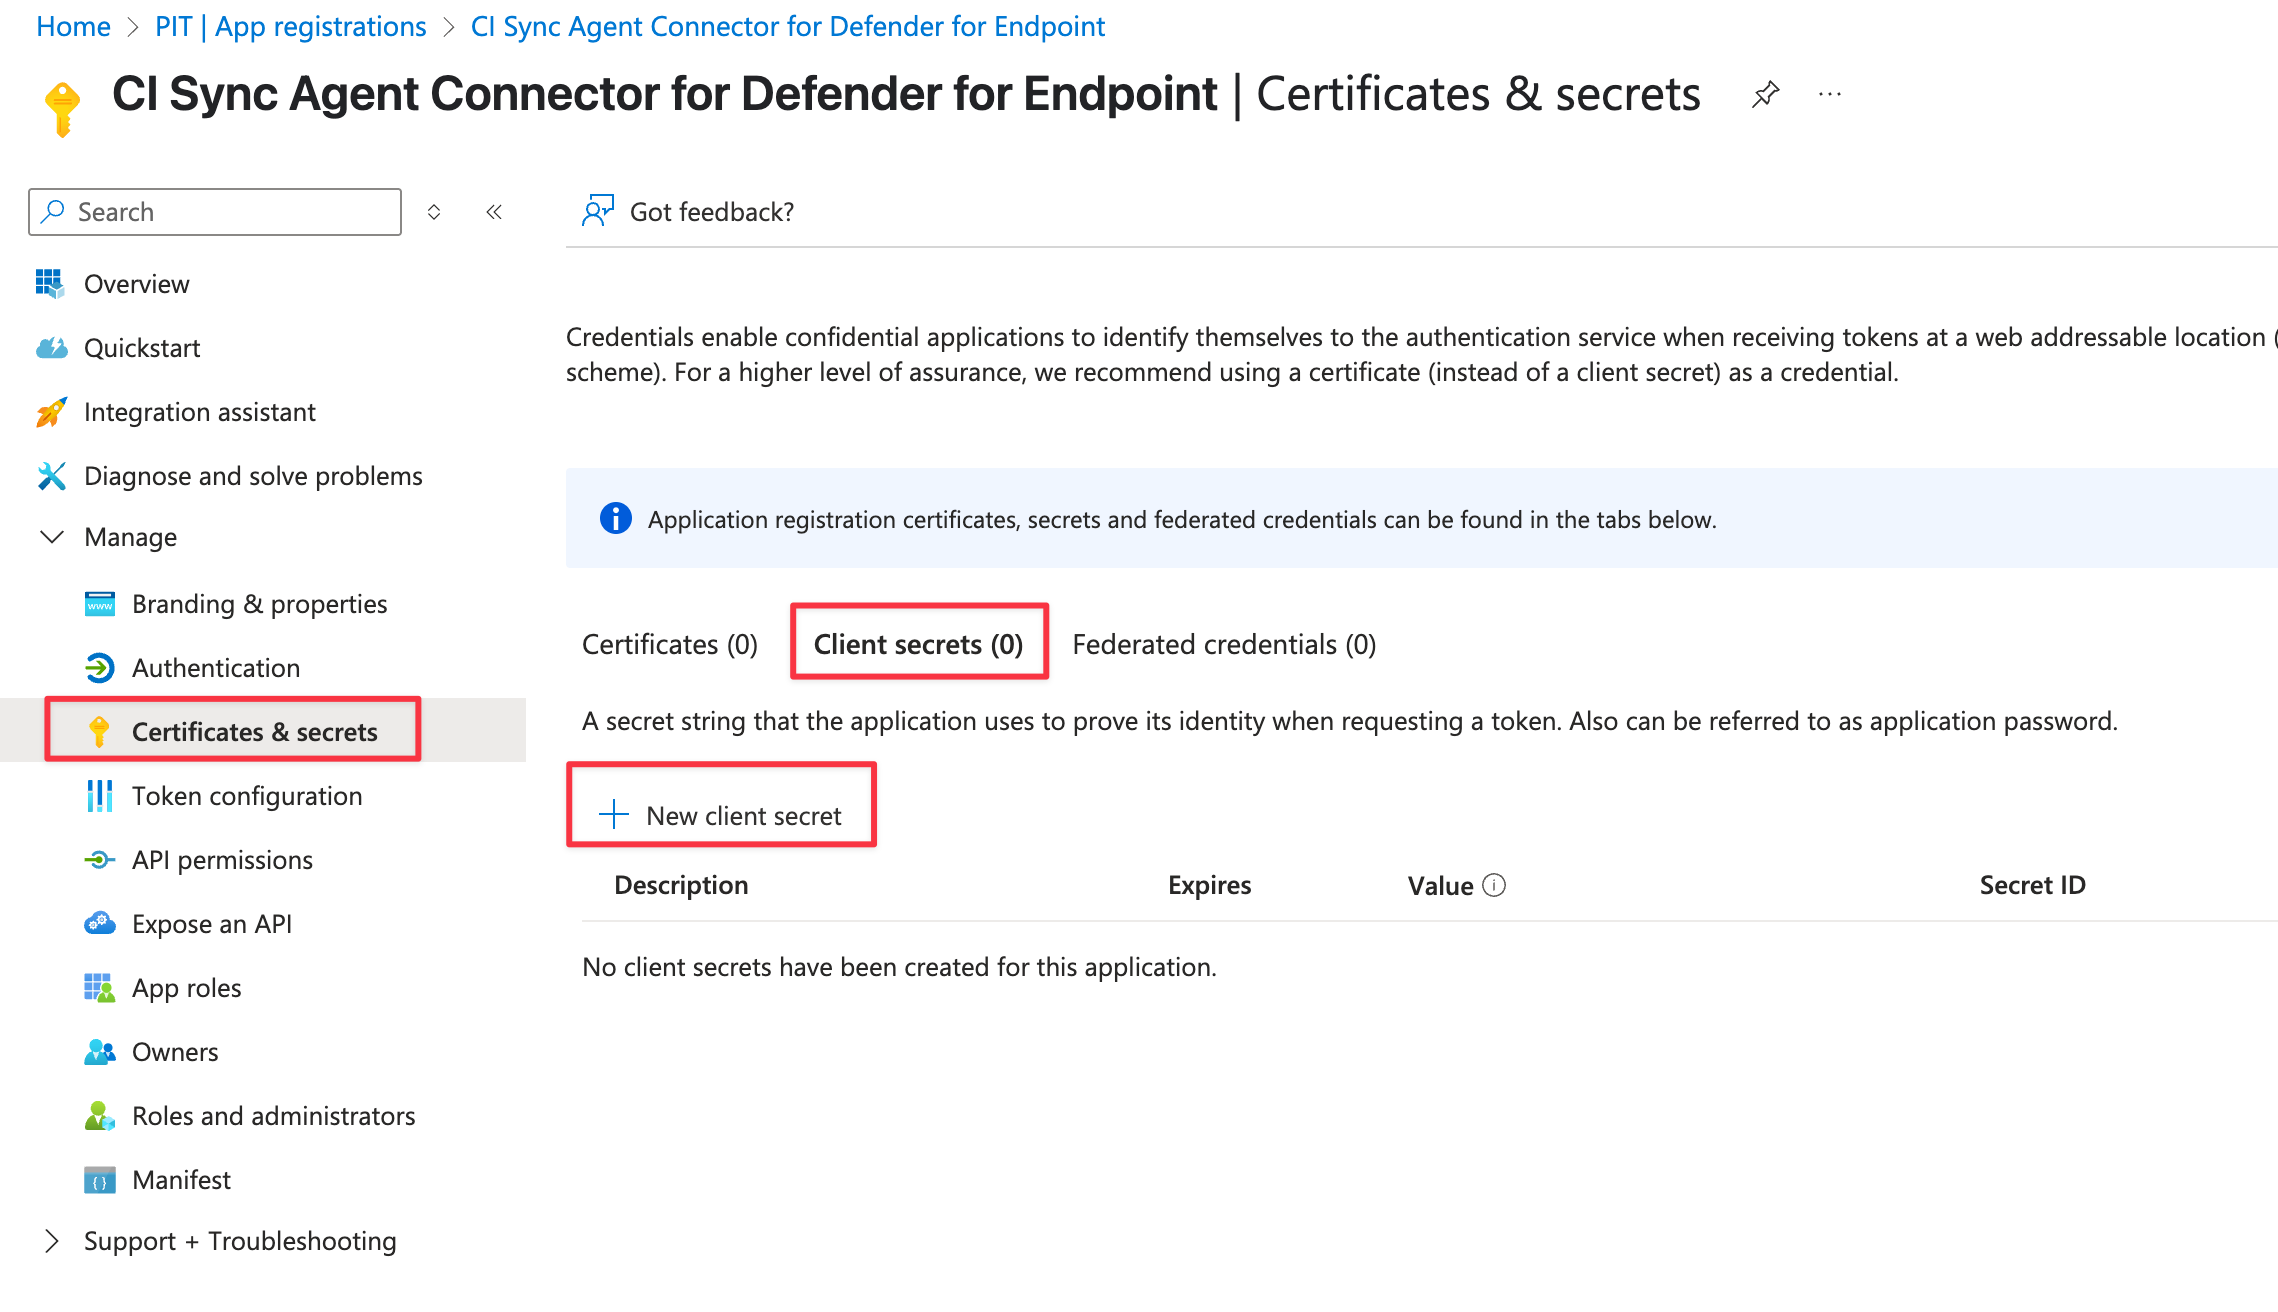
Using the left-hand menu, navigate and select Certificates & secrets. Select “Client secrets (0)” in the middle of the form and then click the “New client secret” button.
-
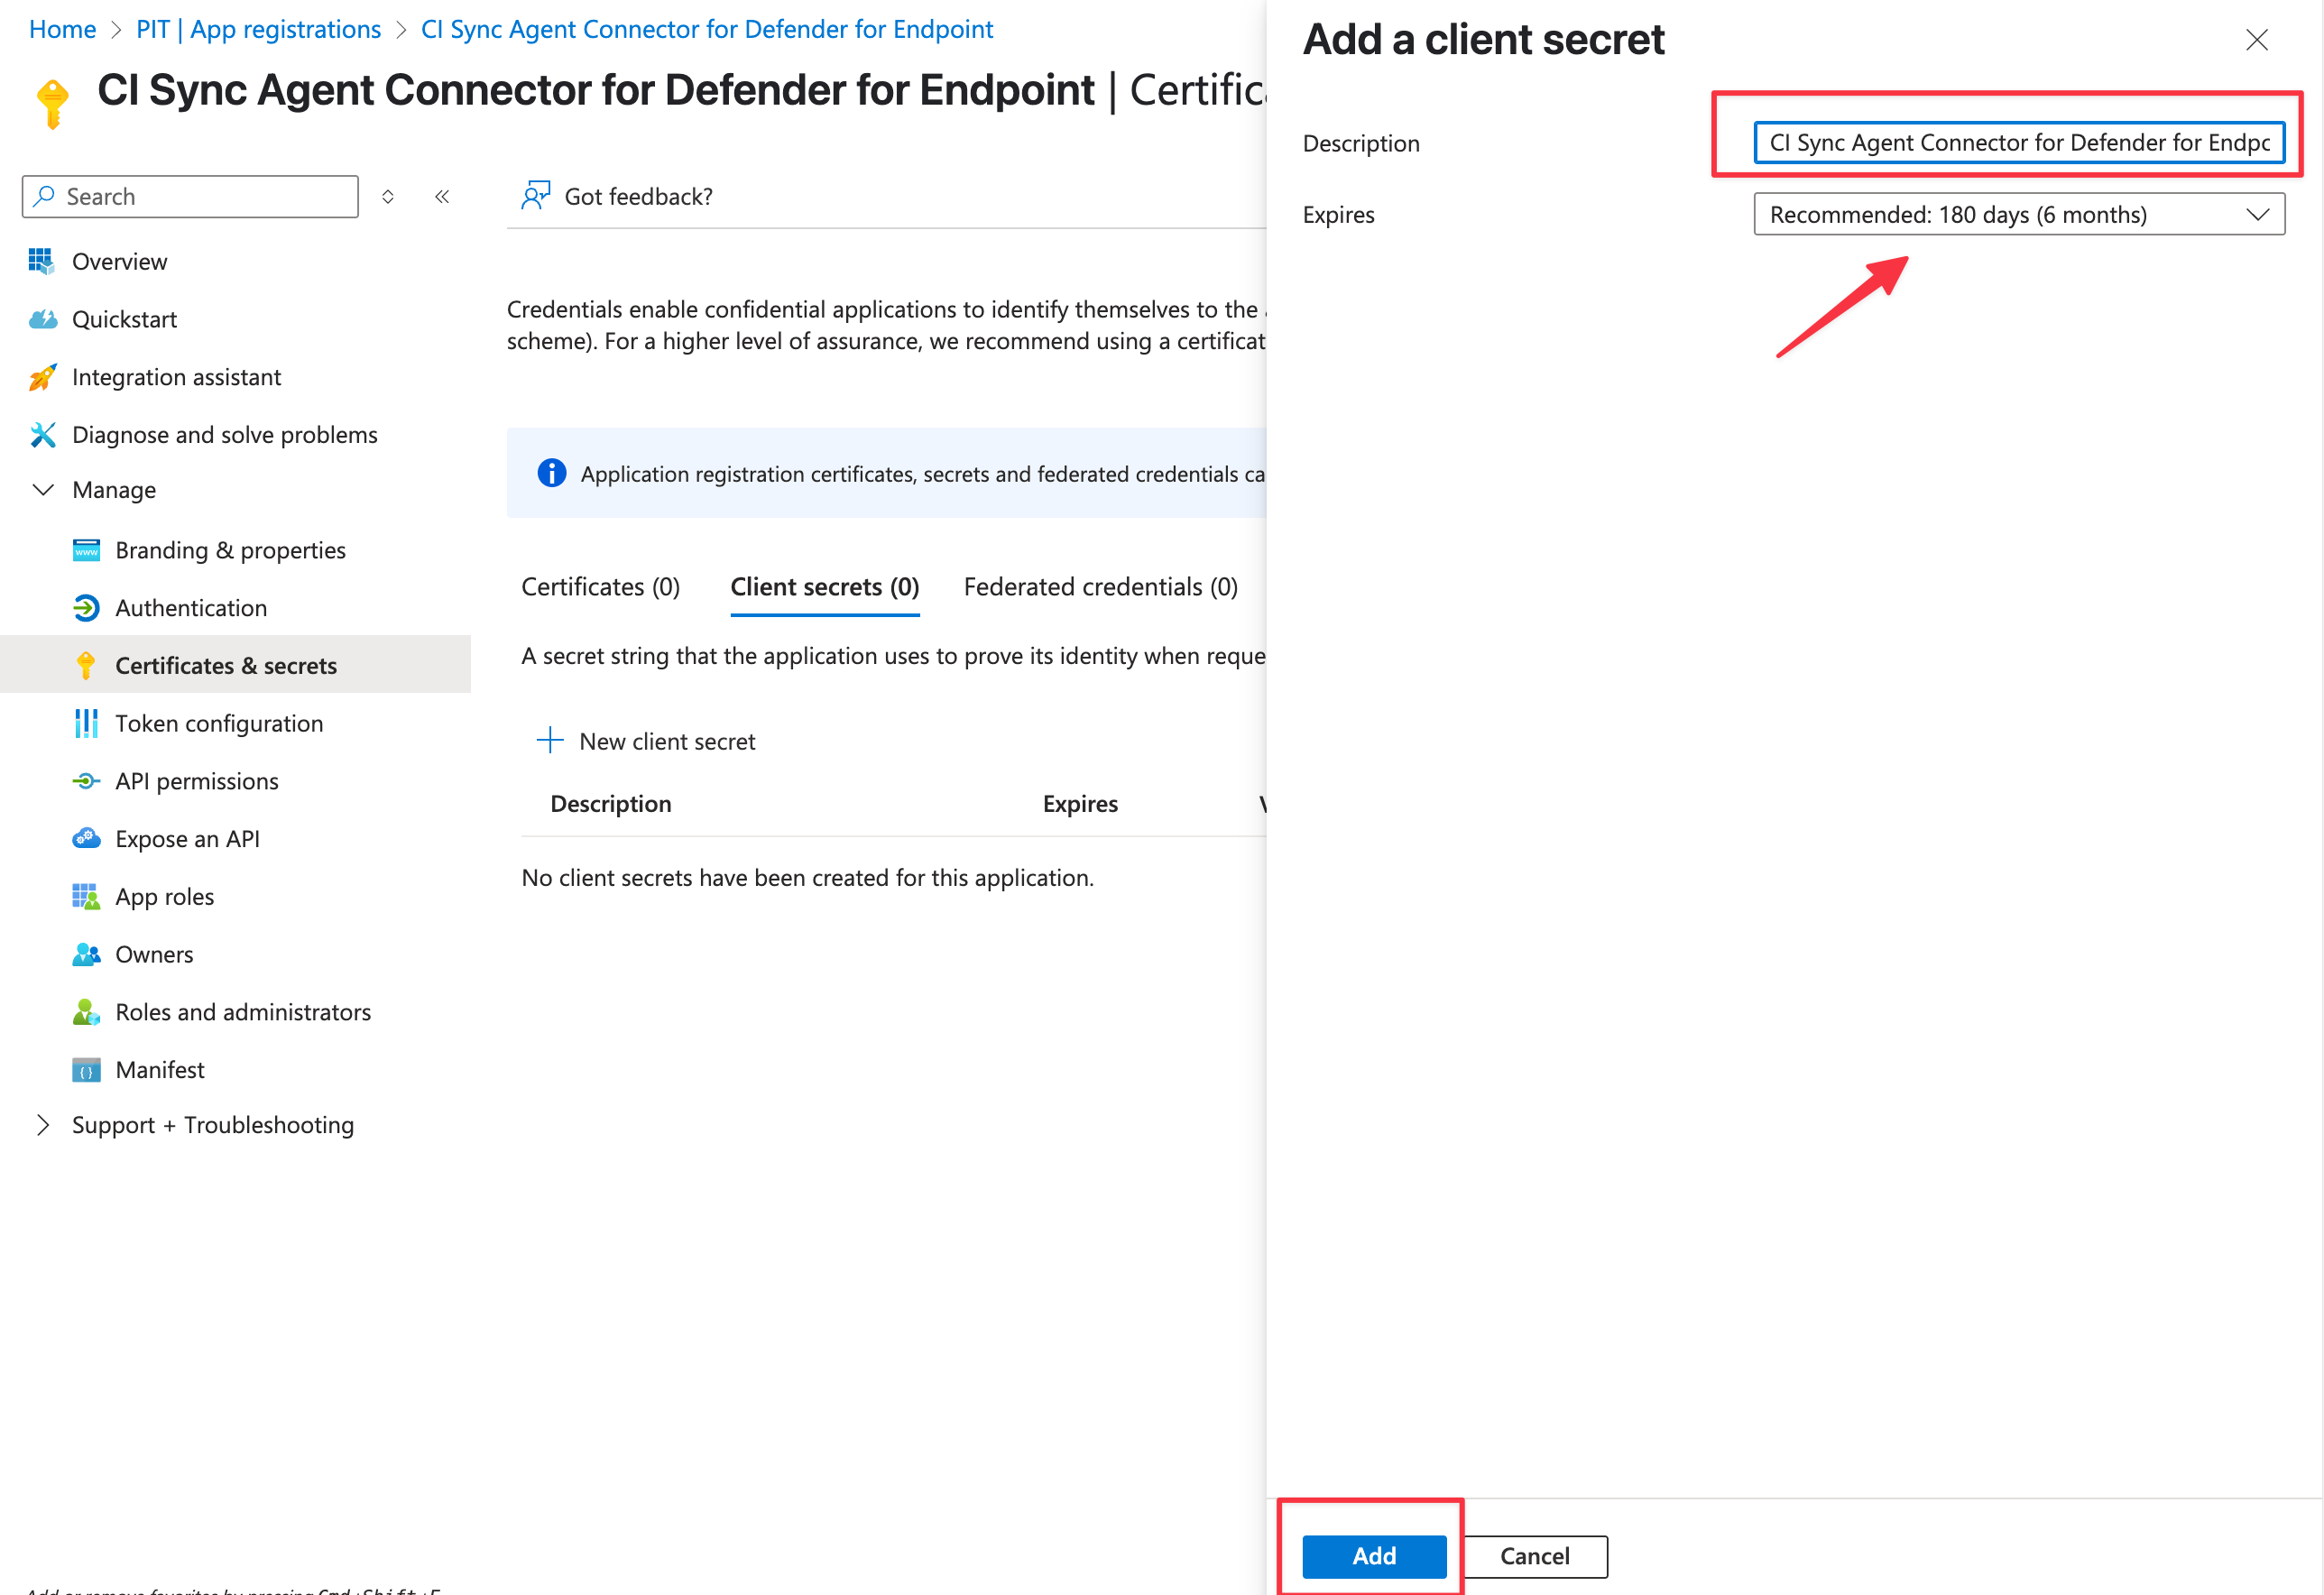
Enter a unique Description for the secret associated with this CI Sync Agent Connector for Defender for Endpoint App Registration (e.g. “CI Sync Agent Connector for Defender for Endpoint Client Secret”).
-
Then, select a suitable Expires duration based on your organisational policy. Finally click the Add button.
Guidance Note
It is recommended you set a reminder prior to the expiry date of the Secret (i.e. a reminder to regenerate in Azure and then update the secret in the CI Sync Agent Config Utility).
-
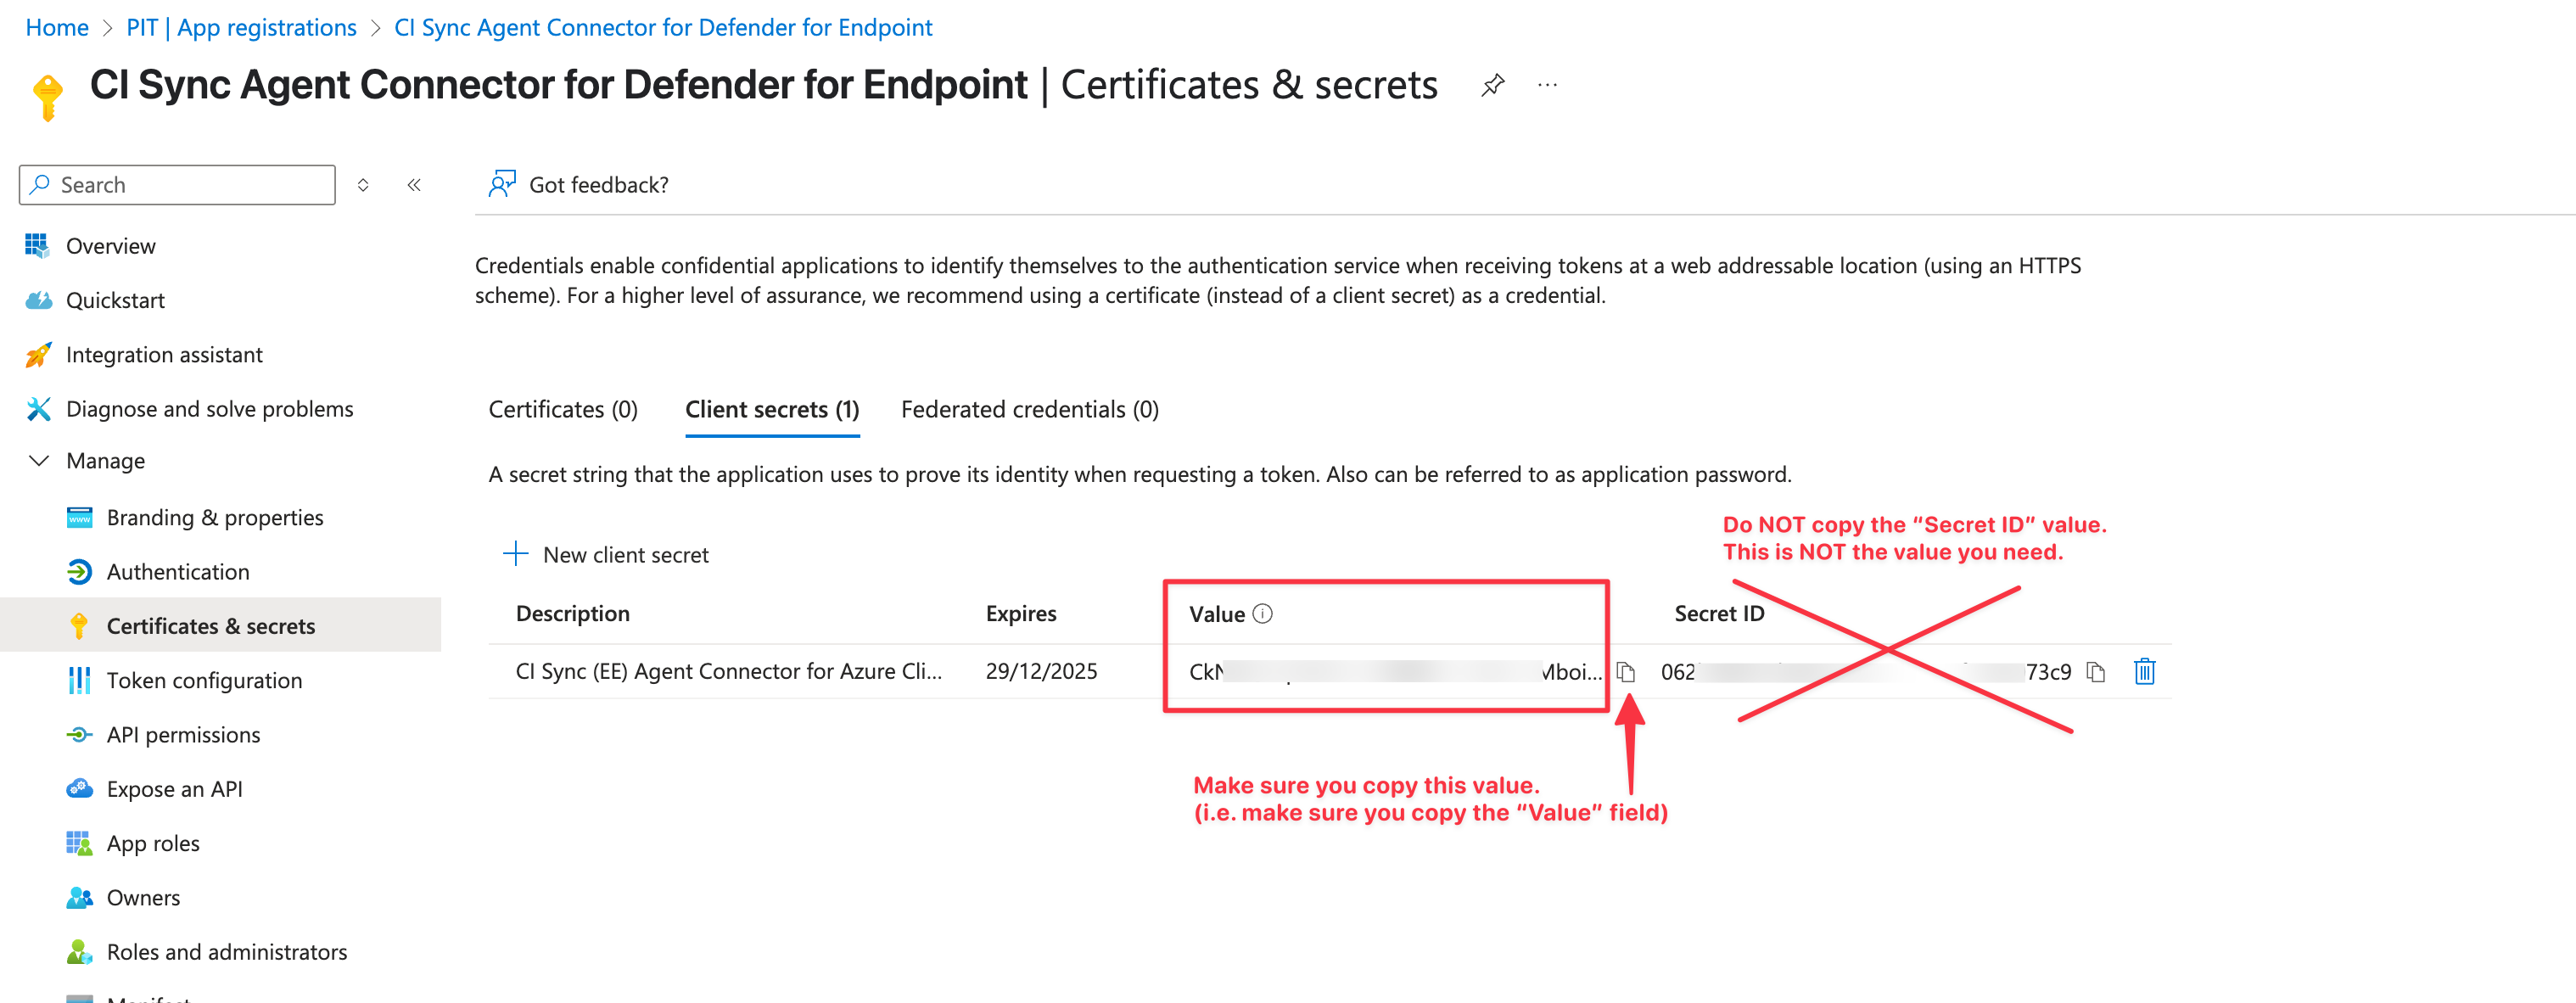
The form now displays the generated secret value (shown in the Value field)
-
Use the copy option to make a copy of the value in the Value field.
-
Data Capture Note
-
The Value is only available while you remain on this screen. You must make a copy of the Value before leaving this form.
-
Make sure you copy the “Value” and NOT the “Secret ID”.
Make sure the secret stored securely and in a way that can be shared with the CI Sync Admin so they can use it when the follow the instructions later in this page.
-
Return to the Overview page for the App Registration.
-
Use the copy option to make a copy of the “Application (client) ID” GUID value and the “Directory (tenant) ID” GUID value.
-
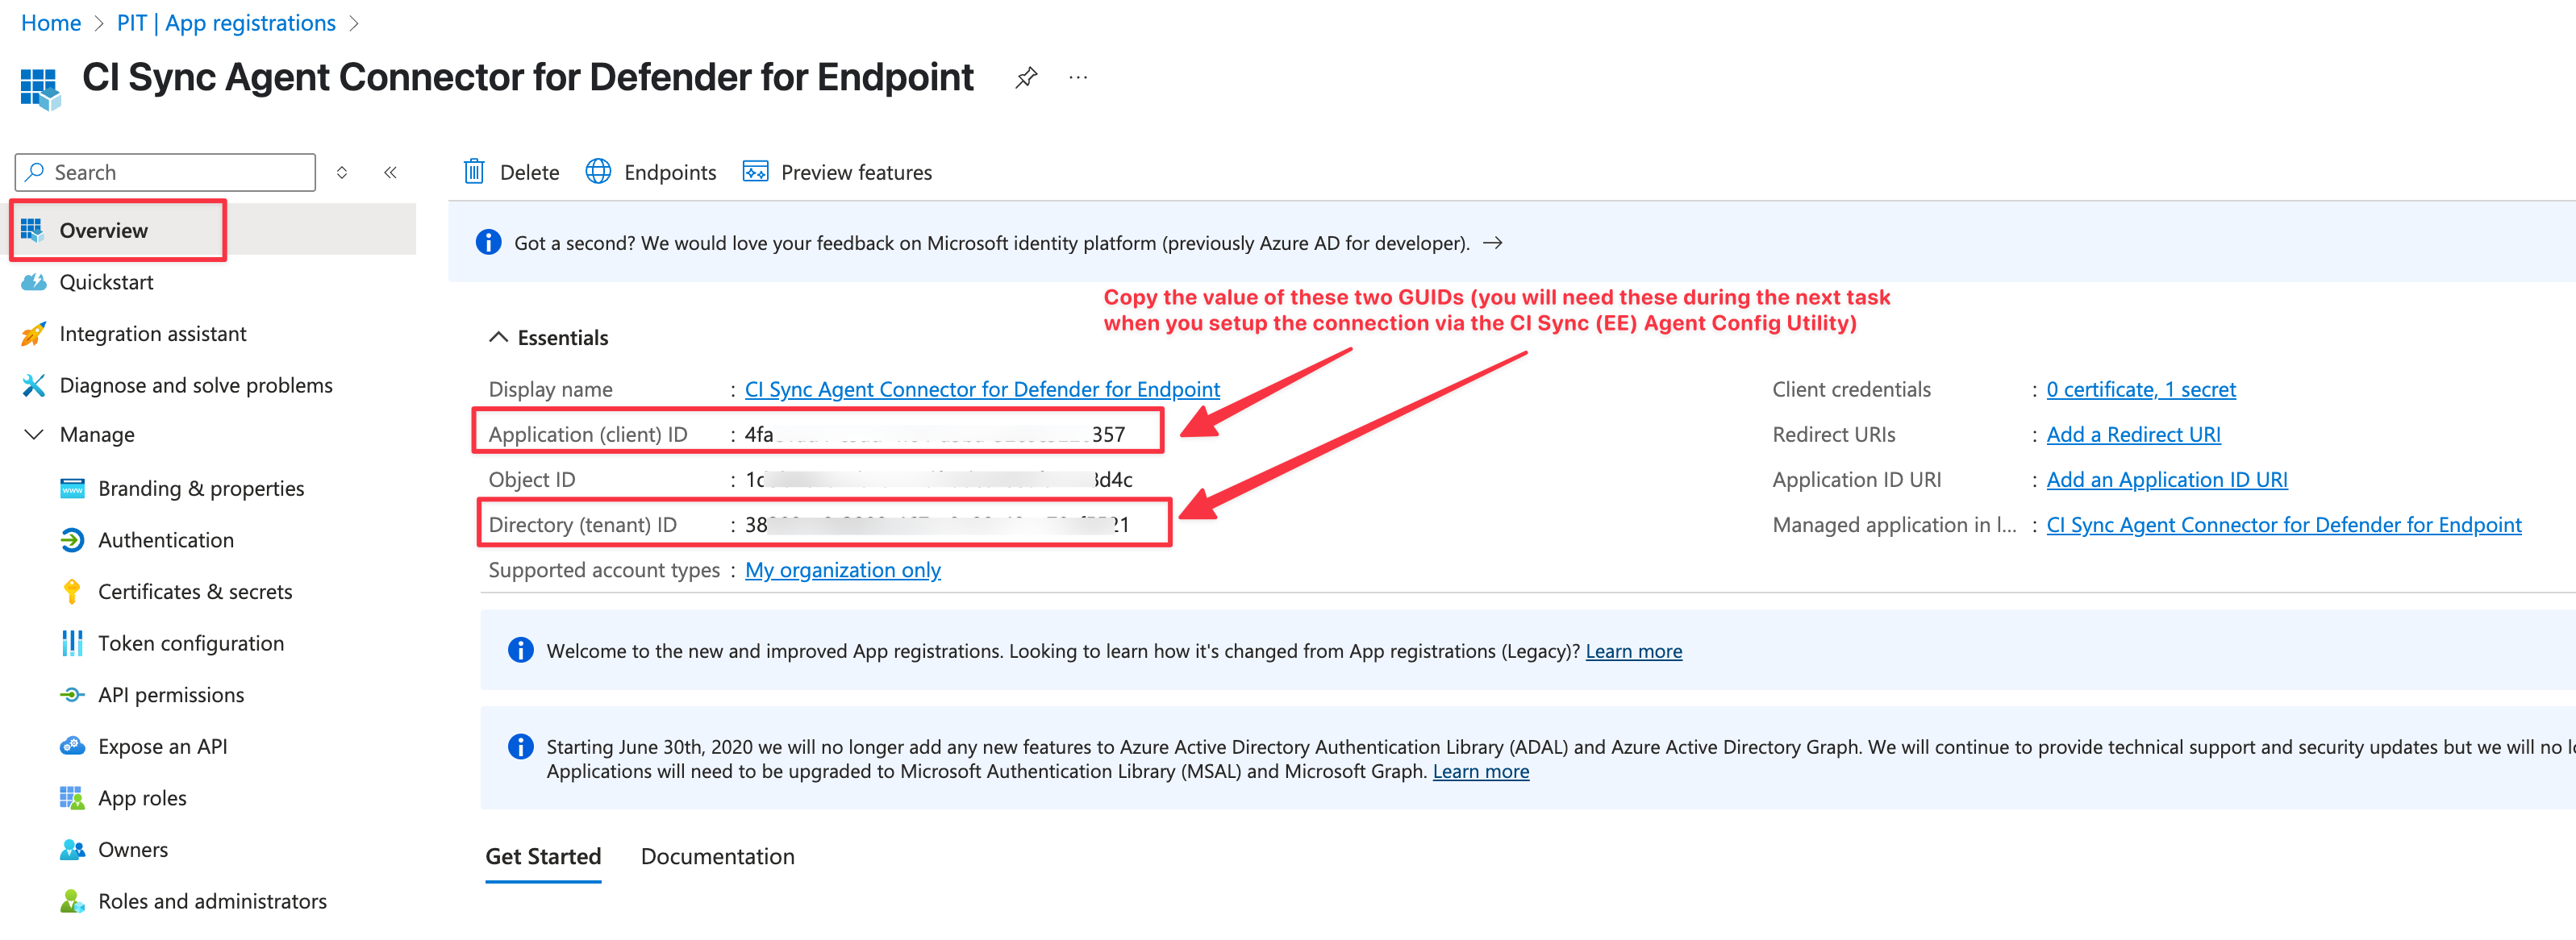
You have now granted the App Registration object (i.e. the CI Sync Agent Connector for Defender for Endpoint) read permissions to MS Defender for Endpoint which will allow you to use the CI Sync User Interface to schedule synchronization jobs using that same Defender for Endpoint as a synchronization source.
Data Capture Summary
As a reminder, you should have captured the following information when completing the above steps.
-
The Secret Value (from Step 14 above). This is the Client Secret value.
-
The Application (client) ID (from Step 15 directly above).
-
The Directory (tenant) ID (also from Step 15 directly above).
Make sure any secrets or sensitive information is stored securely and in a way that can be shared with the CI Sync Admin.
The above information will be needed by the CI Sync Admin when they follow the instructions in Task 3 further below.
Task 1b (Optional): Grant Additional Permissions to the App Registration to enrich Defender Device Data from Entra ID
The API for MS Defender for Endpoint returns limited attributes about each endpoint device.
For example, the API does not return Manufacturer or Model information for each device record.
To compensate for this, CI Sync provides an option to enrich the Defender device records with attribute data from Entra ID. Note: This only works for devices that are AAD enrolled.
If you wish to use this feature (i.e. to enable enrichment of device records from the device data stored in Entra ID) you must grant additional permissions to the App Registration created above in Task 1.
The instructions to grant the additional permissions are included below.
-
In the Azure Portal, navigate to Azure Active Directory -> App Registrations.
-
Locate the Application Registration created above in Task 1.
-
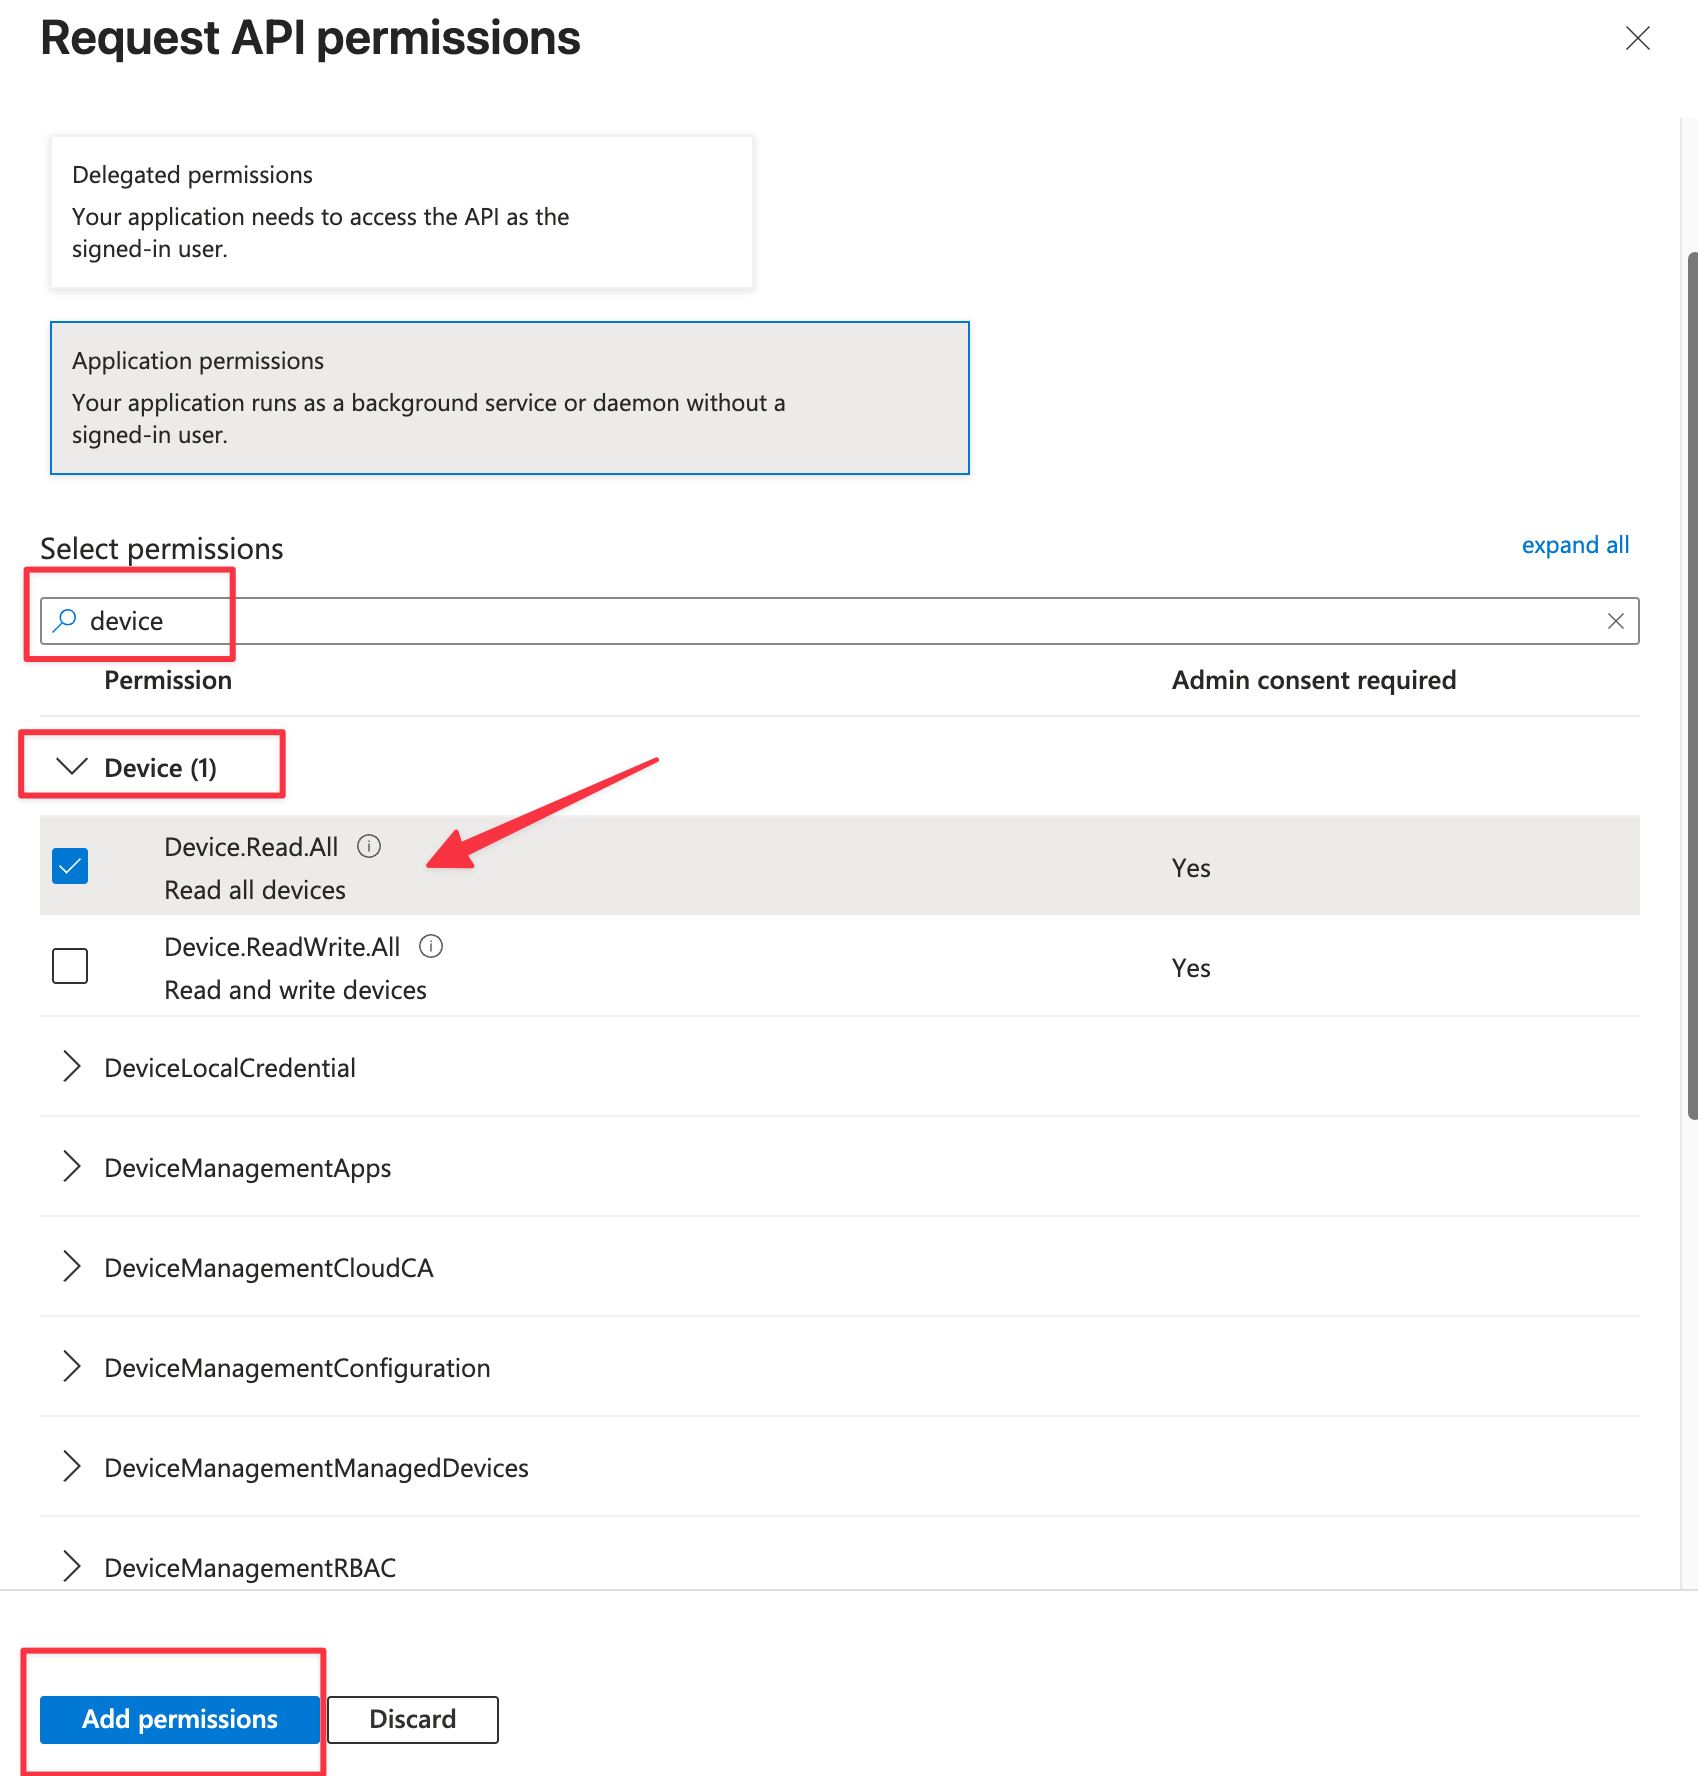
Navigate to API permissions, click Add Permission and click Microsoft Graph.
-
Click Application permissions
-
Locate the Device collection, and select Device.Read.All
-
Click the Add Permission button at the bottom of the page
-
On API Permissions page, Click Grant admin consent for {Your Domain Name}
Task 2: Understand the CI Sync RecVer Database
This “task” is solely about understanding the purpose of the CI Sync RecVer database and making decisions on where to host it and how the CI Sync Agent will authenticate to it.
You may also need to make a decision on which database technology to use for the RecVer Database. The CI Sync Agent supports both MS SQL and MongoDB for the RecVer database (however there are some restirctions on which database technology you can use depending on the source system itself).
Understanding the above topics and making the relevant decisions before you create the source system connection (via the CI Sync Agent Config Utility) will make it quicker/easier to execute the remaining tasks in this guide.
Task 3 (SQL): Create a Source System Connection using the CI Sync Agent Config Utility with a SQL RecVer DB
As explained in the Guidance Notes above there are two options to facilitate the creation of the RecVer database and assigning permissions to it for the CI Sync (Agent). The table below elaborates the two options.
|
Option |
Description |
Details |
|
MS SQL Setup Option 1 |
Automatically using the CI Sync Agent Config Utility |
|
|
MS SQL Setup Option 2 |
Manually via a SQL Database Administrator (DBA) |
|
Expand the instructions below for either Option 1 or Option 2.
Option 1: Use the Config Utility to automatically create the RecVer database
Expand the instructions below if your SQL DBA will manually setup the RecVer database (and set the required permissions to the RecVer SQL DB).
Click to expand the instructions to setup the source connection with a SQL RecVer using Option 1
-
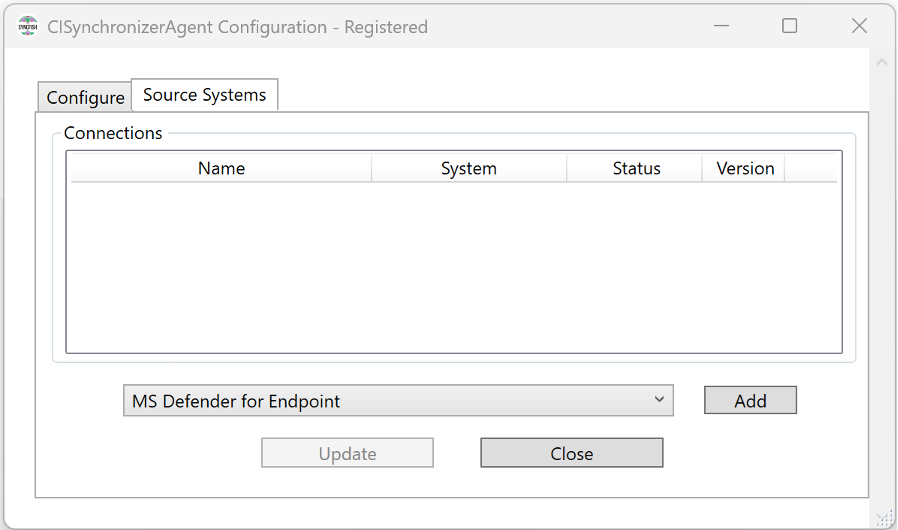
Run the “CISynchronizerAgent Config Utility” from the Windows Start Menu.
-
Within the CI Sync Agent Configuration Utility, navigate to the Source Systems tab, select MS Defender for Endpoint and click the Add button.

-
The “Add Connection” form is shown (specific to the source system).
-
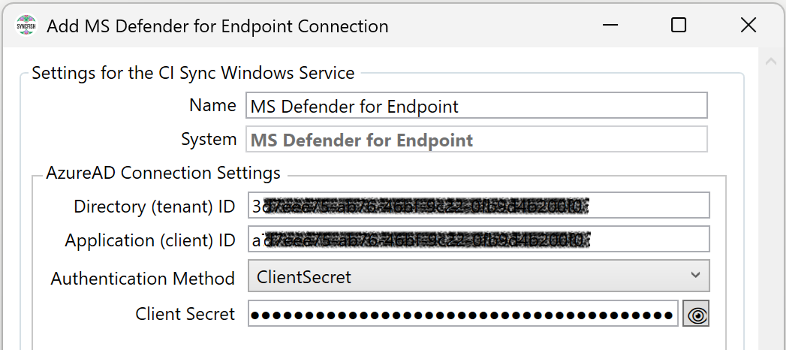
In the section titled “Settings for the CI Sync Windows Service” update the values as follows:
-
Name: Enter a friendly name that describes this source system connection.
-
Directory (tenant) ID: Enter the value you captured in the very first task at the top of this guide.
-
Application (client) ID: Enter the value you captured in the very first task at the top of this guide.
-
Authentication Method: ClientSecret.
-
Client Secret: Enter the value you captured in the very first task at the top of this guide.
-
For Certificate Authentication instructions skip to the Task 3 Supplement and then return here and continue setting up the source system in the CI Sync Agent.
-
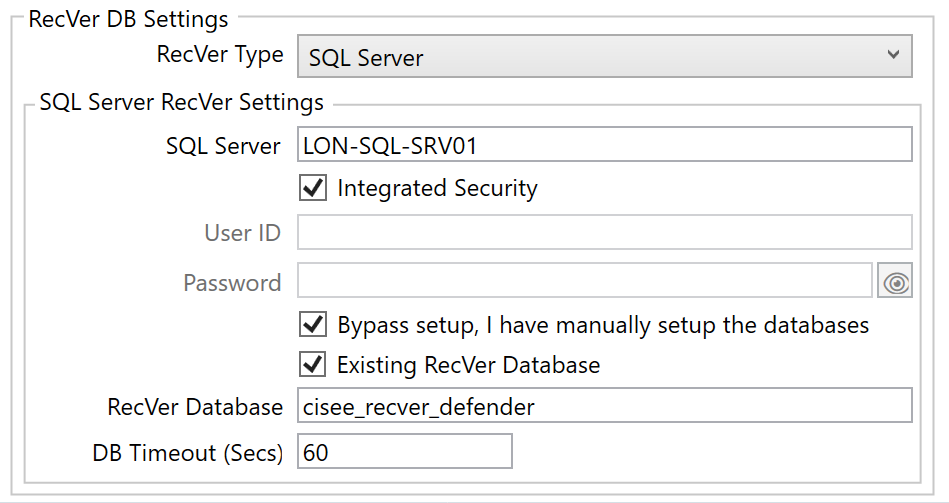
Move to section titled “RecVer DB Settings”
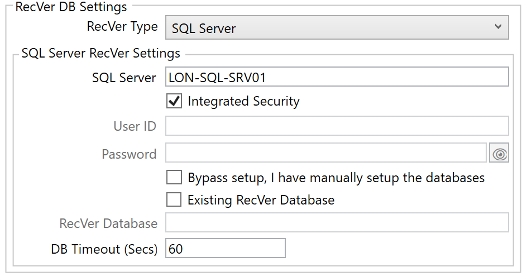
-
Update the “RecVer DB Settings” values as follows:
-
RecVer Type: Set this to SQL Server.
-
-
In the sub-section titled “SQL Server RecVer Settings” update the values as follows:
-
SQL Server: Enter the SQL Server path in the format: server\instance.
-
Integrated Security:
-
Check this checkbox if you want the CI Sync Agent to authenticate to the SQL Server using the Windows User Account you setup for the CI Sync Agent Windows Service (i.e. the account you setup in Task 1: Create Windows Service Account for the CI Sync Agent to use during S4 - Install the On-Prem Multi-Source Agent.
-
Otherwise, uncheck this checkbox and enter the User ID and Password for a Native SQL Login provided to you by the DBA. (Note: Syncfish do not recommend the SQL Login have sysadmin rights).
Note: These authentication settings control how the CI Sync Agent Windows Service authenticates with your SQL Server during ongoing operation of the agent (I.e. when sync jobs are running).
-
-
Bypass setup, I have manually setup the databases: Do NOT check this checkbox (because the Config Utility will be creating the RecVer database for you).
-
Existing RecVer Database: Do NOT check this checkbox (as the Config Utility will create the RecVer database for you).
Note: These RecVer tick boxes (Bypass setup and Existing RecVer) control whether the CI Sync Config UI initiates the setup of the RecVer database (or not if your DBA is doing the SQL setup manually). -
RecVer Database: Greyed out so can be ignored.
-
DB Timeout (Secs): Sets the connection and statement execution timeouts. Syncfish recommend 60.
-
-
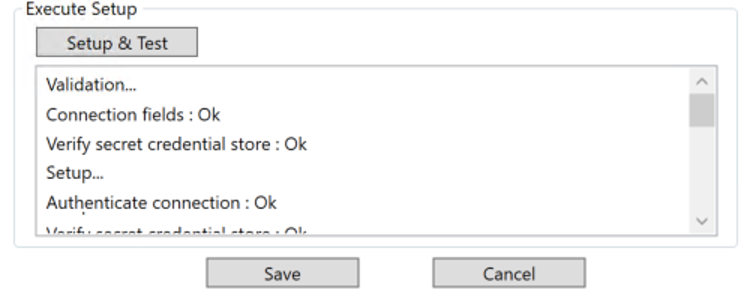
Locate the “Setup & Test” button
-
Do the following:
-
Click the “Setup & Test” button.
-
When the button “Setup & Test” is pressed, the CI Configuration utility will prompt if the user running the utility wants to use Integrated Security or SQL Server security to perform the automated SQL setup and configuration steps.
-
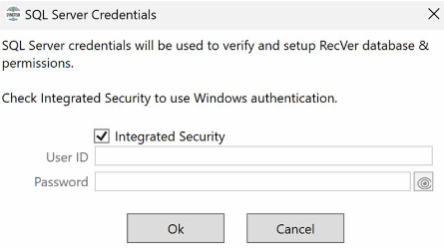
Informational Note
-
The above values do not control the ongoing running of the CI Sync Agent, they are solely used by the CI Sync Config UI to perform the RecVer setup.
-
The user will be required to have admin role in SQL Server to be able to setup the RecVer
Guidance Notes
In the background the Config Utility performs the following SQL setup and configuration steps:
-
The utility creates a SQL Login for the Windows User Account you setup for the CI Sync Agent Windows Service if you selected “Integrated Security” in the section “Settings for the CI Sync Windows Service”, the Config Utility. Or, if instead you are using Native SQL Login (instead of “Integrated Security”) then Config Utility uses the Native SQL Login details you have supplied and performs the following step to grant the Login access to the relevant databases with the permissions noted below.
-
The utility creates the RecVer database, creates a SQL user in the RecVer database for the Login used by the CI Sync Agent and grants the SQL user the agent_role role.
Note: Depending on whether you selected “Integrated Security” or not, the SQL user is either (a) the Windows User/Service Account (created as a SQL Login in point 1 above) or (b) the native SQL login account.
Note: If you are using a Native SQL Login (not Integrated Security) with higher privileges than noted above (e.g. if the account had SQL sysadmin) then the Config Utility will not be able to set the SQL roles noted above. Instead, the Config Utility will not touch the permissions and instead will leave the existing/higher privileges as is. This is not required and not recommended by Syncfish.
-
If all is setup correctly you will see “Ok” against each of the setup tasks. If you see errors recheck the values you entered on the form.
-
After a successful test has been completed, click the Save button.
-
Finally, click Yes to register this new connection (via your CI Sync Agent) with your customer specific CI Sync SaaS instance.

-
Assuming no errors you will see a confirmation message. Click OK and the new connection will appear in the Connections List of the CI Sync Agent.
-
You have now completed the setup of the source connection in the CI Sync Configuration Utility and registered it as a source connection in the CI Sync SaaS application.
Option 2: Use your SQL Database Administrator (DBA) to manually create the RecVer database in advance
Expand the instructions below if your SQL DBA will manually setup the RecVer database (and set the required permissions to the RecVer SQL DB).
Click to expand the instructions to setup the source connection with a SQL RecVer using Option 2
-
Ask you SQL DBA to perform the tasks listed in the table below.
|
Task |
DBA Task (in SQL Server) |
Additional Notes |
|
Task 1 |
Either register a Login (which represents the Windows User Account used by the CI Sync Agent Windows Service) Or create a SQL Login (for the CI Sync Agent to use). |
If you are using Windows “Integrated Security” between the CI Sync Agent and the SQL Server, then the CI Sync Agent Windows Service account needs to be registered within SQL Server as a Login. Note: The CI Sync Agent Windows Service account you setup in Task 1: Create Windows Service Account for the CI Sync Agent to use during S4 - Install the On-Prem Multi-Source Agent. Alternatively, if you are using Native SQL authentication between the CI Sync Agent and the SQL Server, then a Login will need to be created. In this case your DBA will need to provide you with the SQL User ID and password details so you can enter them into the Config Utility UI as explained further below. |
|
Task 2 |
Edit then Execute the SQL Create Script provided by Syncfish located here. The script creates the Syncfish RecVer database. The script is: cisee-recver-create-script.sql |
Notes for the DBA when running the script:
To run the setup script using the sqlcmd utility, the recver_database_name parameter needs to be passed in using the -v switch:
Or, if running the script in SSMS, the value $(recver_database_name) (including the $ and brackets) needs to be replaced in the .sql file with the name for the recver database. The DBA may notice the script includes has a placeholder called $(source_database_name) which is only required when Lansweeper is the source system. This placeholder can be ignored for all other (non-Lansweeper) source systems. |
|
Task 3 |
Edit then Execute the SQL Upgrade Script provided by Syncfish located here. The script creates the Syncfish RecVer database. The script is: cisee-recver-upgrade-script-3.1.1.sql |
Notes for the DBA when running the script:
To run the setup script using the sqlcmd utility, the database_name parameter needs to be passed in using the -v switch: > sqlcmd -I -S localhost -v recver_database_name=" cisee_recver_defender" -i "cisee-recver-upgrade-script-3.1.1.sql" Or, if running the script in SSMS, the value $(recver_database_name) (including the $ and brackets) needs to be replaced with the name for the recver database. |
|
Task 4 |
Map the Login as a user in the RecVer database and grant the user the role_agent role. |
Map the user and grant the role to the RecVer database created by the SQL script above. |
Once your DBA has completed the steps in the table above, use the CI Sync Agent Configuration Utility to setup the source connection and pointing to the RecVer database created by the DBA. See below for instructions on using the CI Sync Agent Configuration Utility.
-
Run the “CISynchronizerAgent Config Utility” from the Windows Start Menu.
-
Within the CI Sync Agent Configuration Utility, navigate to the Source Systems tab, select MS Defender for Endpoint and click the Add button.
-
The “Add Connection” form is shown (specific to the source system).
-
In the section titled “Settings for the CI Sync Windows Service” update the values as follows:
-
Name: Enter a friendly name that describes this source system connection.
-
Directory (tenant) ID: Enter the value you captured in the very first task at the top of this guide.
-
Application (client) ID: Enter the value you captured in the very first task at the top of this guide.
-
Authentication Method: ClientSecret.
-
Client Secret: Enter the value you captured in the very first task at the top of this guide.
-
For Certificate Authentication instructions skip to the Task 3 Supplement and then return here and continue setting up the source system in the CI Sync Agent.
-
Move to section titled “RecVer DB Settings”
-
Update the “RecVer DB Settings” values as follows:
-
RecVer Type: Set this to SQL Server.
-
-
In the sub-section titled “SQL Server RecVer Settings” update the values as follows:
-
SQL Server: Enter the SQL Server path in the format: server\instance.
-
Integrated Security:
-
Check this checkbox if you want the CI Sync Agent to authenticate to the SQL Server using the Windows User Account you setup for the CI Sync Agent Windows Service (i.e. the account you setup in Task 1: Create Windows Service Account for the CI Sync Agent to use during S4 - Install the On-Prem Multi-Source Agent.
-
Otherwise, uncheck this checkbox and enter the User ID and Password for a Native SQL Login provided to you by the DBA. (Note: Syncfish do not recommend the SQL Login have sysadmin rights).
Note: These authentication settings control how the CI Sync Agent Windows Service authenticates with your SQL Server during ongoing operation of the agent (I.e. when sync jobs are running).
-
-
Bypass setup, I have manually setup the databases: Check this checkbox (because your SQL DBA has already manually created the RecVer database and set the relevant permissions for you).
-
Existing RecVer Database: Check this checkbox (because your SQL DBA has already manually created the RecVer database for you
Note: These RecVer tick boxes (Bypass setup and Existing RecVer) control whether the CI Sync Config UI initiates the setup of the RecVer database (or not if your DBA is doing the SQL setup manually). -
RecVer Database: Enter the name of the RecVer database your DBA created. If your DBA used the suggested name (described on the previous page) it will be called cisee_recver_defender.
-
DB Timeout (Secs): Sets the connection and statement execution timeouts. Syncfish recommend 60.
-
-
Locate the “Setup & Test” button
-
Do the following:
-
Click the “Setup & Test” button.
-
If all is setup correctly you will see “Ok” against each of the setup tasks. If you see errors recheck the values you entered on the form.
-
-
After a successful test has been completed, click the Save button.
-
Finally, click Yes to register this new connection (via your CI Sync Agent) with your customer specific CI Sync SaaS instance.
-
Assuming no errors you will see a confirmation message. Click OK and the new connection will appear in the Connections List of the CI Sync Agent.
-
You have now completed the setup of the source connection in the CI Sync Configuration Utility and registered it as a source connection in the CI Sync SaaS application.
Task 3 (Mongo): Or, Create a Source System Connection using the CI Sync Agent Config Utility with a MongoDB RecVer DB (if supported)
This task is not applicable because CI Sync does not support a Mongodb RecVer DB for the source system covered by this guide.
Task 3 (Optional): Supplementary Instructions for Certificate Based Authentication
Click to expand the instructions on setting up Certificate Based Authentication in the CI Sync Agent
Some source systems support Certificate authentication for the authentication principal created in the first step of this guide. In this case, you can configure the CI Sync Agent to use Certificate based authentication rather than Client Secret.
The screen shot/s and instructions below explain how to configure the CI Sync Agent for Certificate Authentication for a given source system. Once you have completed these steps jump back to the relevant task above to finish the steps for setting up your source system connection in the CI Sync Agent Config Utility.
The instructions below replace the Client Secret screen shots and instructions provided in the tasks above. You do NOT need to following the instructions below if you have decided to use Client Secret authentication between the CI Sync Agent and the source system.
Part A - Import your certificate to the Windows Certificate Store on the VM running the CI Sync Agent.
Guidance Notes
-
These instructions assume the organization has a certificate management solution in place and the certificate related to this activity is available to the Windows Server being used to install/run the CI Sync Agent (i.e. the Windows Service).
-
The Digital Certificate itself is the provided to you by the person who created the certificate based authentication principle during the first step of this guide.
-
When importing the certificate, it is recommended you import to the Local Machine Certificate Store. If you import it to the Current User you will almost certainly strike errors when the CI Sync Agent user account (i.e. the user account used by the Windows Service) tries to access the certificate.
-
Only consider importing to the Current User Certificate if you are running the CI Sync Config Utility with “Run As” in the context of the CI Sync Agent user account (i.e. the user account used by the Windows Service).
-
Import the Digital Certificate into the Windows Local Machine Certificate Store. It is recommended you do not import into the Current User Certificate Store (see Guidance Notes above).
-
Ensure the CI Sync Agent user account (i.e. the user account used by the Windows Service) has sufficient permissions to read the Digital Certificate you imported. The following steps explain how to check/set the right permissions.
-
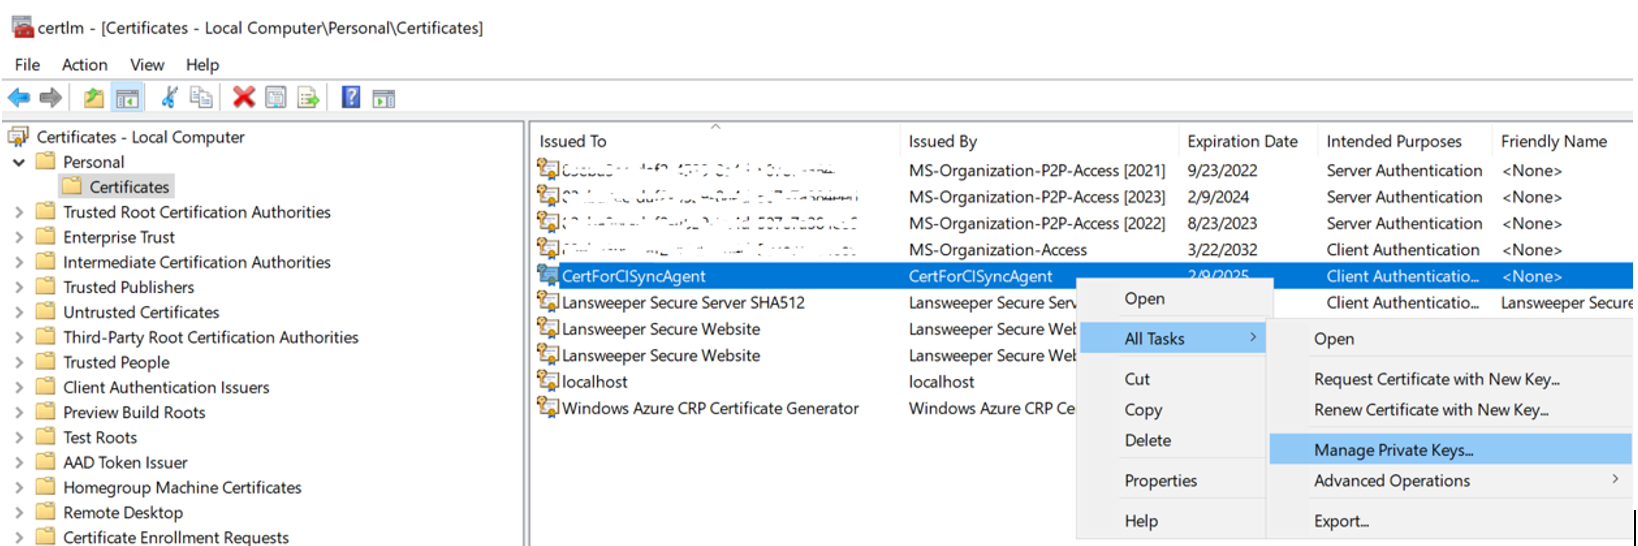
Open Microsoft Management Console.
-
Navigate to Certificates - Local Computer → Personal → Certificates
-
Right-click on the relevant certificate (the one you imported) and select All Tasks → Manage Private Keys
-
On the permissions window, click the Add button.
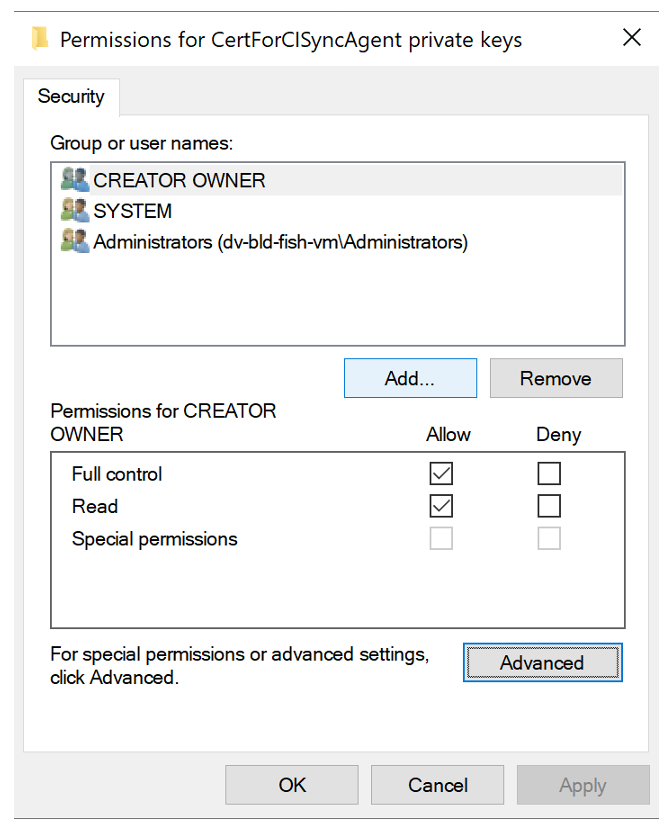
-
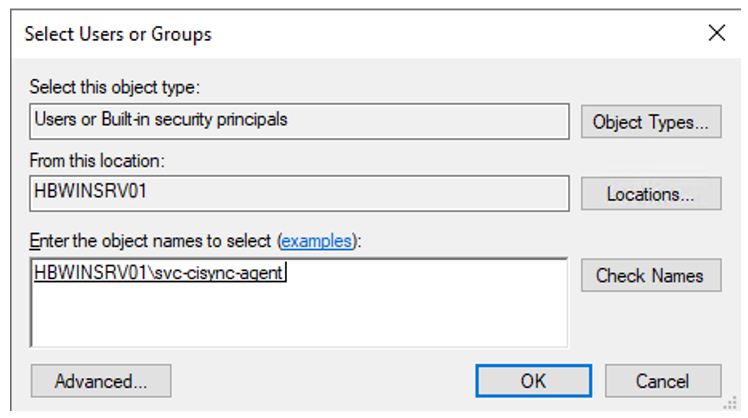
Search for Users, locate the CI Sync Agent User (e.g. svc-cisync-agent), press Check Names, then press the OK button.
-
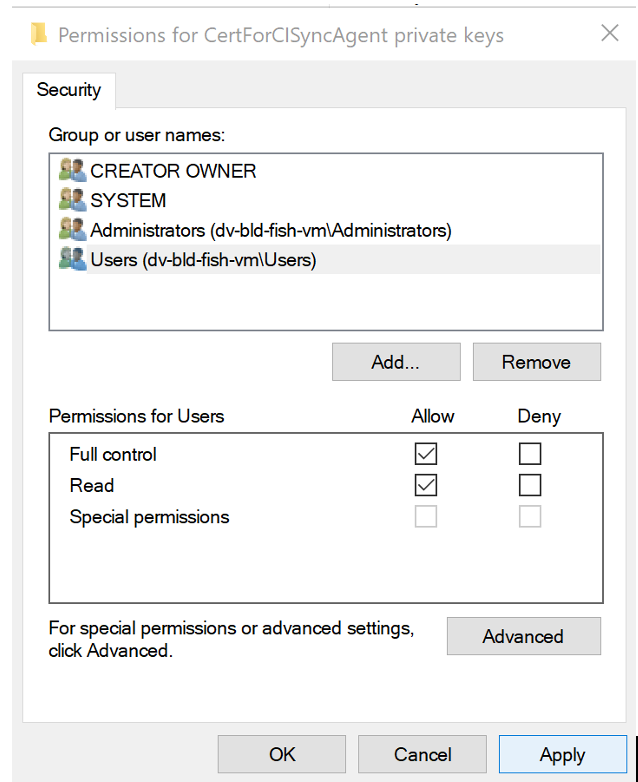
Back on the permissions window, make sure Full control and Read are ticked. Then click Apply and then Ok.
Part B - Use the CI Sync Agent Config Utility to Reference the Imported Certificate
-
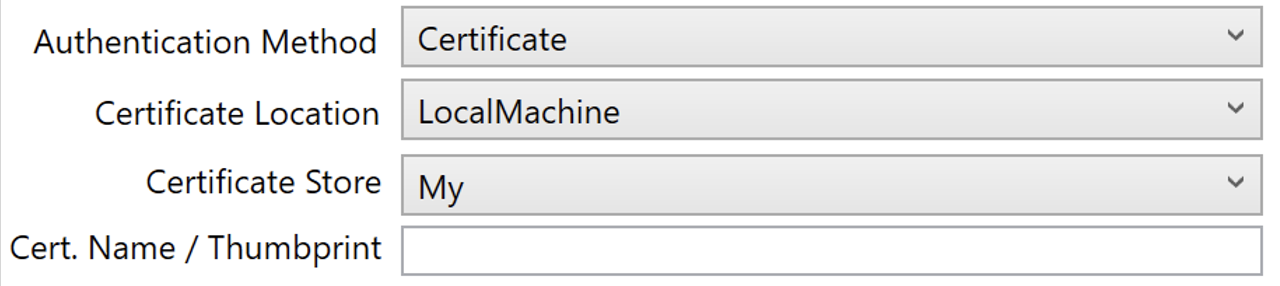
Using the CI Sync Agent Configuration Utility, use the drop down list to set the Authentication Method to Certificate in the Connection Settings section of the Add Connection form.
-
Set the Certificate Location using the following instructions:
-
The options are as follows (these are the standard values provided by Microsoft):
-
LocalMachine
-
CurrentUser
-
-
Syncfish Recommendation:
-
It is strongly recommended you use LocalMachine, as the current user account (the person installing/running the CI Sync Agent Config Utility) is not the same as the CI Sync Agent user account (i.e. the user account used by the Windows Service).
-
If you have saved the certificate in the CurrentUser context, rather than the LocalMachine context (of the Windows Certificate Store) it will cause an error when the CI Sync Agent user account (i.e. the user account used by the Windows Service) tries (and fails) to read the certificate from the Windows Certificate Store.
-
-
-
Set the Certificate Store using the following instructions:
-
The options are as follows (these are a standard values provided by the Microsoft and correspond to the folders in the Windows certificate store):
-
AddressBook
-
AuthRoot
-
CertificateAuthority
-
My
-
Root
-
TrustedPeople
-
TrustedPublisher
-
-
Syncfish Recommendation: It is recommended this value be set to the “My” store (this translates to the “Personal/Certificates” path in the Windows Certificate Store).
-
-
Enter the Certificate Name / Thumbprint value: Enter the subject of the certificate related to the authentication principal created in the first step of this guide.
-
Finally, jump back to the relevant task above to finish the steps for setting up your source system connection in the CI Sync Agent Config Utility.
Setting up certificate based authentication can be somewhat fiddly to get right. Syncfish have published a number of troubleshooting articles in our knowledge base. Search for “certificate” in our support portal at https://support.syncfish.com.au .
Task 4: Finalise Settings in the CI Sync SaaS UI
-
Login to your CI Sync SaaS instance at https://YourCo.syncfish.app
-
In the CI Sync UI, navigate to Settings > Connections.
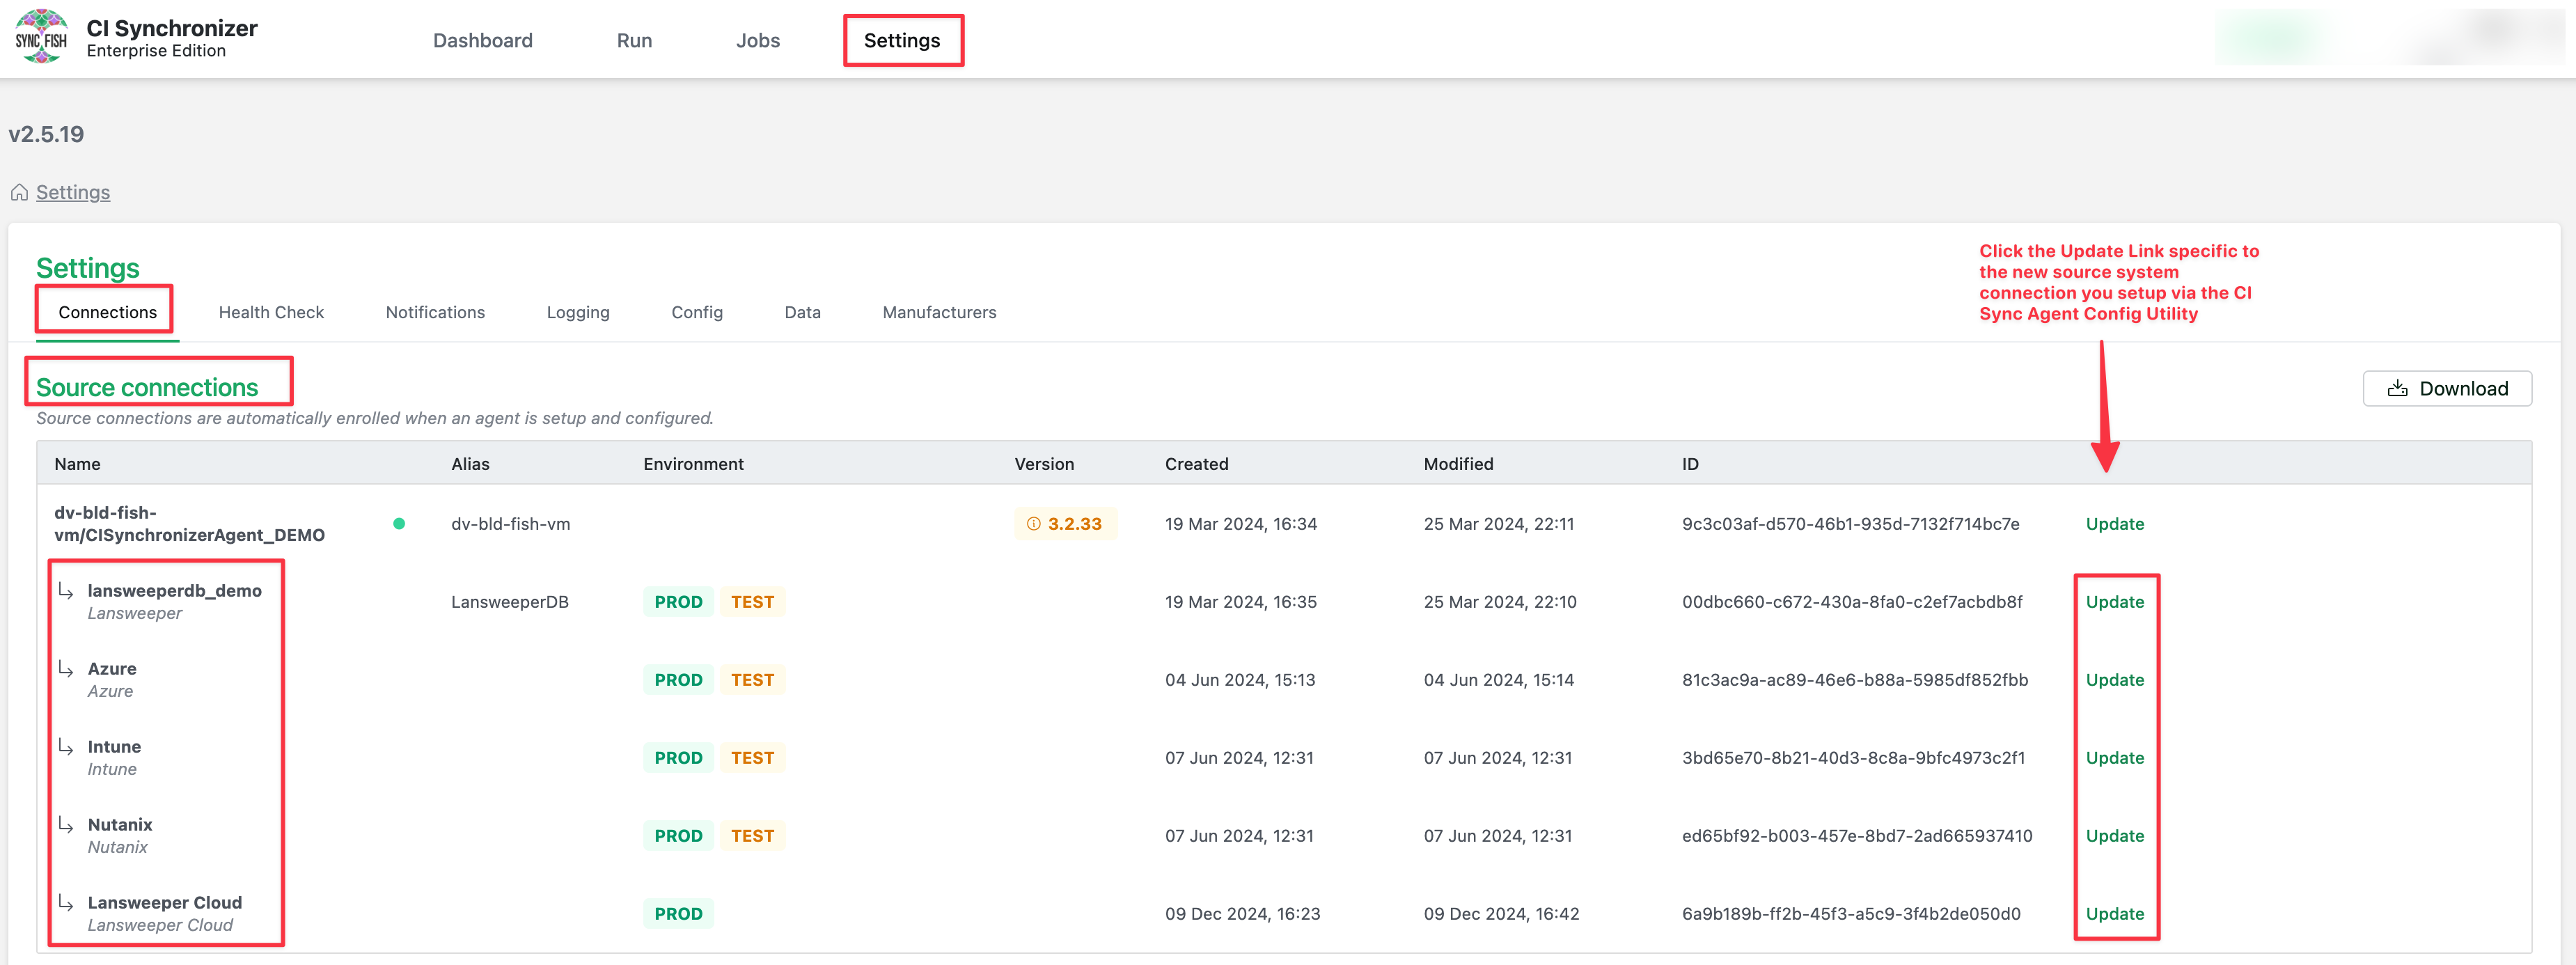
-
Find the new source system connection you just added in the list of Source Connections (the screen shot above is a sample only).
-
Find your specific Source System Connection in the list and click the Update hyperlink (on the right hand side of the screen).
-
The connection Settings Form is presented. Update as follows:
-
Enter an Alias (optional) - the alias is only used in the CI Sync SaaS UI to show a friendly name in various UI forms.
-
Set the Environment/s the new source connection can be used for.
-
In most cases a Source System Connection is used for both Test and Production sync jobs (as distinct from the Destination Connections which can only be either Test or Production).
-
The Environment value is used to filter the connections dropdown list when you are creating a sync job.
-
-

-
While you are on this page you can/should check whether there are any connection specific settings you may want to adjust either now or at some point in the future. Connection specific settings (or just Connection Settings) allow you to override the default data sync rules for your CI Sync instance.
-
Read the following details to understand more about CI Sync Connection Settings:
-
Scroll further down to the Additional Settings section on the page to see any available Connection Settings. Below is an example of the sorts of settings you might notice.
-
The settings are specific to each source connection so the screen shot is an example only.
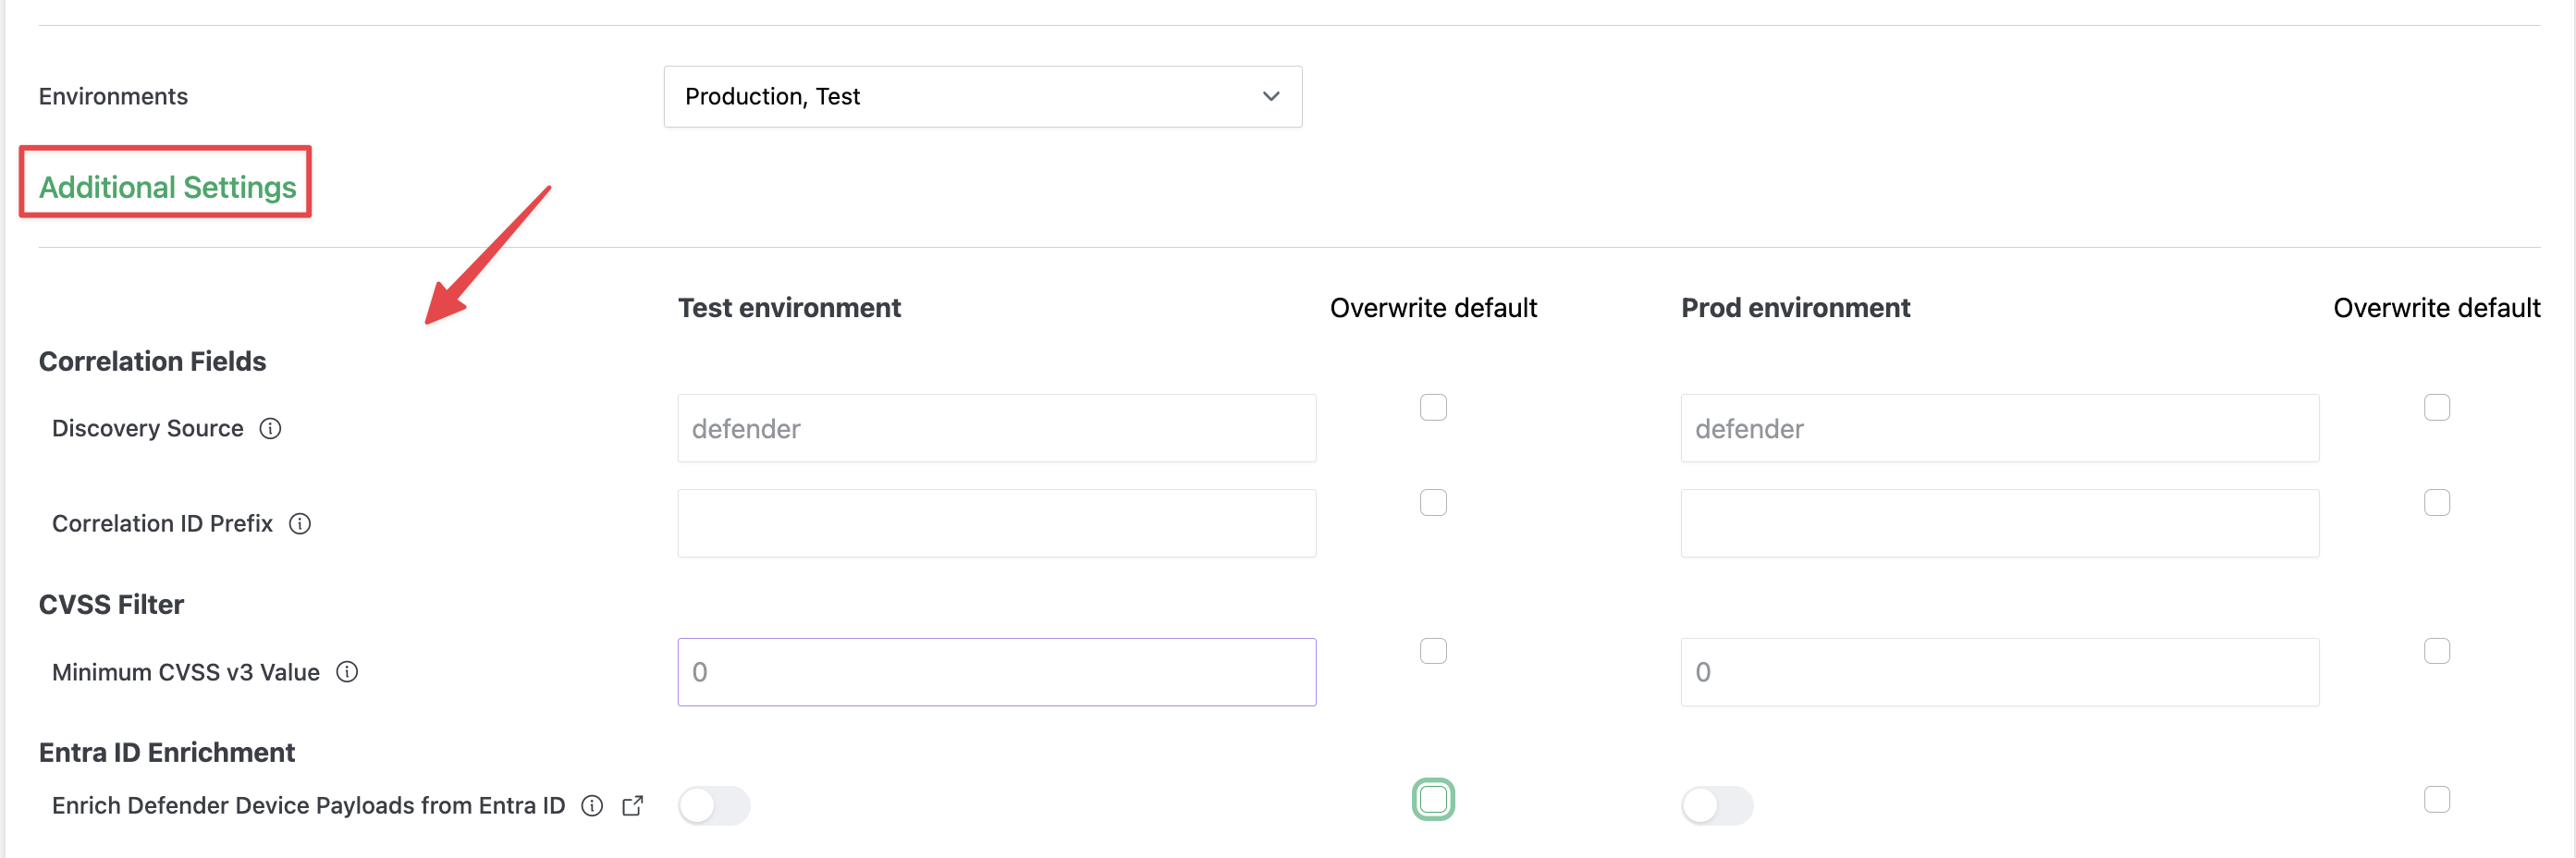
-
Syncfish recommend you read the following documentation before overriding any of the default settings:
-
Read the CI SyncDefault Configuration Guides. The pages in that tree provide comprehensive information about the default behaviour of the CI Sync data sync rules, the options available for overriding those rules and typical reasons why you might want to do this.
-
Read Understanding the use of CI Sync Connection Settings. This page explains how the Connection Settings should be used, how to modify settings via the CI Sync UI and how to test any setting changes in non-production prior to production.
-
-
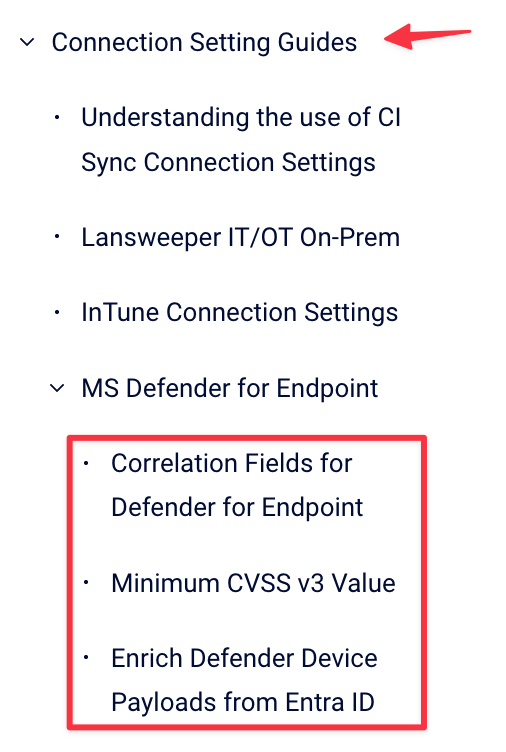
Finally, if you are ready to modify any of the Connection Settings, visit Connection Setting Guides and locate the specific Source System page/s in that tree. The individual pages in that tree provide detailed information about each setting.
-
-
After making any changes on this page, scroll to the bottom of the page, Check the consent checkbox and Click the Save connection button.
You have now completed all tasks to add your new Source Connection in the CI Sync Agent.
Please do one of the following:
-
Either add any additional source connections (using the relevant pages under Add Source Systems to On-Prem Agent)
-
Or if you haven’t do so already, then follow the instructions inS6 - Configure your ServiceNow for CI Sync.
Task 5: Perform Updates in ServiceNow (if required)
Guidance Note
Syncfish recommend the person setting up the source system described in this guide discusses this particular task with their ServiceNow system administrator.
A ServiceNow administrator will need to perform these steps.
Syncfish recommend following these instructions in your non-production ServiceNow environment for testing synchronizations jobs.
Only once exhaustive testing in non-production is complete, repeat this process in your ServiceNow production environment.
Context
CI Sync synchronizes IT assets including their installed software with known CVEs from Defender for Endpoint.
CI Sync relies upon two custom tables in ServiceNow.
-
One table is used to store the CVE records.
-
A second table stores the link between CIs and the CVEs.
Syncfish provides a ServiceNow updateset to prepare your ServiceNow instance for CI Sync. The updateset does the following:
-
Creates the custom tables mentioned above.
-
Applies the ACL on the custom tables and assigns the ACL to the ServiceNow role called “Asset” (which is one of the roles granted to the CI Sync Integration Account created during S6 - Configure your ServiceNow for CI Sync).
Task Steps
Follow these steps to apply the updateset provided by Syncfish:
-
Download the update set from Syncfish at the below URL: https://downloads.syncfish.app/servicenow/cisync-cmdb-vulnerabilities.xml
-
Login to your ServiceNow instance with Admin permissions.
-
Open a browser and navigate to your ServiceNow instance
-
In the left nav menu search for “Retrieved Update Sets” and click to open
-
Right click on the column heading row and select “Import XML”
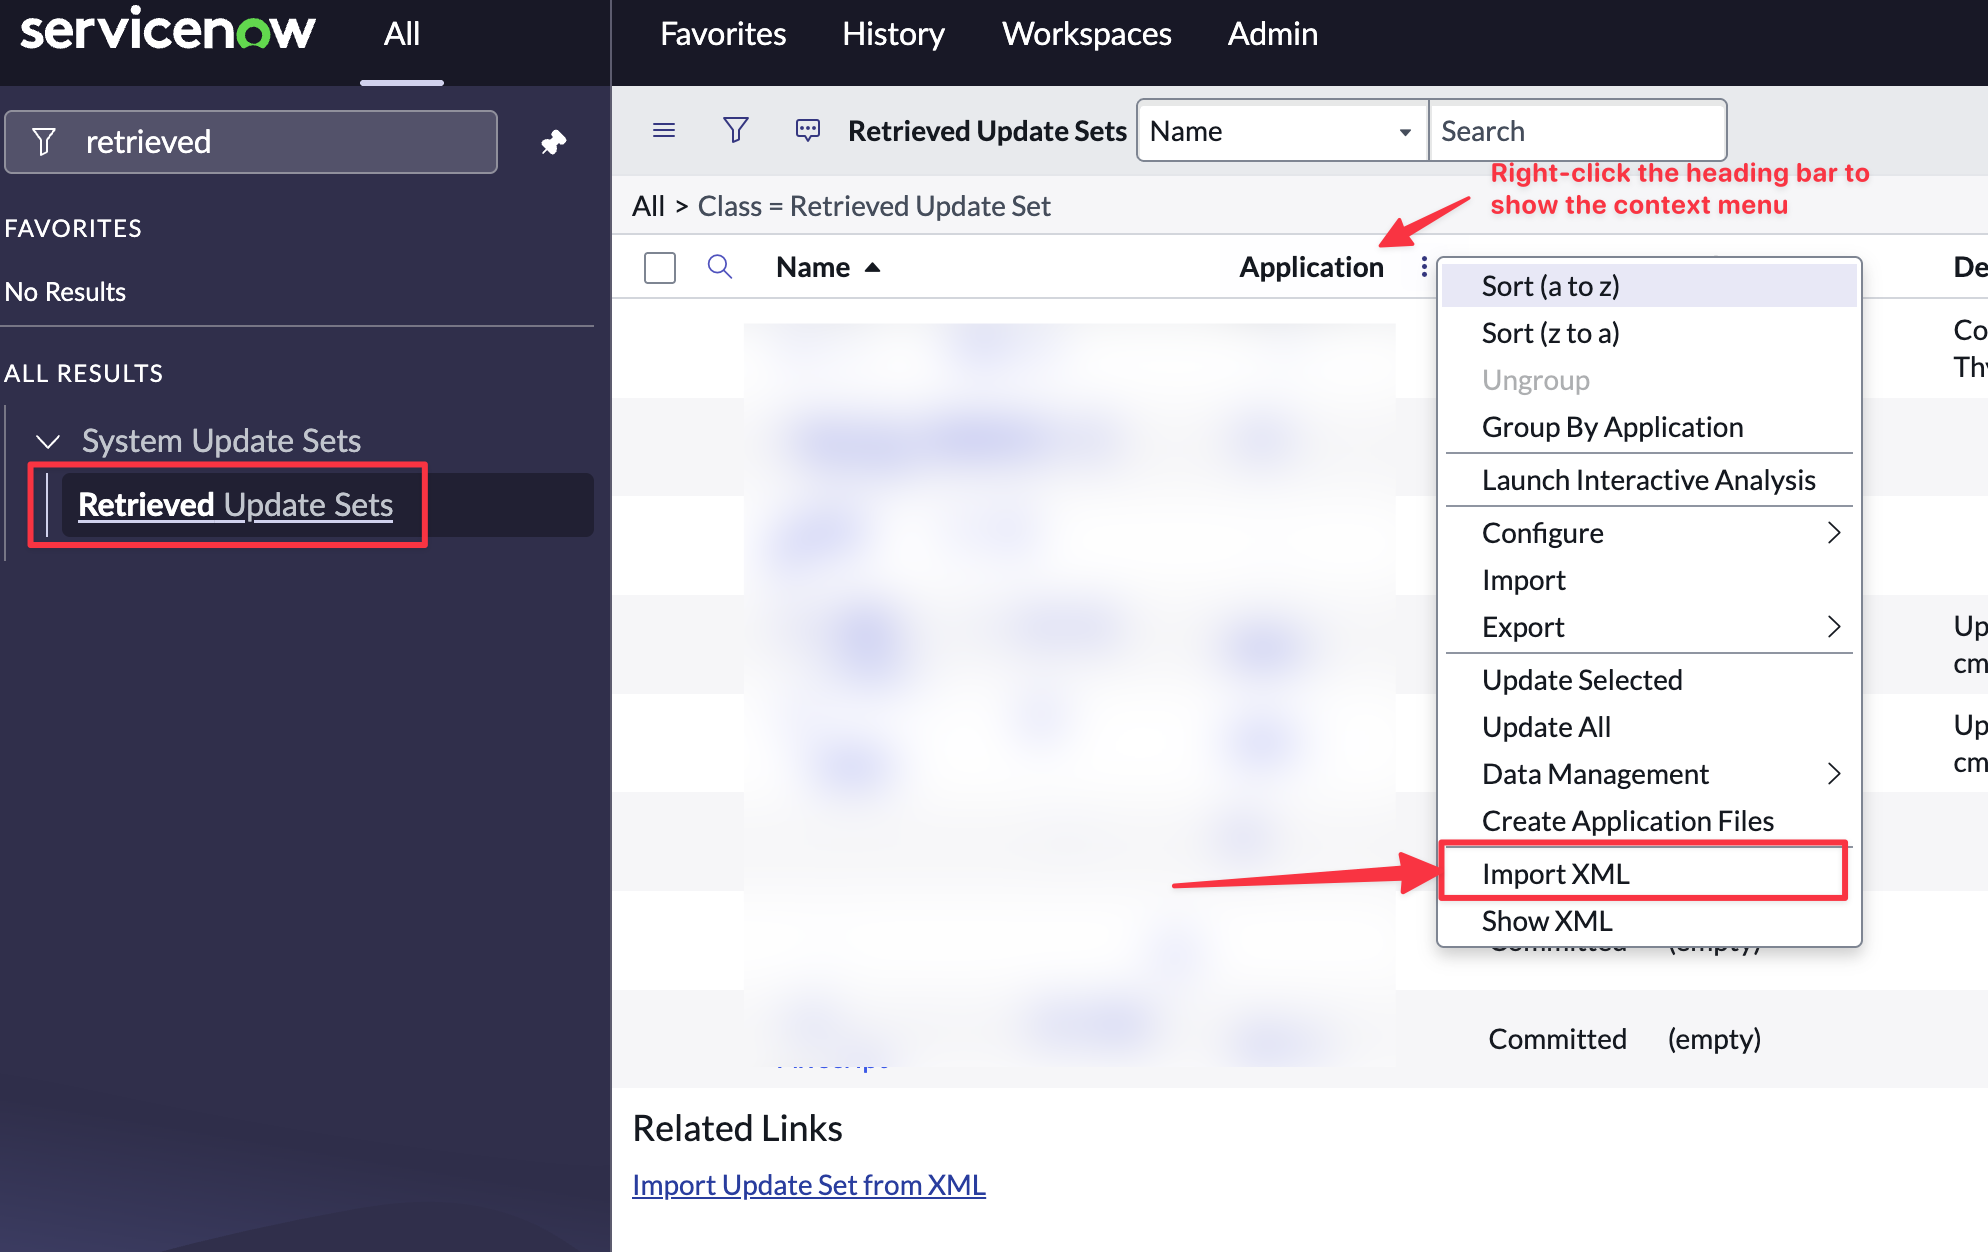
-
Select “Choose File”
-
Select the downloaded file “cisync-cmdb-vulnerabilities.xml”
-
Click to open the Update Set
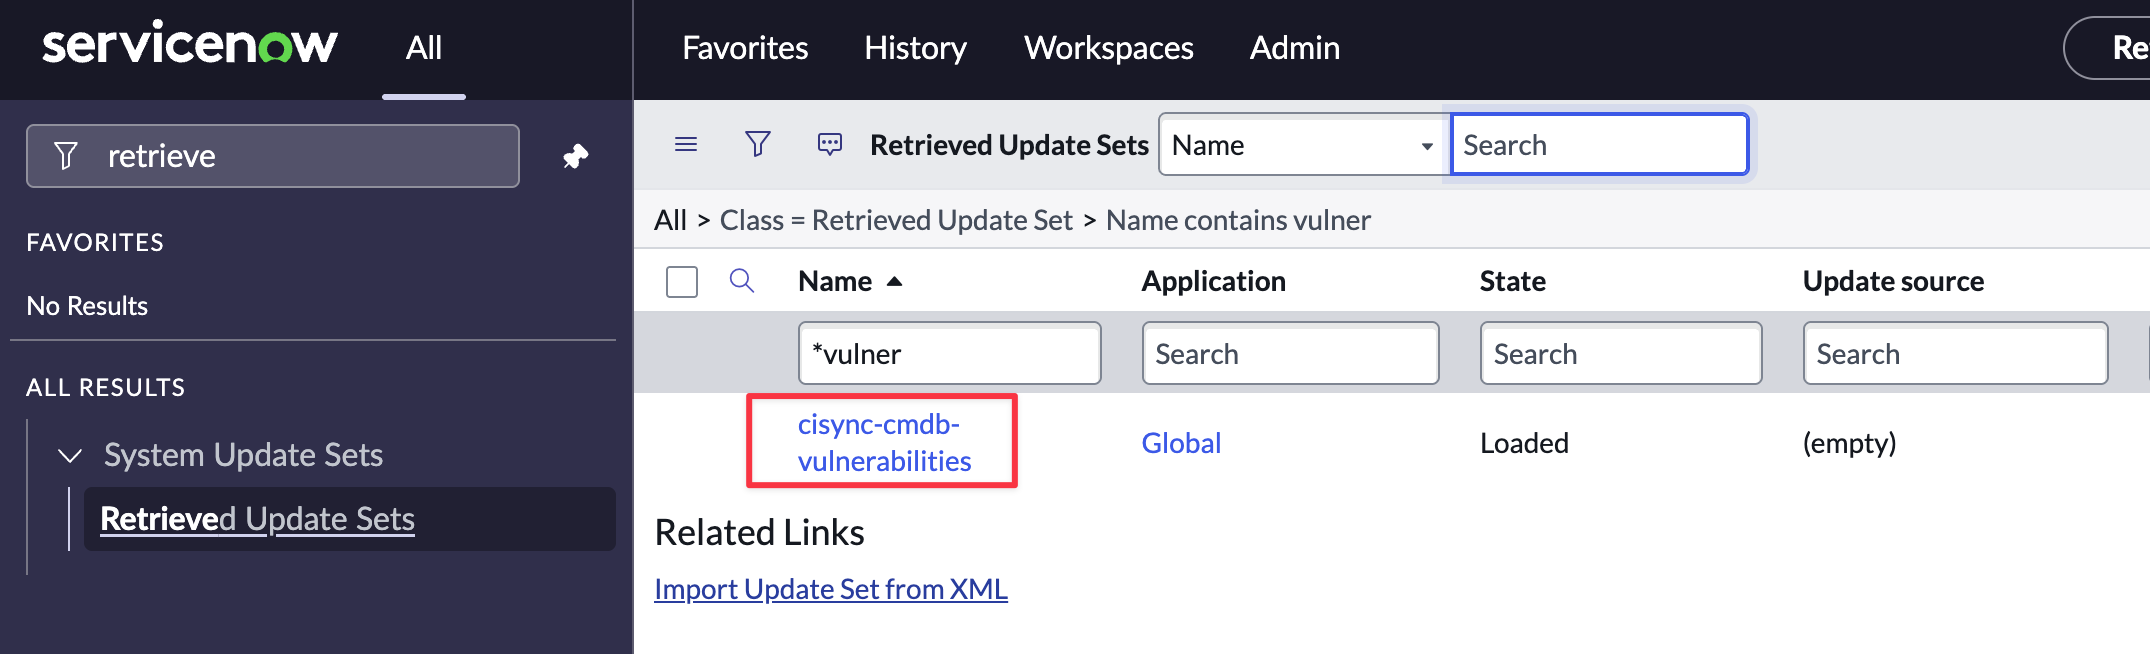
-
Click “Preview Update Set”
-
If there are no preview errors, Click “Close”.
-
Click “Commit Update Set”.
-
Your ServiceNow instance is now ready to receive CVE data from MS Defender for Endpoint via sync jobs from CI Sync.
Task 6: Understand the data CI Sync sends to ServiceNow from Defender for Endpoint
Synchronizing data from Microsoft Defender for Endpoint allows organisations to view and act upon vulnerabiltiies associated with CIs from within ServiceNow. Organisations can create dashboards based on the data sync’d by CI Sync and can also create workflows to automate the allocation of remediation tasks to the operational teams responsible for groups of CIs.
Syncfish recommend reading the details in this section to understand the records and attributes CI Sync sends to ServiceNow using Defender for Endpoint as the source system.
Set the Common Vulnerability Scoring System (CVSS) threshold for CI Sync jobs
CI Sync allows you to set a minimum CVE severity threshold to control the severity of CVEs synchronized into ServiceNow. That is, you can define which CVEs are not worth synchronizing into ServiceNow based on the CVSS threshold value.
You should review and set the desired CVSS threshold value before running your first sync job from Defender for Endpoint.
The following pages are specifically related:
Understand the record sets, related lists and attributes populated by CI Sync
Please refer to the MS Defender for Endpoint Data Sync Rules for detailed information about various default rules used by CI Sync source system connnector for MS Defender for Endpoint.
The following pages are specifically related:
-
Rule 1 - Defender for Endpoint Record Sets for Assets and Related Child Records
-
Rule 2 - Mapping of Defender for Endpoint Asset Types to ServiceNow CMDB CI Classes
-
Rule 3 - ServiceNow Master Data Tables updated by CI Sync for Defender for Endpoint
-
Rule 4 - Mapping of Defender for Endpoint Attributes/Fields into CMDB CI Classes
-
Rule 10 - Enrich Defender for Endpoint Device Data (Payloads) from Entra ID
Sample screen shots of the resulting data
Below are screen shots showing the resulting data in ServiceNow thanks to CI Sync synchronizing the above record sets.
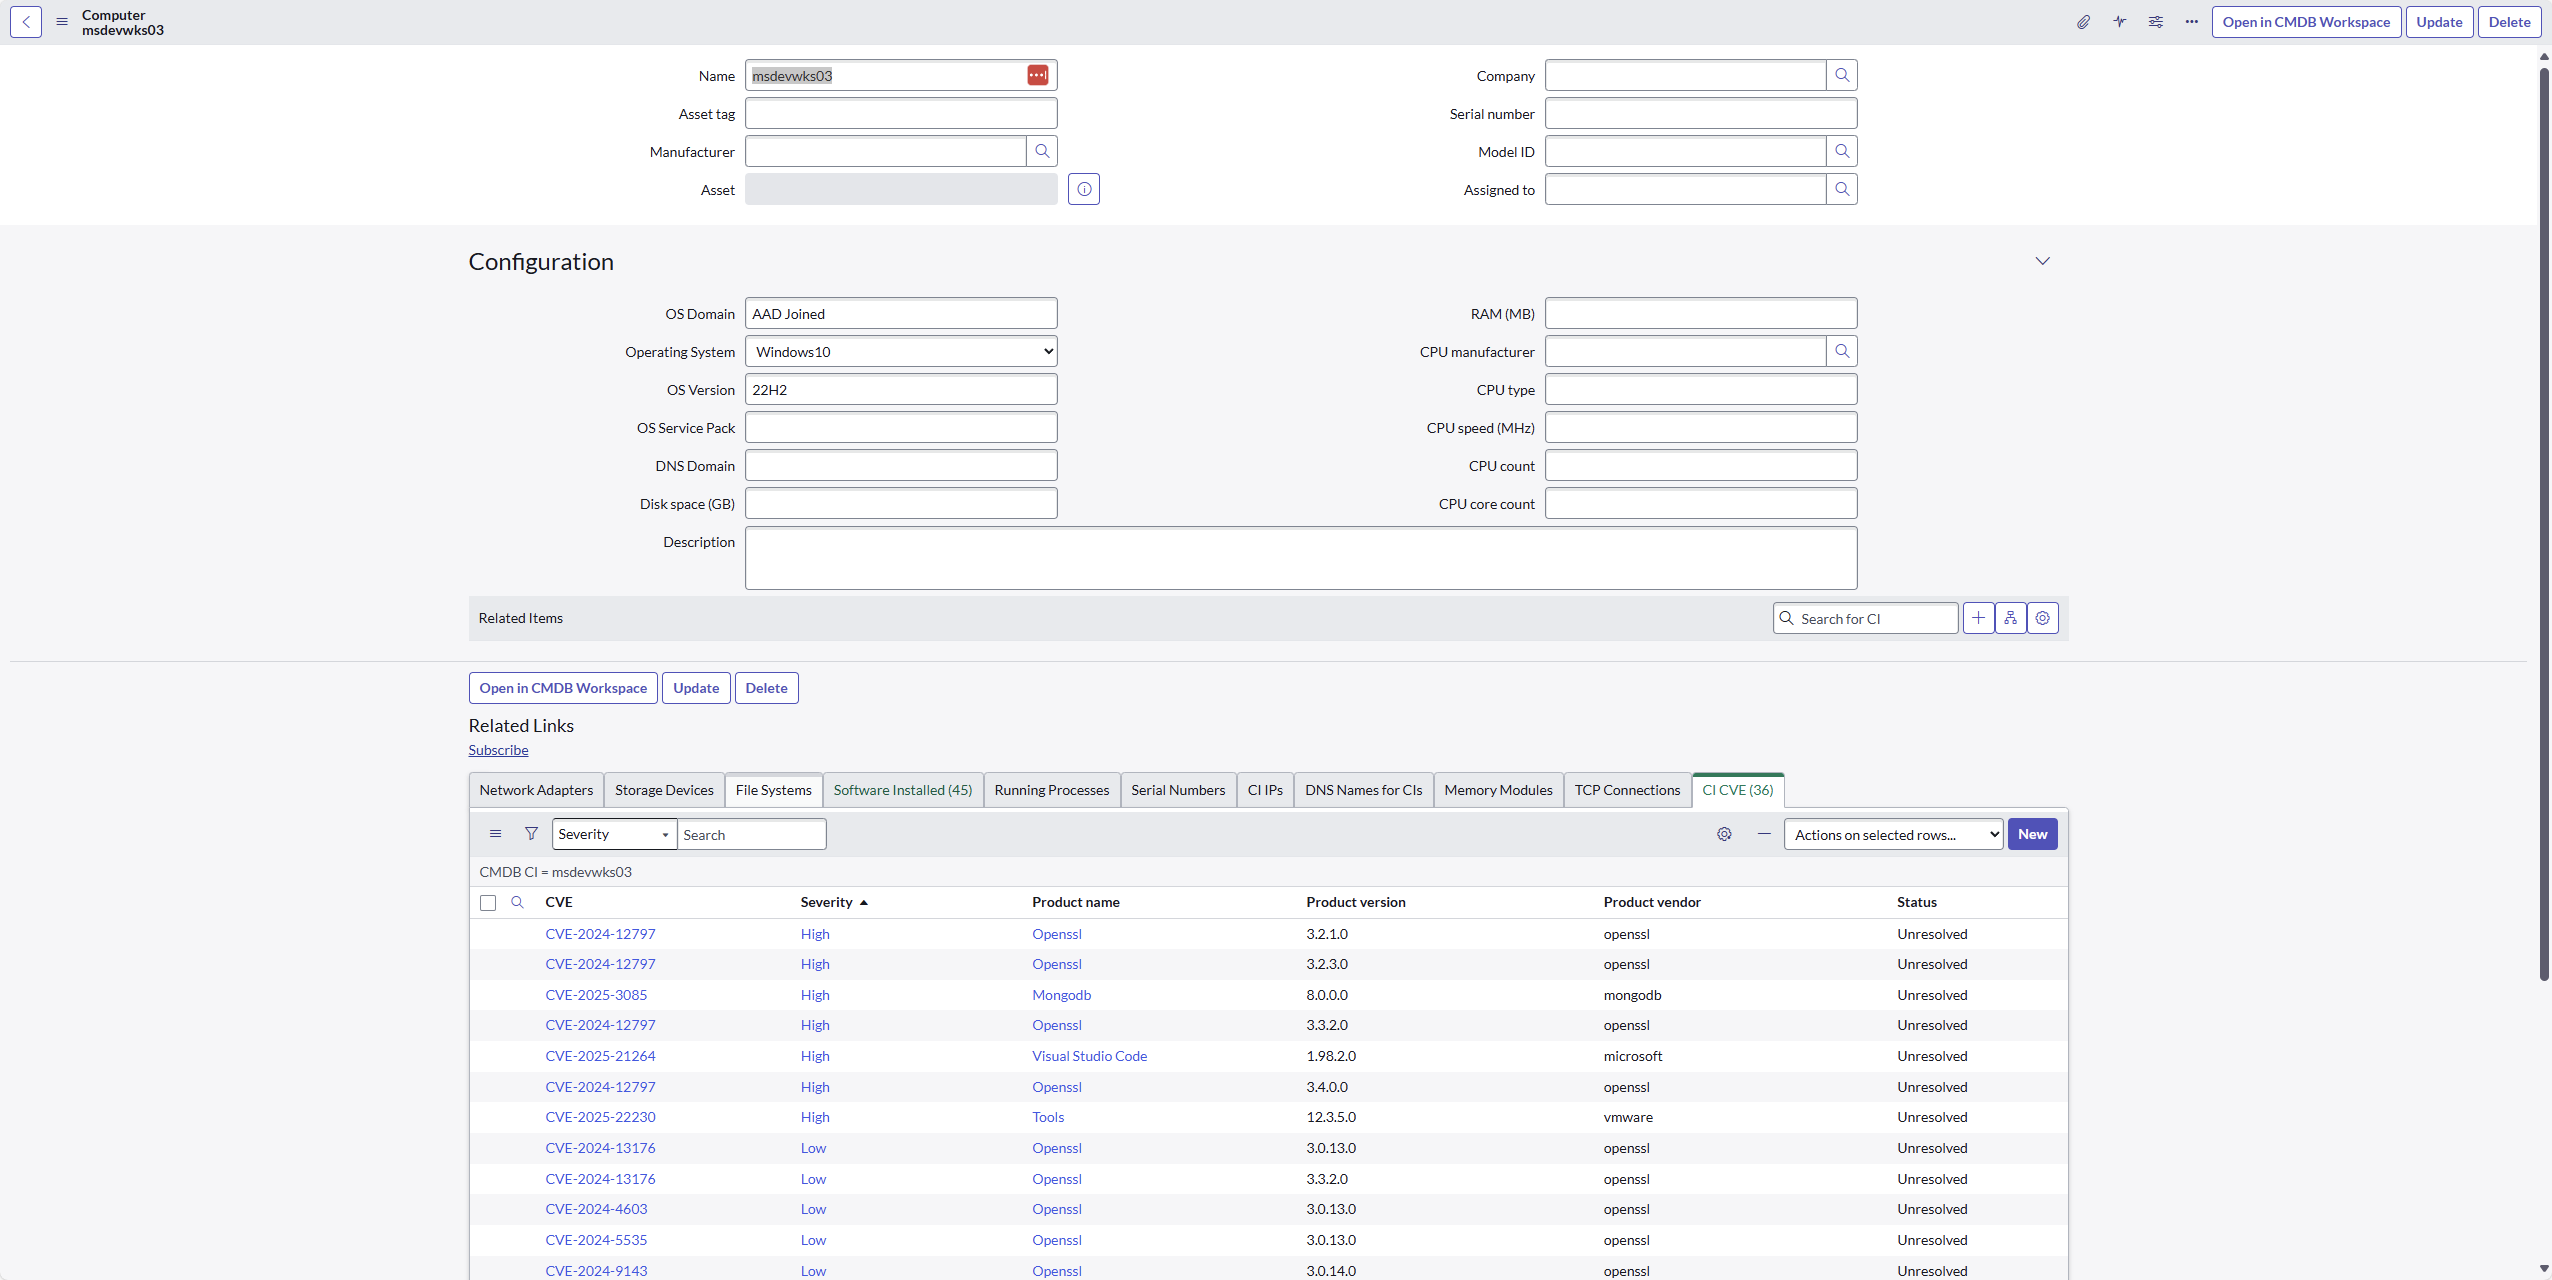
Screen Shot 1: An IT asset created by CI Sync showing related CVEs and associated software applications identified by Defender for Endpoint.
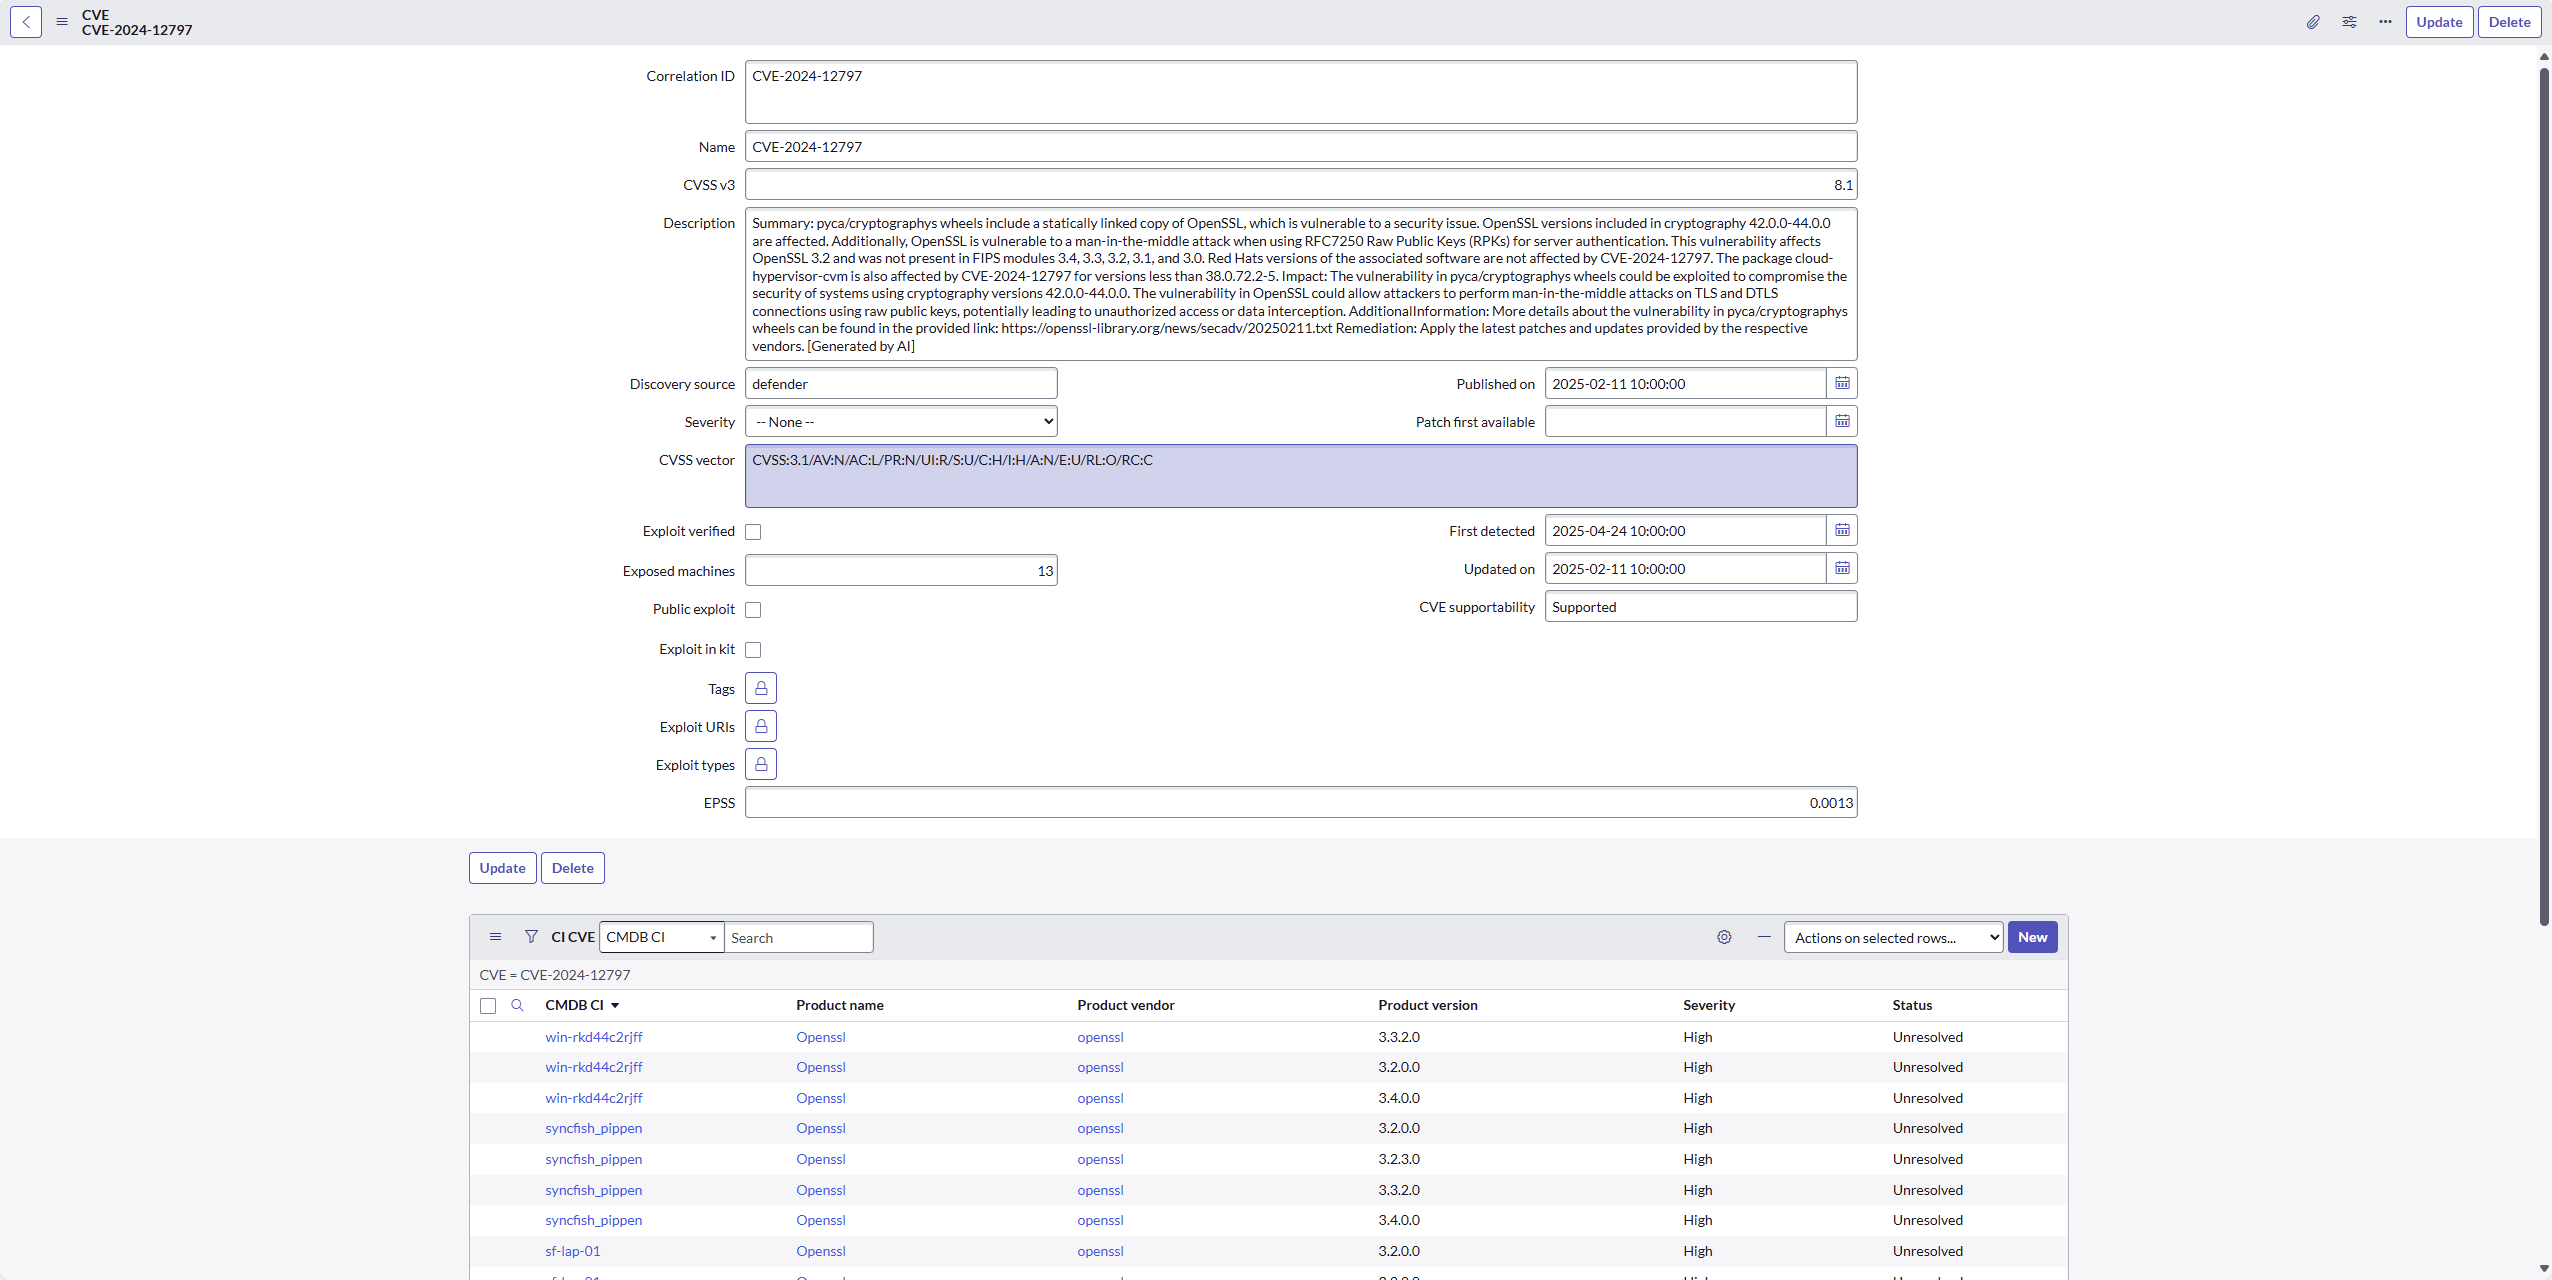
Screen Shot 2: An individual CVE master record showing the CVE details and the related list of all impacted CIs (including the related software applications).
NOTE: You can locate the generated data from the ServiceNow navigation menu.

Optional: Add Related Lists to existing CI forms
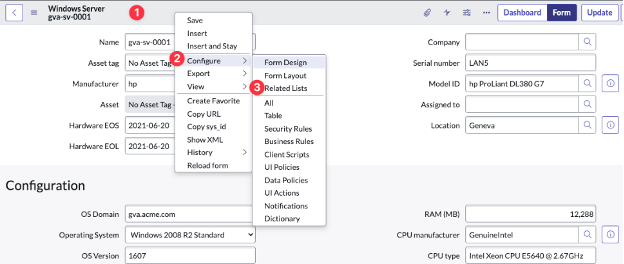
Below are the steps to modify a ServiceNow CI form to expose “CVE Instances” for related CIs.
-
Login to your ServiceNow instance with Admin permissions.
-
Navigate to the CI form for a CI Class relevant to CVEs (e.g. navigate to a Windows Server CI).
-
Right-click in the heading area of the form, then click Configure and then Related Lists from the sub-menus.
-
Identify the Related List you want to expose on the CI form using the table further below (i.e. the table that shows the Related Lists populated by CI Sync).
-
Click the Related List and then click add (the selection arrow) to move the item to the Selected column and then click Save.
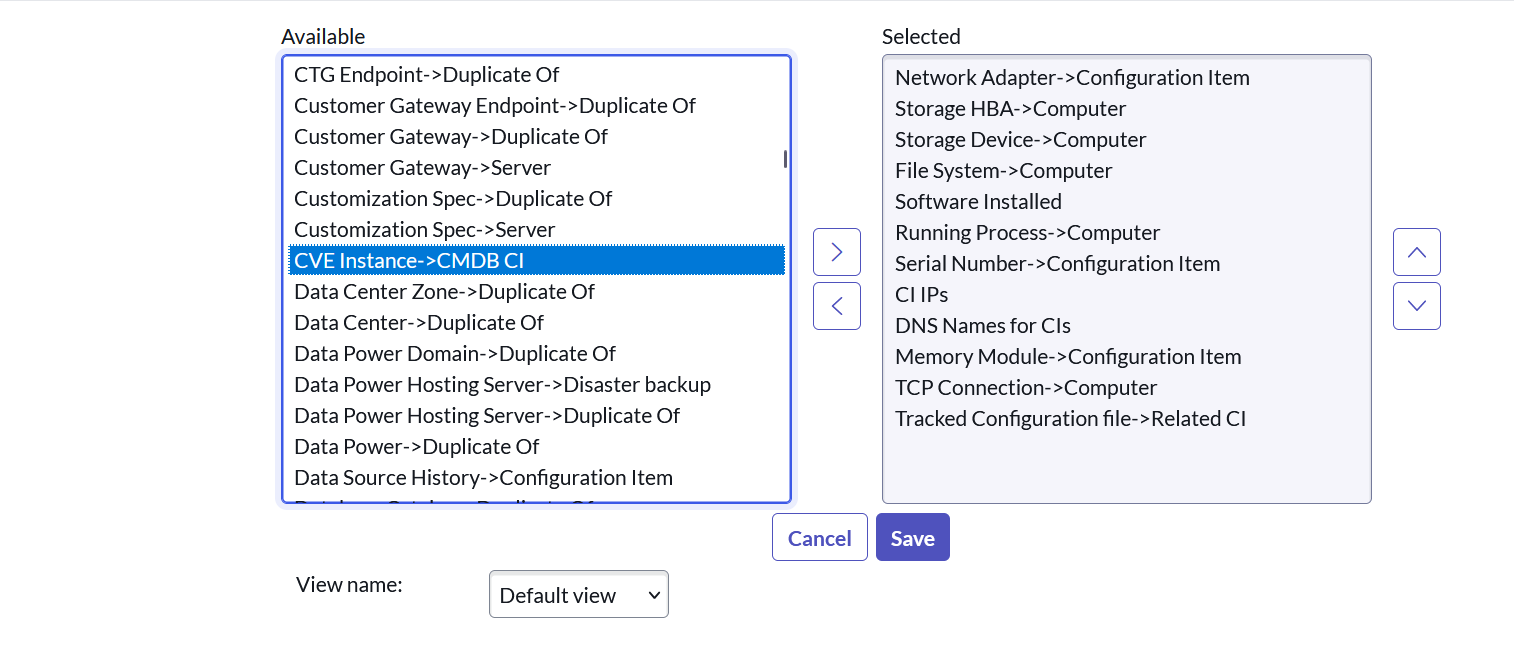
Table showing the Related Lists (per CI Class) populated by CI Sync for the source system in this guide.
|
CI Class |
Related List
|
Related List Name as it appears in the ServiceNow UI when adding it to a CI Form
|
|
Apple Macs |
CVE Instance |
CVE Instance → CMDB CI |
|
Windows PC |
CVE Instance |
CVE Instance → CMDB CI |
|
Windows Servers |
CVE Instance |
CVE Instance → CMDB CI |
How CI Sync uses the CVE Status value so you can establish a remediation workflow
In addition to creating the record sets and related lists described above, CI Sync sets a dedicated CVE Status attribute on each CVE associated with a given CI and the associated software appplication. This can be a highly valuable feature allowing organisations to define an end-to-end workflow for remediating detected CVEs.
Here’s how it works:
-
When CI Sync first creates the CVE record against each CI, the status value is set to “Unresolved”. See the screen shot below.
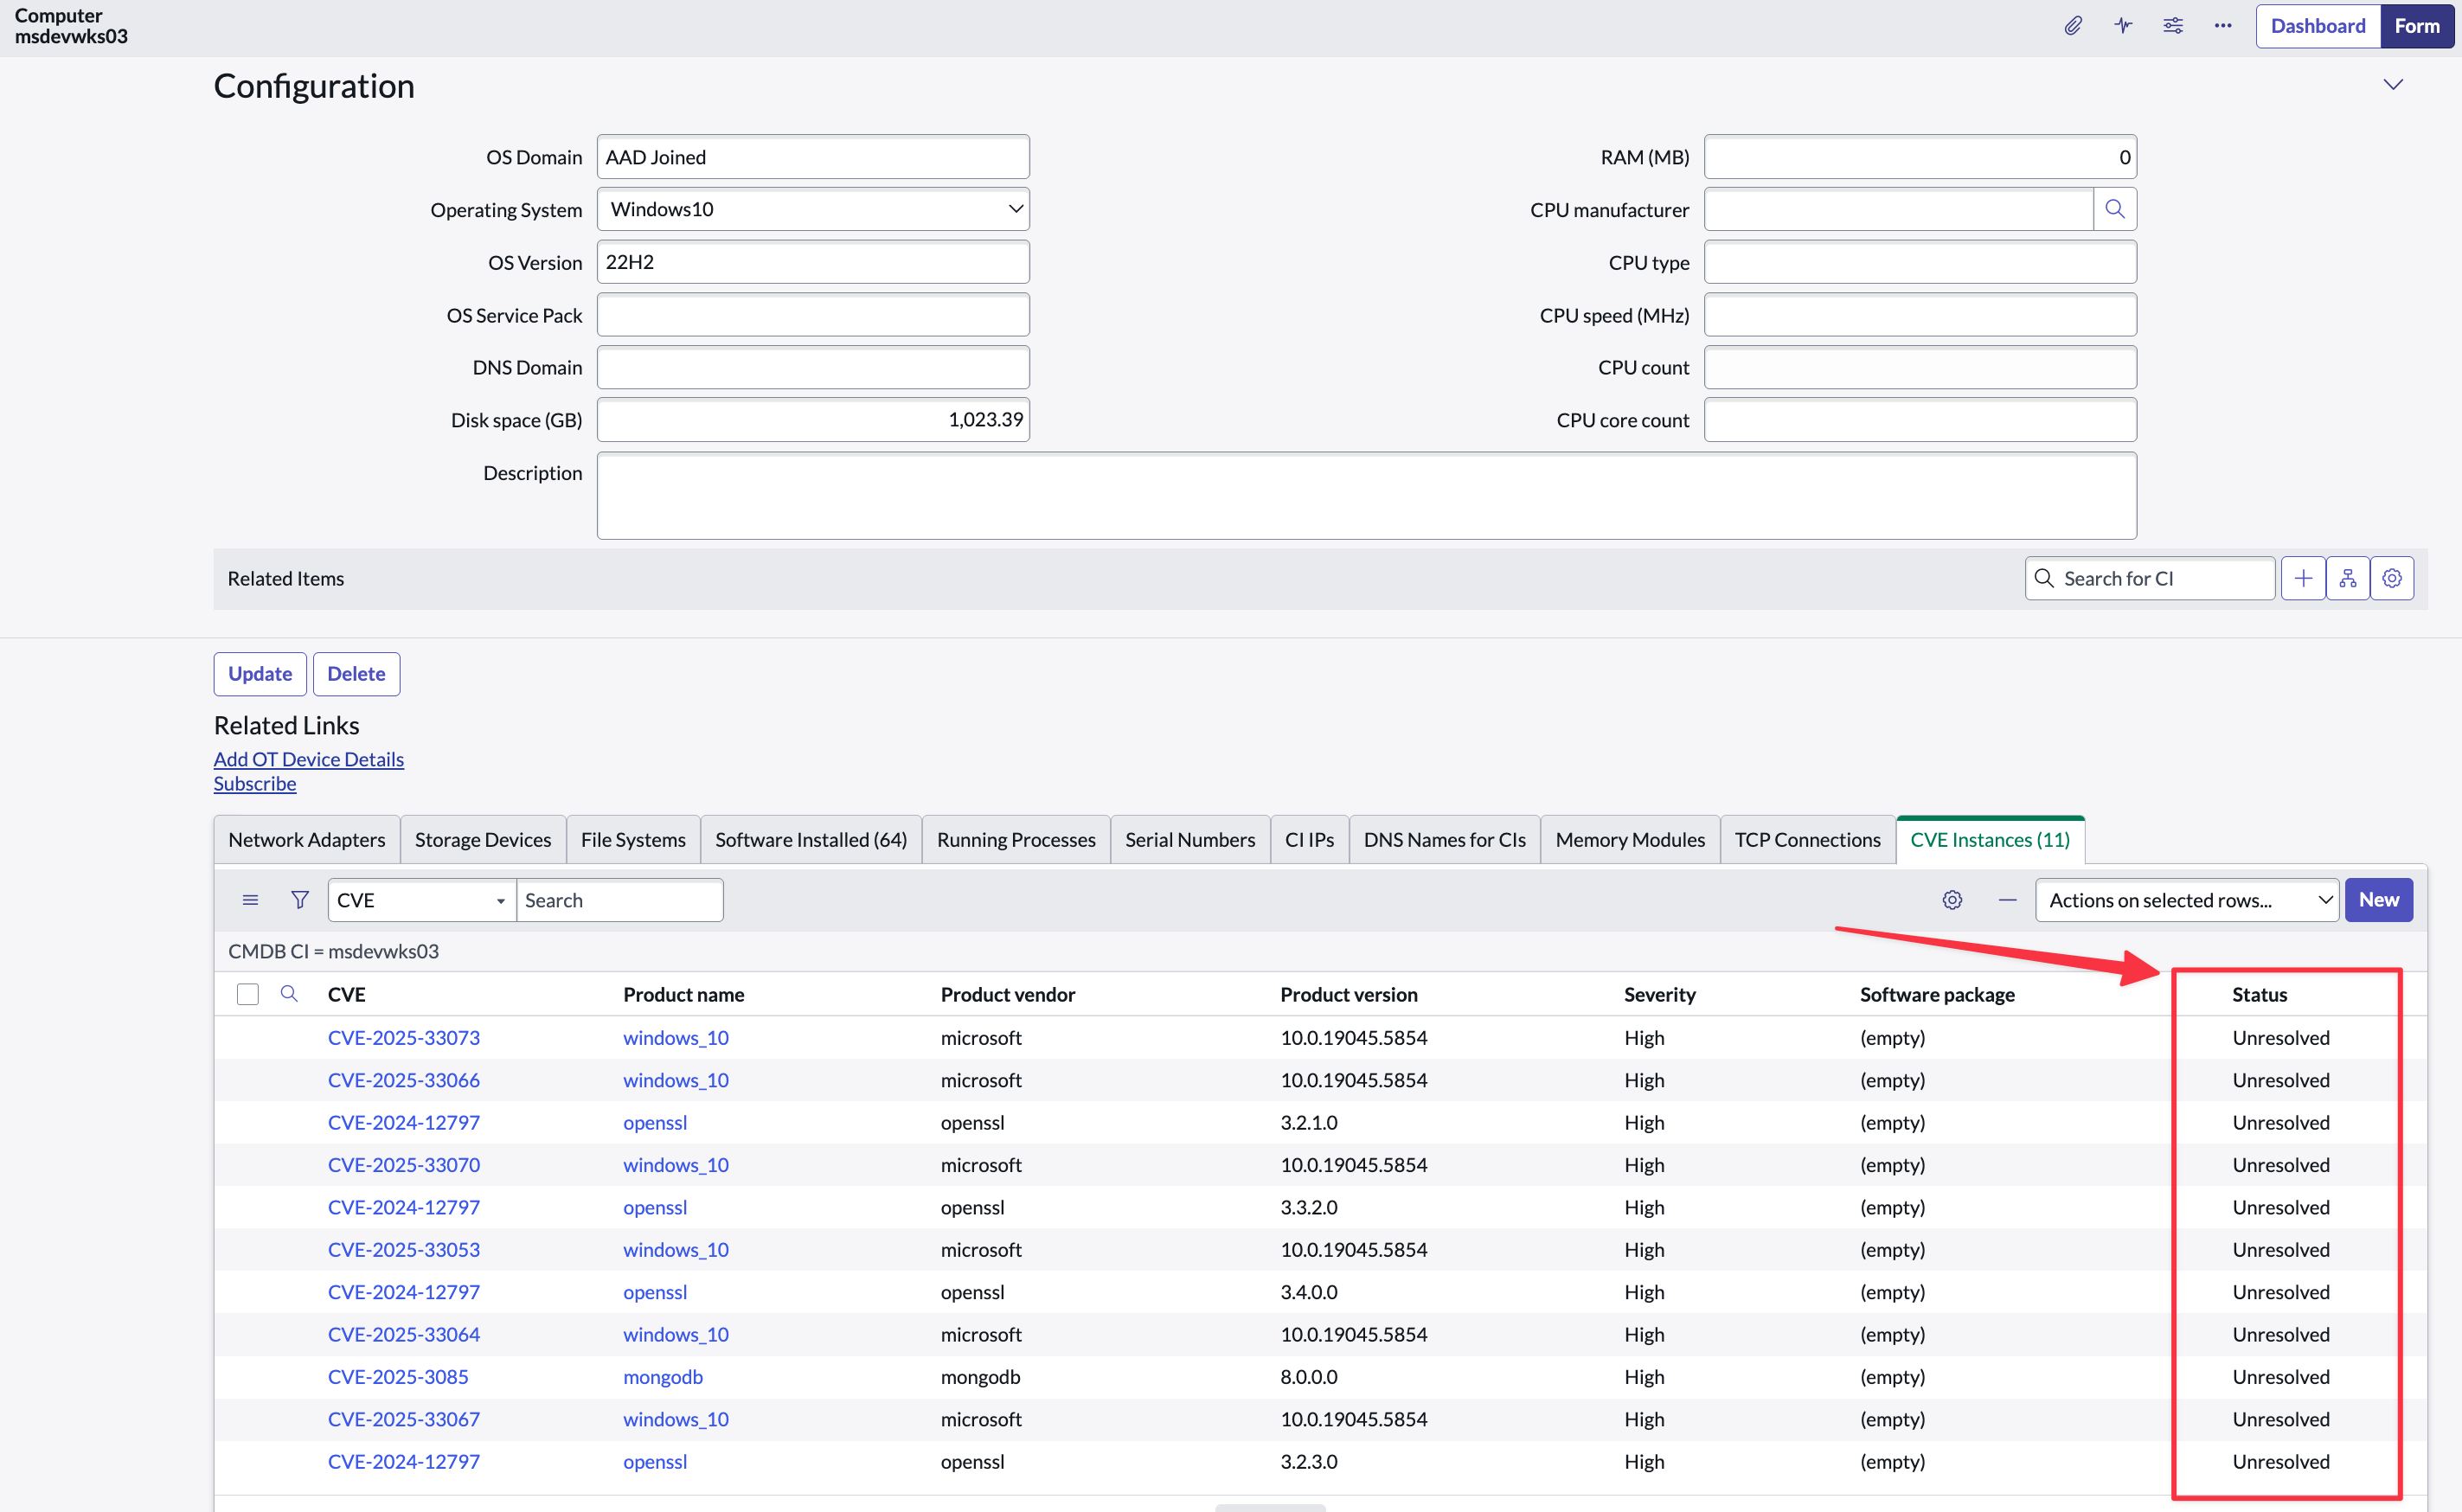
-
Organisations can use this “Unresolved” status to create one/more remediation tasks to the relevant operational teams.
-
Syncfish recommend the status be set to “Resolved Pending” once the team has remediated the CVE/s on the related CI.
-
Resolved Pending indicates the team is waiting for Microsoft Defender for Endpoint to separately detect the CVE has been addressed and therefore can be removed from the asset in the Defender for Endpoint portal.
-
-
At this point the Microsoft Defender for Endpoint portal has removed the CVE against the asset.
-
The subsequent CI Sync job will detect the CVE has been removed by Microsoft Defender for Endpoint and CI Sync will change the status value to “Resolved Confirmed” against the CI.
Other synchronization behaviours
-
CI Sync only creates CVE definition records for records that have current occurrences across the devices inventory being synchronized from MS Defender.
-
CI Sync won't attempt to delete the CVE definition records when there are no more instances of that CVE across the devices inventory being synchronized from MS Defender.
-
CI Sync doesn’t delete the records that link the CVE records to the CIs.
Task 7: Do Not Synchronize Installed Software from two different source systems
Customers should be aware that if you synchronize Installed Software (i.e. the installed software applications for the same IT asset) from two different source systems (e.g. from Intune and Defender, or from Lansweeper and Defender, or InTune and SCCM, etc etc) for the same device you will end up with duplicate software instance records in your CMDB.
The cause of this issue is the naming convention of Installed Software is inconsistent between different source systems, and therefore CI Sync cannot reliably correlate the Installed Software per CI within the CMDB. By way of example:
-
In InTune, “Microsoft Teams” is stored as “MSTeams” (and there is no Manufacturer attribute in InTune).
-
However, in Defender for Endpoint, “Microsoft Teams” is stored as “Teams”.
Important Recommendation from Syncfish
Syncfish do NOT recommend synchronizing Installed Software from two different source systems.
Below are some notes to action this in advice in the CI Sync Web UI:
-
When you are creating a sync job via the CI Sync UI and reach the Selections page, do not select “Software” or “Software Installs” from a given source system if you have already selected Installed Software on another source system sync job.
The screen shot below shows a sample of the Selection page for InTune as the source system for a CI Sync job. If you have selected Software Installs for InTune you should not select Software Installs for a Microsoft Defender for Endpoint sync job (as shown on the subsequent screen shot below)
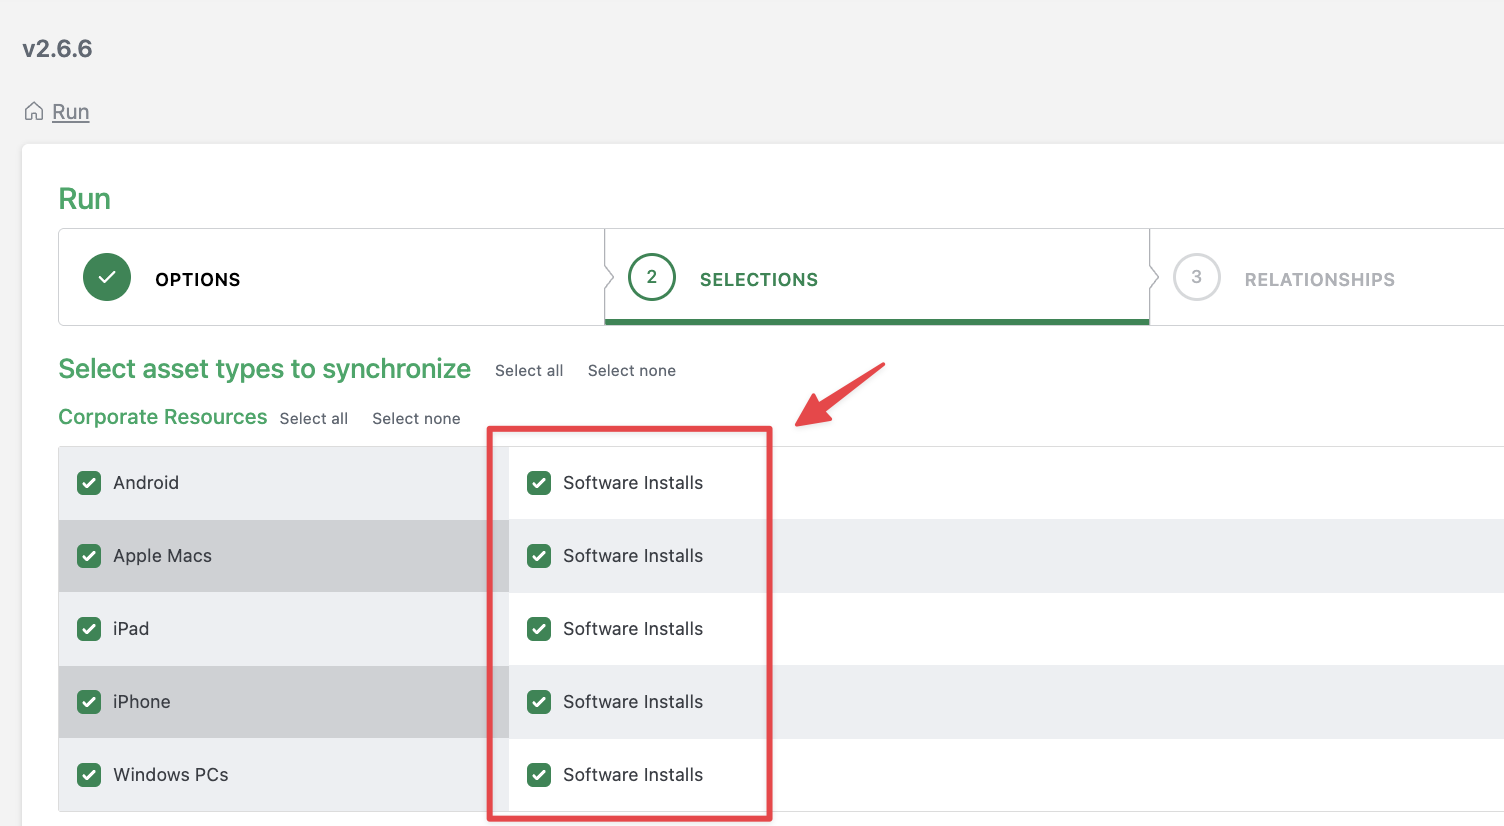
The screen shot shows the Selection page for Microsoft Defender for Endpoint as the source system for a CI Sync job. You should NOT select Software Installs via Microsoft Defender for Endpoint because you have selected Software Installs via the InTune source system.

The same logic/approach applies to any other source system that offers Installed Software, such as SCCM or Lansweeper. The key message is: do NOT recommend synchronizing Installed Software from two different source systems.