Task List
|
Task # |
Task |
Performed by |
|---|---|---|
|
1 |
Prepare SentinelOne for use with CI Sync |
SentinelOne Admin |
|
2 |
Add SentinelOne as a Source System using the CI Sync SaaS UI |
CI Sync Admin |
|
3 |
Check status of the new SentinelOne Source System connection |
CI Sync Admin |
|
4 |
Assess if additional updates are required in ServiceNow |
ServiceNow Admin |
|
5 |
Do Not Synchronize Installed Software from two different source systems |
CI Sync Admin |
Task 1: Prepare SentinelOne for use with CI Sync
The CI Sync agent will require Base URL (of your SentinelOne instance) and an API Token/API Key you will generate for CI Sync to connect to SentinelOne.
The following guide will demonstrate how to create a Service User with an API Key within your SentinelOne environment to obtain the API Key needed by CI Sync.
-
Log into your SentinelOne Management Console with your admin credentials.
-
In the Management Console, click Settings, then click Users, then click Service Users.
-
Click Actions, then select Create New Service User to create the Service User for CI Sync to access SentinelOne.
-
In the Create New Service User pop-up window, fill in the Details:
-
Name (e.g. “CISync Service User”).
-
Description (e.g. “Service User for CI Sychronizer API Access to SentinelOne).
-
Expiration Date. Choose an expiration date appropriate based on your security requirements. A longer expiration is more convenient but less secure. Set a reminder of the expiration date so it can be updated/extended at the appropriate point in the future.
-
Click Next.
-
-
Now set the Scope of Access for the CI Sync Service User
Important
This is an important step for least-privilege access as you'll be choosing what the service principal can see (i.e. what the CI Sync Service User can see/access).
The subsequent steps define the scope of access of the CI Sync Service User.
-
Do the following on the Scope of Access screen
-
Either select Account in the Access Level box if you need the CI Sync integration to have access across all of your SentinelOne Sites. Make sure the appropriate Role is selected in the drop-down next to your site name before proceeding.
-
Or, if you only need access to specific sites, select Site scope instead and choose the relevant sites.
-
Since the CI Sync integration only needs to read from SentinelOne, select the Viewer role rather than Admin.
-
-
Next, click Create User.
-
In the pop-up window that opens, click Copy API Token to copy the API key to your clipboard, or click Download API Token to save a copy.
-
Data Capture Note
-
The API Token (sometimes called the API Key) is only available while you remain on this screen. You must make a copy of the secret before leaving this form.
Make sure the secret stored securely and in a way that can be shared with the CI Sync Admin so they can use it when the follow the instructions later in this page.
-
The SentinelOne environment setup is now complete. You can now proceed to the subsequent tasks below.
Data Capture Summary
As a reminder, you should have captured the following information when completing the above steps.
-
The SentinelOne Base URL (for cloud hosted SentinelOne it be something like the following https://your-tenant.sentinelone.net)
-
The API Token (sometimes called the API Key) (from Step 7 above).
Make sure any secrets or sensitive information is stored securely and in a way that can be shared with the CI Sync Admin.
The above information will be needed by the CI Sync Admin when they follow the instructions in Task 2 immediately below.
Task 2: Add SentinelOne as a Source System using the CI Sync SaaS UI
-
Login to your CI Sync SaaS instance at https://YourCo.syncfish.app
-
In the CI Sync UI, navigate to Settings > Connections.
-
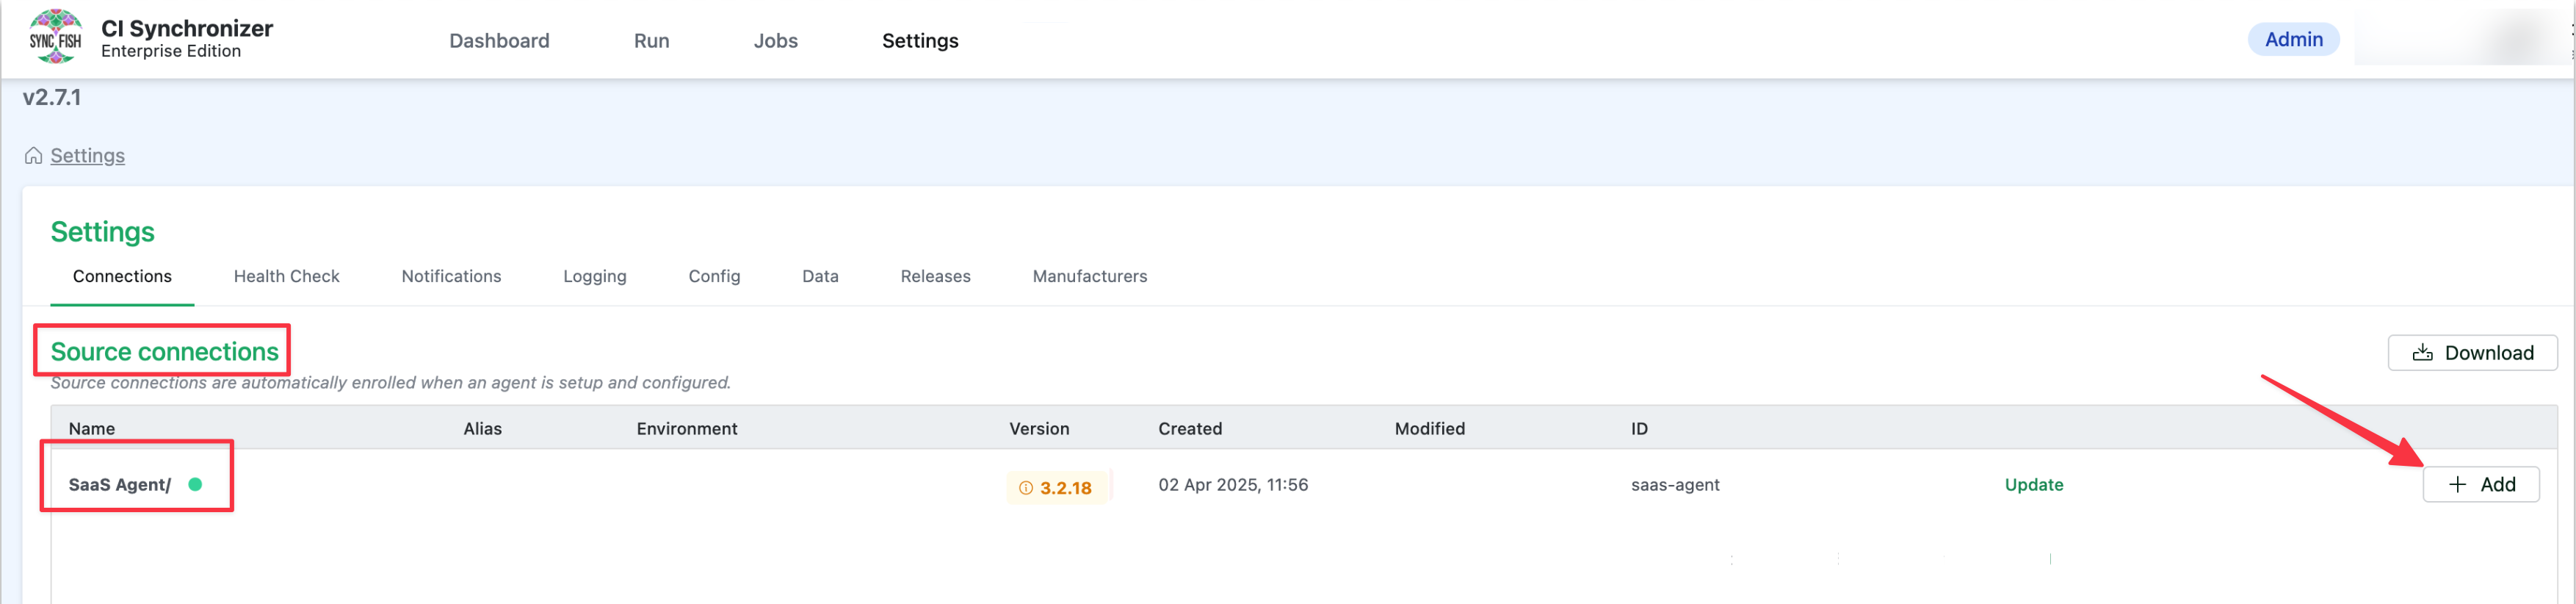
Find the “SaaS Agent” sub-heading under the Source Connections section. If you don’t see “SaaS Agent” it means your CI Sync instance hasn’t been configured for this feature. Please contact your Sync representative to discuss.
-
On the right hand side of the form, click the +Add button.
-
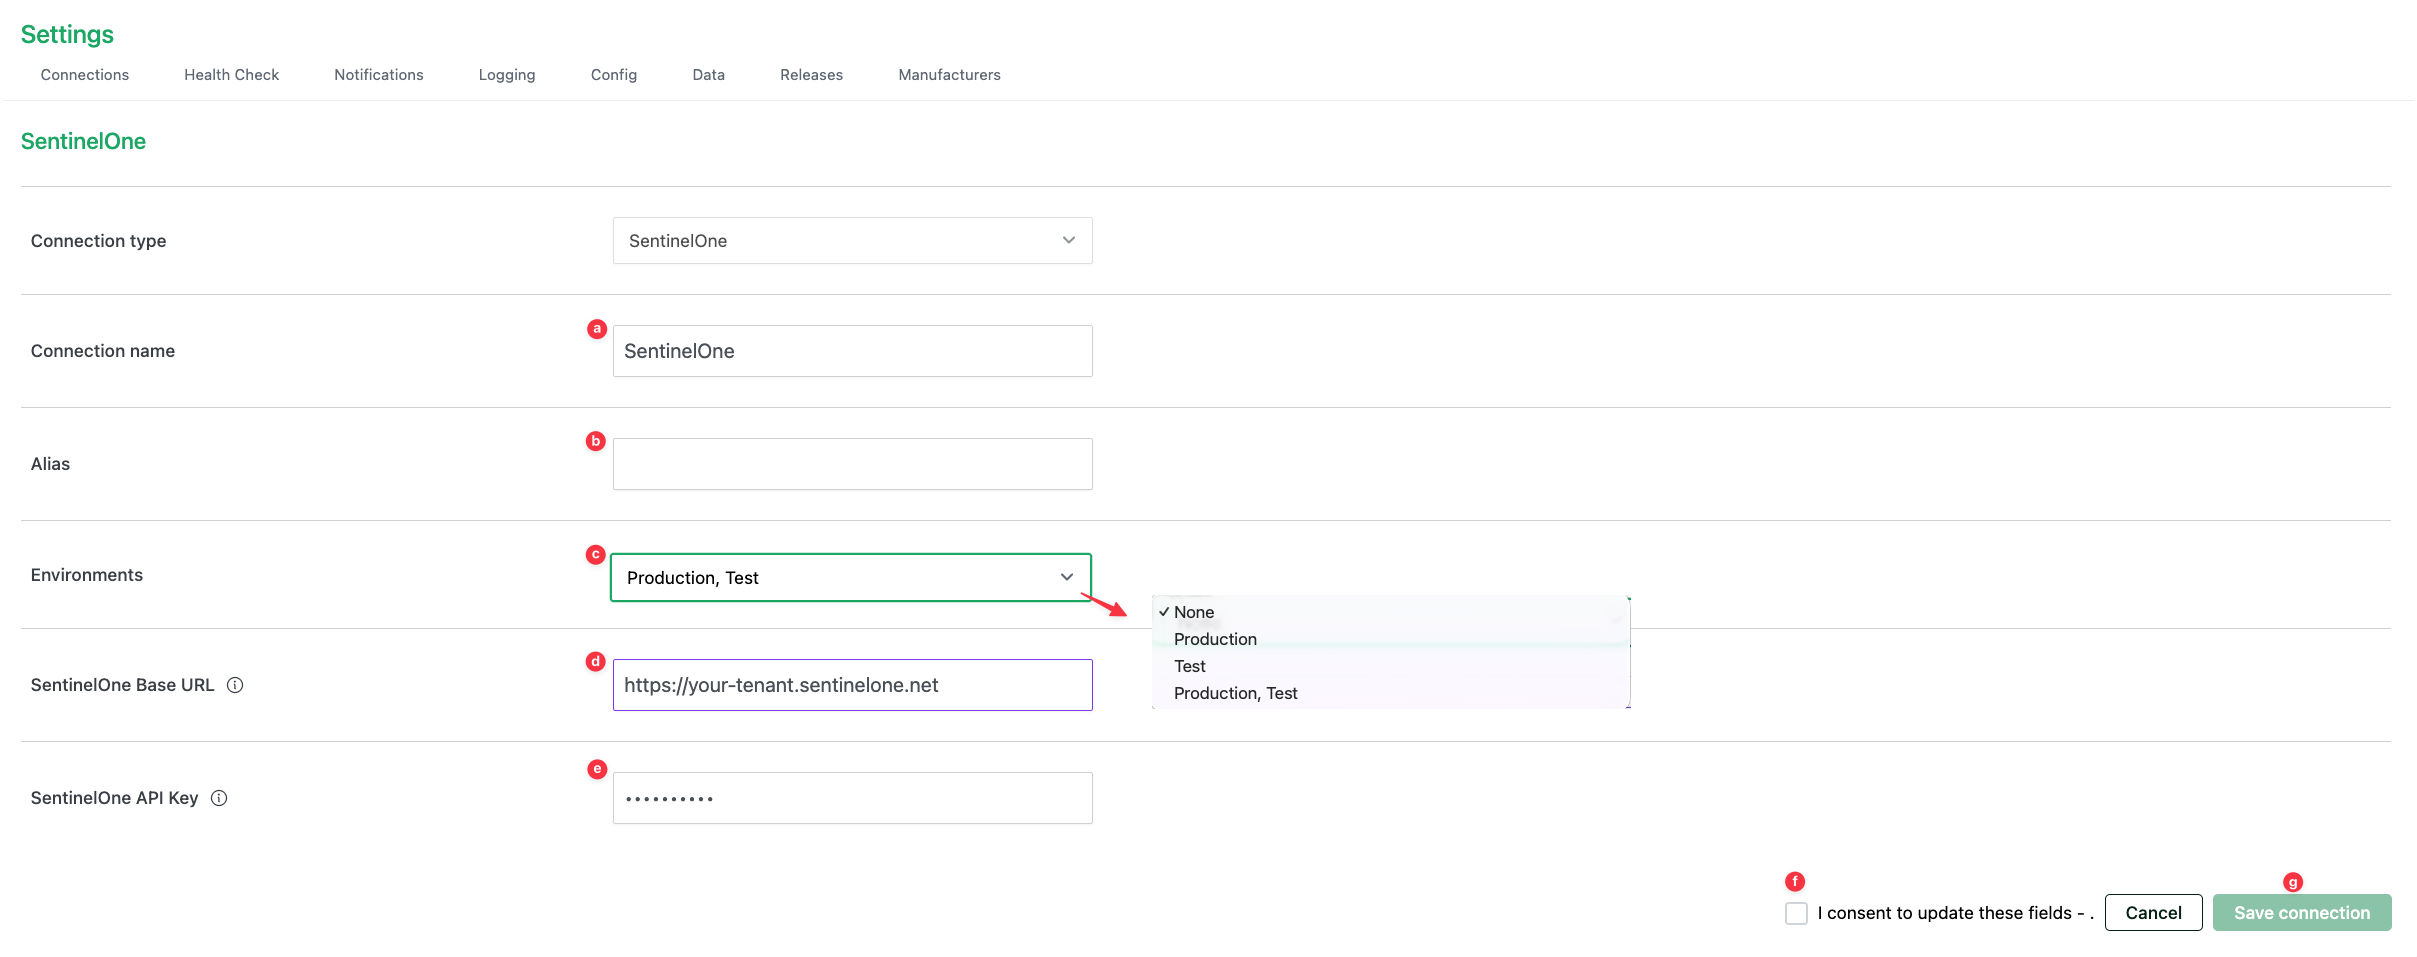
The New Connection form now appears. Use the Connection Type drop down list to select the source system you wish to add (in this case SentinelOne).
-
Update the fields using these instructions
-
Connection name
-
This is a friendly name that represents the source system connection.
-
The name you enter here will appear when you create a new sync job and are selecting from the available source system list.
-
Note: Syncfish recommend using a textual suffix on the connection name if for any reason you have setup multiple CI Sync Connections to SentinelOne.
-
-
Alias: Please ignore this field (it is not used for the CI Sync Cloud Agent and is being deprecated).
-
Environments
-
Select from the available choices Production, Test, or Production/Test (the latter being both).
-
The selection you make for this field affects which source systems appear when you create a new sync job (i.e. when you are selecting the source system list based on the “Environment” you have chosen for the sync job). See this page for more details on creating a CI Sync job: Run a Small Initial Sync Job (then run more).
-
FYI: CI Sync allows a source system to be both Production/Test because CI Sync only reads from a source system (it doesn’t write to it). Destination systems can only be Test or Production (not both).
-
-
SentinelOne Base URL
-
Enter the Base URL to your SentinelOne instance.
-
-
SentinelOne API Key
-
Paste the API Token captured by your SentinelOne Admin in Task 1 above.
-
-
The click the Consent to update fields checkbox.
-
Finally click the Create connection button.
-
You will be returned to the main settings screen and your new source system connection will appear in the list as shown below.

Task 3: Check status of new Saentinel Source System connection
-
To check the status of the newly added InTune Source System connection click the green Test Connection link. This will test whether your CI Sync connection can successfully reach and authenticate to the SentineOne instance defined in the connection itself.

-
If the connection is successful, you will see a green dot next to the source connection name.

-
To test again in the future, you can click the green Re-Test Connection link.
-
If the test is unsuccessful, you will see a red dot next to the source connection name and an error message underneath. If you need assistance resolving an error, please contact Syncfish support.
This means you are ready to run a sync job using the new source connection using these high-level instructions: Run a Small Initial Sync Job (then run more).
Task 4: Assess if additional updates are required in ServiceNow
Guidance Note
Syncfish recommend the person setting up the source system described in this guide discusses this particular task with their ServiceNow system administrator.
A ServiceNow administrator will need to perform these steps.
Syncfish recommend following these instructions in your non-production ServiceNow environment for testing synchronization jobs.
Only once exhaustive testing in non-production is complete, repeat this process in your ServiceNow production environment.
In this section your ServiceNow SME will assess various updates to ServiceNow to support this CI Sync connector:
-
Task 4a: Assess if the CMDB CI Class Models plug-in is needed for this connector
-
Task 4b: Assess if any custom tables or attributes are needed for this connector
-
Task 4c: Assess if additional permissions are required for this connector
-
Task 4d: (Optional though recommended) Assess your ServiceNow CI forms and update to include additional Related Lists specific to this connector
-
Task 4e: Read and understand more about the data and functionality related to this connector
Task 4a: Assess if the CMDB CI Class Models plug-in is required for this connector
Context
One of more record sets (asset types/resource types) available to sync using this connector rely upon CMDB CI Classes that are only available via the CMDB CI Class Models plug-in.
You therefore need to install the CMDB CI Class Models plug-in to your ServiceNow instance.
If you already have the plug-in you may want to upgrade it to the latest version (as ServiceNow occasionally updates the plug-in to include extra CI Classes/tables).
|
Source System |
Specific Record Sets that require the CMDB CI Class Models plug-in |
|
SentinelOne |
|
Instructions
Follow these steps to add this plug-in (and similar steps to locate it and upgrade it if required):
-
Assess the use/inclusion of this plug-in within your ServiceNow (ensure you are comfortable installing this plug-in).
-
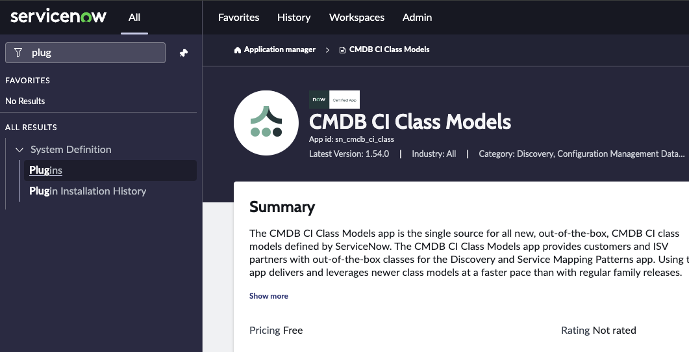
Search for Plugins via the ServiceNow navigation menu.
-
Locate the CMDB CI Class Models plug-in.
-
Click Add -> Install and follow the instructions provided.
Task 4b: Assess if custom tables or attributes are needed for this connector
Use Case - If you are planning to use CI Sync to sync vulnerabilities to the CMDB
Context
CI Sync synchronizes IT assets including their installed software with known CVEs from SentinelOne.
CI Sync relies upon two custom tables in ServiceNow.
-
One table is used to store the CVE records.
-
A second table stores the link between CIs and the CVEs.
Syncfish provides a ServiceNow updateset to prepare your ServiceNow instance for CI Sync. The updateset does the following:
-
Creates the custom tables mentioned above.
-
Applies the ACL on the custom tables and assigns the ACL to the ServiceNow role called “Asset” (which is one of the roles granted to the CI Sync Integration Account created during S3 - Configure ServiceNow for CI Sync).
Task Steps
Follow these steps to apply the updateset provided by Syncfish:
-
Download the update set from Syncfish at the below URL: https://downloads.syncfish.app/servicenow/cisync-cmdb-vulnerabilities.xml
-
Login to your ServiceNow instance with Admin permissions.
-
Open a browser and navigate to your ServiceNow instance
-
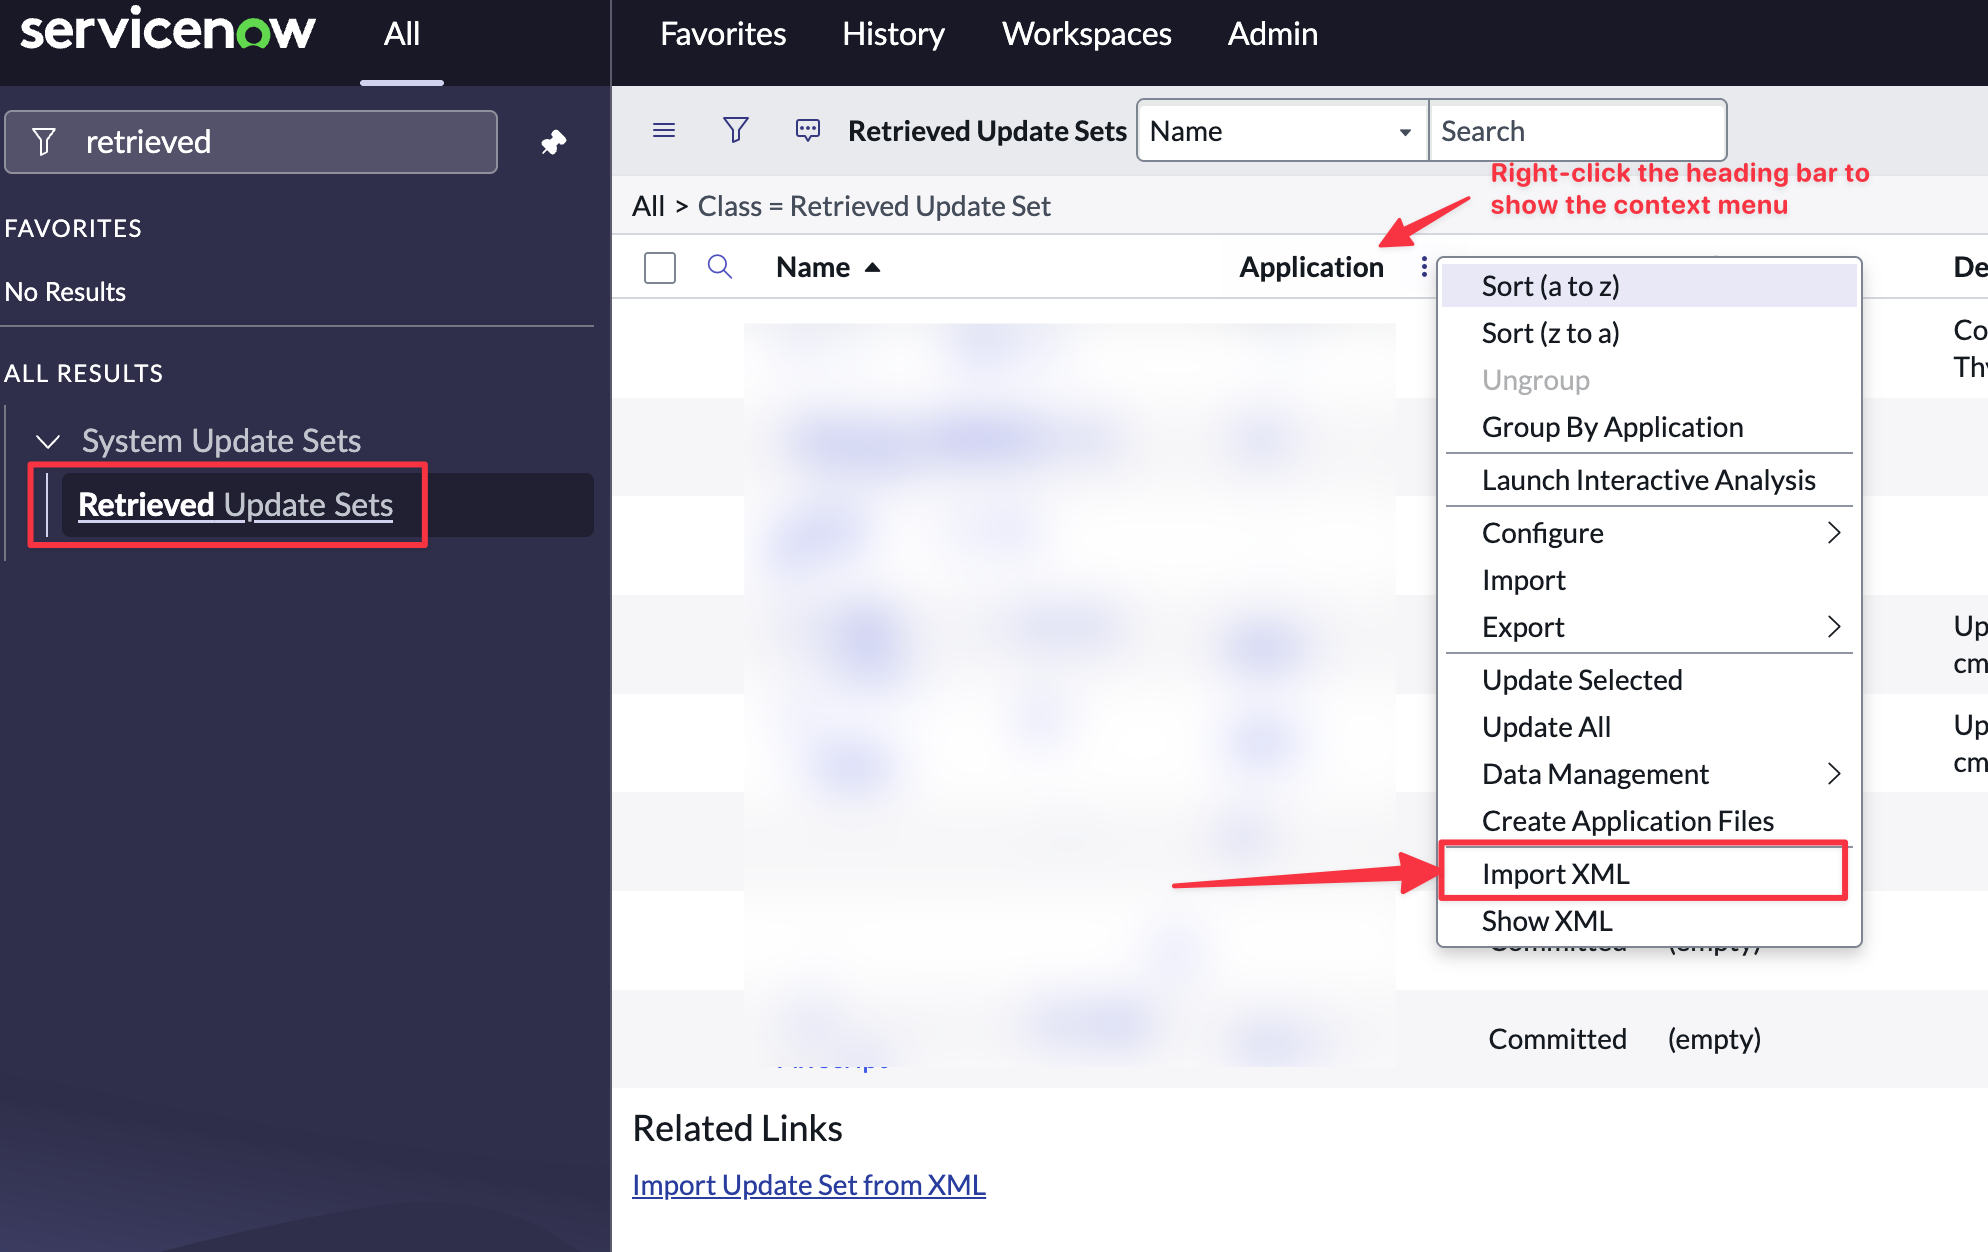
In the left nav menu search for “Retrieved Update Sets” and click to open
-
Right click on the column heading row and select “Import XML”
-
Select “Choose File”
-
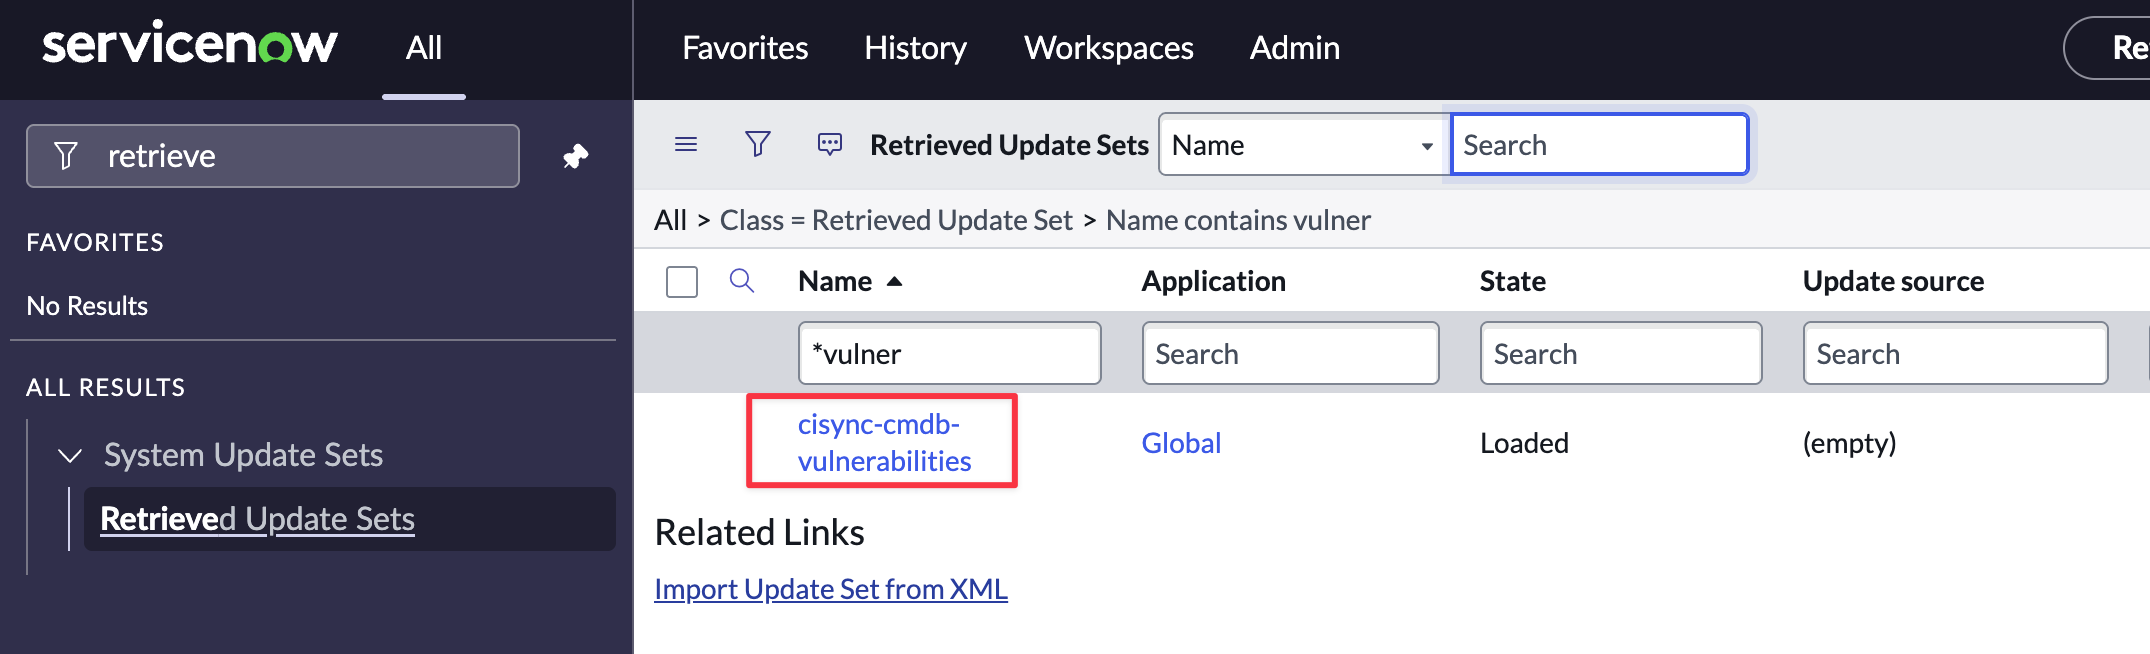
Select the downloaded file “cisync-cmdb-vulnerabilities.xml”
-
Click to open the Update Set
-
Click “Preview Update Set”
-
If there are no preview errors, Click “Close”.
-
Click “Commit Update Set”.
-
Your ServiceNow instance is now ready to receive CVE data from MS Defender for Endpoint via sync jobs from CI Sync.
Task 4c: Assess if additional permissions are required for this connector
Use Case #1 - If you are planning to use CI Sync to sync vulnerabilities to the CMDB
The additional permissions to sync vulnerabilities are granted by the updateset used in the previous task.
Use Case #2 - If you are planning to use CI Sync to write SentinelOne Tags to the CMDB
Context
CI Sync writes SentinelOne Tags to the cmdb_key_value table in ServiceNow.
The standard/out-of-the-box roles provided by ServiceNow (and recommended by Syncfish during S3 - Configure ServiceNow for CI Sync) do not provide access to the cmdb_key_value table. Therefore, the CI Sync Integration User account created during S3 - Configure ServiceNow for CI Sync requires additional permissions to write to the cmdb_key_value table.
Syncfish provides a ServiceNow updateset to prepare your ServiceNow instance for CI Sync. The updateset does the following:
-
Creates a read/write ACL on the cmdb_key_value table.
-
Applies the ACL on the cmdb_key_value table and assigns the ACL to the ServiceNow role called “Asset” (which is one of the roles granted to the CI Sync Integration Account created during S3 - Configure ServiceNow for CI Sync).
Instructions
Follow these steps to apply the updateset provided by Syncfish:
-
Download the update set from Syncfish at the below URL:
https://downloads.syncfish.app/servicenow/cisync-cmdb-key-value.xml -
Login to your ServiceNow instance with Admin permissions.
-
Open a browser and navigate to your ServiceNow instance
-
In the left nav menu search for “Retrieved Update Sets” and click to open
-
Right click on the column heading row and select “Import XML”
-
Select “Choose File”
-
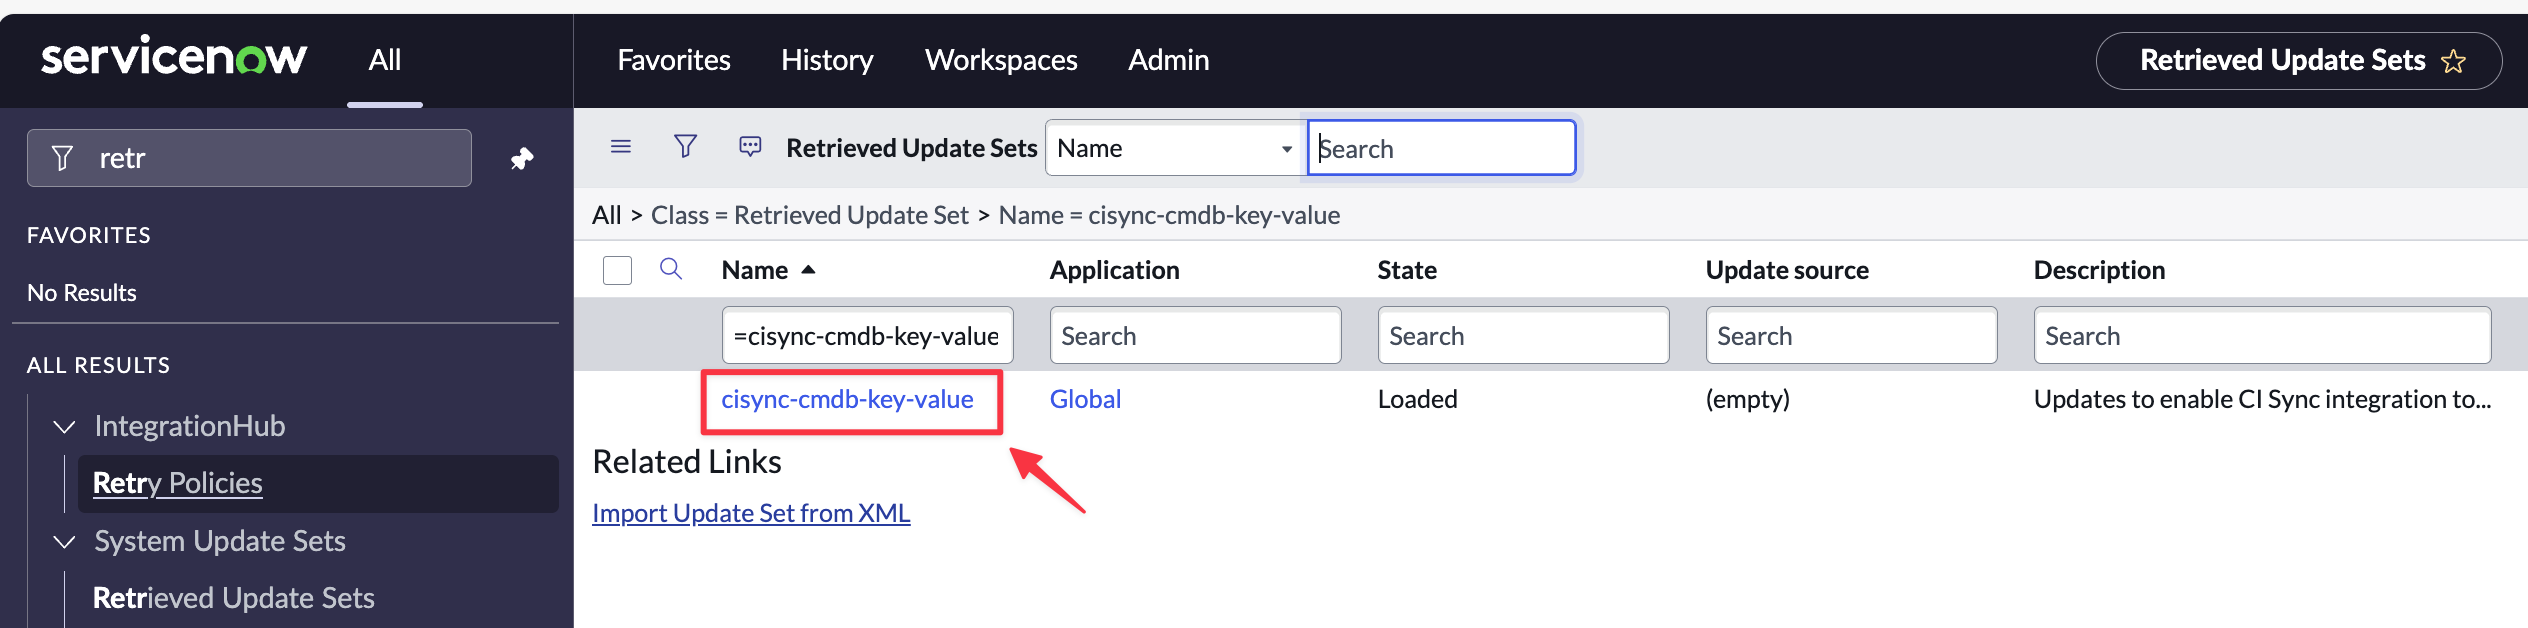
Select the downloaded file “cisync-cmdb-key-value.xml”
-
Click to open the Update Set
-
Click “Preview Update Set”
-
If there are no preview errors, Click “Close”.
-
Click “Commit Update Set”.
-
Your ServiceNow instance is now ready to receive Tag data from Azure via sync jobs from CI Sync.
Task 4d: (Optional though recommended) Assess your ServiceNow CI forms and update to include additional Related Lists specific to this connector
Context
CI Sync populates various child tables (related lists) associated with parent CIs.
The following table shows the Related Lists (per CI Class) populated by this CI Sync connector.
|
CI Class |
Related List
|
Related List Name as it appears in the ServiceNow UI when adding it to a CI Form
|
|
Windows PC |
CVE Instance |
CVE Instance → CMDB CI |
|
Windows Servers |
CVE Instance |
CVE Instance → CMDB CI |
|
Linux Servers |
CVE Instance |
CVE Instance → CMDB CI |
|
Kiosks |
CVE Instance |
CVE Instance → CMDB CI |
Instructions
Below are the steps to modify a ServiceNow CI form to expose a new Related List.
-
Login to your ServiceNow instance with Admin permissions.
-
Navigate to any CI in the relevant CI Class (i.e. one/all of those listed in the table in the Context section above). For example, navigate to a Windows Server CI).
-
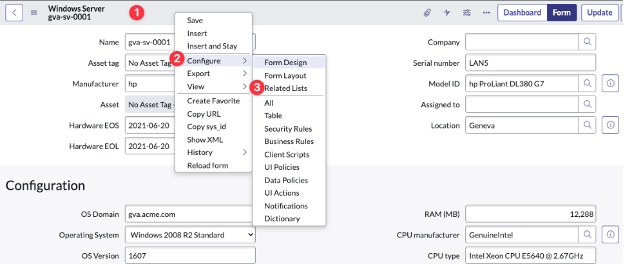
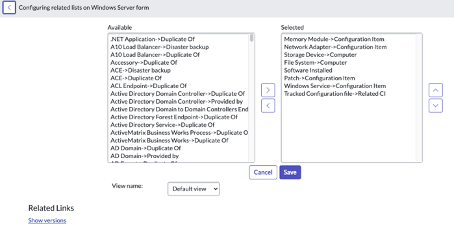
Right-click in the heading area of the form, then click Configure and then Related Lists from the sub-menus.
-
Identify the Related List you want to expose on the CI form using the table in the Context section above.
-
Find the Related List in the left hand column which lists all Available Related Lists.
-
Click the Related List and then click add (the selection arrow) to move the item to the Selected column and then click Save.
-
Repeat for each additional CI Class listed in the table in the Context section above.
Task 4e: Read and understand more about the data and functionality related to this connector
Synchronizing data from SentinelOne allows organisations to view and act upon vulnerabilities associated with CIs from within ServiceNow.
Organisations can create dashboards based on the data sync’d by CI Sync and can also create workflows to automate the allocation of remediation tasks to the operational teams responsible for groups of CIs.
Syncfish recommend reading the details in this section to understand the records and attributes CI Sync sends to ServiceNow using SentinelOne as the source system.
Set the Common Vulnerability Scoring System (CVSS) threshold for CI Sync jobs
CI Sync allows you to set a minimum CVE severity threshold to control the severity of CVEs synchronized into ServiceNow. That is, you can define which CVEs are not worth synchronizing into ServiceNow based on the CVSS threshold value.
You should review and set the desired CVSS threshold value before running your first sync job from SentinelOne.
The following pages are specifically related:
Understand the record sets, related lists and attributes populated by CI Sync
Please refer to the MS Defender for Endpoint Data Sync Rules for detailed information about various default rules used by CI Sync source system connector for MS Defender for Endpoint.
The following pages are specifically related:
-
Rule 1 - SentinelOne Record Sets for Assets and Related Child Records
-
Rule 3 - Mapping of SentinelOne Asset Types to ServiceNow CMDB Classes
-
Rule 4 - ServiceNow Master Data Tables updated by CI Sync for SentinelOne
-
Rule 5 - Mapping of SentinelOne Attributes/Fields into CMDB Cl Classes
Sample screen shots of the resulting data
Below are screen shots showing the resulting data in ServiceNow thanks to CI Sync synchronizing the above record sets.
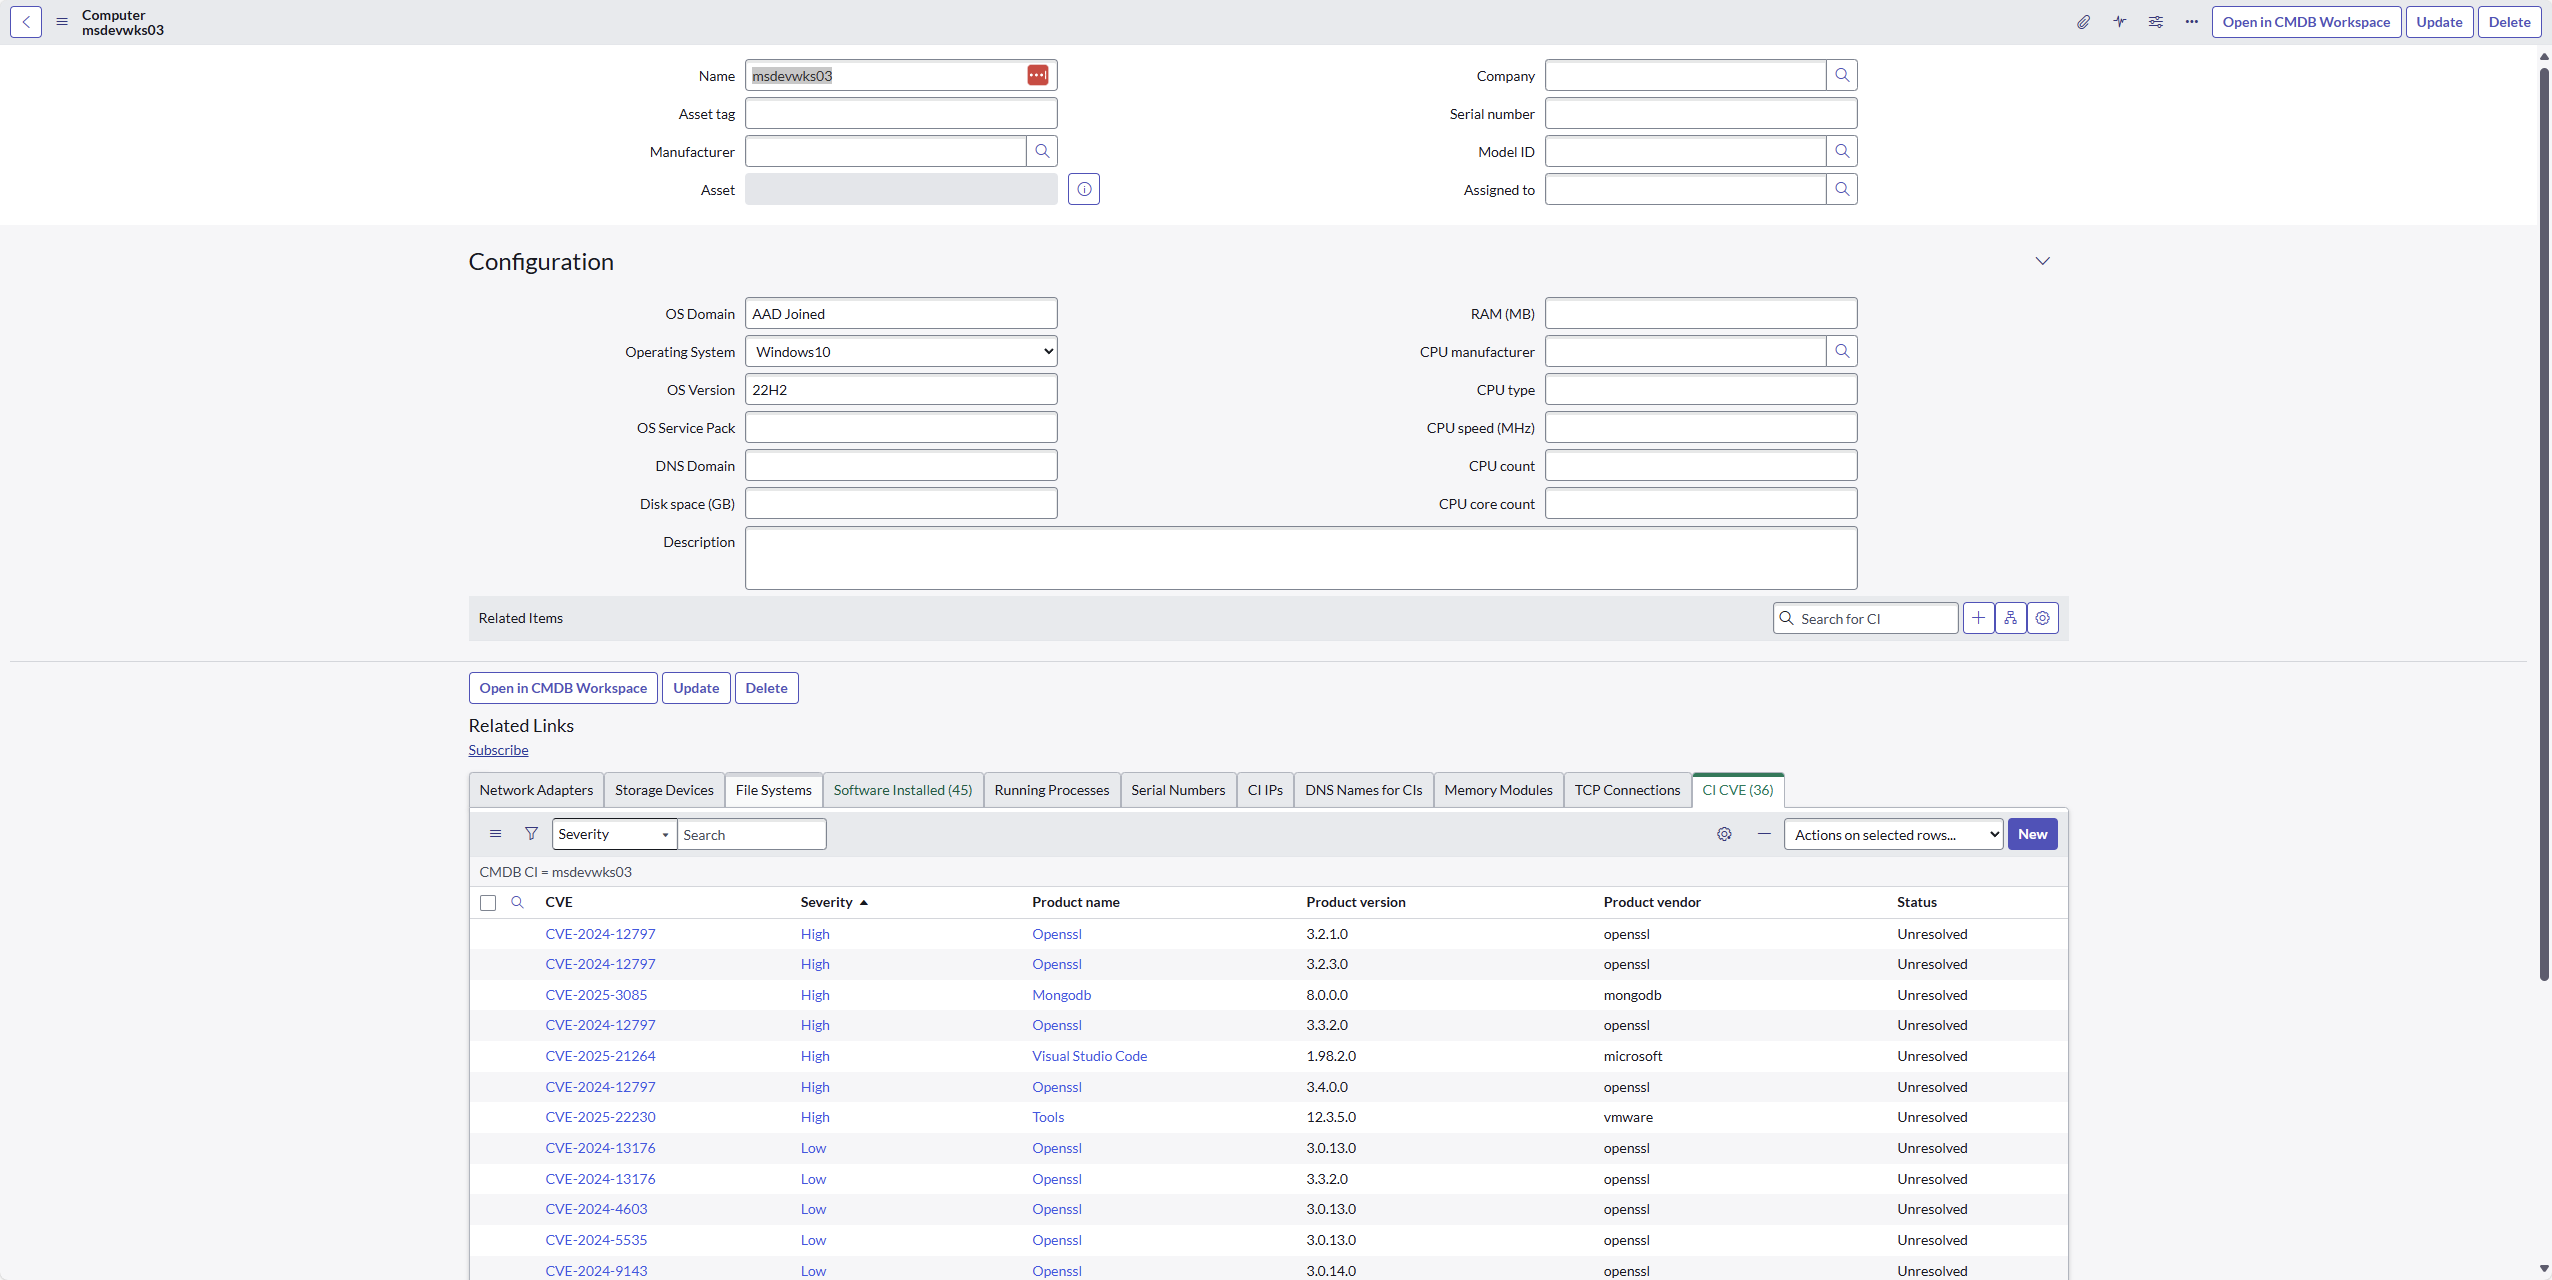
Screen Shot 1: An IT asset created by CI Sync showing related CVEs and associated software applications identified by SentinelOne.
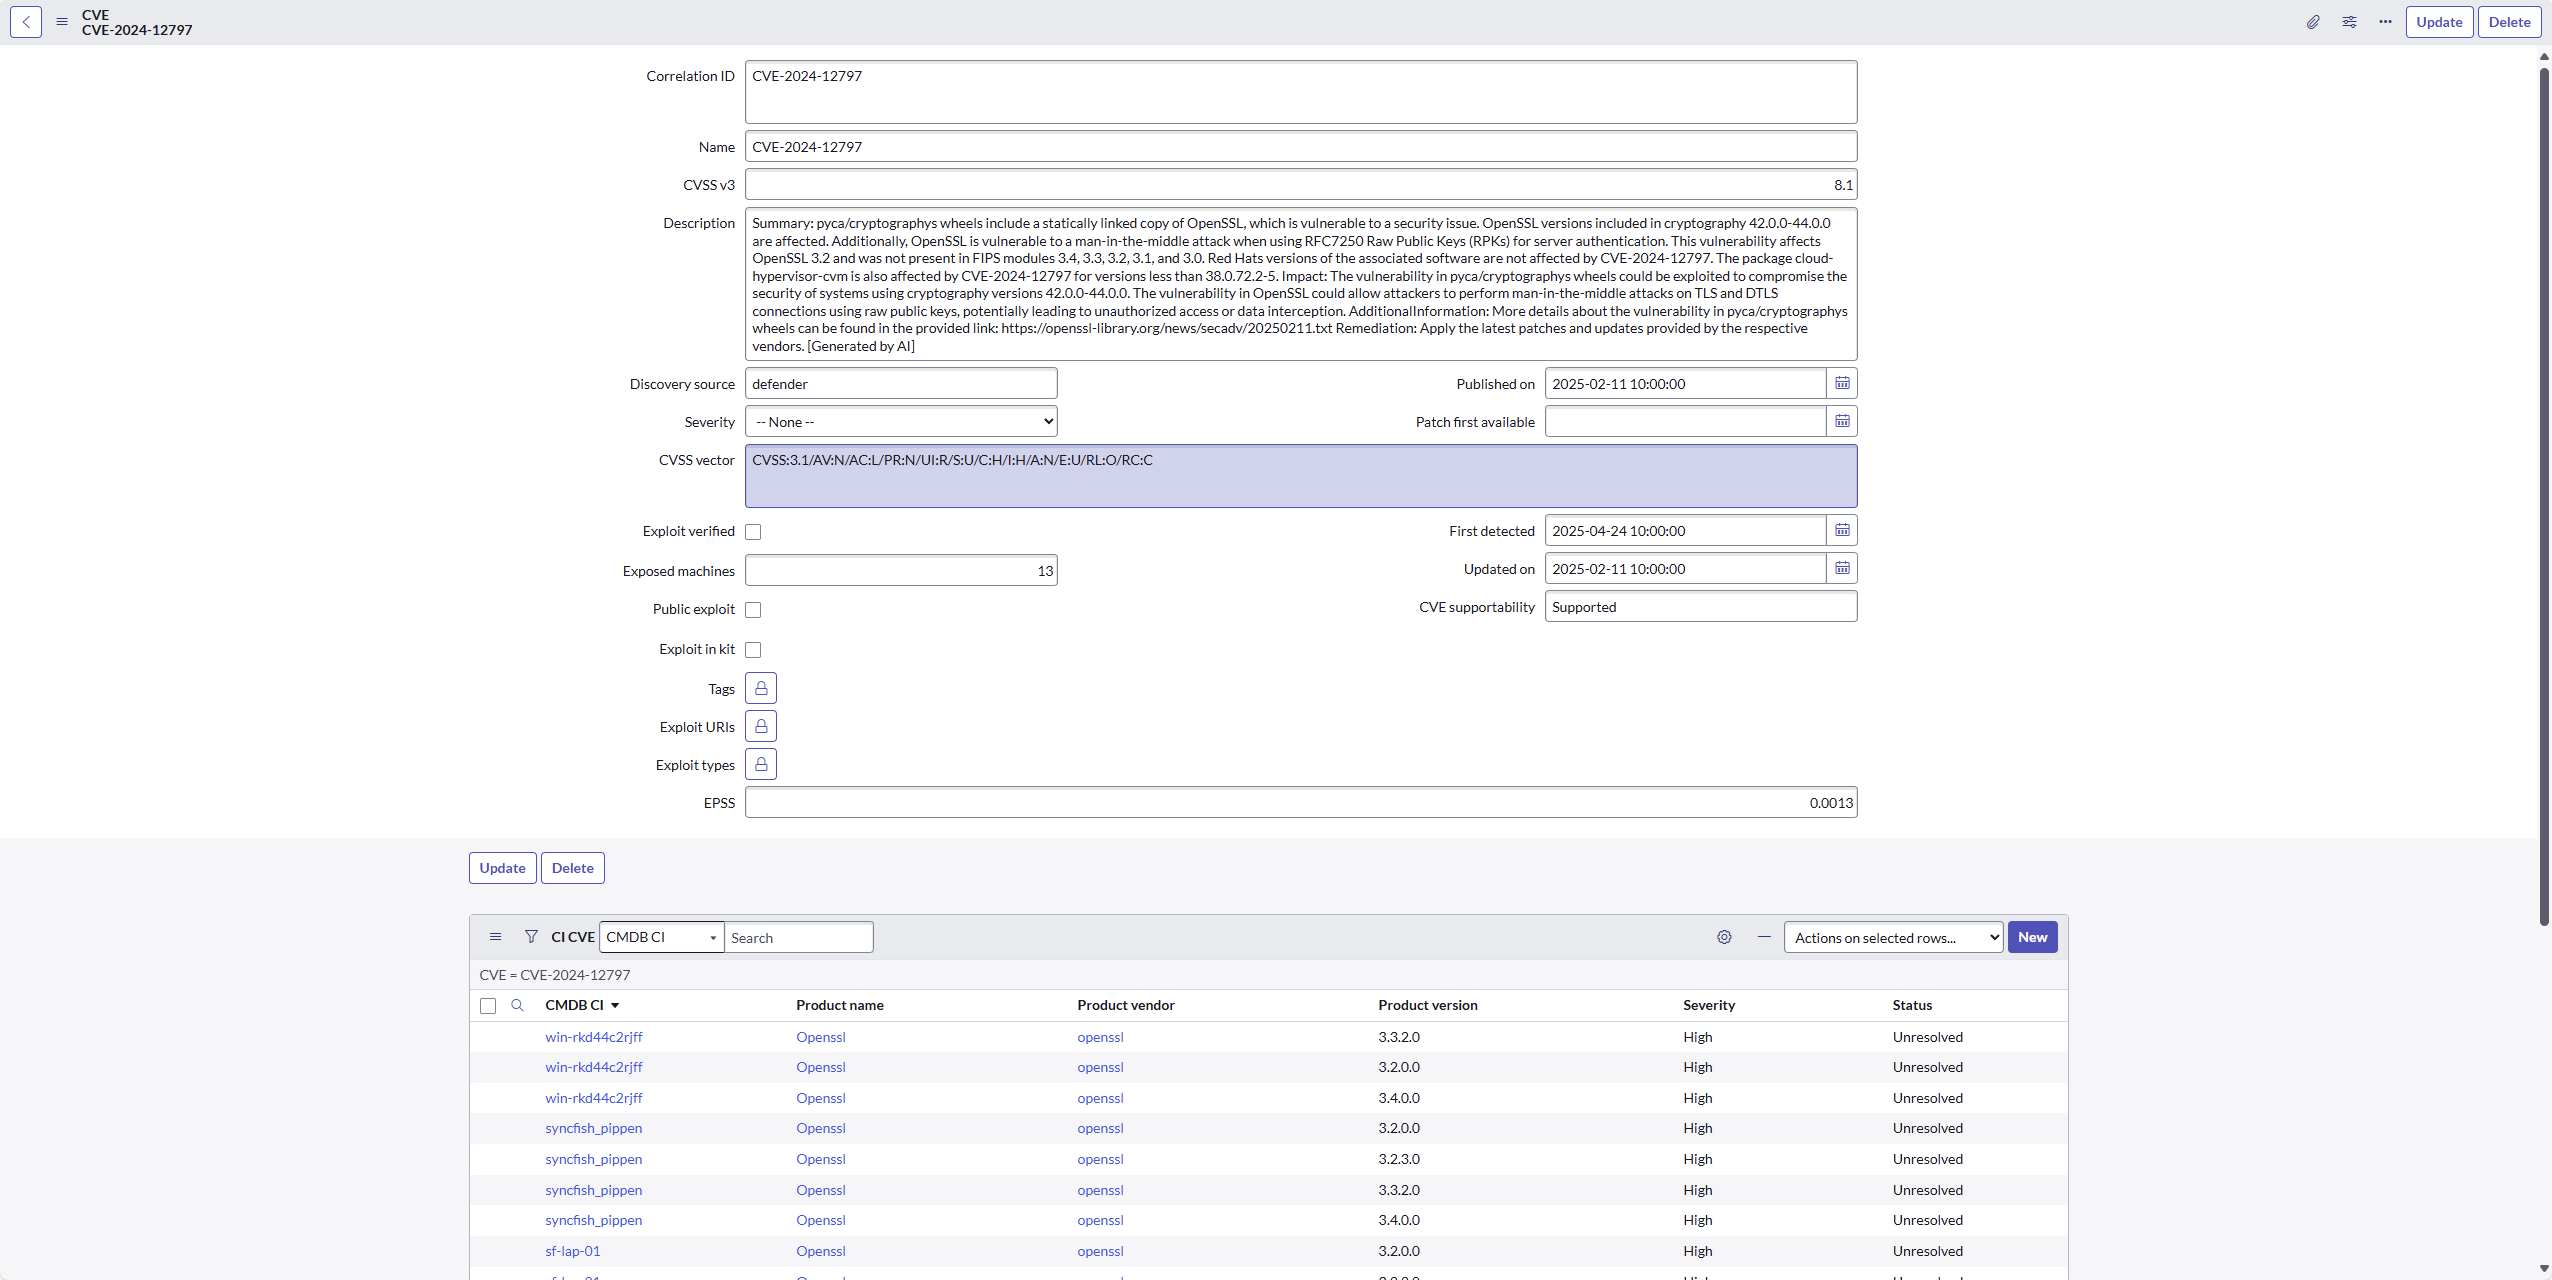
Screen Shot 2: An individual CVE master record showing the CVE details and the related list of all impacted CIs (including the related software applications).
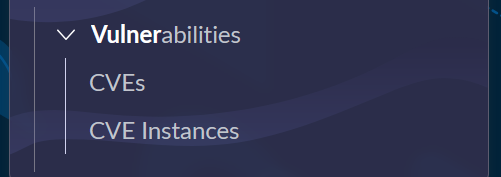
NOTE: You can locate the generated data from the ServiceNow navigation menu.
How CI Sync uses the CVE Status value so you can establish a remediation workflow
In addition to creating the record sets and related lists described above, CI Sync sets a dedicated CVE Status attribute on each CVE associated with a given CI and the associated software application. This can be a highly valuable feature allowing organisations to define an end-to-end workflow for remediating detected CVEs.
Here’s how it works:
-
When CI Sync first creates the CVE record against each CI, the status value is set to “Unresolved”. See the screen shot below.
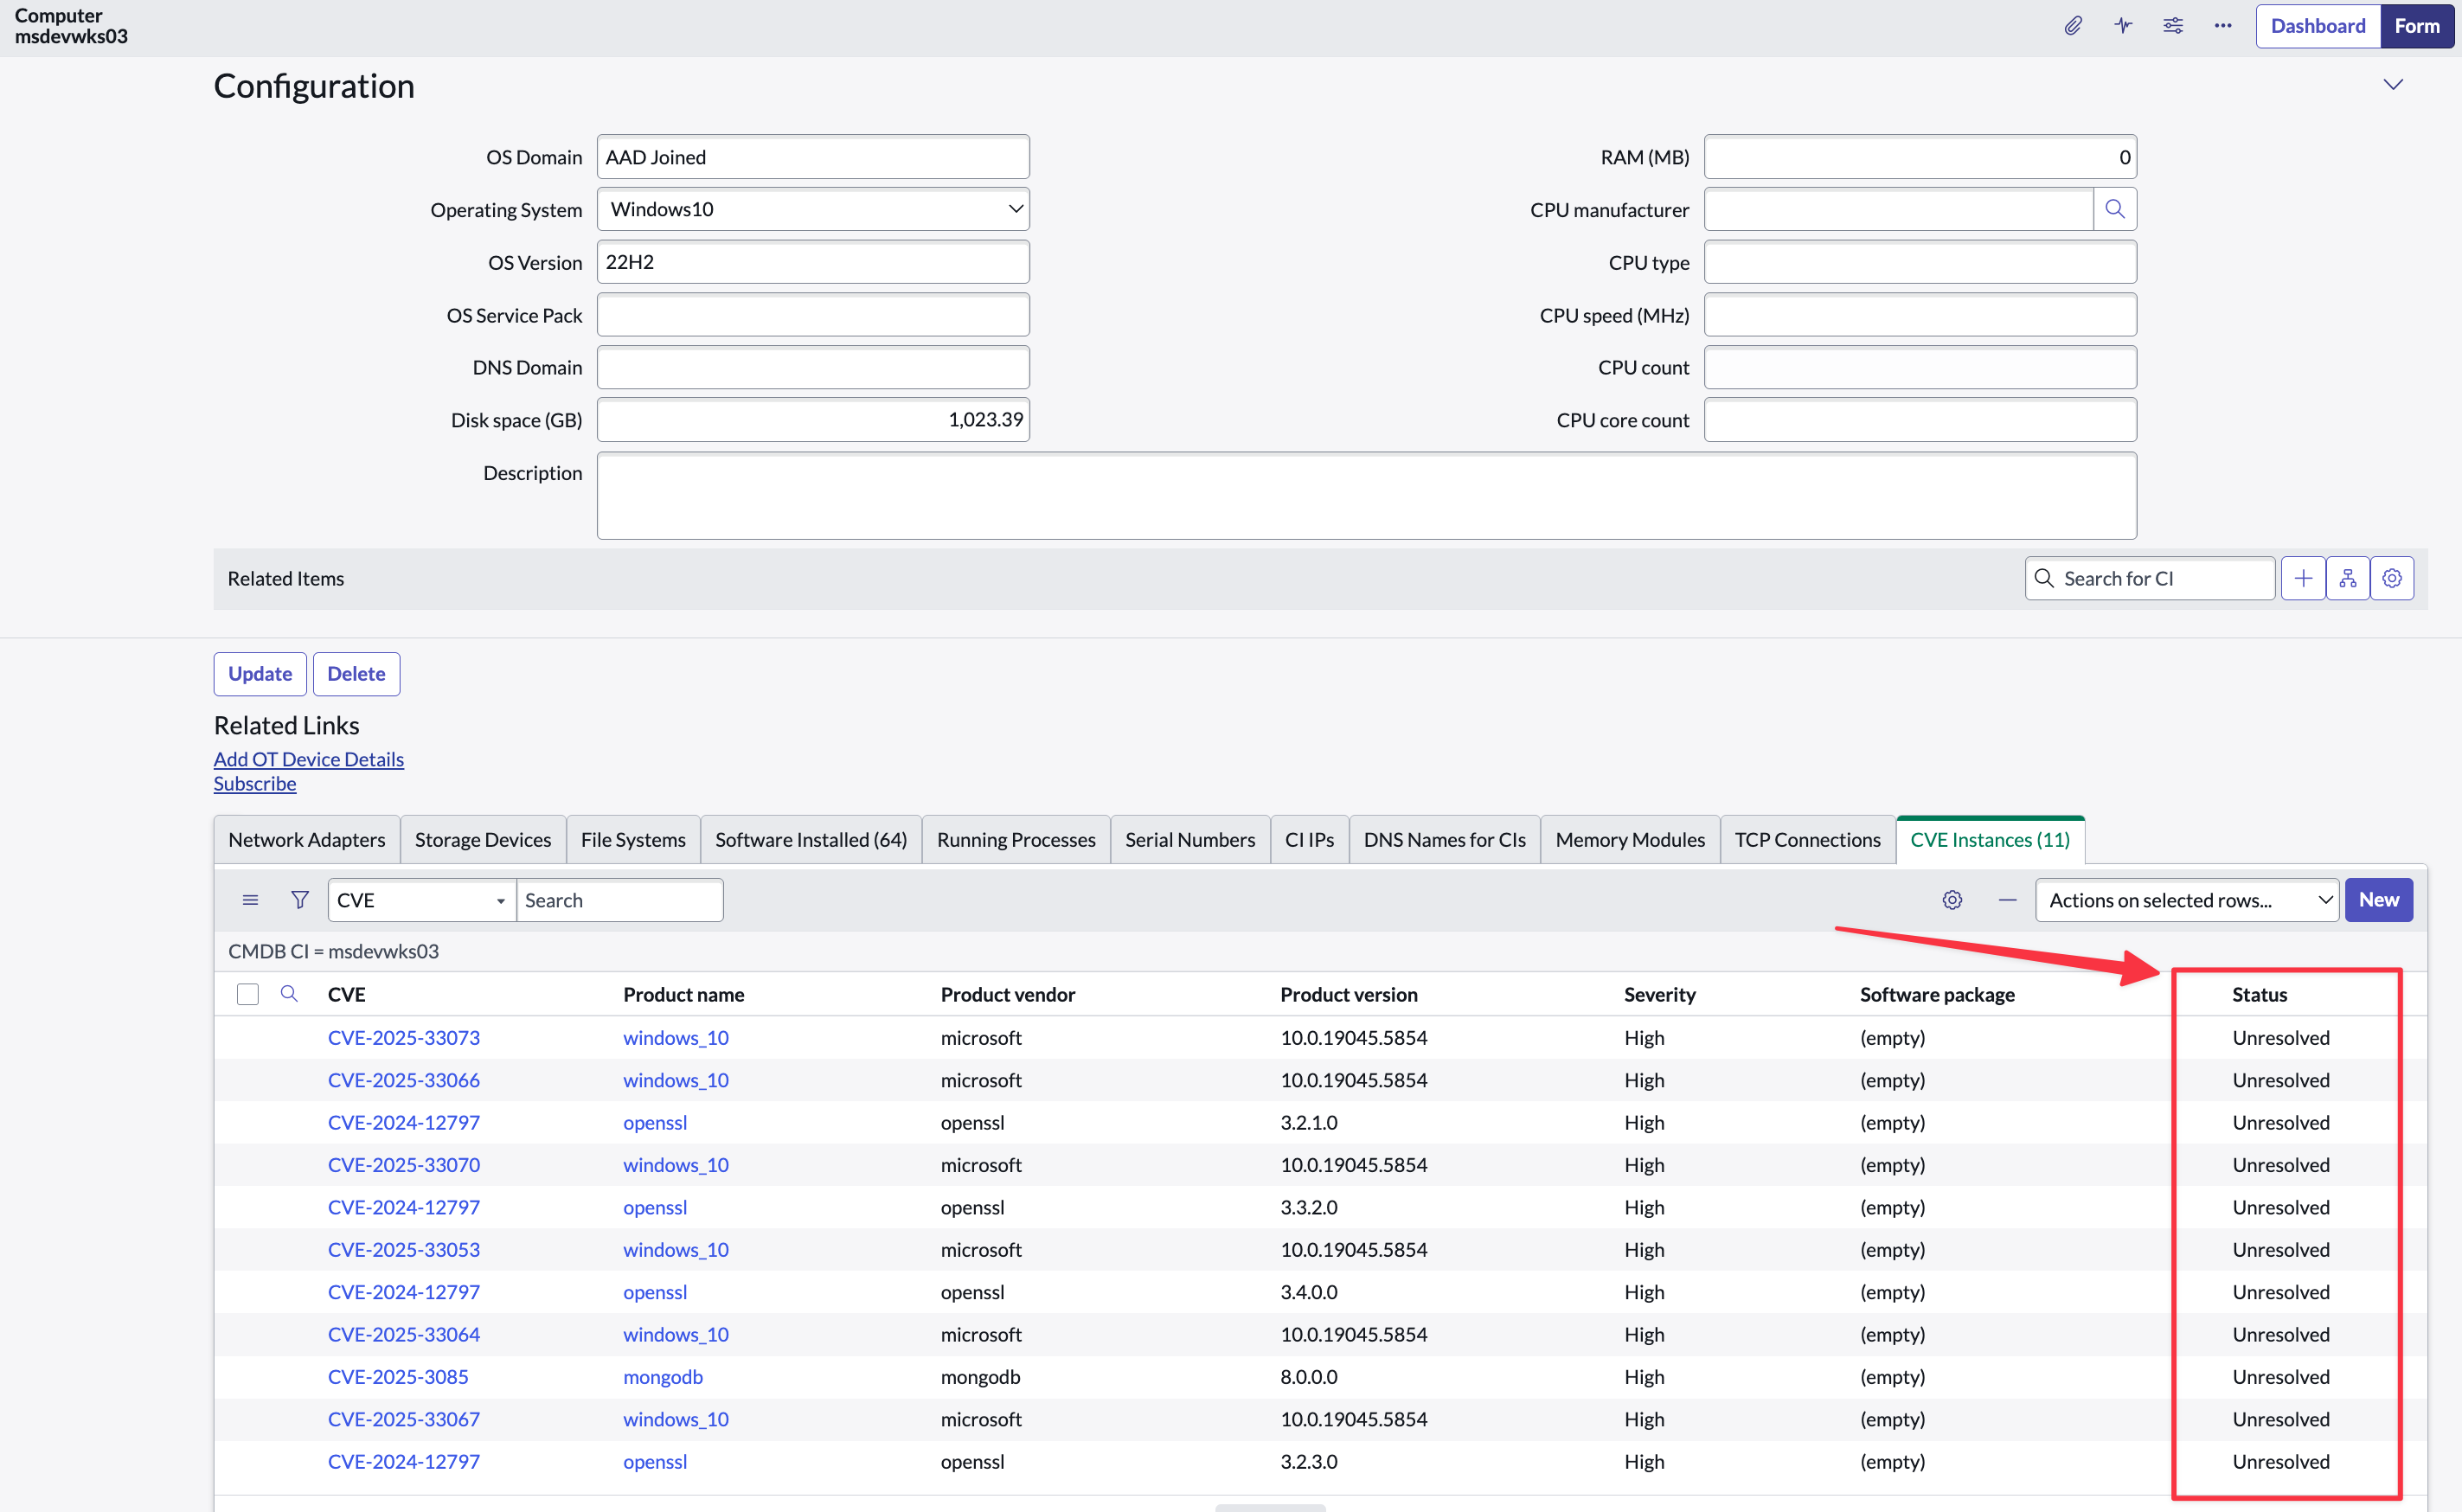
-
Organisations can use this “Unresolved” status to create one/more remediation tasks to the relevant operational teams.
-
Syncfish recommend the status be set to “Resolved Pending” once the team has remediated the CVE/s on the related CI.
-
Resolved Pending indicates the team is waiting for Microsoft Defender for Endpoint to separately detect the CVE has been addressed and therefore can be removed from the asset in the Defender for Endpoint portal.
-
-
At this point the SentinelOne portal has removed the CVE against the asset.
-
The subsequent CI Sync job will detect the CVE has been removed by SentinelOne and CI Sync will change the status value to “Resolved Confirmed” against the CI.
Other synchronization behaviours
-
CI Sync only creates CVE definition records for records that have current occurrences across the devices inventory being synchronized from SentinelOne.
-
CI Sync won't attempt to delete the CVE definition records when there are no more instances of that CVE across the devices inventory being synchronized from SentinelOne.
-
CI Sync doesn’t delete the records that link the CVE records to the CIs.
Task 5: Do Not Synchronize Installed Software from two different source systems
Customers should be aware that if you synchronize Installed Software (i.e. the installed software applications for the same IT asset) from two different source systems (e.g. from Intune and Defender, or from Lansweeper and Defender, or InTune and SCCM, etc etc) for the same device you will end up with duplicate software instance records in your CMDB.
The cause of this issue is the naming convention of Installed Software is inconsistent between different source systems, and therefore CI Sync cannot reliably correlate the Installed Software per CI within the CMDB. By way of example:
-
In InTune, “Microsoft Teams” is stored as “MSTeams” (and there is no Manufacturer attribute in InTune).
-
However, in Defender for Endpoint, “Microsoft Teams” is stored as “Teams”.
Important Recommendation from Syncfish
Syncfish do NOT recommend synchronizing Installed Software from two different source systems.
Below are some notes to action this in advice in the CI Sync Web UI:
-
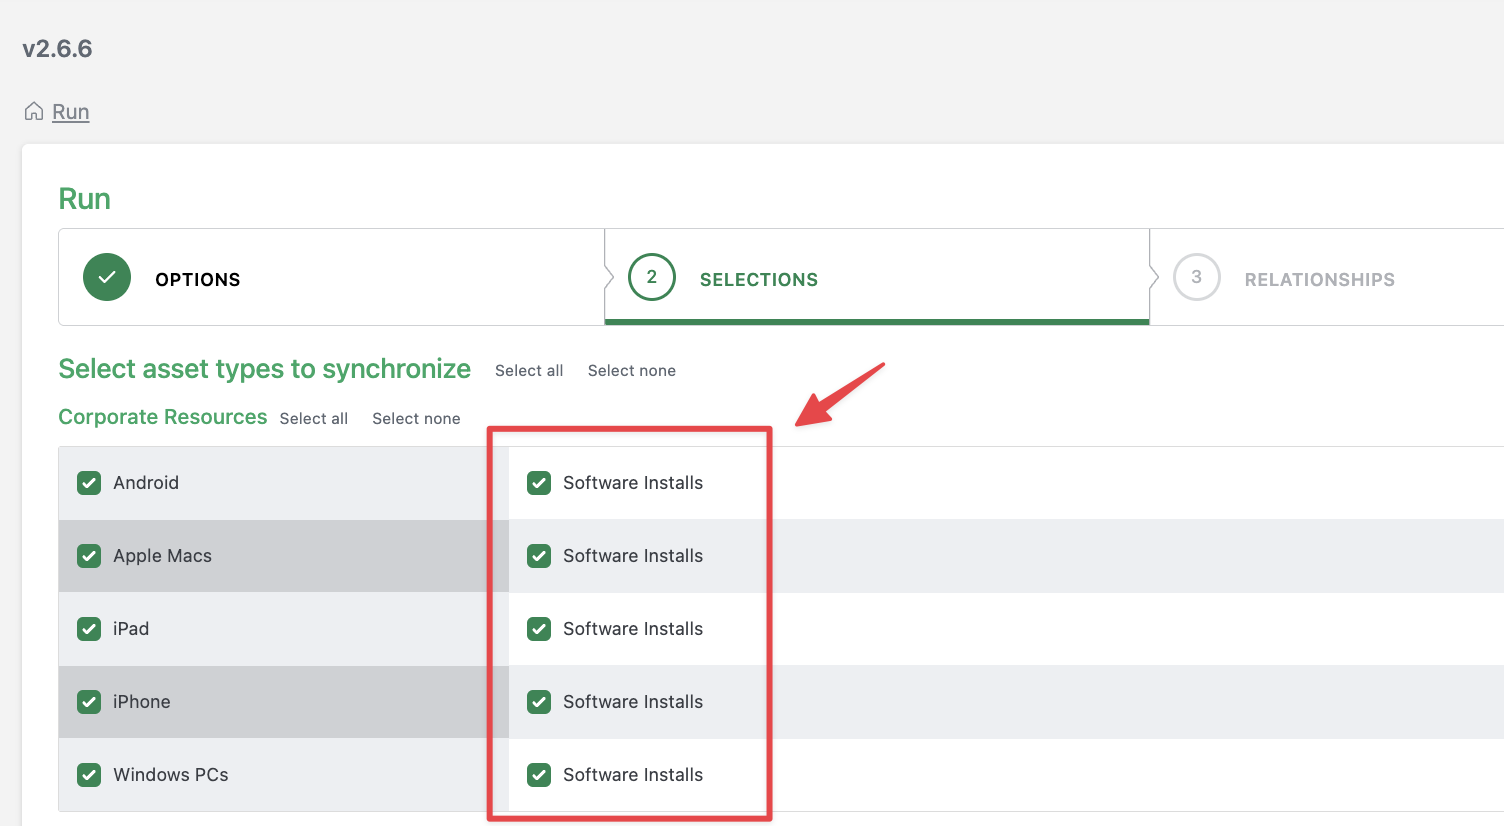
When you are creating a sync job via the CI Sync UI and reach the Selections page, do not select “Software” or “Software Installs” from a given source system if you have already selected Installed Software on another source system sync job.
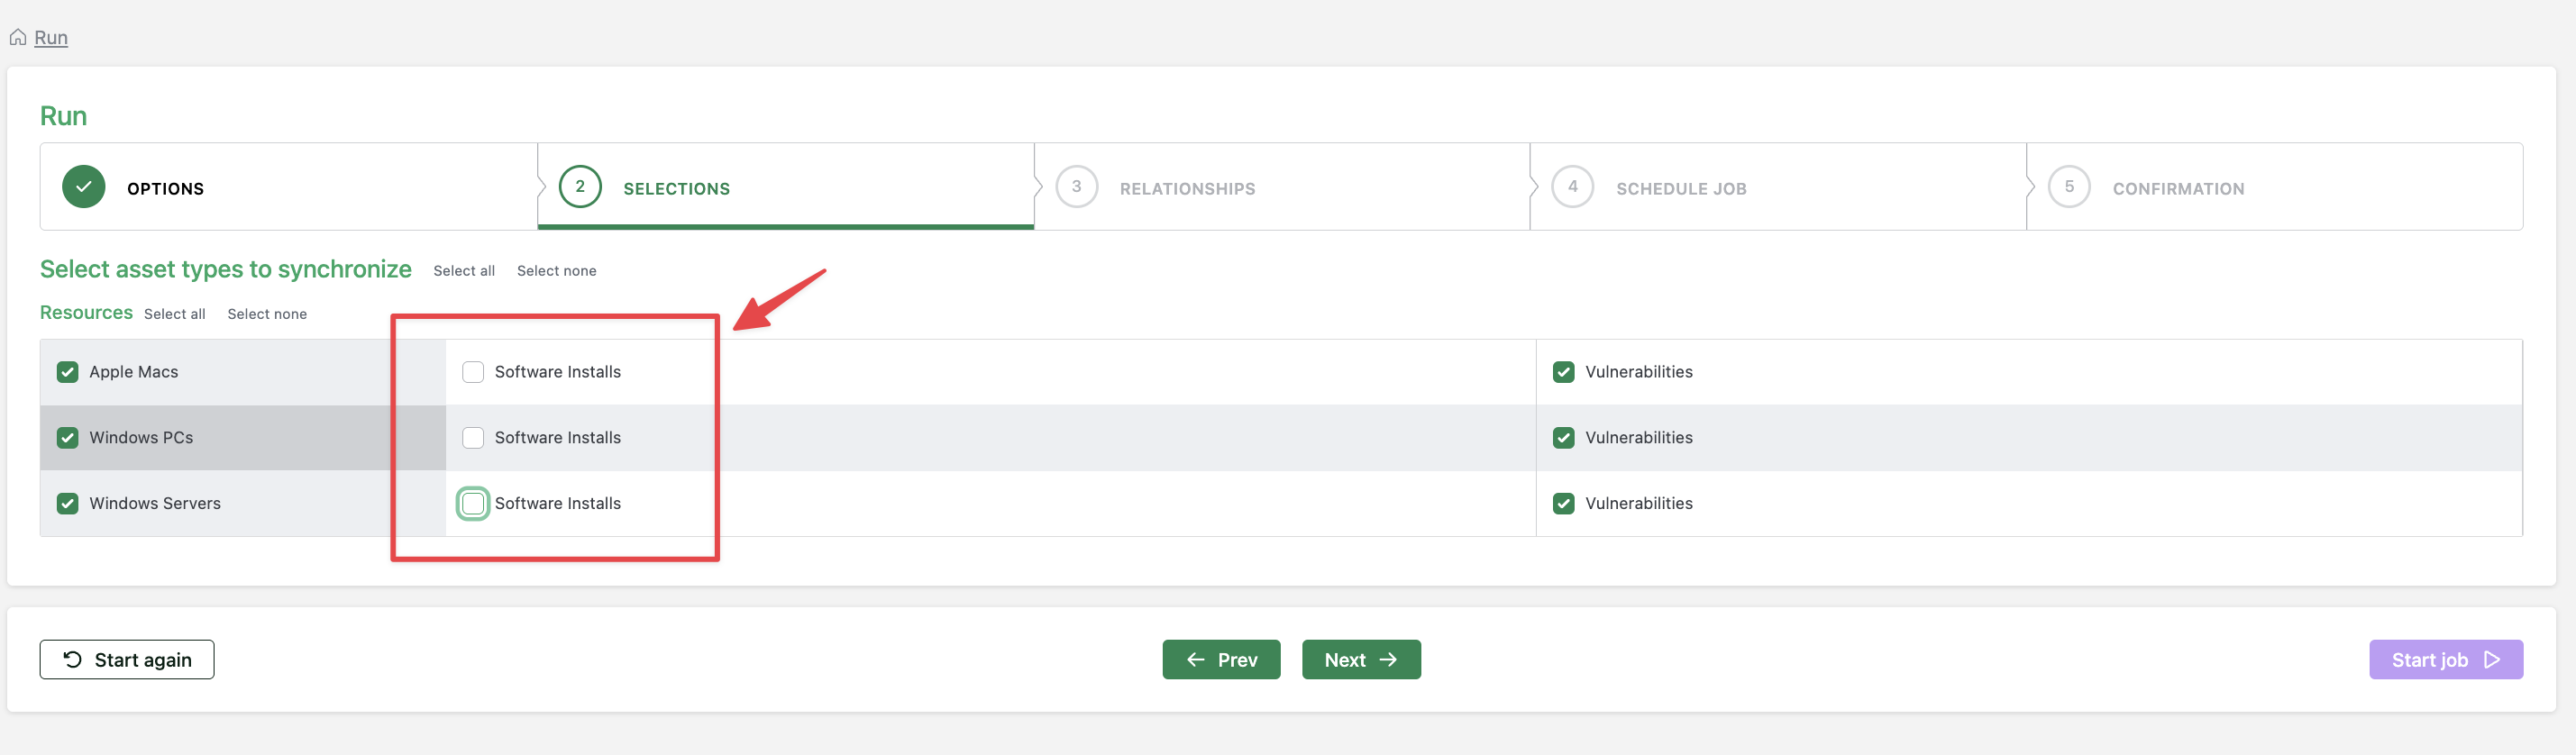
The screen shot below shows a sample of the Selection page for InTune as the source system for a CI Sync job. If you have selected Software Installs for InTune you should not select Software Installs for a Microsoft Defender for Endpoint sync job (as shown on the subsequent screen shot below)
The screen shot shows the Selection page for Microsoft Defender for Endpoint as the source system for a CI Sync job. You should NOT select Software Installs via Microsoft Defender for Endpoint because you have selected Software Installs via the InTune source system.
The same logic/approach applies to any other source system that offers Installed Software, such as SCCM, Jamf, or Lansweeper. The key message is: do NOT recommend synchronizing Installed Software from two different source systems.