Extended Page Title
Step 3 - Configure your ServiceNow to be ready for CI Sync
Task List
|
Task # |
Task |
Performed by |
|---|---|---|
|
1 |
Configure the Batch API timeout |
ServiceNow Admin |
|
2 |
Configure the CMDB CI Software Package Name field for increased performance |
ServiceNow Admin |
|
3 |
Create a User Account (to be used by the CI Sync SaaS application) |
ServiceNow Admin |
|
4 |
Configure permissions on the new User Account |
ServiceNow Admin |
|
5 |
(Optional) Configure OAuth Authentication on the CI Sync User Account |
ServiceNow Admin |
|
6 |
(Optional) Consider applying additional changes to ServiceNow to support the specific requirements of source systems |
ServiceNow Admin |
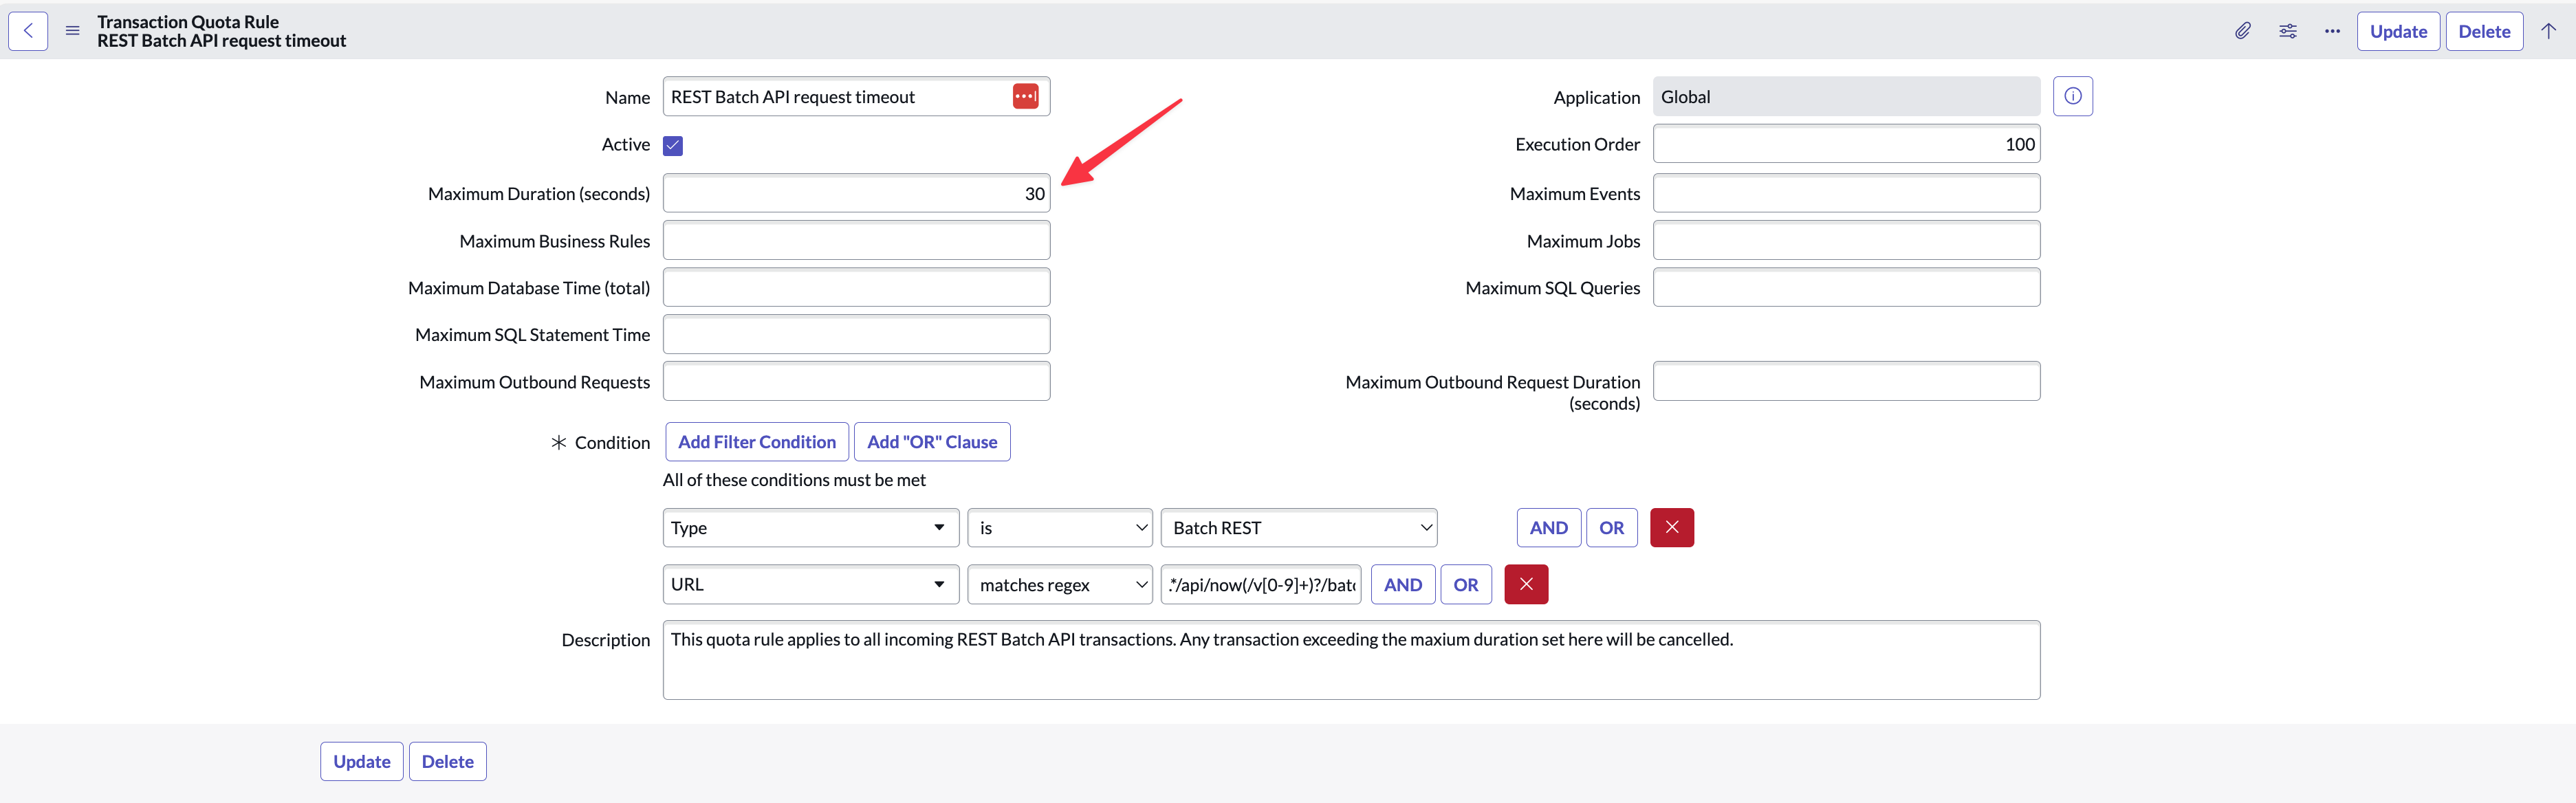
Task 1: Configure the Batch API timeout
-
Navigate to your ServiceNow at this URL:
https://YourInstance.service-now.com/sysrule_quota_list.do?sysparm_query=nameLIKEbatch -
From the list, locate the entry where the Name is “Rest Batch API request timeout”
-
Change the “Maximum Duration (seconds)” to 60, then click Update
Task 2: Configure the CMDB CI Software Package Name field for increased performance
This task only applies to customers syncing Installed Software records in the CMDB (i.e. into the cmdb_ci_spkg table).
If you are not sync’ing Installed Software records there is no need to perform this task.
There are two options for completing the configuration of your ServiceNow instance.
|
Option |
Summary and Link to Detailed Instructions |
|
Option 1 – Automated Steps using Update Set |
|
|
Option 2 – Manual Steps using ServiceNow UI Steps |
|
Each of the above options achieves the same end-result. That is, each option applies the following changes:
-
Updates the dictionary record to display=False on the table “cmdb_ci_spkg” for column “package_name”
-
Add the “Package name” field to the “List Layout” on each of the following CI Class default views:
-
AIX Server
-
Computer
-
ESX Server
-
HPUX Server
-
Hyper-V Server
-
Linux Server
-
Netware Server
-
OS/X Server
-
Solaris Server
-
UNIX Server
-
Windows Server
-
Task 2 (Option 1): Automated Steps using Update Set
Expand the instructions below to use a ServiceNow Updateset (provided by Syncfish) to update the dictionary value on the various CI classes.
Click to expand the instructions for Option 1
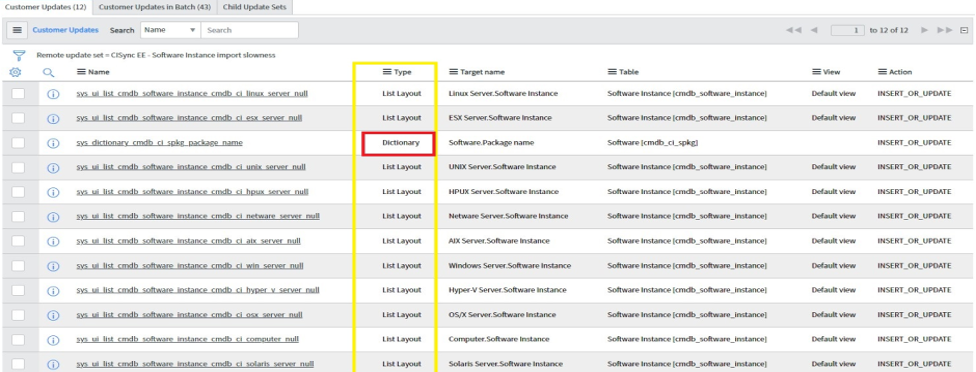
Informational Note (about what the updateset updates)
The update set includes two types of update as follows.
-
It updates to the Dictionary on the table “cmdb_ci_spkg”.
-
It adds the “Package name” field to the default “List Layout” on a few CI Classes
These two updates are shown in the screen below.
When you preview the update set you may see preview errors if the above List Layouts have already been modified in your ServiceNow instance. If you receive preview errors and use the instructions further below to decide how best to proceed. If in doubt contact Syncfish for assistance.
-
Download the update set from Syncfish at the below URL:
https://downloads.syncfish.app/servicenow/cisync-fix-software_instance-import-slowness.xml -
Open a browser and navigate to your ServiceNow instance
-
In the left nav menu search for “Retrieved Update Sets” and click to open
-
Right click on the column heading row and select “Import XML”
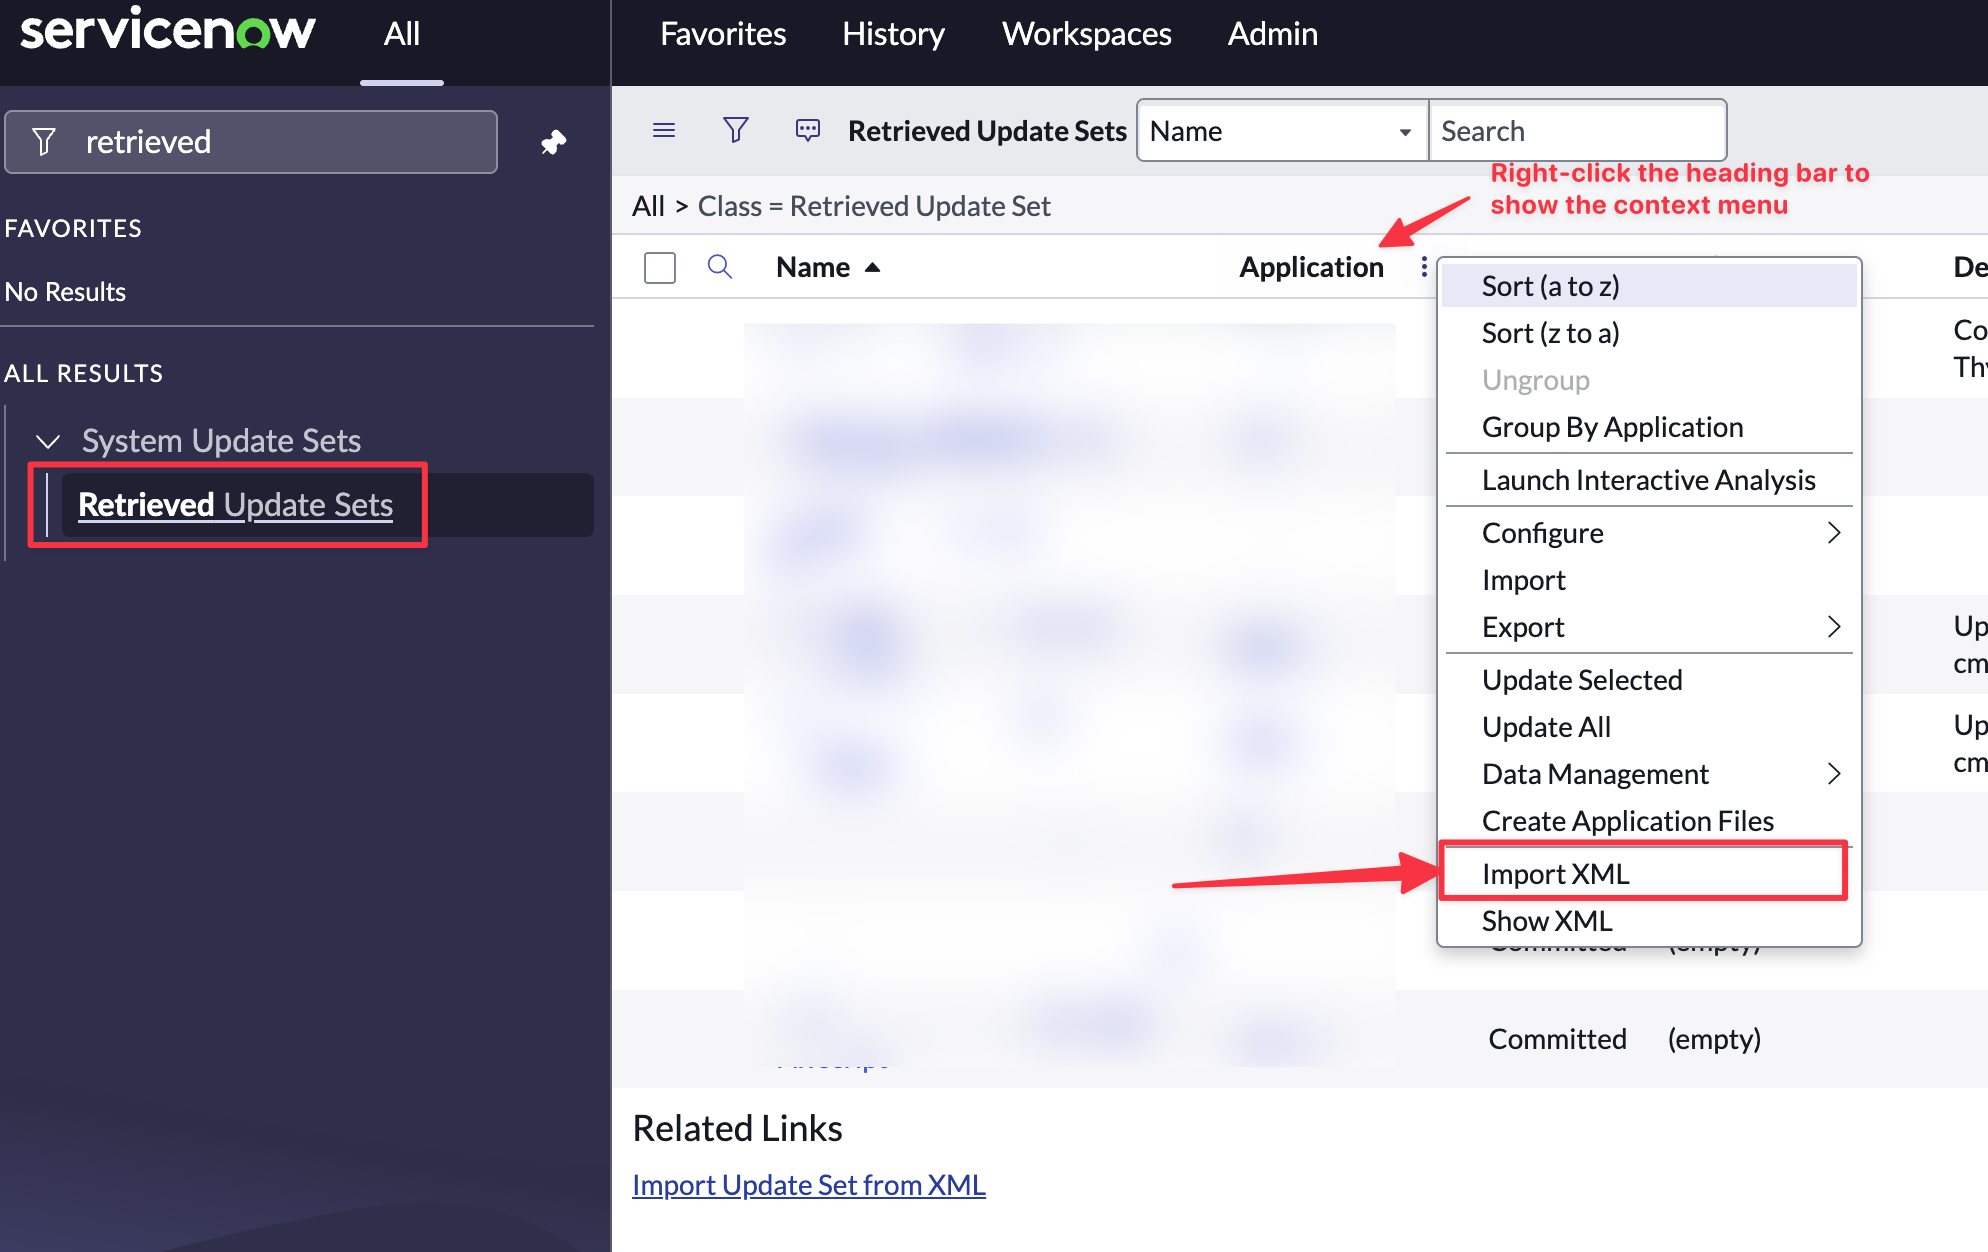
-
Select “Choose File”
-
Select the downloaded file “cisync-fix-software_instance-import-slowness.xml”
-
Click to open the Update Set
-
Click “Preview Update Set”
-
If there are no preview errors, Click “Close” and proceed to Step 12 below to Commit the Update Set.
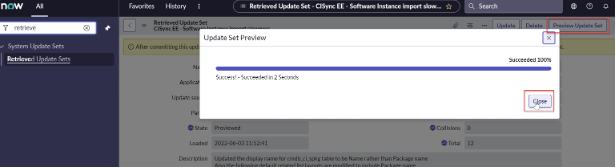
-
If there are preview errors, they are likely to be related to the List Layout update (as described in the Informational Note at the start of this task). Use the details below to diagnose and resolve the errors and if in doubt contact Syncfish for assistance.
-
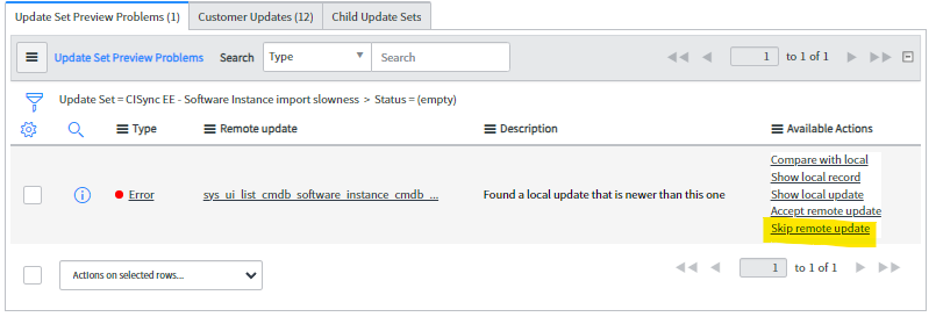
View the errors in the ‘Update Set Preview Problems’ shown below.

Make sure all the errors are related to the UI List view updates and the error is not for the Dictionary update then you can Skip the remote update in the Available Actions list.
-
Click “Commit Update Set”
-
Proceed now to Task 3: Create a User Account (to be used by your CI Sync SaaS instance).
Task 2 (Option 2): Manual Steps using ServiceNow UI
Expand the instructions below if your ServiceNow Admin will manually update the dictionary value on the various CI classes.
Click to expand the instructions for Option 2
Guidance Note
Only perform the below steps if you didn’t use Option 1 above (i.e. didn’t use the Update Set option).
If you have already used Option 1 (the automated method) then proceed now to Task 3: Create a User Account (to be used by your CI Sync SaaS instance).
-
Navigate to the dictionary record for Table: cmdb_ci_spkg, Column name: package_name using the following URL:
https://YourServiceNowInstance.service-now.com/sys_dictionary_list.do?sysparm_query=nameSTARTSWITHcmdb_ci_spkg%5EelementSTARTSWITHpackage_name -
In the list, click on the record called cmdb_ci_spkg to open it.
-
Uncheck the Display checkbox.
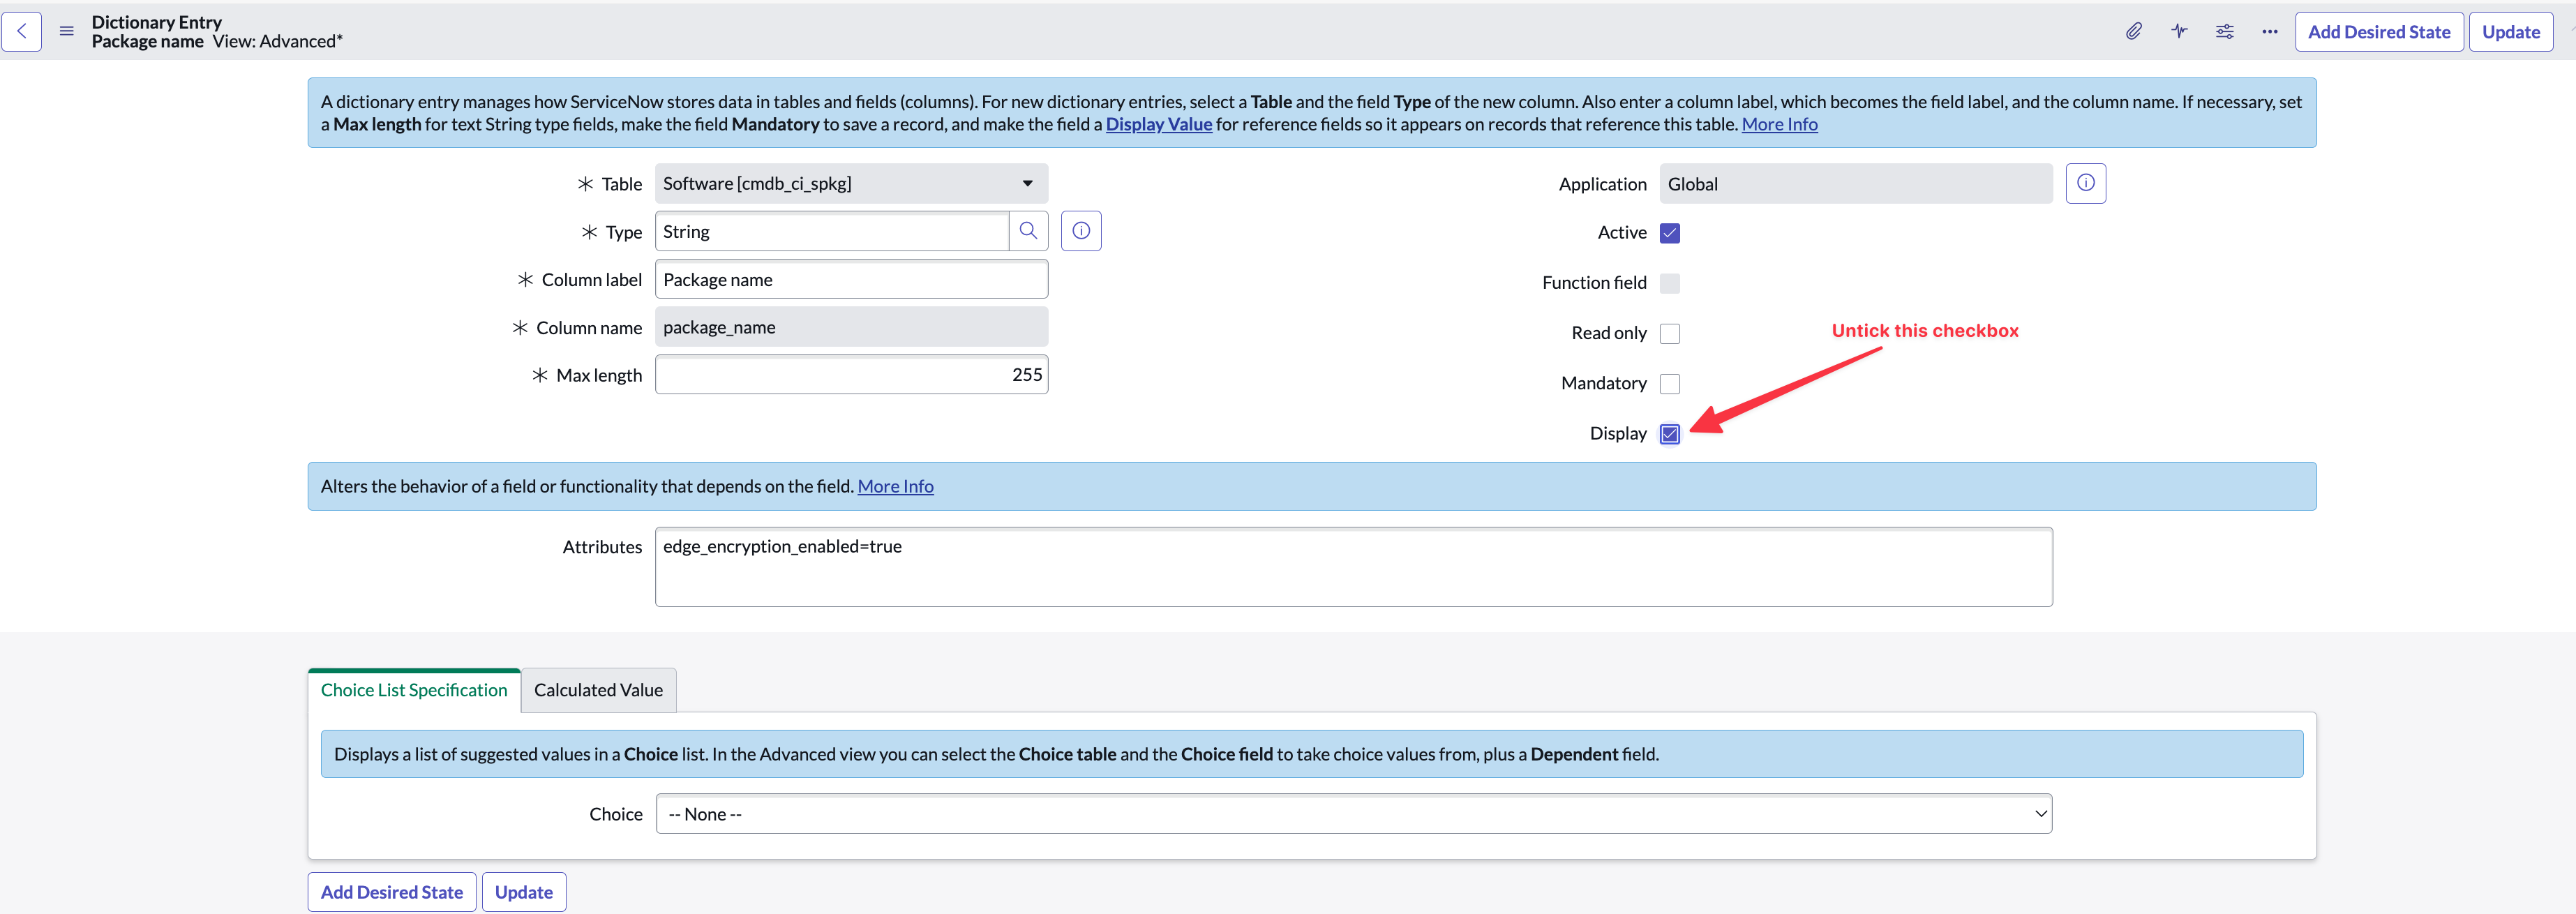
-
Click Update.
-
Next, you need to update the “Software Installed” Related Lists column layout for a number of CMDB CI record types.
-
To begin with, execute the steps below to update the Windows Server – Default view (and then repeat these steps for the additional CI record types noted further below).
-
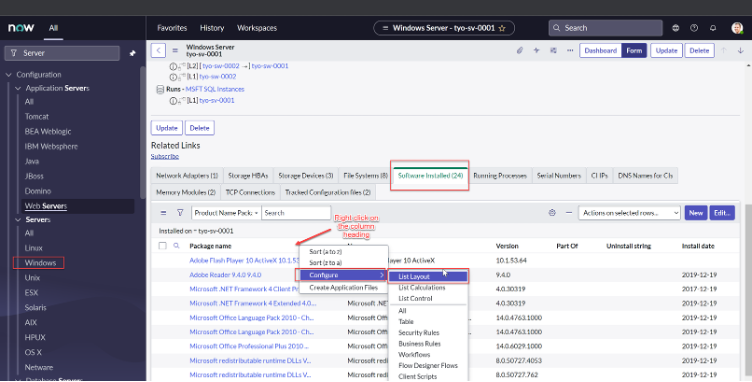
Navigate to the list of “Windows Servers” in your CMDB and open a server record.
-
Scroll down to the form to see the Related Lists (the set of tabs at the bottom of the form)
-
Click “Software Installed”
-
Right click the column heading (e.g. Package Name) within the “Software Installed” Related List
-
Select “Configure”
-
Select “List Layout”
-
-
In the Available list select “Product Name”, select “Expand selected reference field” in the middle buttons between the “Available” list and “Select” list
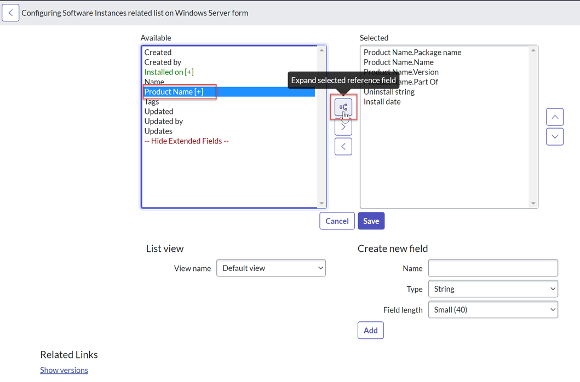
-
Scroll down to find “Package name” under the “.Product Name --> Software Fields”
-
Select “Package name”
-
Select the “Add” button
-
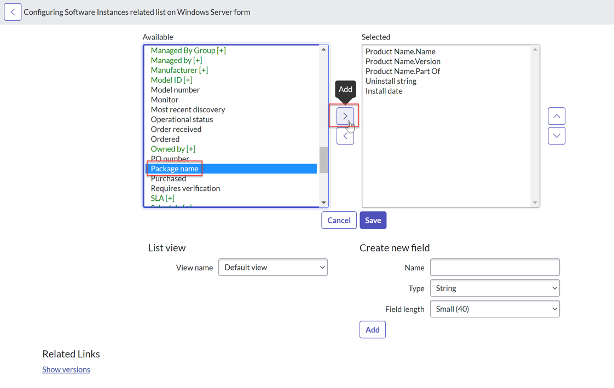
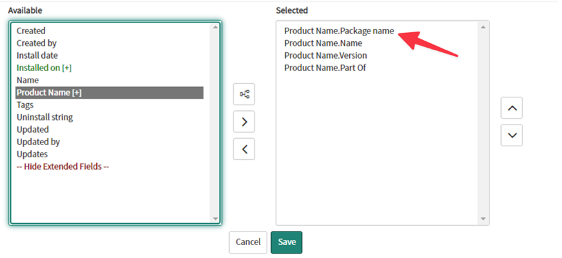
-
“Package name” should now be added to the “Selected” list on the right-hand side
-
Click “Save”
-
-
Repeat the above steps by navigating to each of the following CMDB CI record types and amending each of their “Software Installed” Related List:
-
AIX Server - Default view
-
Computer - Default view
-
ESX Server - Default view
-
HPUX Server - Default view
-
Hyper-V Server - Default view
-
Linux Server - Default view
-
Netware Server - Default view
-
OS/X Server - Default view
-
Solaris Server - Default view
-
UNIX Server - Default view
-
-
Proceed now to Task 3: Create a User Account (to be used by your CI Sync SaaS instance).
Task 3: Create a User Account (to be used by your CI Sync SaaS instance)
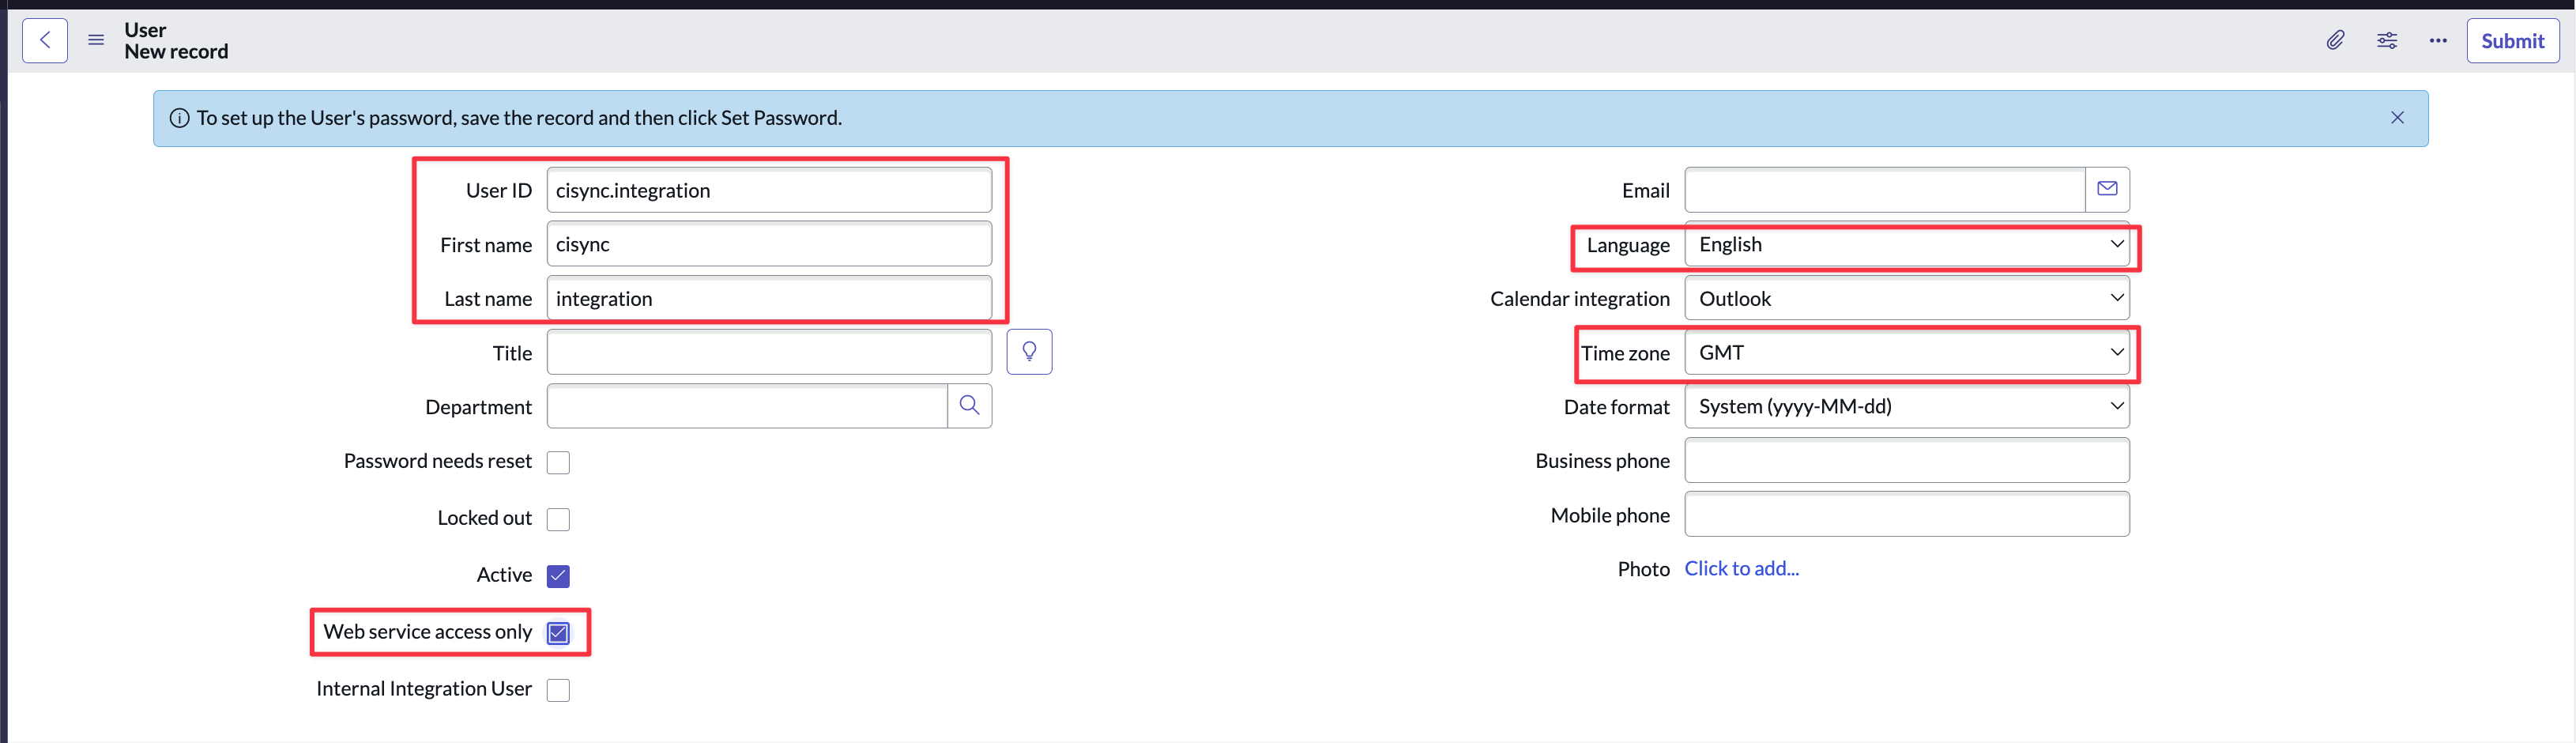
Create a ServiceNow user account. It is recommended that it be named accordingly so users can identify the records created/updated by the integration. e.g. “cisync.integration”.
-
Log into ServiceNow as an Administrator
-
Navigate to System Security → Users
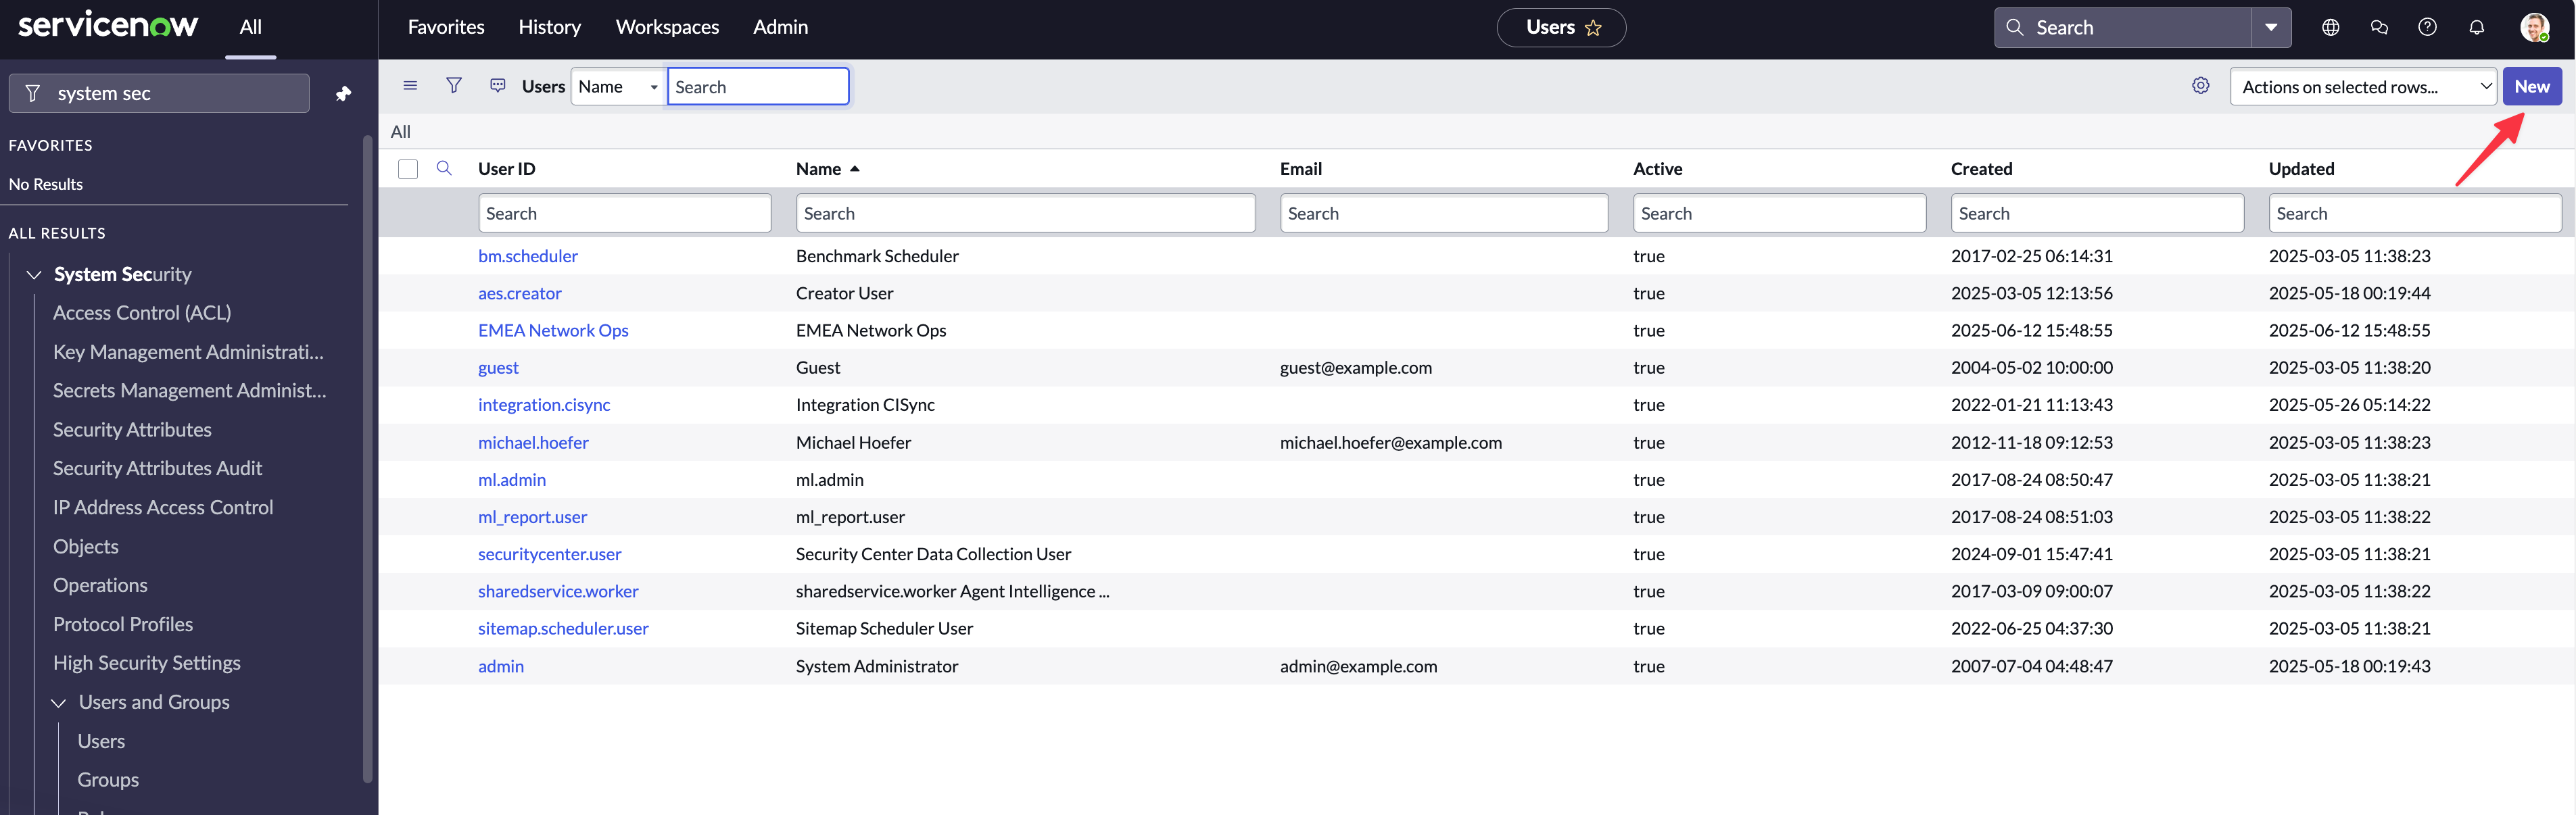
-
Click New to start creating a new account for the CI Sync integration
-
Some key points when creating the account:
-
Enter a User ID, First name and Last name that allow the CI Sync account to be easily identifiable in the future.
-
The way you set the password will vary depending on your edition of ServiceNow. Make sure you know/capture the password as you’ll need it later on.
-
Set the Language to English in all cases.
Important: If you set Language to anything other than English it will cause issues when you start to run synchronization jobs. -
Set the Time zone to GMT
-
-
Syncfish recommend tagging the account as a non-interactive account. The way you do this varies based the version and patch level of your ServiceNow. Here are some guidance notes
-
The two ways to flag the account are:
-
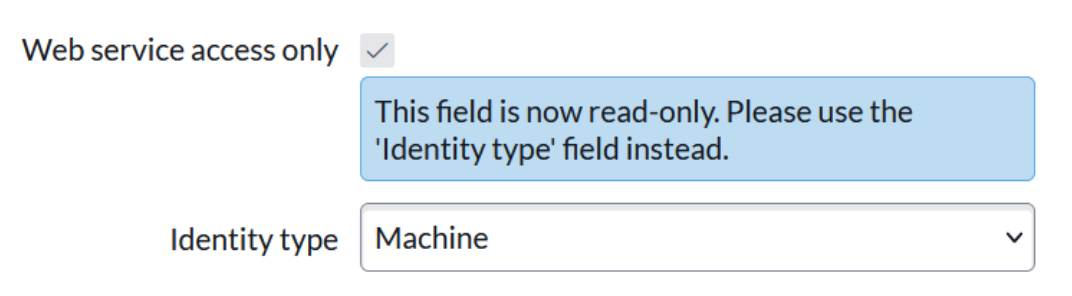
Either, tick the “Web service access only” checkbox (as shown in the screen shot below)
-
Or, set the “Identify Type” as “Machine” (as shown in the screen shot directly below)
-
-
If you don’t see either of the above options:
-
The field "web service access only" is controlled by the new field "Identity Type" for Yokohama Patch 6 and later. See this ServiceNow article: https://support.servicenow.com/kb?id=kb_article_view&sysparm_article=KB2420837
-
If you don’t see the “Web service access only” checkbox you may not be running the Non-Interactive Sessions plugin from ServiceNow. Discuss this topic as needed with your ServiceNow platform admin/technical owner to decide how best to configure the CI Sync integration account as a non-interactive account. The following article from ServiceNow may assist: https://www.servicenow.com/docs/bundle/zurich-platform-administration/page/administer/users-and-groups/concept/c_NonInteractiveSessions.htm
-
Click Submit
Data Capture Note
Make sure you record Username/Password as they will be required when configuring the ServiceNow connection properties using the CI Sync Web UI during S4 - Add ServiceNow as a Destination for CI Sync later in these setup guides.
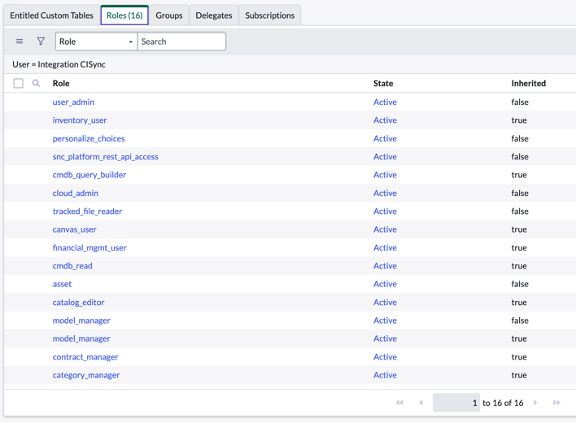
Task 4: Configure permissions on the new User Account
-
Navigate to the cisync user account (e.g. “cisync.integration” or the account name you used in Task 3 above).
-
Select the Roles tab and click the Edit… button
-
Filter/Select the roles below and click the Save button
-
asset
-
cloud_admin
-
model_manager
-
personalize_choices
-
snc_platform_rest_api_access
-
tracked_file_reader
-
user_admin
-
-
Click Save. Then use the “Roles” tab to check the above roles and the various inherited ones have been applied by comparing to screen shot below.
Task 5: (Optional) Configure OAuth Authentication on the CI Sync User Account
The CI Sync SaaS application supports the following authentication methods provided by the ServiceNow platform for API integrations:
-
Basic Auth
-
OAuth
Use the instructions below to configure OAuth Authentication if this is requried by your organisation.
You don’t need to use these OAuth instructions if you have decided to use Basic Auth.
Click to expand the instructions if using OAuth
Setting up the ServiceNow end of an OAuth endpoint is typically performed by a ServiceNow SME with specific knowledge of this functionality.
Also, different editions of ServiceNow may have different requirements for an OAuth endpoint.
The ServiceNow related instructions provided below are intended as a high level guide only, and are provided by Syncfish for general guidance.
If a Syncfish customer is unsure how to setup the ServiceNow elements for OAuth authentication for the incoming CI Sync connection, then we recommend the following:
-
Read the ServiceNow documentation on this same topic. The ServiceNow documentation can be less than clear, so if in doubt, contact your ServiceNow SME with OAuth experience. For ServiceNow Zurich release here are two articles Syncfish recommend are read in the order below
-
How to check/set a number of key settings/properties related to OAuth. See here: https://www.servicenow.com/docs/bundle/zurich-platform-security/page/administer/security/task/t_SettingUpOAuth.html
-
How to Create an endpoint for clients to access the instance. See here: https://www.servicenow.com/docs/bundle/zurich-platform-security/page/administer/security/task/t_CreateEndpointforExternalClients.html
-
-
Or, reach out to the Syncfish team. We have ServiceNow experts and are happy to assist customers who are struggling with this topic.
Syncfish general steps/guidance to perform within your ServiceNow instance (please take tje above comments into account).
Step 1 - Make sure the OAuth plugin is activated
-
Navigate to All > System Applications > All Available Applications > All.
-
Find the plugin using the filter criteria and search bar.
You can search for the plugin by its name or ID. If you cannot find a plugin, you might have to request it from ServiceNow personnel.
-
If the plugin is not installed yet, Select Install to start the installation process.
Step 2 - Set the OAuth Property (if not already set)
-
To use OAuth 2.0, enter sys_properties.list in the navigator and select New.
You can also open the system properties list by navigating to All > System Properties > All Properties > .
-
Filter for *oauth*
-
Make sure com.snc.platform.security.oauth.is.active is set to true
Step 3 - Change OAuth password parameter (if not already set)
-
Navigate to All > System Properties > All Properties >
-
Filter for *oauth*
-
Make sure glide.oauth.allow.parameters.in.post.body.only is set to true
Step 4 - Create an OAuth application endpoint for external client applications to access the ServiceNow instance (i.e. create an OAuth endpoint for CI Sync to target for authentication)
-
Navigate to All > System OAuth > Application Registry and then click New.
-
On the interceptor page, click Create an OAuth API endpoint for external clients.
-
Complete the fields on this form using the screen shot below and the following points for guidance
-
Name: Use a meaningful/recognisable name relative to the endpoint being for CI Sync.
-
Client Secret: Enter a complex secret or allow ServiceNow to generate one on save.
-
Redirect URL and Logo URL: No need to enter these.
-
Public Client: No need to tick this.
-
Client Type: Integration as a service.
-
Application: Global scope.
-
Accessible from: All application scopes (or as otherwise directed by your ServiceNow SME).
-
Active: Tick.
-
Other settings: Leave as default (or as otherwise directed by your ServiceNow SME).
-
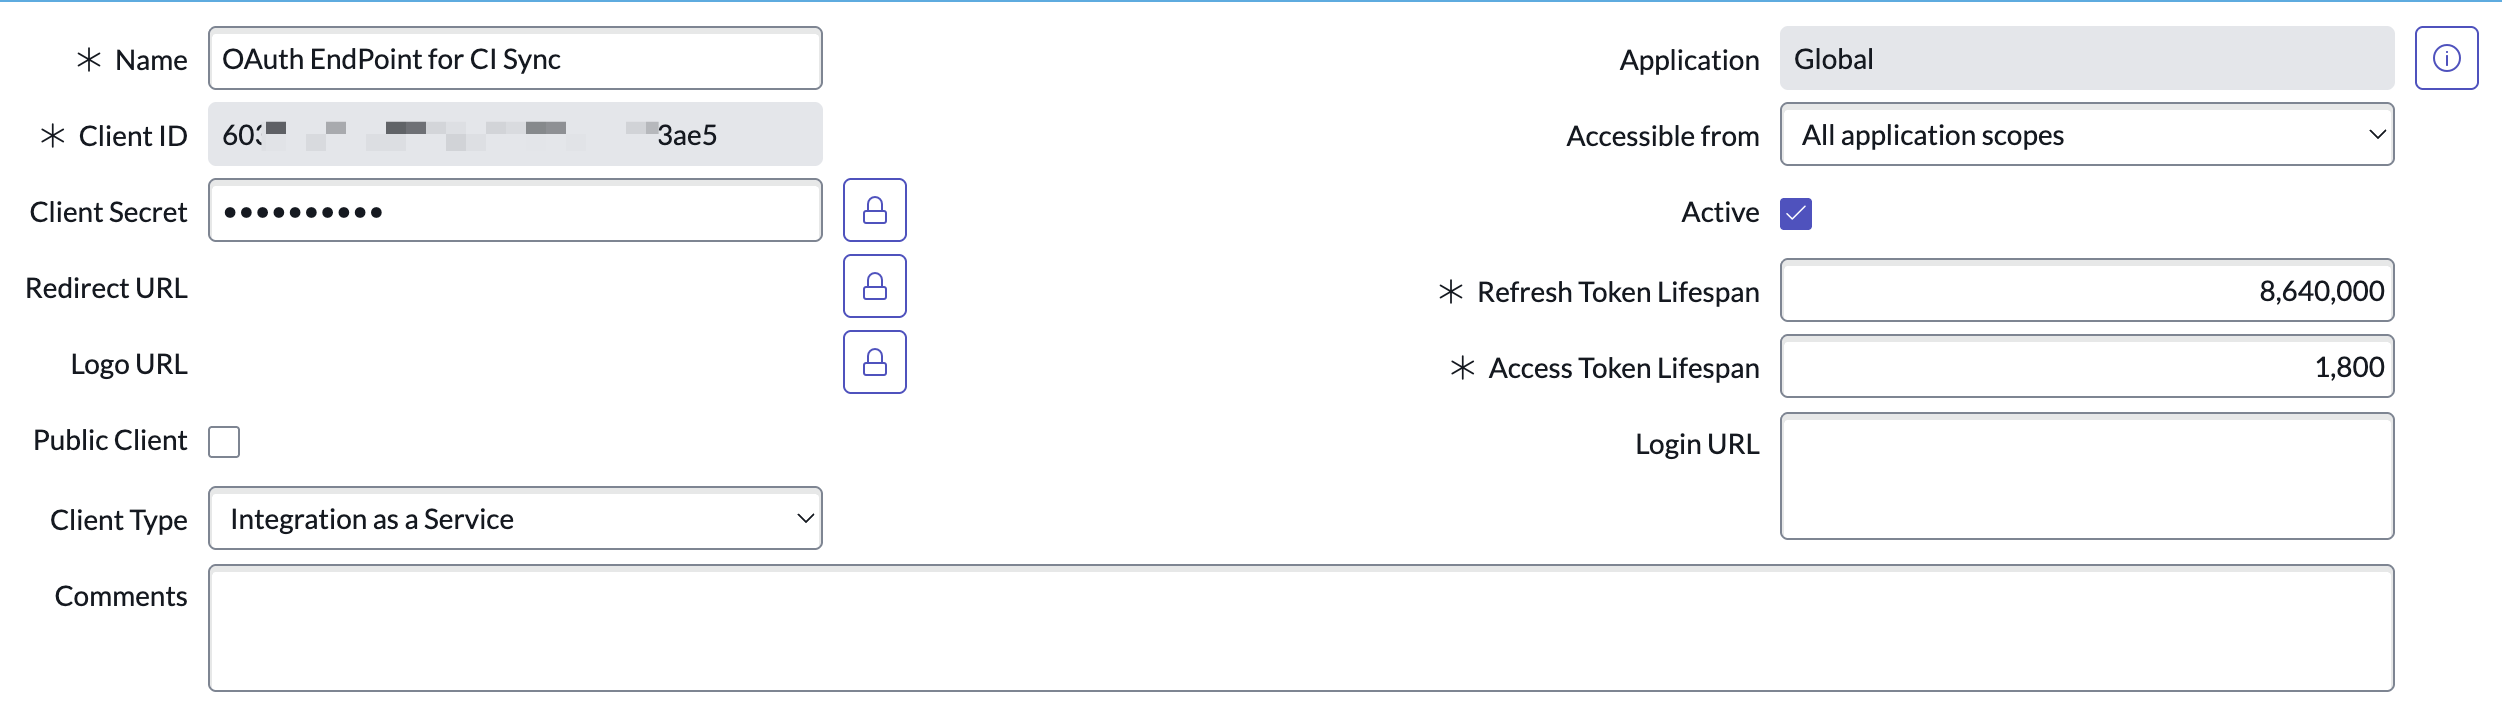
Note: This form may differ between versions of ServiceNow.
Once the OAuth setup is completed, open the application registry record created and copy the Client ID and Secret to setup the connection in the CI Sync SaaS application User Interface
Guidance Note
Click the Client Secret padlock to view/copy the secret.
Data Capture Note
Take note of the Client Id and Client Secret as they will be required when configuring the ServiceNow connection within the CI Sync SaaS application (via the CI Sync User Interface) when performing the tasks in S7 - Add your ServiceNow Instance as a Destination for CI Sync.
Task 6: (Optional) Consider applying additional changes to ServiceNow to support the specific requirements of source systems
Informational Note
The tasks in this section are optional depending on which source systems you intend to use with CI Sync.
Click to expand the detailed instructions in this section relative to the source systems you may be using with CI Sync.
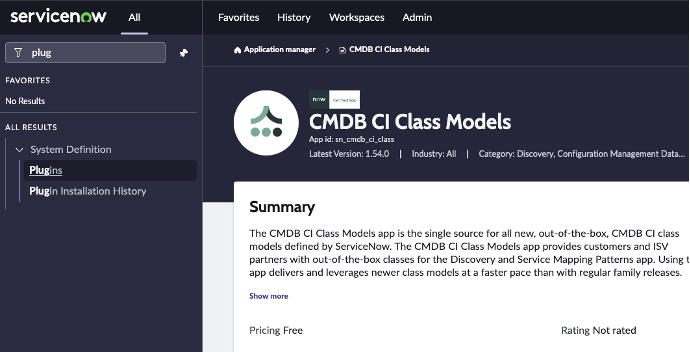
CMDB CI Class Models plug-in
These instructions are relevant to the following source systems
-
Lansweeper OT (from Lansweeper Cloud)
-
Azure
-
AWS
-
GCP
Click for context and task instructions
Context
Several data sources used by CI Sync include record sets that rely on CI Classes only available via the CMDB CI Class Models plug-in.
If you plan to synchronize any of the following data sources and recordsets you will need to add the CMDB CI Class Models plug-in to your ServiceNow instance.
If you already have the plug-in you may want to upgrade it to the latest version (as ServiceNow occasionally update the plug-in to include extra CI Classes/tables).
|
Source System |
Specific Record Sets that require the CMDB CI Class Models plug-in |
|
Lansweeper |
|
|
Lansweeper OT
|
|
|
Azure |
|
|
AWS |
|
|
GCP |
|
Task Steps
Follow these steps to add this plug-in (and similar steps to locate it and upgrade it if required)
-
Assess the use/inclusion of this plug-in within your ServiceNow (ensure you are comfortable installing this plug-in).
-
Search for Plugins via the ServiceNow navigation menu.
-
Locate the CMDB CI Class Models plug-in.
-
Click Add -> Install and follow the instructions provided.
Add permissions for CI Sync to write to the cmdb_key_value table to support Cloud Tags
These instructions are relevant to the following source systems
-
AWS (for synchronizing AWS Tags to ServiceNow)
-
Azure (for synchronizing Azure Tags to ServiceNow)
-
GCP (for synchronizing GCP Labels to ServiceNow)
Click for context and task instructions
Context
CI Sync writes Tags (or GCP Labels) to the cmdb_key_value table in ServiceNow.
The standard/out-of-the-box roles provided by ServiceNow (and recommended by Syncfish earlier in this page) do not provide access to the cmdb_key_value table. Therefore, the CI Sync Integration User account created above requires additional permissions to write to the cmdb_key_value table.
Syncfish provides a ServiceNow updateset to prepare your ServiceNow instance for CI Sync. The updateset does the following:
-
Creates a read/write ACL on the cmdb_key_value table.
-
Applies the ACL on the cmdb_key_value table and assigns the ACL to the ServiceNow role called “Asset” (which is one of the roles granted to the CI Sync Integration Account created above).
Task Steps
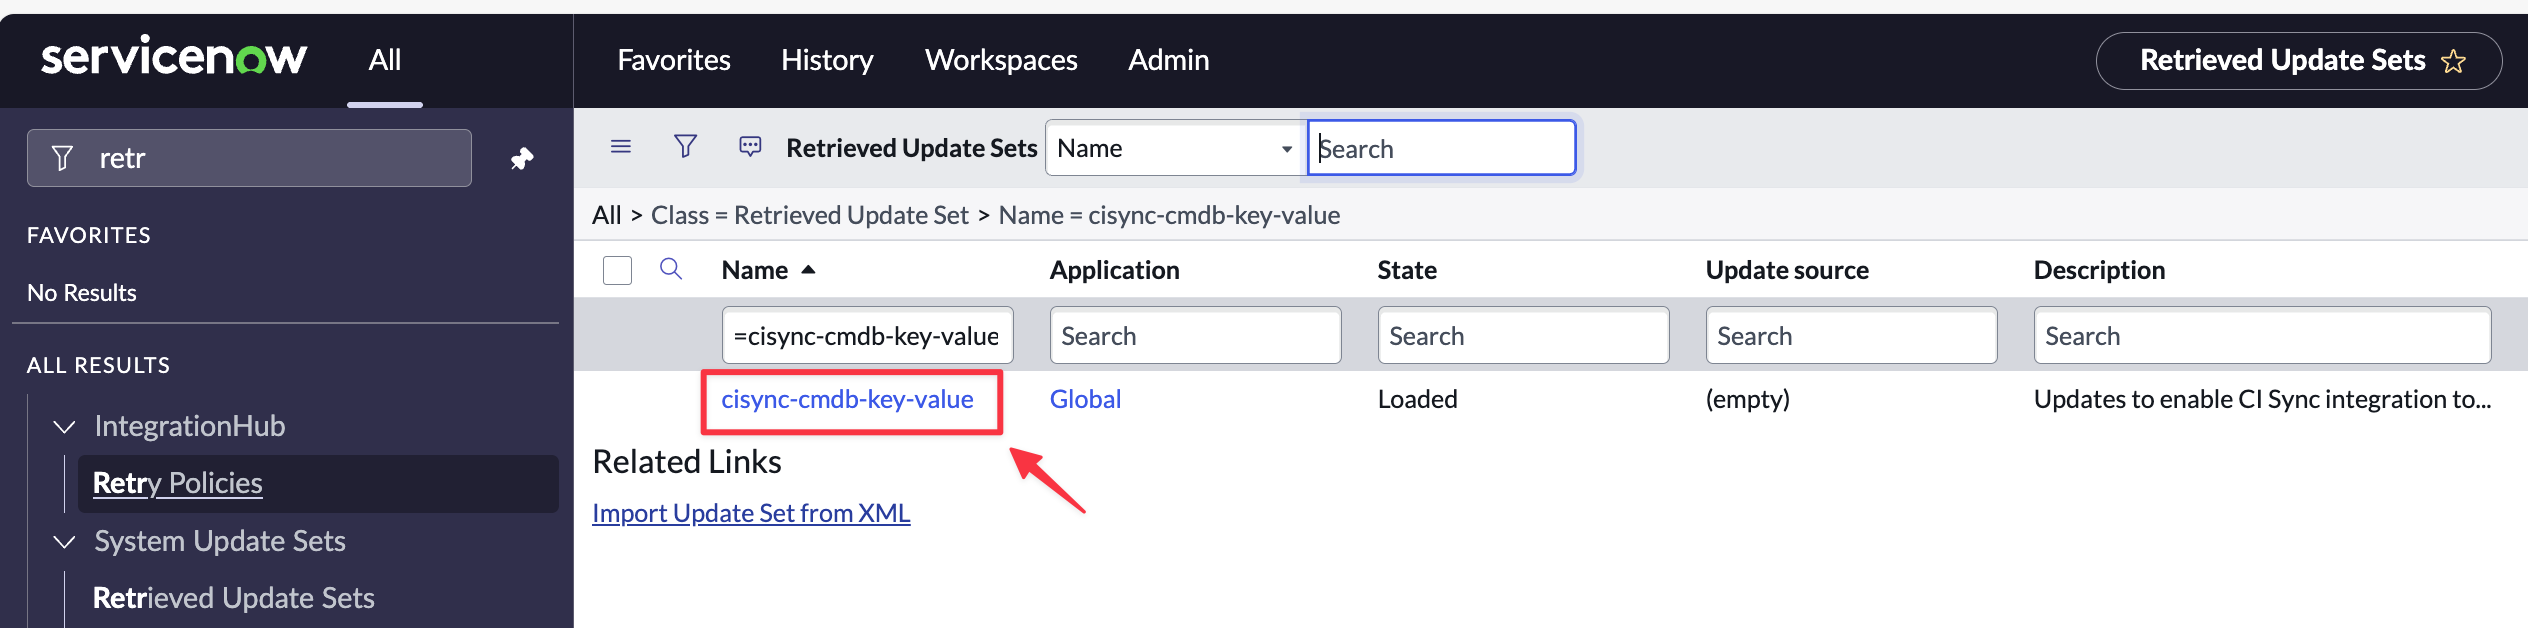
Follow these steps to apply the updateset provided by Syncfish:
-
Download the update set from Syncfish at the below URL:
https://downloads.syncfish.app/servicenow/cisync-cmdb-key-value.xml -
Login to your ServiceNow instance with Admin permissions.
-
Open a browser and navigate to your ServiceNow instance
-
In the left nav menu search for “Retrieved Update Sets” and click to open
-
Right click on the column heading row and select “Import XML”

-
Select “Choose File”
-
Select the downloaded file “cisync-cmdb-key-value.xml”
-
Click to open the Update Set
-
Click “Preview Update Set”
-
If there are no preview errors, Click “Close”.
-
Click “Commit Update Set”.
-
Your ServiceNow instance is now ready to receive Azure Tag data from Azure via sync jobs from CI Sync.
Add custom tables and grant permissions for CI Sync to write CVE data to ServiceNow for MS Defender for Endpoint
These instructions are relevant to the following source systems
-
MS Defender for Endpoint (for synchronizing CVE data to ServiceNow)
Click for context and task instructions
Context
CI Sync synchronizes IT assets including their installed software with known CVEs from Defender for Endpoint.
CI Sync relies upon two custom tables in ServiceNow.
-
One table is used to store the CVE records.
-
A second table stores the link between CIs and the CVEs.
Syncfish provides a ServiceNow updateset to prepare your ServiceNow instance for CI Sync. The updateset does the following:
-
Creates the custom tables mentioned above.
-
Applies the ACL on the custom tables and assigns the ACL to the ServiceNow role called “Asset” (which is one of the roles granted to the CI Sync Integration Account created earlier in this page).
Task Steps
Follow these steps to apply the updateset provided by Syncfish:
-
Download the update set from Syncfish at the below URL: https://downloads.syncfish.app/servicenow/cisync-cmdb-vulnerabilities.xml
-
Login to your ServiceNow instance with Admin permissions.
-
Open a browser and navigate to your ServiceNow instance
-
In the left nav menu search for “Retrieved Update Sets” and click to open
-
Right click on the column heading row and select “Import XML”
-
Select “Choose File”
-
Select the downloaded file “cisync-cmdb-vulnerabilities.xml”
-
Click to open the Update Set
Unknown Attachment
-
Click “Preview Update Set”
-
If there are no preview errors, Click “Close”.
-
Click “Commit Update Set”.
-
Your ServiceNow instance is now ready to receive CVE data from MS Defender for Endpoint via sync jobs from CI Sync.
Add permissions for CI Sync to create Application Service Mapping relationships in ServiceNow
These instructions are relevant to the following source systems
-
Lansweeper Cloud
-
Azure
Add permissions for CI Sync to create and update OT CIs in ServiceNow
These instructions are relevant to the following source systems
-
Lansweeper Cloud