Task List
|
Task # |
Task |
Performed by |
|---|---|---|
|
1 |
Prepare Meraki for use with CI Sync |
Meraki Admin |
|
2 |
Add Meraki as a Source System using the CI Sync SaaS UI |
CI Sync Admin |
|
3 |
Check status of new Meraki Source System connection |
CI Sync Admin |
|
4 |
Assess if additional updates are required in ServiceNow |
ServiceNow Admin |
Task 1: Prepare Meraki for use with CI Sync
The CI Sync agent will require Base URL (of your Meraki instance) and an API Key you will generate for CI Sync to connect to Meraki.
The following guide will demonstrate how to create a Service User with an API Key within your Meraki environment to obtain the API Key needed by CI Sync.
-
Log into your Meraki admin console/web interface with your admin credentials.
-
In the web interface go to Organization > Administrators, and click the Add admin button
-
Fill in the fields
-
Name (e.g. “CISync API Account”).
-
Email (e.g. An internal email address to represent the account. Many organisations use a shared mailbox/DL for this purpose).
-
Organization access — select Read-only (since CI Sync only needs to read).
-
-
Click Create admin.
-
Meraki will send an email to the address provided so the account can complete registration.
-
Complete the registration from that email before proceeding.
-
-
Confirm the API is Enabled for Your Organization
-
The Cisco Meraki Dashboard API is enabled by default on all organizations. To generate an API key, go to the API & Webhooks page → API keys and access tab, and click Generate API Key.
-
If it's not enabled, go to Organization > Settings and enable API access there first.
-
-
Generate an API Key for the CI Sync API Access Account
-
Log in to the Meraki Dashboard as the new CI Sync API Access Account (using the email account of the CI Sync account you created above).
-
Navigate to Organization > API & Webhooks from the left nav.
-
Select the API keys and access tab. This page lists your personal API keys, if any.
-
Click Generate API Key.
After clicking the generate button, a window containing the unique API key will be displayed. It is critical this key is recorded now, as once this window closes, the full key cannot be viewed in the Meraki dashboard again.
-
Once the key is copied, check the checkbox for "I have stored my new API key", then click Done. Only the last 4 digits of the key will be displayed going forward for security purposes.
-
-
The Meraki environment setup is now complete. You can now proceed to the subsequent tasks below.
Data Capture Summary
As a reminder, you should have captured the following information when completing the above steps.
-
The Meraki API URL
-
The API Key (from Step 7 above).
Make sure any secrets or sensitive information is stored securely and in a way that can be shared with the CI Sync Admin.
The above information will be needed by the CI Sync Admin when they follow the instructions in Task 2 immediately below.
Task 2: Add Meraki as a Source System using the CI Sync SaaS UI
-
Login to your CI Sync SaaS instance at https://YourCo.syncfish.app
-
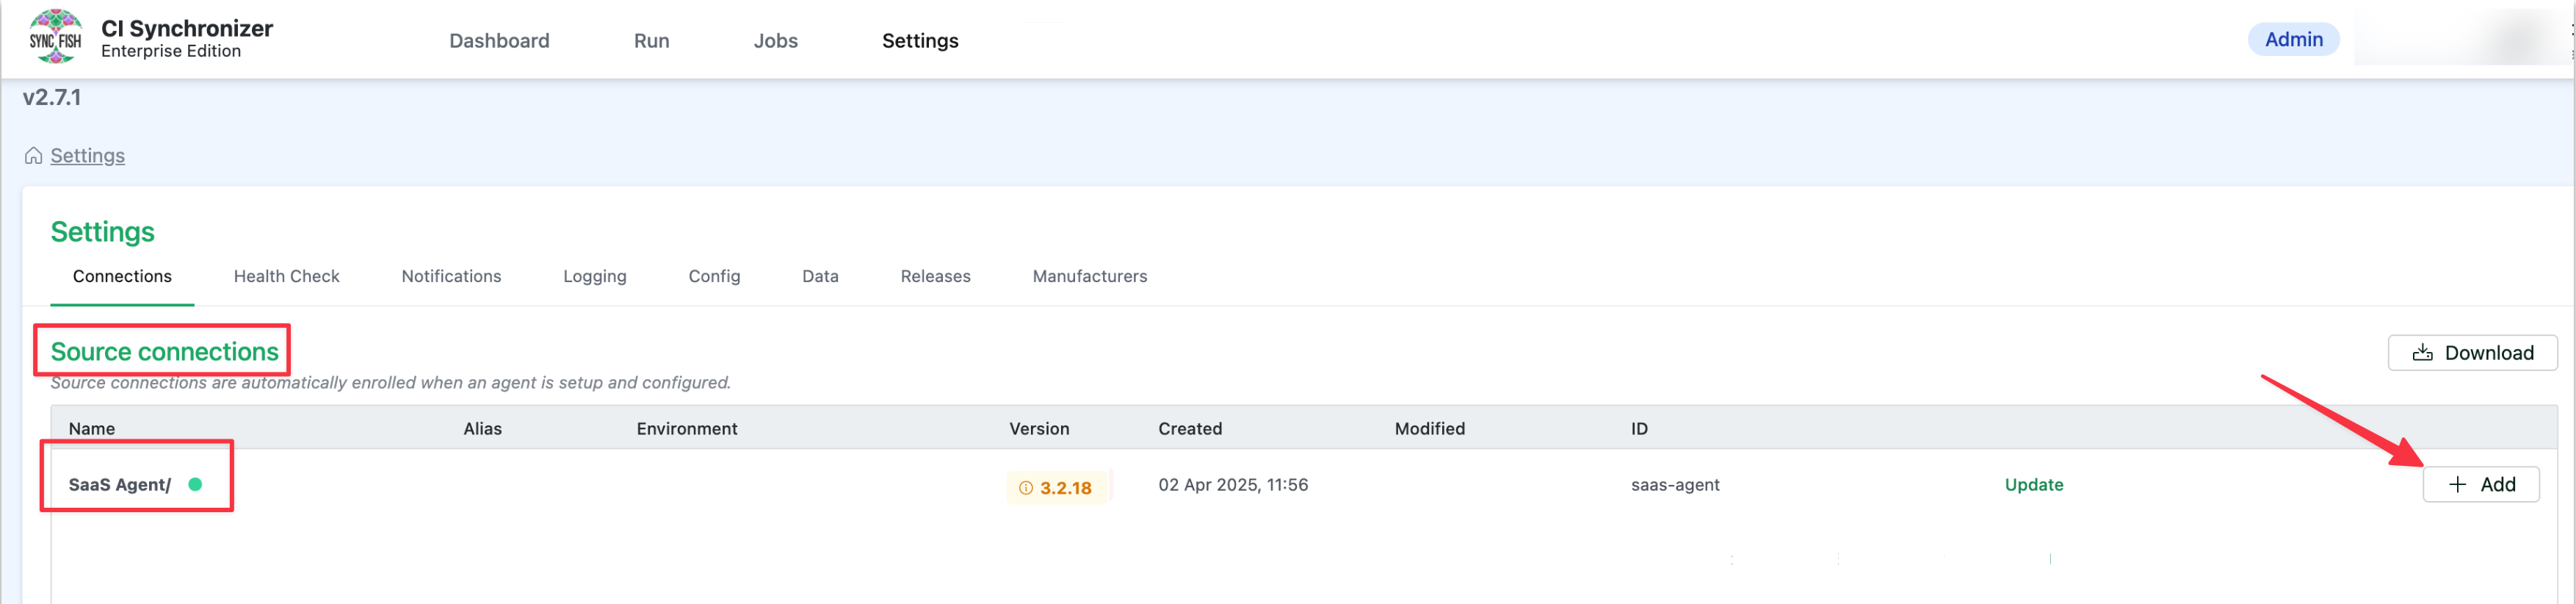
In the CI Sync UI, navigate to Settings > Connections.
-
Find the “SaaS Agent” sub-heading under the Source Connections section. If you don’t see “SaaS Agent” it means your CI Sync instance hasn’t been configured for this feature. Please contact your Sync representative to discuss.
-
On the right hand side of the form, click the +Add button.
-
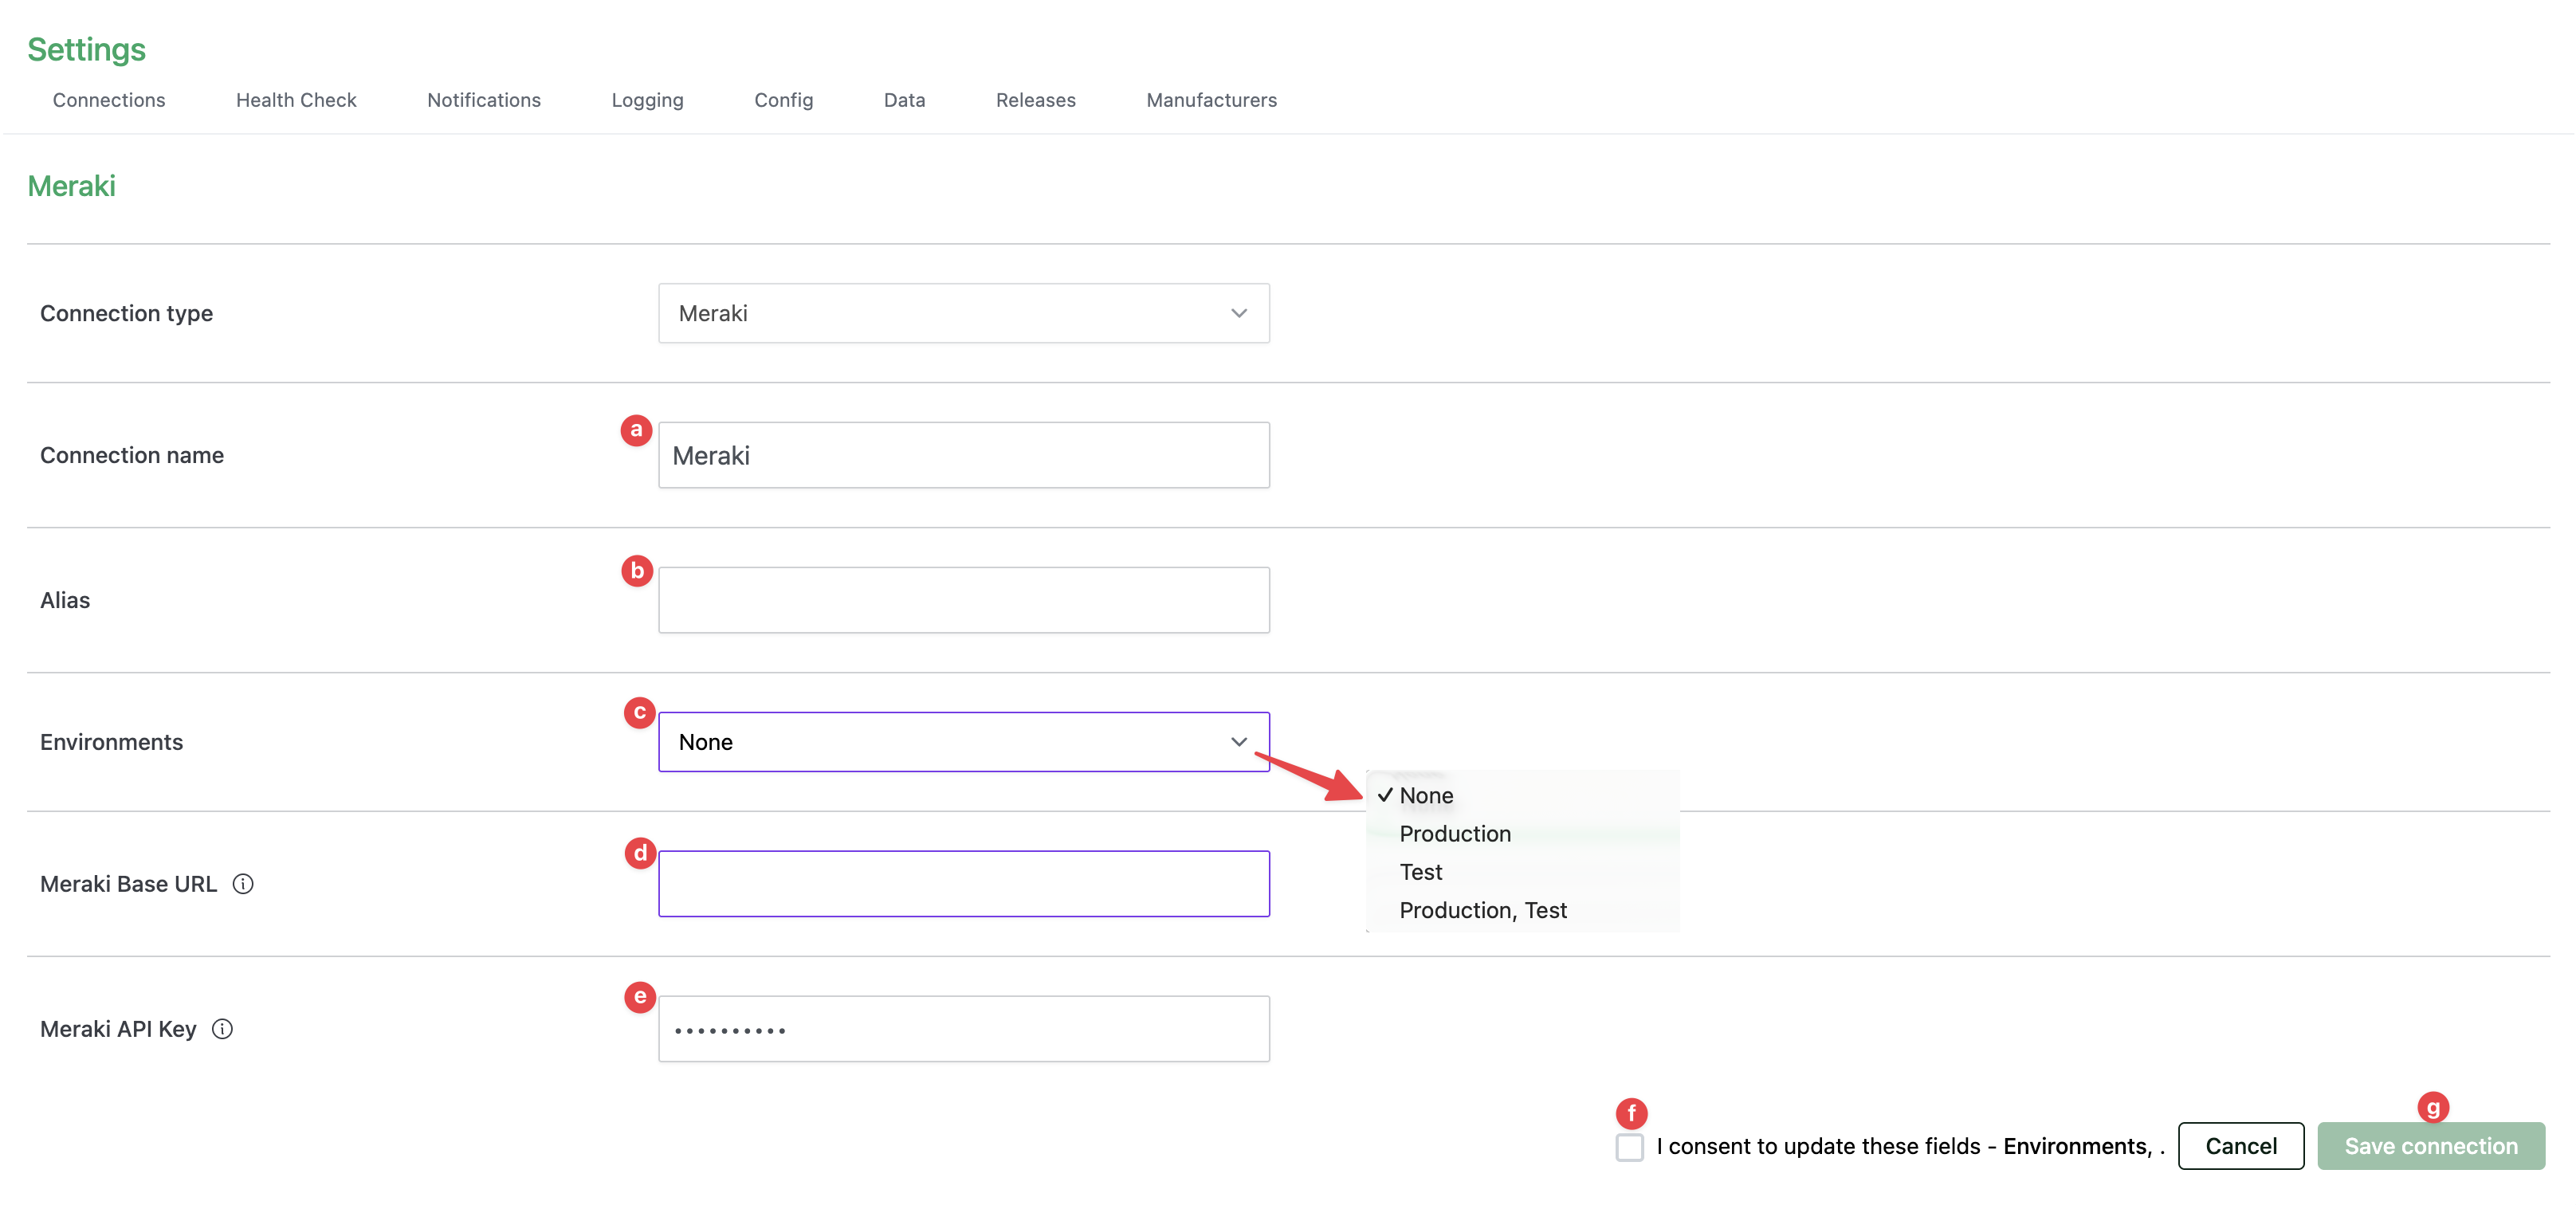
The New Connection form now appears. Use the Connection Type drop down list to select the source system you wish to add (in this case Meraki).
-
Update the fields using these instructions
-
Connection name
-
This is a friendly name that represents the source system connection.
-
The name you enter here will appear when you create a new sync job and are selecting from the available source system list.
-
Note: Syncfish recommend using a textual suffix on the connection name if for any reason you have setup multiple CI Sync Connections to Meraki.
-
-
Alias: Please ignore this field (it is not used for the CI Sync Cloud Agent and is being deprecated).
-
Environments
-
Select from the available choices Production, Test, or Production/Test (the latter being both).
-
The selection you make for this field affects which source systems appear when you create a new sync job (i.e. when you are selecting the source system list based on the “Environment” you have chosen for the sync job). See this page for more details on creating a CI Sync job: Run a Small Initial Sync Job (then run more).
-
FYI: CI Sync allows a source system to be both Production/Test because CI Sync only reads from a source system (it doesn’t write to it). Destination systems can only be Test or Production (not both).
-
-
Meraki Base URL
-
Enter this value or the URL: https://api.meraki.com/api/v1
-
-
Meraki API Key
-
Paste the API Key captured by your Meraki Admin in Task 1 above.
-
-
The click the Consent to update fields checkbox.
-
Finally click the Create connection button.
-
You will be returned to the main settings screen and your new source system connection will appear in the list as shown below.

Task 3: Check status of new Meraki Source System connection
-
To check the status of the newly added InTune Source System connection click the green Test Connection link. This will test whether your CI Sync connection can successfully reach and authenticate to the Meraki instance defined in the connection itself.

-
If the connection is successful, you will see a green dot next to the source connection name.

-
To test again in the future, you can click the green Re-Test Connection link.
-
If the test is unsuccessful, you will see a red dot next to the source connection name and an error message underneath. If you need assistance resolving an error, please contact Syncfish support.
This means you are ready to run a sync job using the new source connection using these high-level instructions: Run a Small Initial Sync Job (then run more).
Task 4: Assess if additional updates are required in ServiceNow
Guidance Note
Syncfish recommend the person setting up the source system described in this guide discusses this particular task with their ServiceNow system administrator.
A ServiceNow administrator will need to perform these steps.
Syncfish recommend following these instructions in your non-production ServiceNow environment for testing synchronization jobs.
Only once exhaustive testing in non-production is complete, repeat this process in your ServiceNow production environment.
In this section your ServiceNow SME will assess various updates to ServiceNow to support this CI Sync connector:
-
Task 4a: Assess if the CMDB CI Class Models plug-in is needed for this connector
-
Task 4b: Assess if any custom tables or attributes are needed for this connector
-
Task 4c: Assess if additional permissions are required for this connector
-
Task 4d: (Optional though recommended) Assess your ServiceNow CI forms and update to include additional Related Lists specific to this connector
-
Task 4e: Read and understand more about the data and functionality related to this connector
Task 4a: Assess if the CMDB CI Class Models plug-in is required for this connector
Context
One of more record sets (asset types/resource types) available to sync using this connector rely upon CMDB CI Classes that are only available via the CMDB CI Class Models plug-in.
You therefore need to install the CMDB CI Class Models plug-in to your ServiceNow instance.
If you already have the plug-in you may want to upgrade it to the latest version (as ServiceNow occasionally updates the plug-in to include extra CI Classes/tables).
|
Source System |
Specific Record Sets that require the CMDB CI Class Models plug-in |
|
Meraki |
|
Instructions
Follow these steps to add this plug-in (and similar steps to locate it and upgrade it if required):
-
Assess the use/inclusion of this plug-in within your ServiceNow (ensure you are comfortable installing this plug-in).
-
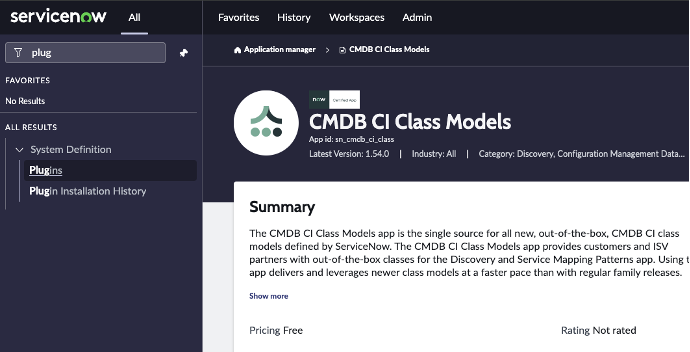
Search for Plugins via the ServiceNow navigation menu.
-
Locate the CMDB CI Class Models plug-in.
-
Click Add -> Install and follow the instructions provided.
Task 4b: Assess if custom tables or attributes are needed for this connector
No custom tables and no custom attributes are required in ServiceNow to support this CI Sync connector.
You can therefore ignore / skip this task.
Task 4b: Assess if additional permissions are required for this connector
If you are planning to use CI Sync to write Meraki Tags to the CMDB
Context
CI Sync writes Meraki Tags to the cmdb_key_value table in ServiceNow.
The standard/out-of-the-box roles provided by ServiceNow (and recommended by Syncfish during S3 - Configure ServiceNow for CI Sync) do not provide access to the cmdb_key_value table. Therefore, the CI Sync Integration User account created during S3 - Configure ServiceNow for CI Sync requires additional permissions to write to the cmdb_key_value table.
Syncfish provides a ServiceNow updateset to prepare your ServiceNow instance for CI Sync. The updateset does the following:
-
Creates a read/write ACL on the cmdb_key_value table.
-
Applies the ACL on the cmdb_key_value table and assigns the ACL to the ServiceNow role called “Asset” (which is one of the roles granted to the CI Sync Integration Account created during S3 - Configure ServiceNow for CI Sync).
Instructions
Follow these steps to apply the updateset provided by Syncfish:
-
Download the update set from Syncfish at the below URL:
https://downloads.syncfish.app/servicenow/cisync-cmdb-key-value.xml -
Login to your ServiceNow instance with Admin permissions.
-
Open a browser and navigate to your ServiceNow instance
-
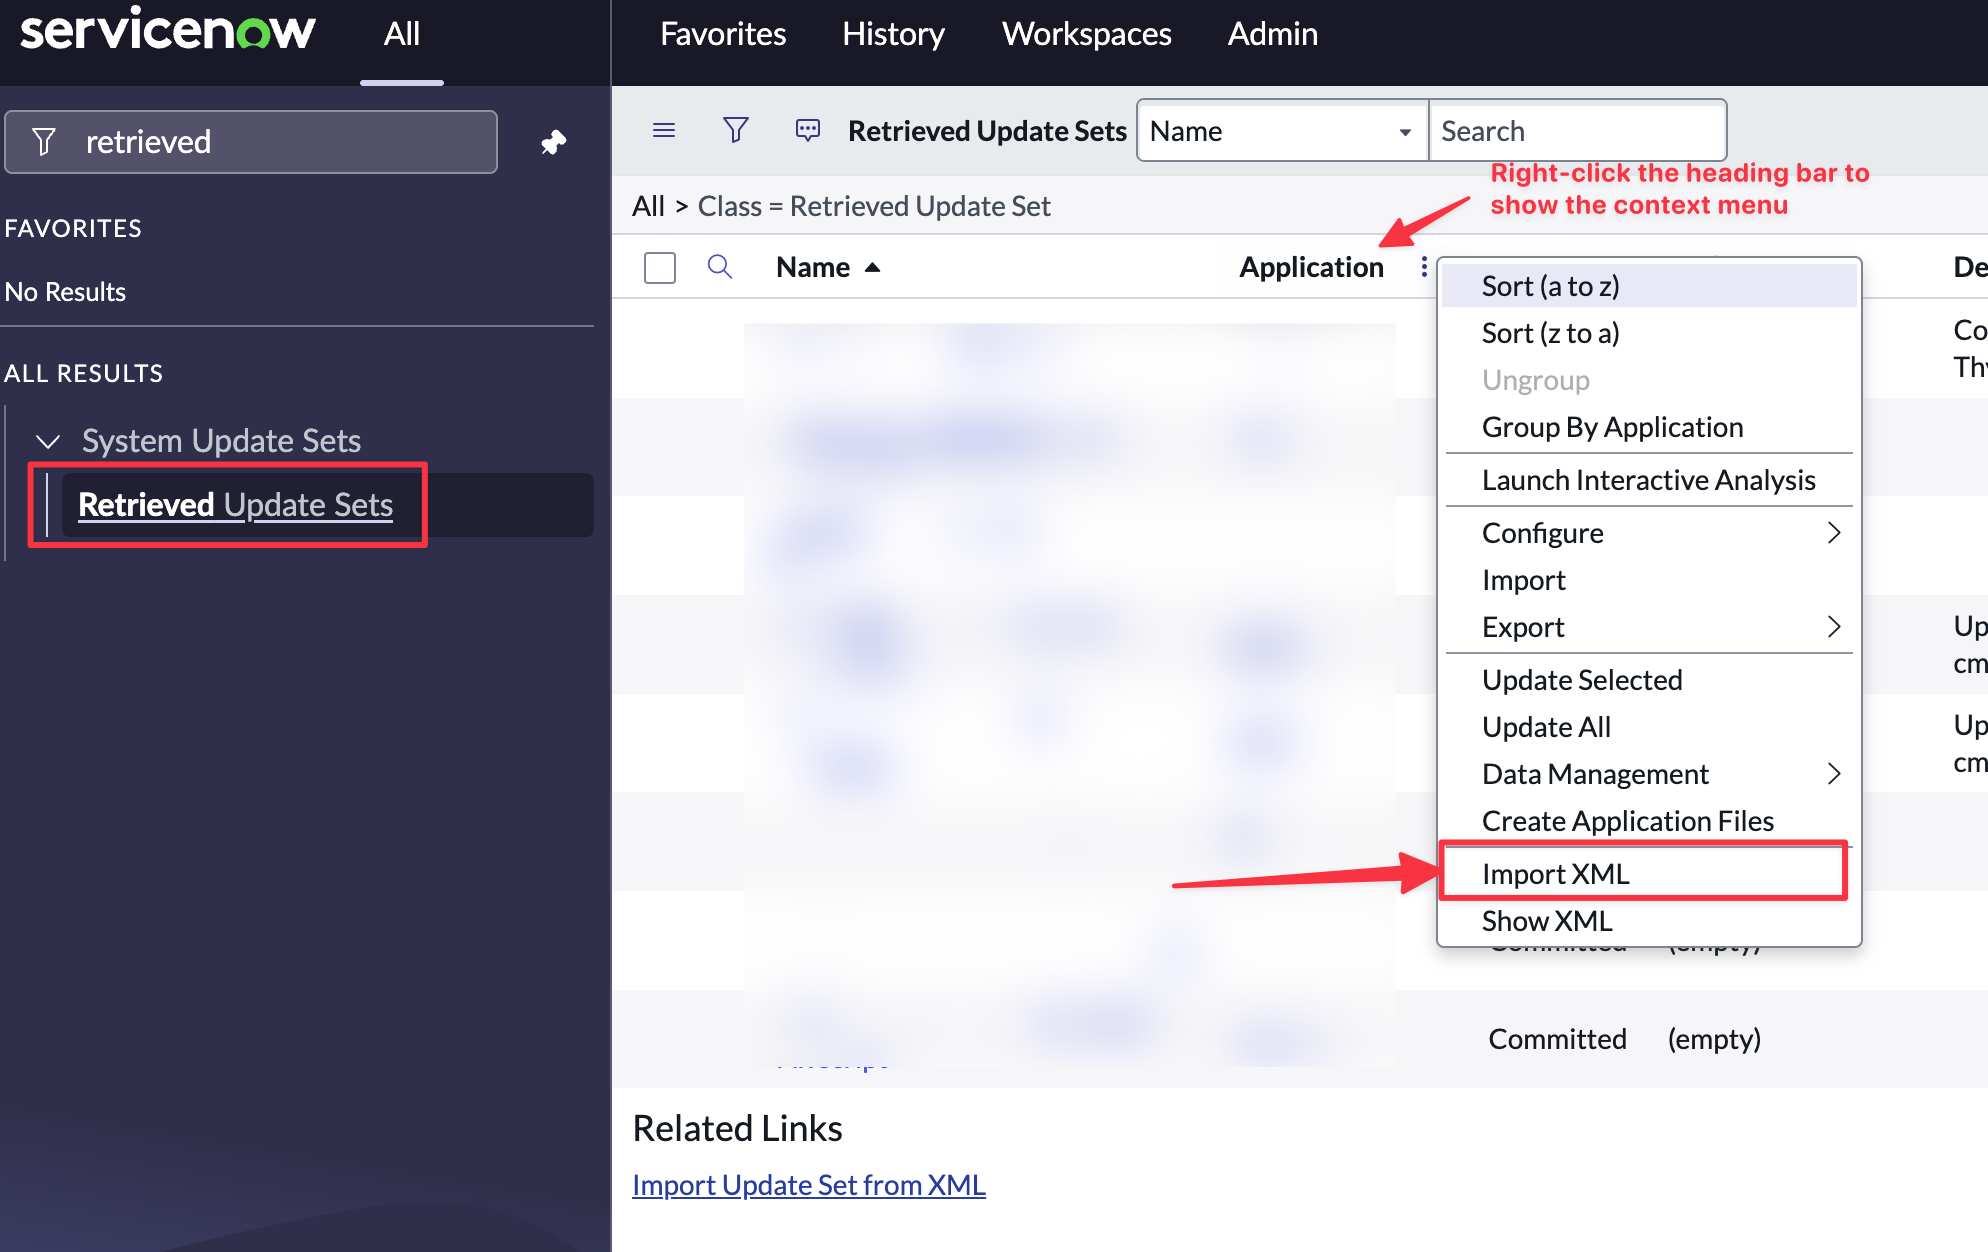
In the left nav menu search for “Retrieved Update Sets” and click to open
-
Right click on the column heading row and select “Import XML”
-
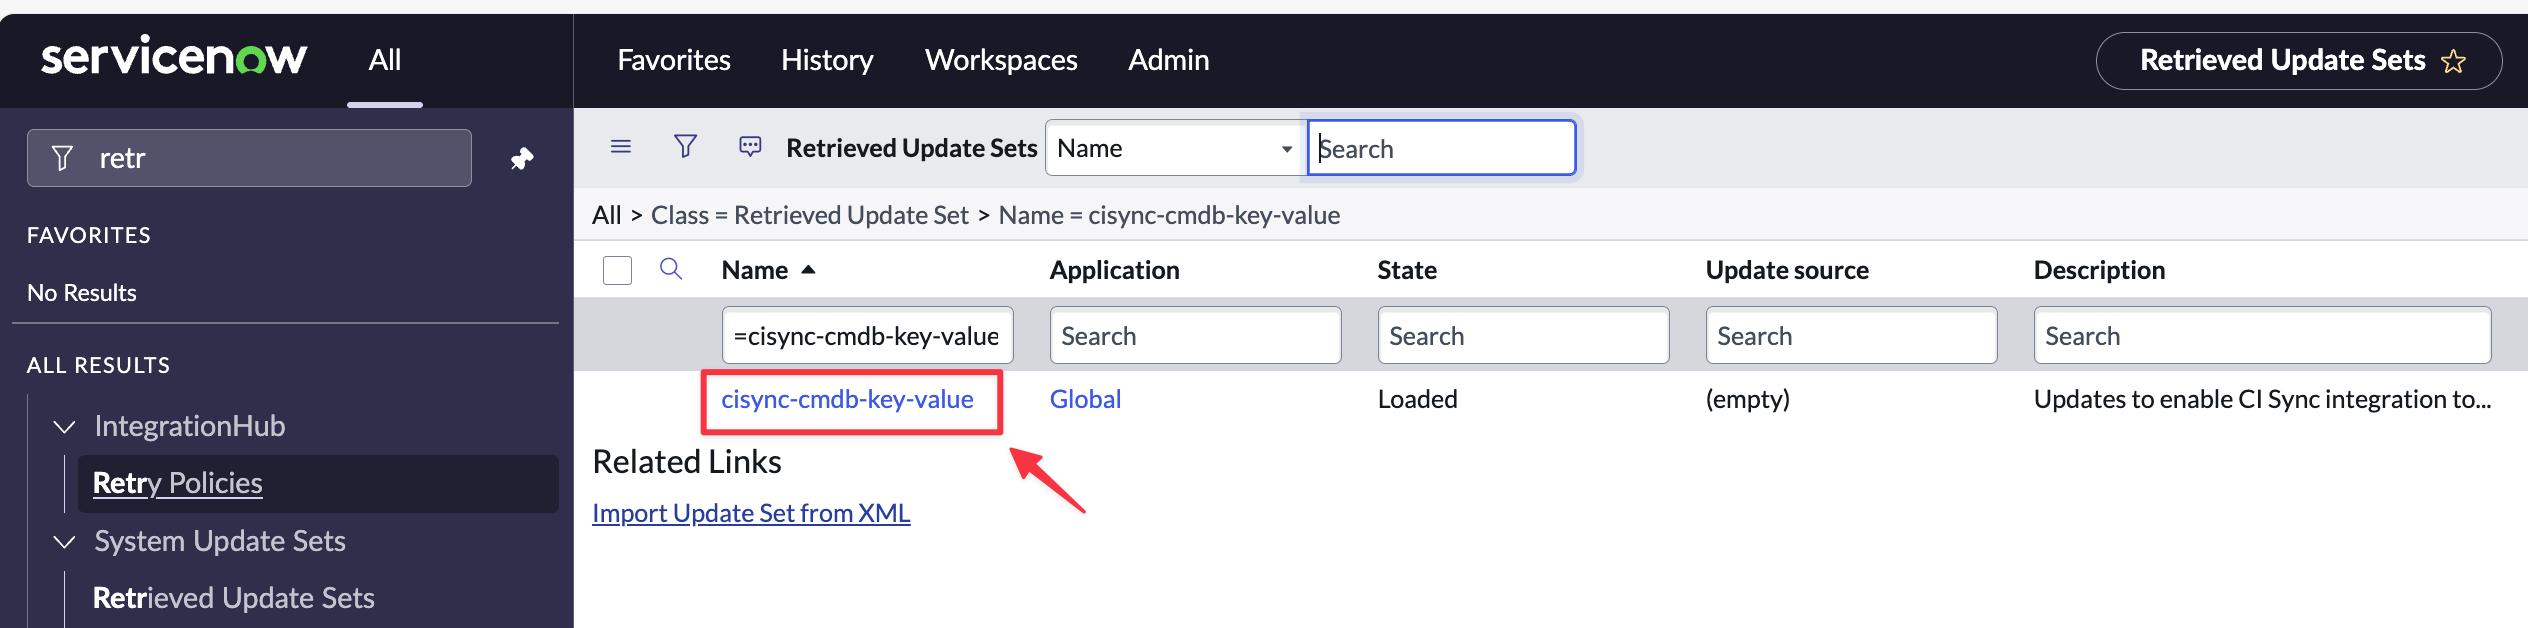
Select “Choose File”
-
Select the downloaded file “cisync-cmdb-key-value.xml”
-
Click to open the Update Set
-
Click “Preview Update Set”
-
If there are no preview errors, Click “Close”.
-
Click “Commit Update Set”.
-
Your ServiceNow instance is now ready to receive Tag data from Azure via sync jobs from CI Sync.
Task 4d: (Optional though recommended) Assess your ServiceNow CI forms and update to include additional Related Lists specific to this connector
Context
CI Sync populates various child tables (related lists) associated with parent CIs.
The following table shows the Related Lists (per CI Class) populated by this CI Sync connector.
|
CI Class |
Related List
|
Related List Name as it appears in the ServiceNow UI when adding it to a CI Form |
|
Network |
Switch Ports |
Switch Port -> CMDB CI |
|
VLANs |
To be confirmed |
|
|
Switches |
Switch Ports |
Switch Port -> CMDB CI |
|
Key Values (Tags) |
Key Value → Configuration Item |
|
|
Appliances |
Key Values (Tags) |
Key Value → Configuration Item |
|
Cameras |
Key Values (Tags) |
Key Value → Configuration Item |
|
Cellular Gateways |
Key Values (Tags) |
Key Value → Configuration Item |
|
Secure Connects |
Key Values (Tags) |
Key Value → Configuration Item |
|
Sensors |
Key Values (Tags) |
Key Value → Configuration Item |
|
Wireless Access Points |
Key Values (Tags) |
Key Value → Configuration Item |
|
Wireless Controllers |
Key Values (Tags) |
Key Value → Configuration Item |
Instructions
Below are the steps to modify a ServiceNow CI form to expose a new Related List.
-
Login to your ServiceNow instance with Admin permissions.
-
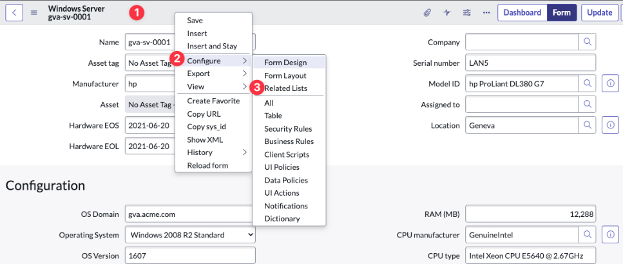
Navigate to any CI in the relevant CI Class (i.e. one/all of those listed in the table in the Context section above). For example, navigate to a Windows Server CI).
-
Right-click in the heading area of the form, then click Configure and then Related Lists from the sub-menus.
-
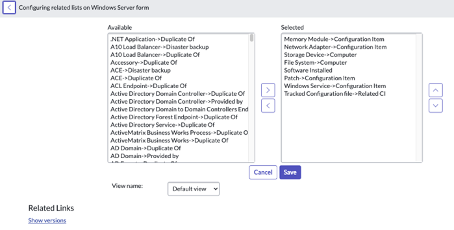
Identify the Related List you want to expose on the CI form using the table in the Context section above.
-
Find the Related List in the left hand column which lists all Available Related Lists.
-
Click the Related List and then click add (the selection arrow) to move the item to the Selected column and then click Save.
-
Repeat for each additional CI Class listed in the table in the Context section above.
Task 4e: Read and understand more about the data and functionality related to this connector
There are no additional data or functionality topics called out for this CI Sync connector.
You can therefore ignore / skip this task.