|
Task # |
Task |
Performed by |
|---|---|---|
|
1 |
Overview |
CI Sync Admin |
|
2 |
Execute a Reference Data Read Test |
CI Sync Admin |
|
3 |
Execute Mock Sync Insert, Update, Delete Test |
CI Sync Admin |
|
4 |
Read the CI Sync Default Configuration Guide/s |
CI Sync Admin
|
|
5 |
Perform a small initial synchronization |
CI Sync Admin
|
|
6 |
Progressively perform more (and more) synchronizations |
CI Sync Admin
|
Task 1: Overview
In this step, the individual/s with login access to the CI Sync SaaS application user interface, working with your Cloud Source System (e.g. Lansweeper Cloud, InTune, Azure, etc) and CMDB colleagues will perform the following tasks.
The CI Sync User Interface was designed with simplicity and ease of use in mind. As such, getting up and running with initial and ongoing synchronizations should be quick and easy. If not, please let us know!
The tasks in this section are not intended to be a screen-by-screen guide to using the CI Sync UI. Instead, this section provides general pointers for performing an initial sync (using a small number of records) so you can assess the results in your CMDB before moving on to further/larger synchronization jobs.
Validating the source data (in the relevant source system), and the resulting data in ServiceNow is tge important part of thoroughly testing CI Sync in your environment as you progressively increase the scale, complexity and frequency of your synchronization jobs in CI Sync.
Important Information about Non-Production vs Production Synchronization
-
The tasks in this section are applicable to either a Non-Production or Production ServiceNow CMDB.
-
Data sync’d into a CMDB can have a significant implication on the business processes and workflows that depend on the underlying CMDB. Therefore, customers should throughly test and validate the results of sync’ing into a Non-Production CMDB before considering any form of sync’ing into a Production CMDB.
-
Before sync’ing to production we recommend you inform the Syncfish Team. This ensures Syncfish are aware in case you need extra assistance and also means Syncfish can advise how to check whether any specific CI Sync configuration settings need to be promoted from your CI Sync Test Config to your CI Sync Prod Config.
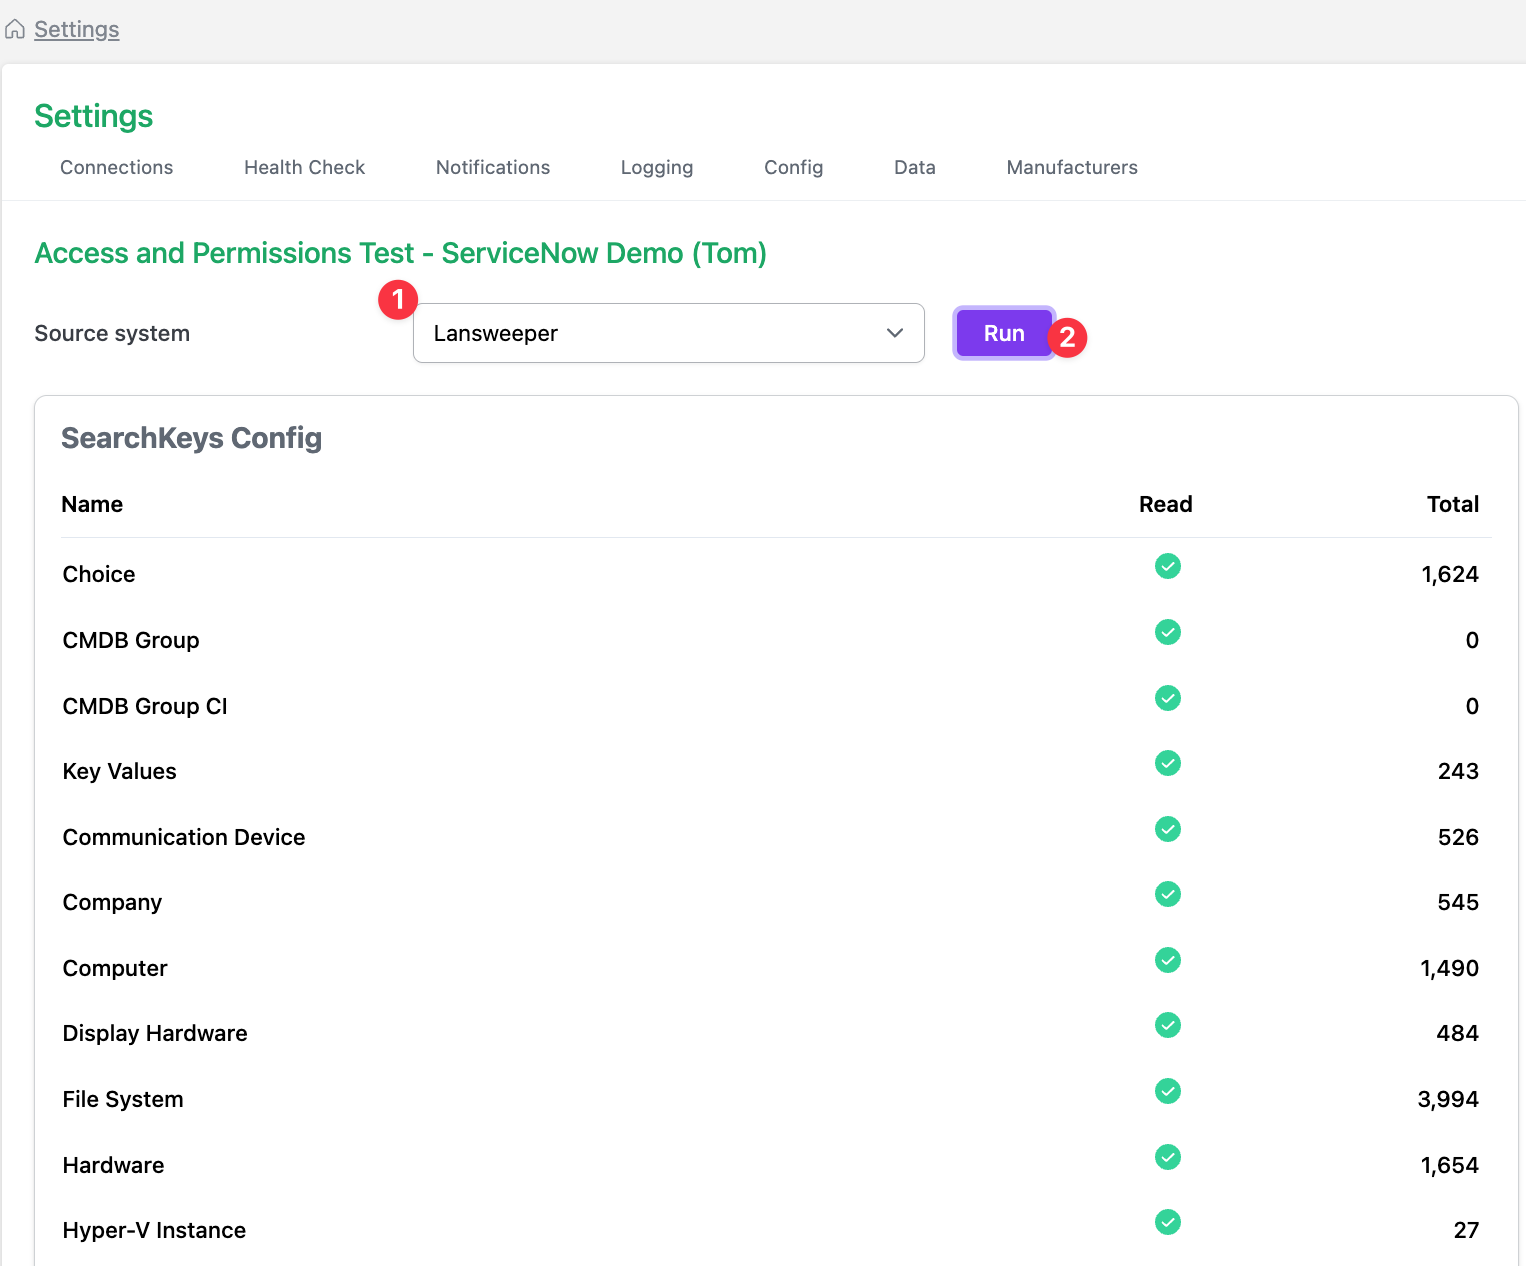
Task 2: Execute a Reference Data Read Test
Context Note
During this task you will confirm the ServiceNow user account (i.e. the account you created earlier) has sufficient permissions to read from the various ServiceNow tables.
-
Login to your CI Sync SaaS application user interface, then:
-
Go to the Settings page
-
Locate the specific ServiceNow connection under the Destination Connections heading
-
Click the Test Access link.
-

-
Do the following on the Access and Permissions Test Access page
-
Select a source system from the dropdown list
-
Click the Run button. This will execute a reference data (or what CI Sync calls a “SearchKey Config”) read test.
-
Even though you are running the Access and Permissions test against a given destination system, you are indeed selecting a Source System from the dropdown. The reason being, it is the source system recordsets that utlimately influence which ServiceNow tables CI Sync needs to read from.
-
If you have red lights:
-
There is likely to be a permission issue with the ServiceNow user account being used by CI Sync (i.e. the account is unable to read the various CMDB CI tables). In this case:
-
Recheck the roles/permissions assigned to the user account within ServiceNow.
-
Check for custom ACLs related to the ServiceNow tables in scope for CI Sync.
-
If you can’t resolve the issue, then contact Syncfish Support.
-
-
You can still proceed to the subsequent Mock Sync Insert, Update, Delete Tests to develop a complete picture of access/permissions issues needing resoltion.
-
-
If you have all green lights, then the ServiceNow user account (i.e. the account configured in the CI Sync SaaS application) has sufficient permissions to read the various tables in scope for CI Sync.
Task 3: Execute Mock Sync Insert, Update, Delete Test
Context Note
In this step you will trigger a “dummy” sync of CIs into the ServiceNow CMDB. CI Sync will attempt to insert, update and delete a single record into each of the ServiceNow tables in scope for CI Sync.
-
Remain on the Access and Permissions Test page described above in Task 7b.
-
On the right hand side of the page (under the info note titled “Sync Config Test”), click the “Confirm & Run” button.
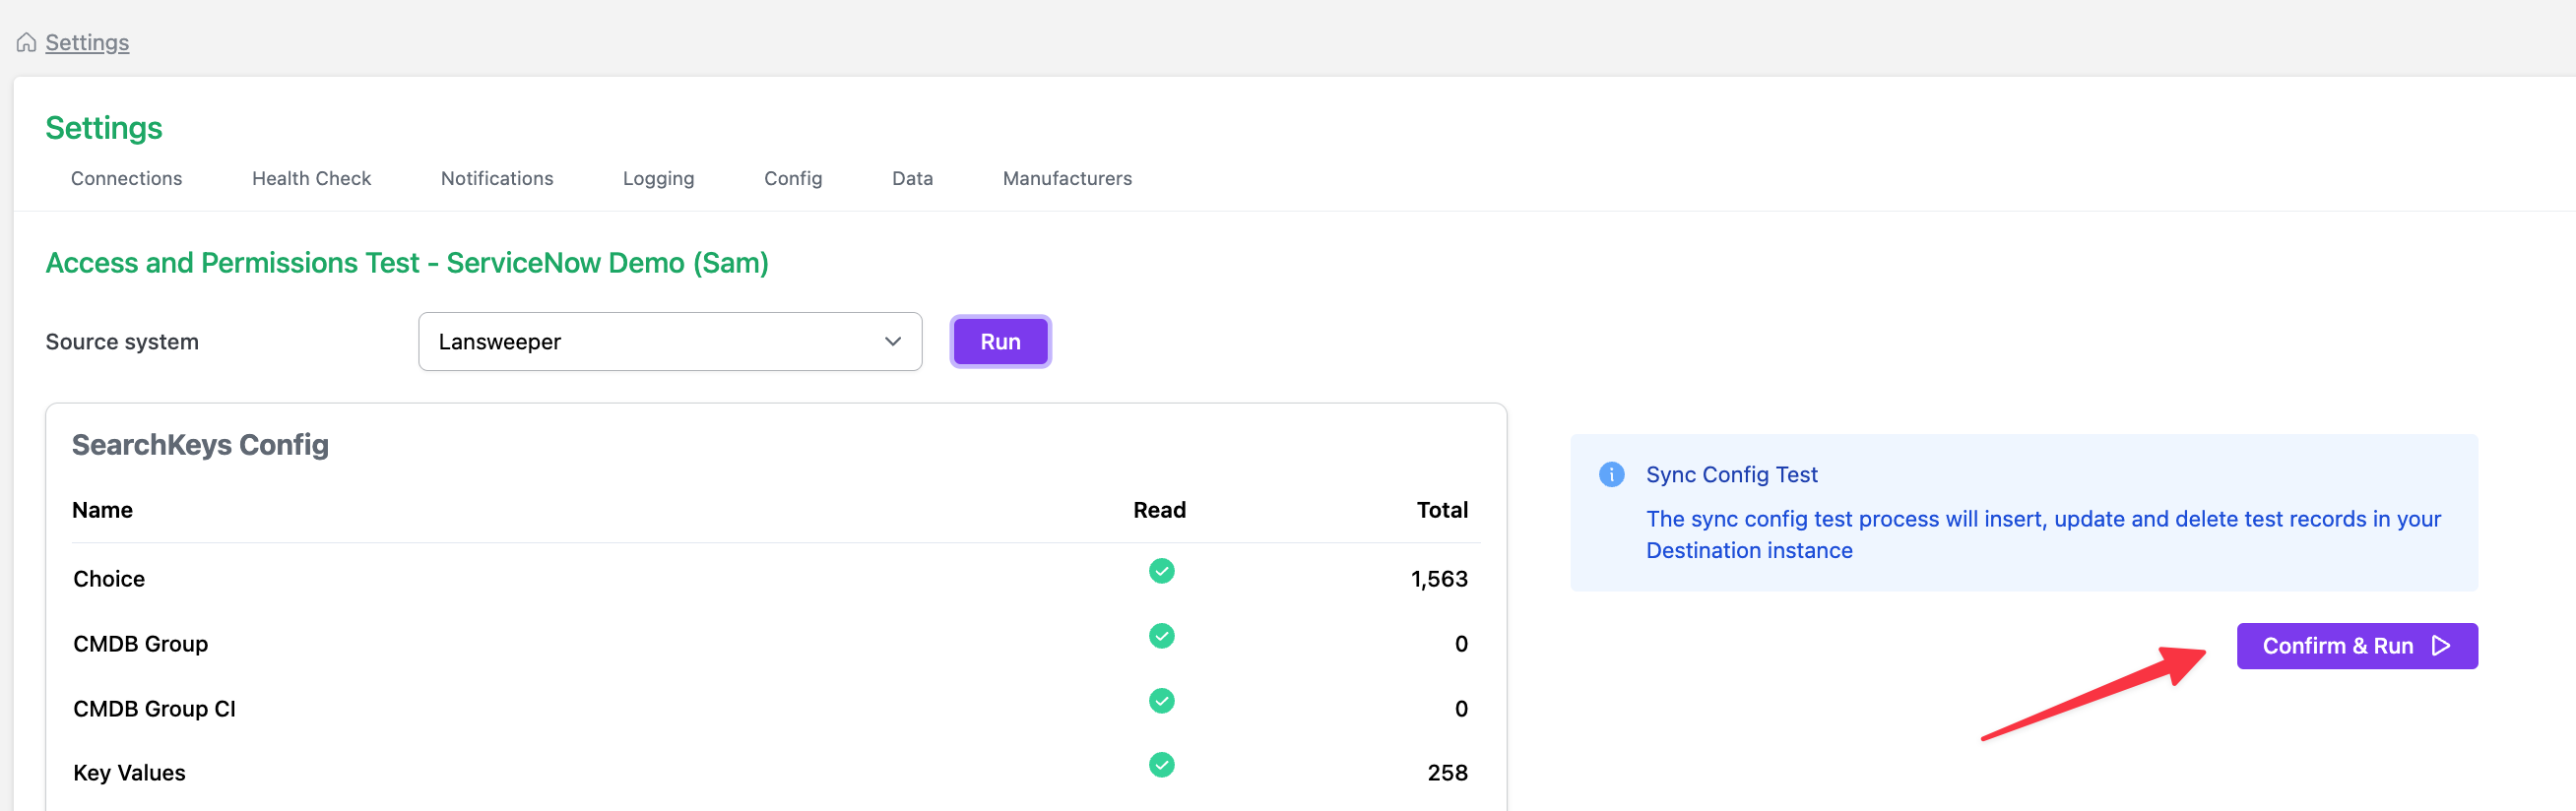
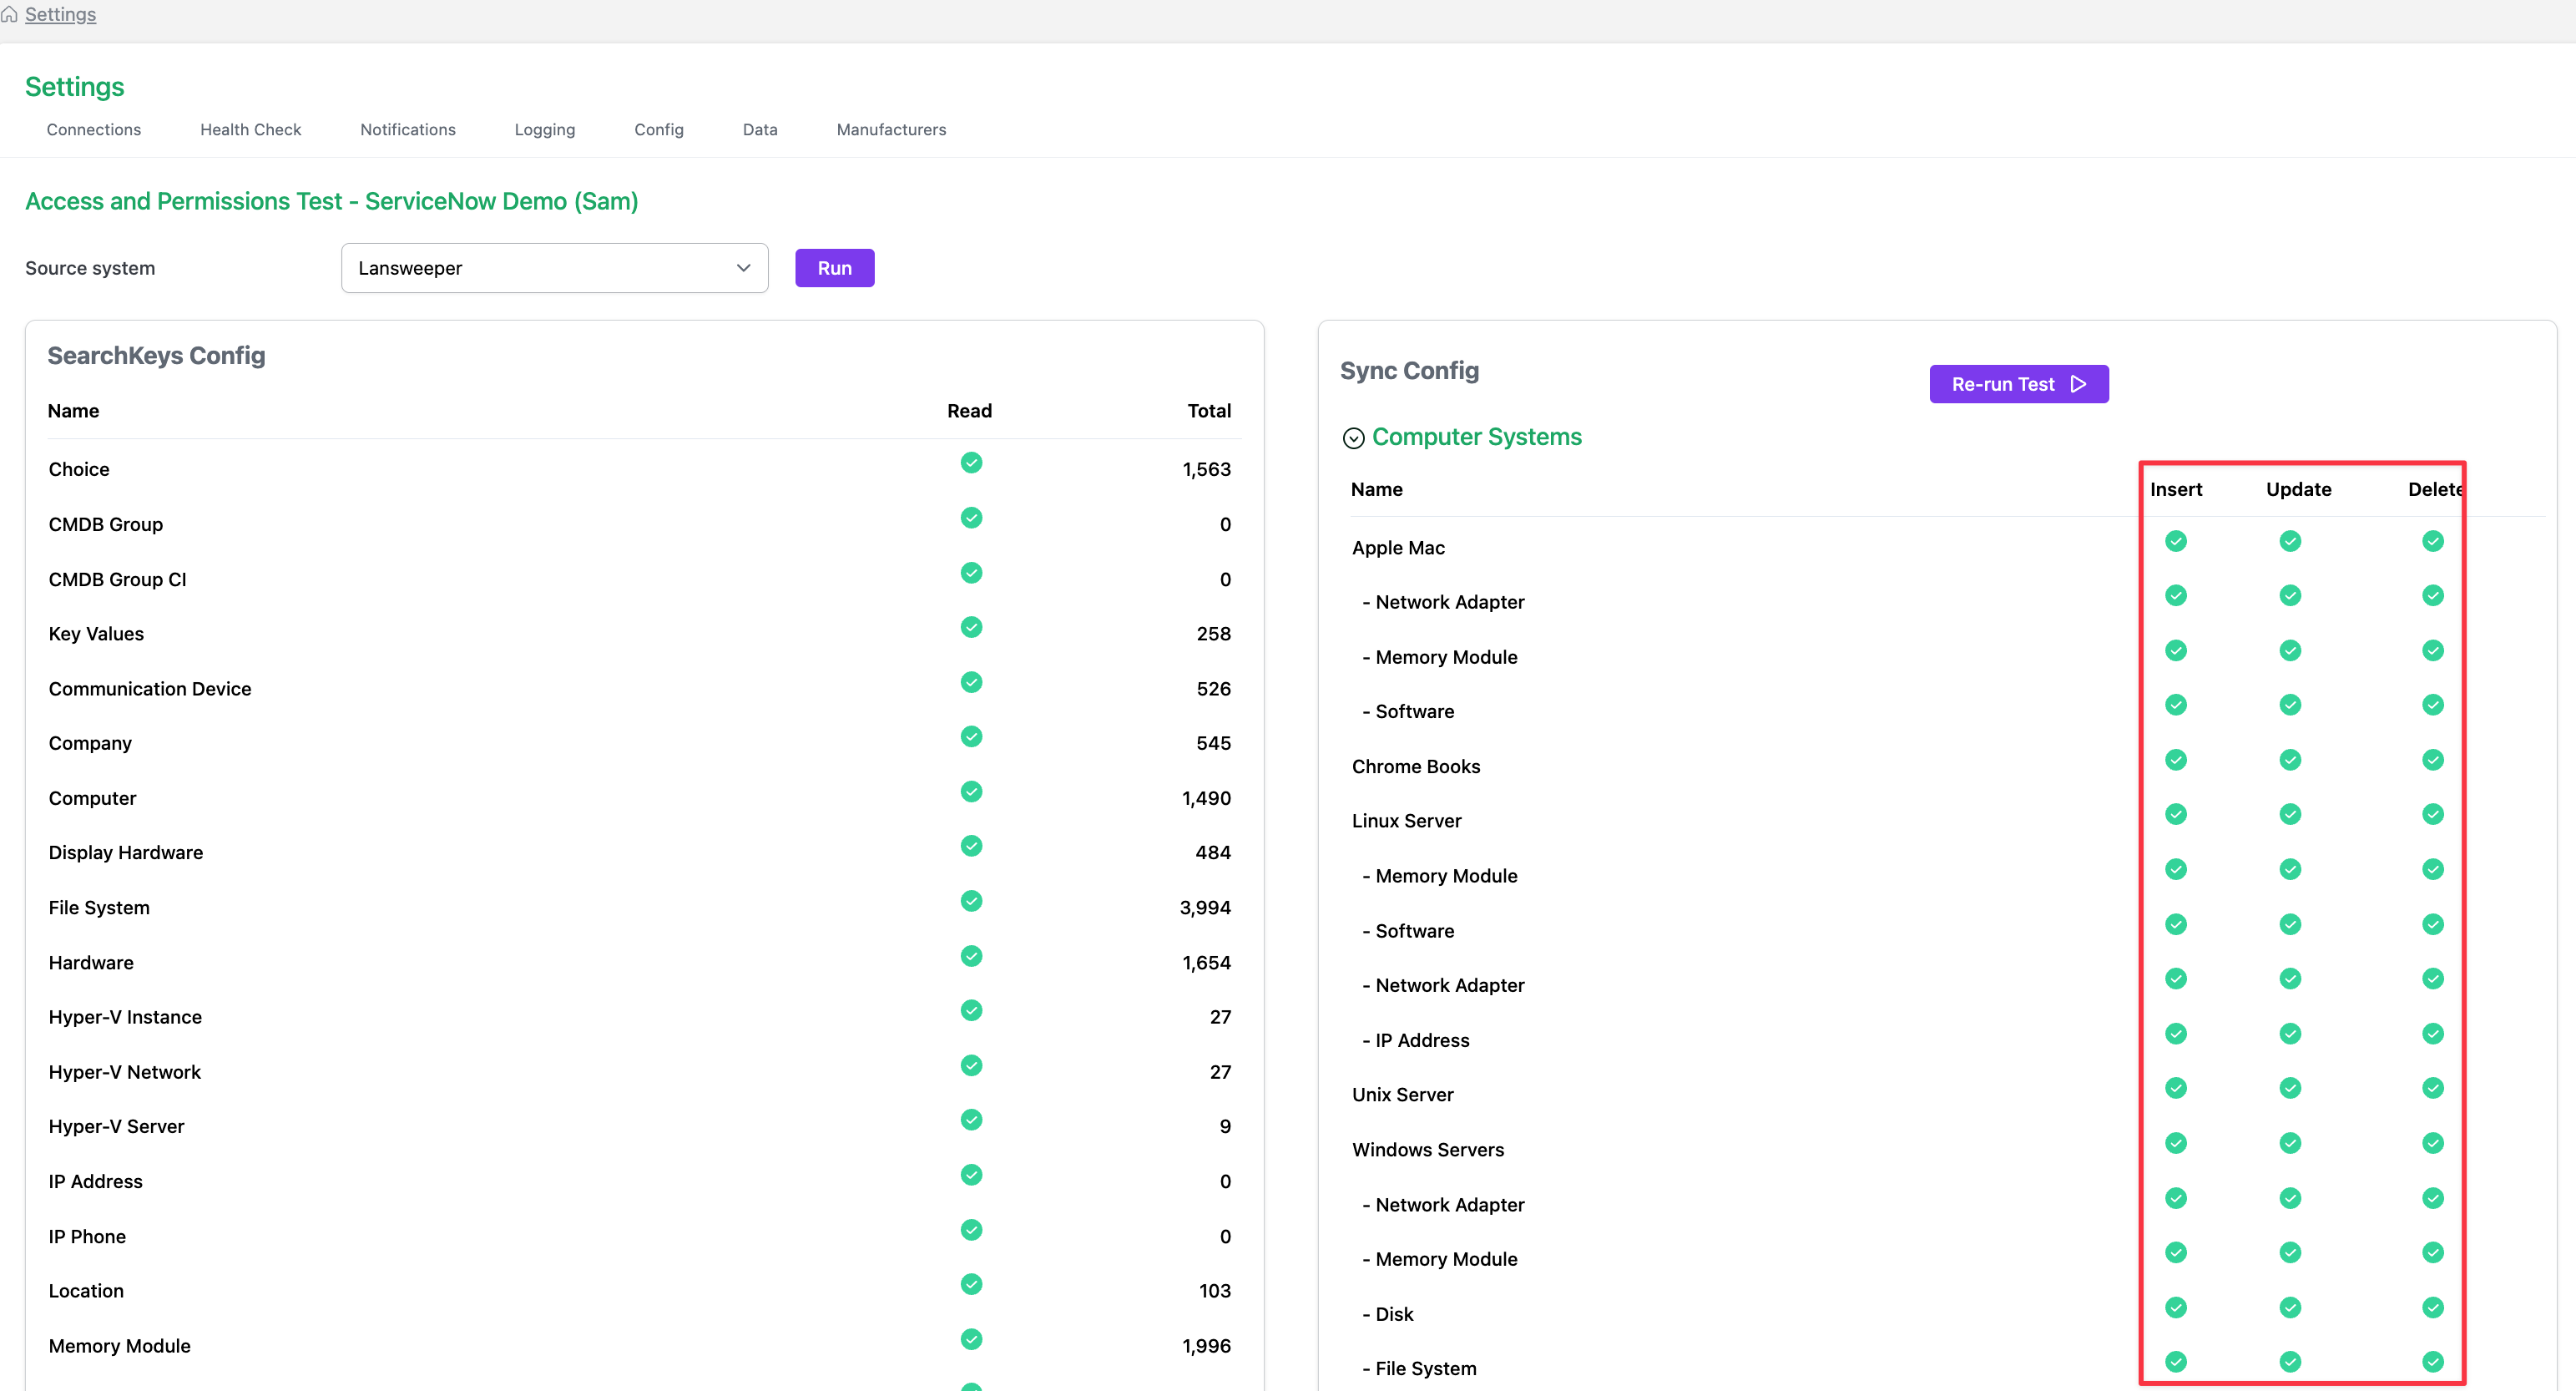
-
The test will execute and a results screen similar to one below will be returned (i.e. the right hand side of the screen will show the results under the “Sync Config” heading).
-
If you have red lights:
-
There is likely to be a permission issue with the ServiceNow user account being used by CI Sync (i.e. the account is unable to read the various CMDB CI tables). In this case:
-
Recheck the roles/permissions assigned to the user account within ServiceNow.
-
Check for custom ACLs related to the ServiceNow tables in scope for CI Sync.
-
If you can’t resolve the issue, then contact Syncfish Support.
-
-
Also, it’s best not to proceed with an initial synchronization of assets into your ServiceNow CMDB until the failed tests are resolved (see also Information Note below for exceptions).
-
You may see red light (failed tests) against one or more “Asset Group Link” related tests for a Lansweeper source system. This relates to additional permissions required in ServiceNow for these record types.
In Syncfish experience Asset Groups Links are not widely used by Lansweeper/CI Sync customers.
If you have a requirement to use/sync Lansweeper Asset Group Links (which are treated as a relationship type in ServiceNow) please contact Syncfish support and we will explain the extra permissions needed in ServiceNow.
-
If you have all green lights, you are ready to go with an initial synchronization of Lansweeper assets into your ServiceNow CMDB.
Task 4: Read the CI Sync Default Configuration Guide/s
Syncfish publish “Default Configuration Guides” specific to a given Source and Destination System. The guides are located here: Default Configuration Guides
These guides cover various topics about the CI Sync Default Configuration rules, and in particular how the configuration rules will read, map, transform and interact with data and objects between a given Source System and Destination System.
Syncfish strongly recommend the default configuration guide is read in advance of performing your first synchronization.
In addition to the Default Configuration Guides, Syncfish Syncfish highly recommend reading the following page before your first sync:
FAQ - What are the Top Tips when first synchronizing data to my non-PROD CMDB?
Task 5: Perform a small initial synchronization
-
Login to the CI Sync UI and navigate to the Run page
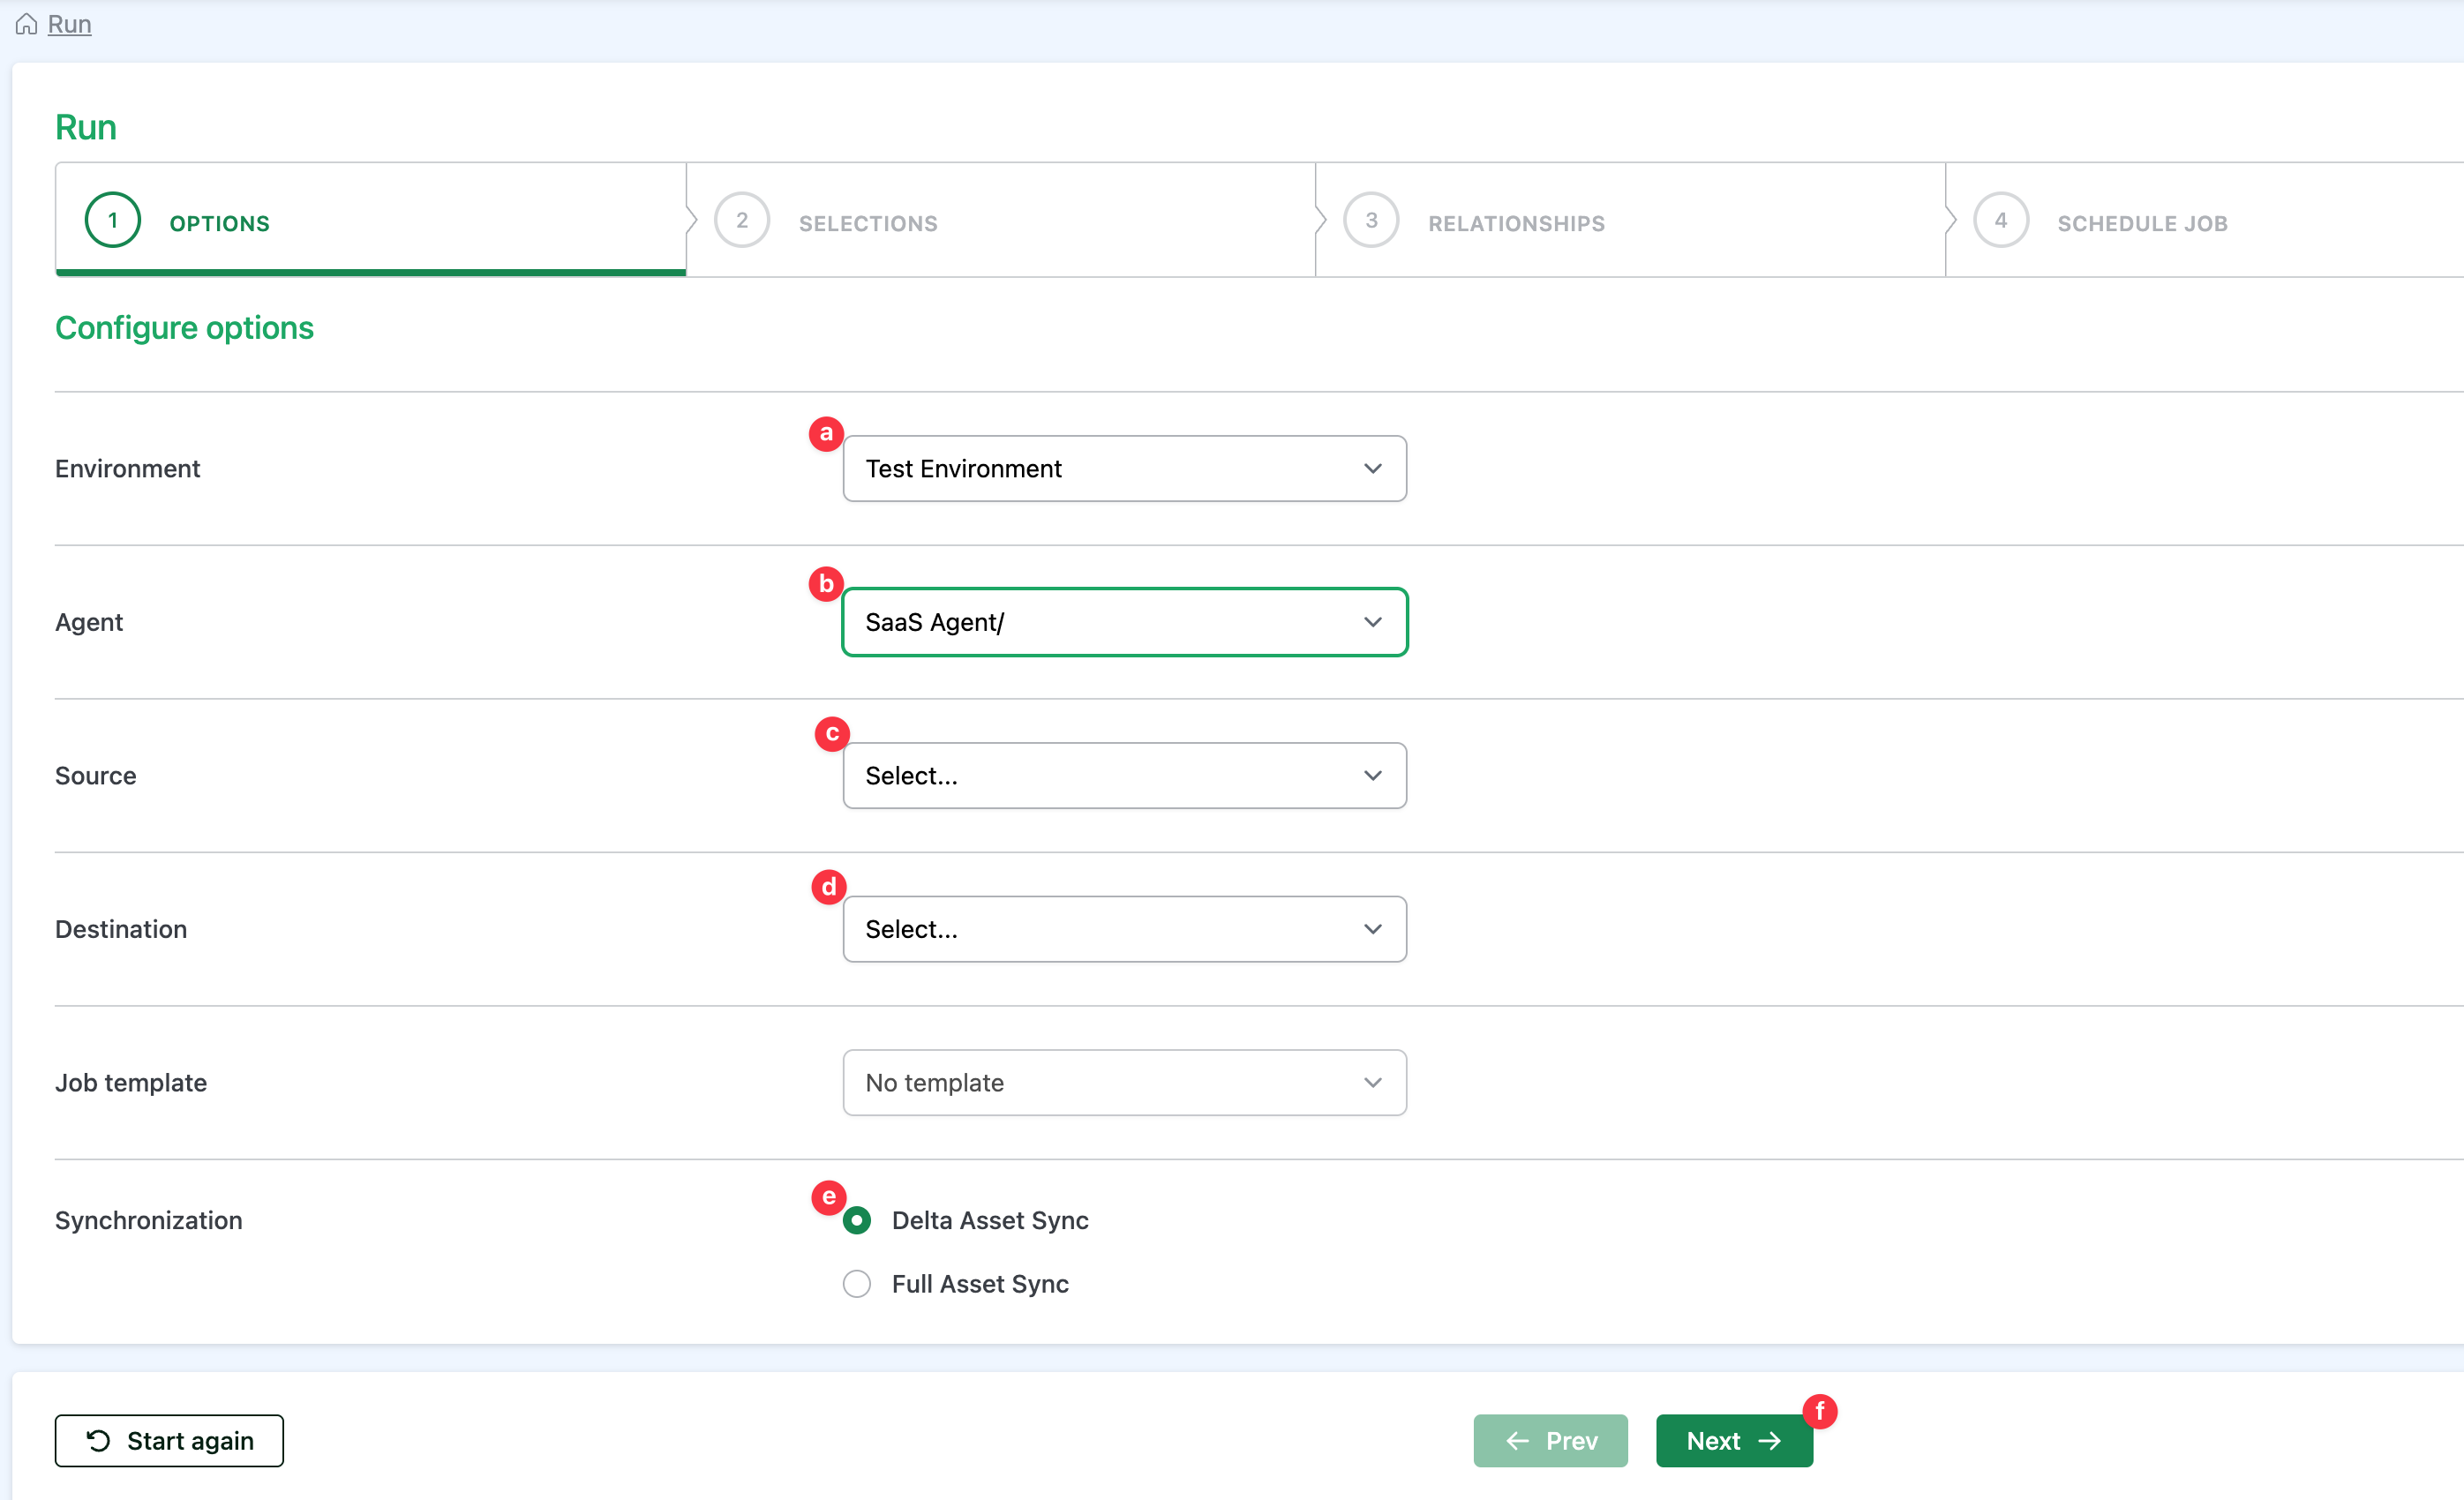
-
On the (1) Options page, complete the fields using these instructions:
-
Select the Environment.
-
You can select either Test or Production.
-
The selection you make here will filter the list of available Source and Destination connections you can select in the subsequent drop-down boxes.
-
-
Select the Agent
-
You will see any/all agents regsitered in your Settings page.
-
Select the one called “SaaS Agent/”.
-
Other Notes
-
If you added an Alias to your SaaS Agent via the Settings page then the Alias name appears in the drop down list here.
-
The context of this guide (the one you are reading now) is the CI Sync Cloud Agent (sometimes called the Cloud-to-Cloud Extractor) and thefore
-
-
-
Select the desired source system from the drop down list.
-
Your source is any one of your CI Sync source connections (which represent the given source asset repository).
-
Other Notes:
-
The drop-down list is populated from the source connections defined in the Settings page.
-
The drop-down list is filtered based on the Environment you set against each source connection using the Settings page.
-
-
-
Select the desired destination system from the drop down list.
-
The destination is any one of your ServiceNow instances
-
Other Notes:
-
The drop-down list is populated from the destination connections defined in the Settings page.
-
The drop-down list is filtered based on the Environment you set against each destination connection using the Settings page.
-
Make sure you are aware of the destination you are synchronizing to, in particular if the destination is production!
-
-
-
Select either Delta Asset Sync or Full Asset Sync as the job type
-
Click Next
-
For initial/first time synchronizations a Delta sync (i.e. what’s changed since the previous sync) will be the same as a Full sync (because there has never been a “previous” sync). As such you can select either Delta or Full sync and the result will be the same. For ongoing sync jobs, you should use Delta syncs in the vast majority of cases.
-
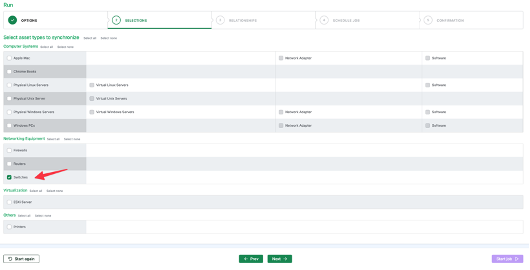
On the (2) Selections page tick one (maybe two) asset types that you know contain a small number of records (e.g. Switches). The idea is to create a small sync job as a basic end-to-end test. When ready, click Next
-
Depending on the asset types you ticked on the (2) Selections page you will see all possible relationships presented on the (3) Relationships page. Use the defaults which have been selected and then click Next

-
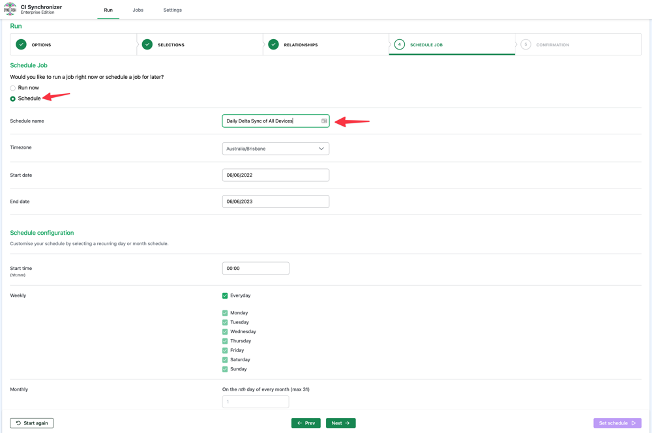
Ensure the “Run now” option is selected on the (4) Schedule Job page, cand then click Next

-
Review the details on the (5) Confirmation page and when ready click “Start job”.
-
The job will take a few moments to begin, and you will see various metrics and visual indicators of the job progress.
-
Upon completion you see if the job completed successfully or not.
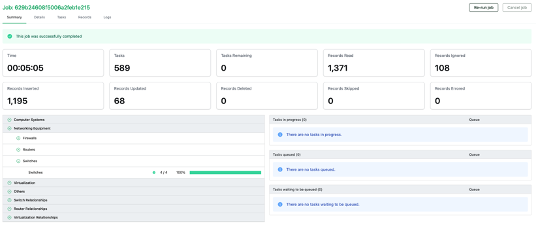
-
Depending on the results presented by CI Sync, you can/should also review the CIs in your ServiceNow CMDB to confirm the expected data has been sent across.
-
You can also use the Jobs page in the CI Sync User Interface to drill down into the Job Logs at varying levels of detail.
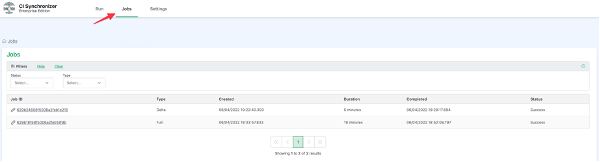
The Job Logs can be a bit overwhelming on first review as they contain a great deal of information to assist Syncfish diagnosing issues. If your first job has errors which aren’t immediately obvious, please contact the Syncfish team for assistance.
-
Once you are comfortable with the CI Sync and you have successfully sync’d a small number of records without error (or with explainable error/s), proceed to the next task to synchronize more records and to create one or more Scheduled Jobs.
Task 6: Progressively perform more (and more) synchronizations
-
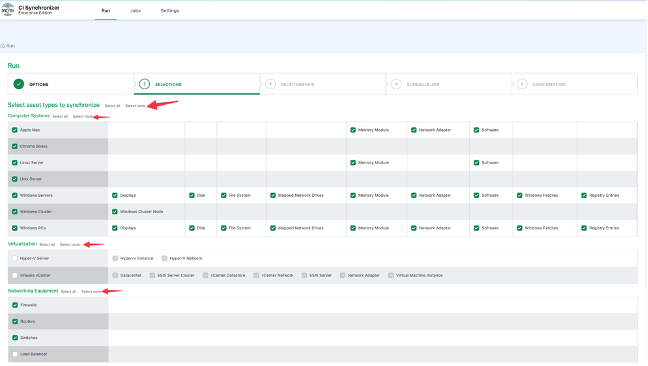
Use the (2) Selections page in the CI Sync UI to increase the number of asset types you are selecting for synchronization. Use the “Select all” and “Select none” links at the very top of the page or in each asset type section to make selections. Also tick/untick any of the related records such as displays, disks, etc.
-
Syncfish recommend you continue to use the “Run now” option as you build up/select to more and more asset types (and relationships) being synchronized. Ensure you are frequently checking the resulting CIs in your ServiceNow CMDB and comparing to the source data in Lansweeper.

-
Once you’ve executed and verified enough synchronizations to be confident about the results, use the (4) Schedule Job page to create one or more scheduled jobs based on the selections you’ve made on the previous pages. Scroll the entire page to see all of the options and the schedule detail which aim to demystify time zone and time of day topics from your choices. When ready click the “Set schedule” button in the bottom right of the page.
Extra Details about Scheduling Jobs
You can modify and delete scheduled jobs after they have been created.
Please also review FAQ - How often to schedule Delta Sync and Full Sync Jobs