Task List
|
Task # |
Task |
Performed by |
|---|---|---|
|
1 |
Prepare Microsoft 365 for use with CI Sync |
Azure Admin |
|
2 |
Add Microsoft 365 as a Source System using the CI Sync SaaS UI |
CI Sync Admin |
|
3 |
Check status of the new Microsoft 365 Source System connection |
CI Sync Admin |
|
4 |
Assess if additional updates are required in ServiceNow |
ServiceNow Admin |
Task 1: Prepare Microsoft 365 for use with CI Sync
-
In the Azure Portal, navigate to Azure Active Directory -> App Registrations and click New Registration
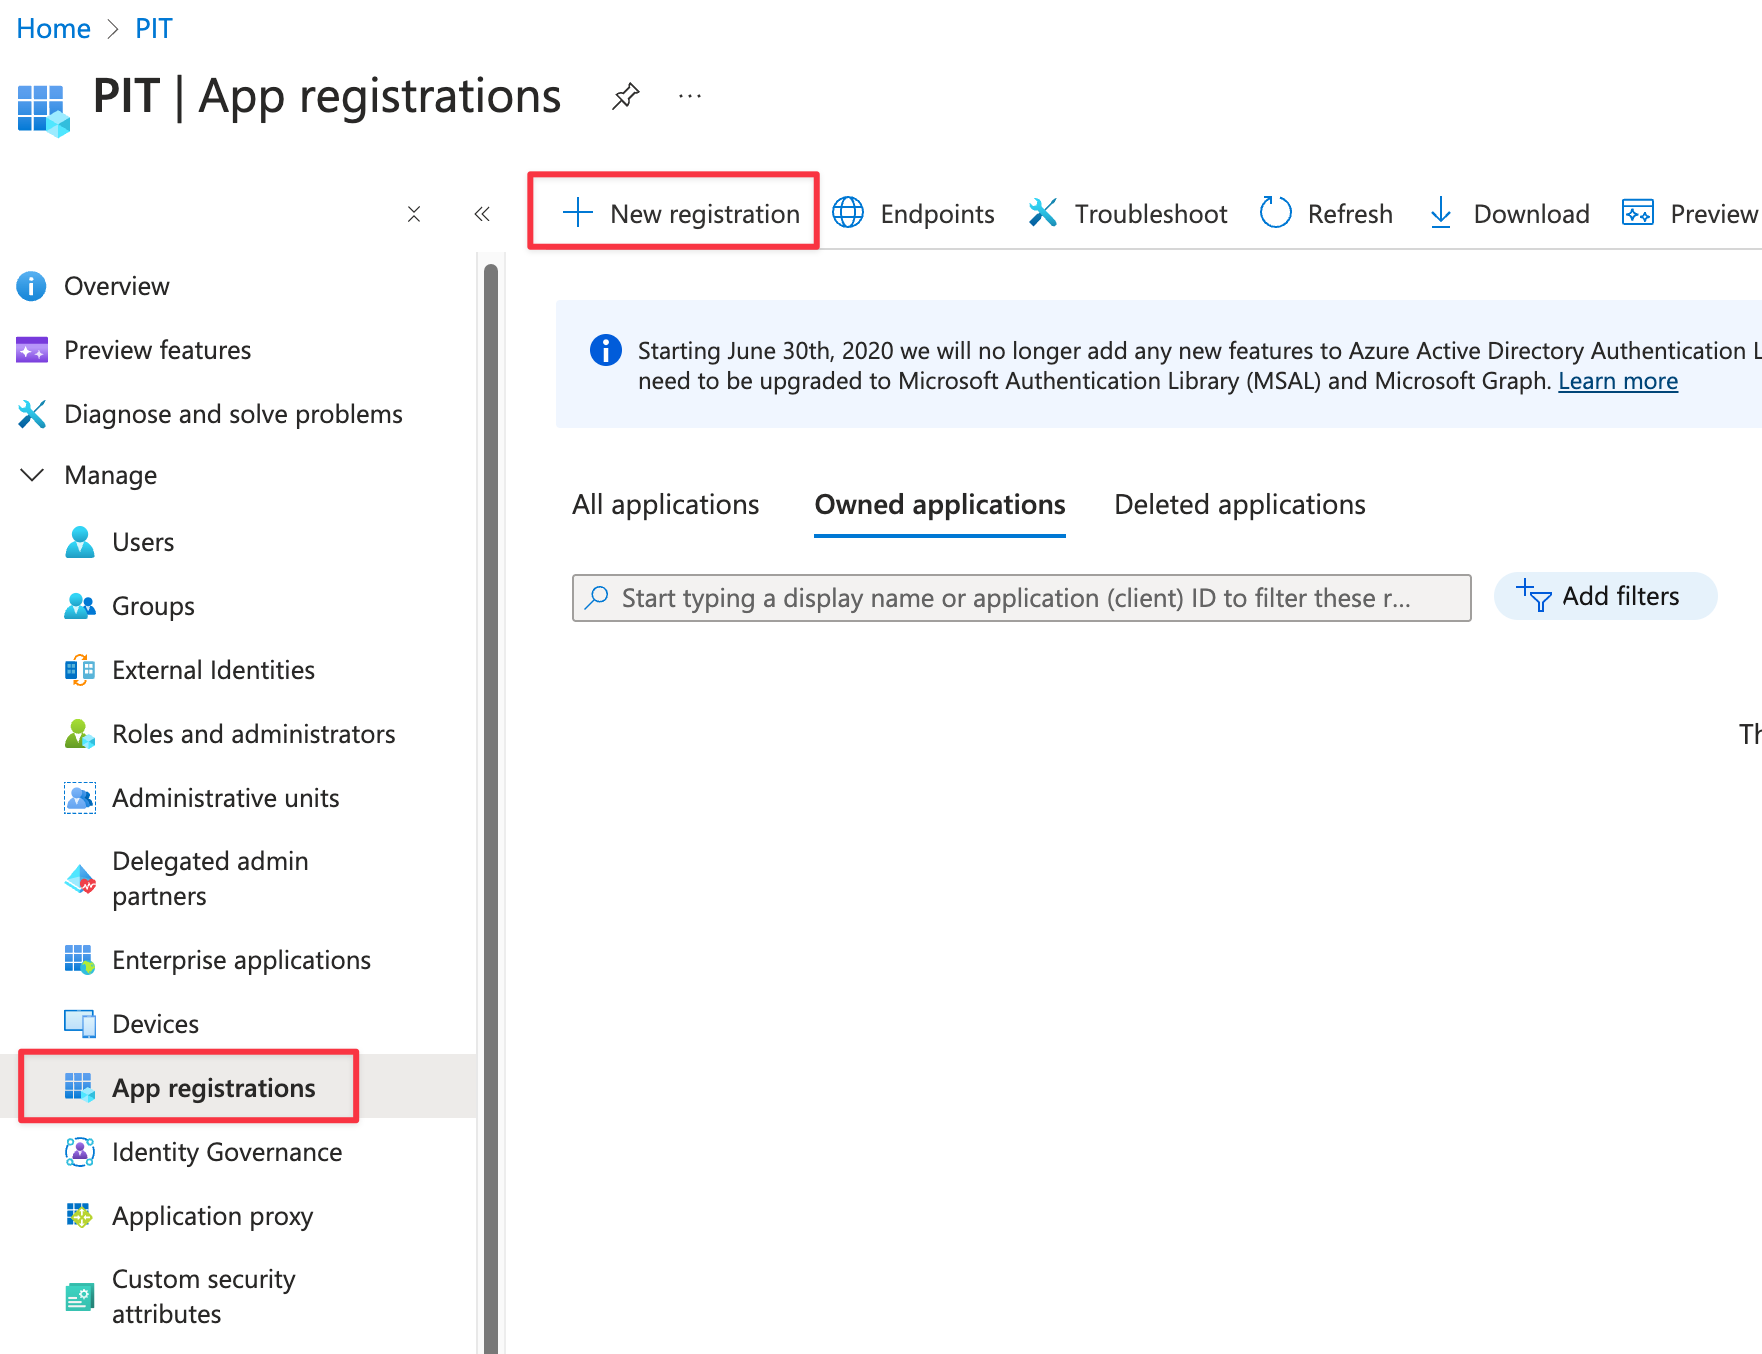
-
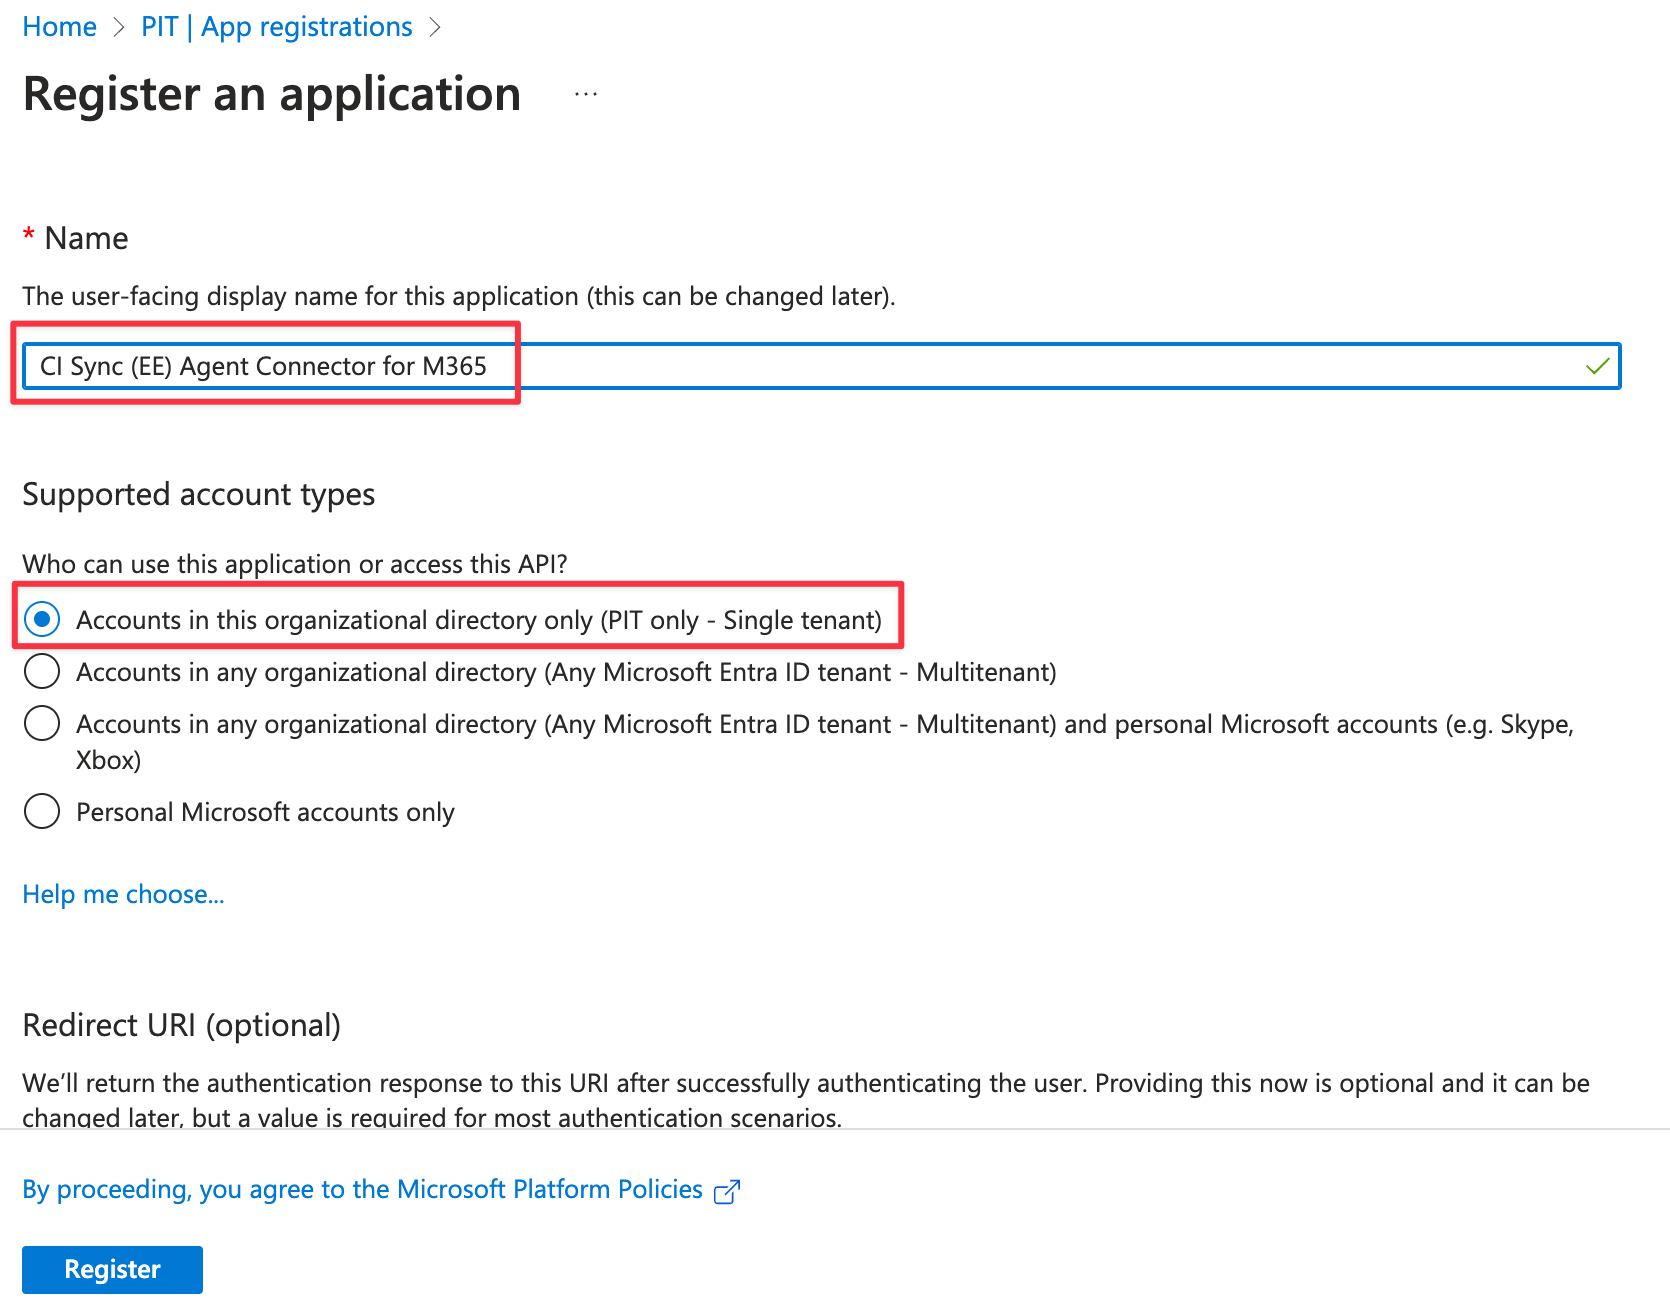
On the Register an application form complete as follows:
-
Enter the Name (Note: Syncfish recommend using “CI Sync Agent Connector for Microsoft 365”)
-
Under Supported account types select “Accounts in this organizational directory only ({Your Domain/Tenant Name} only - Single tenant)”
-
Click Register
-
-
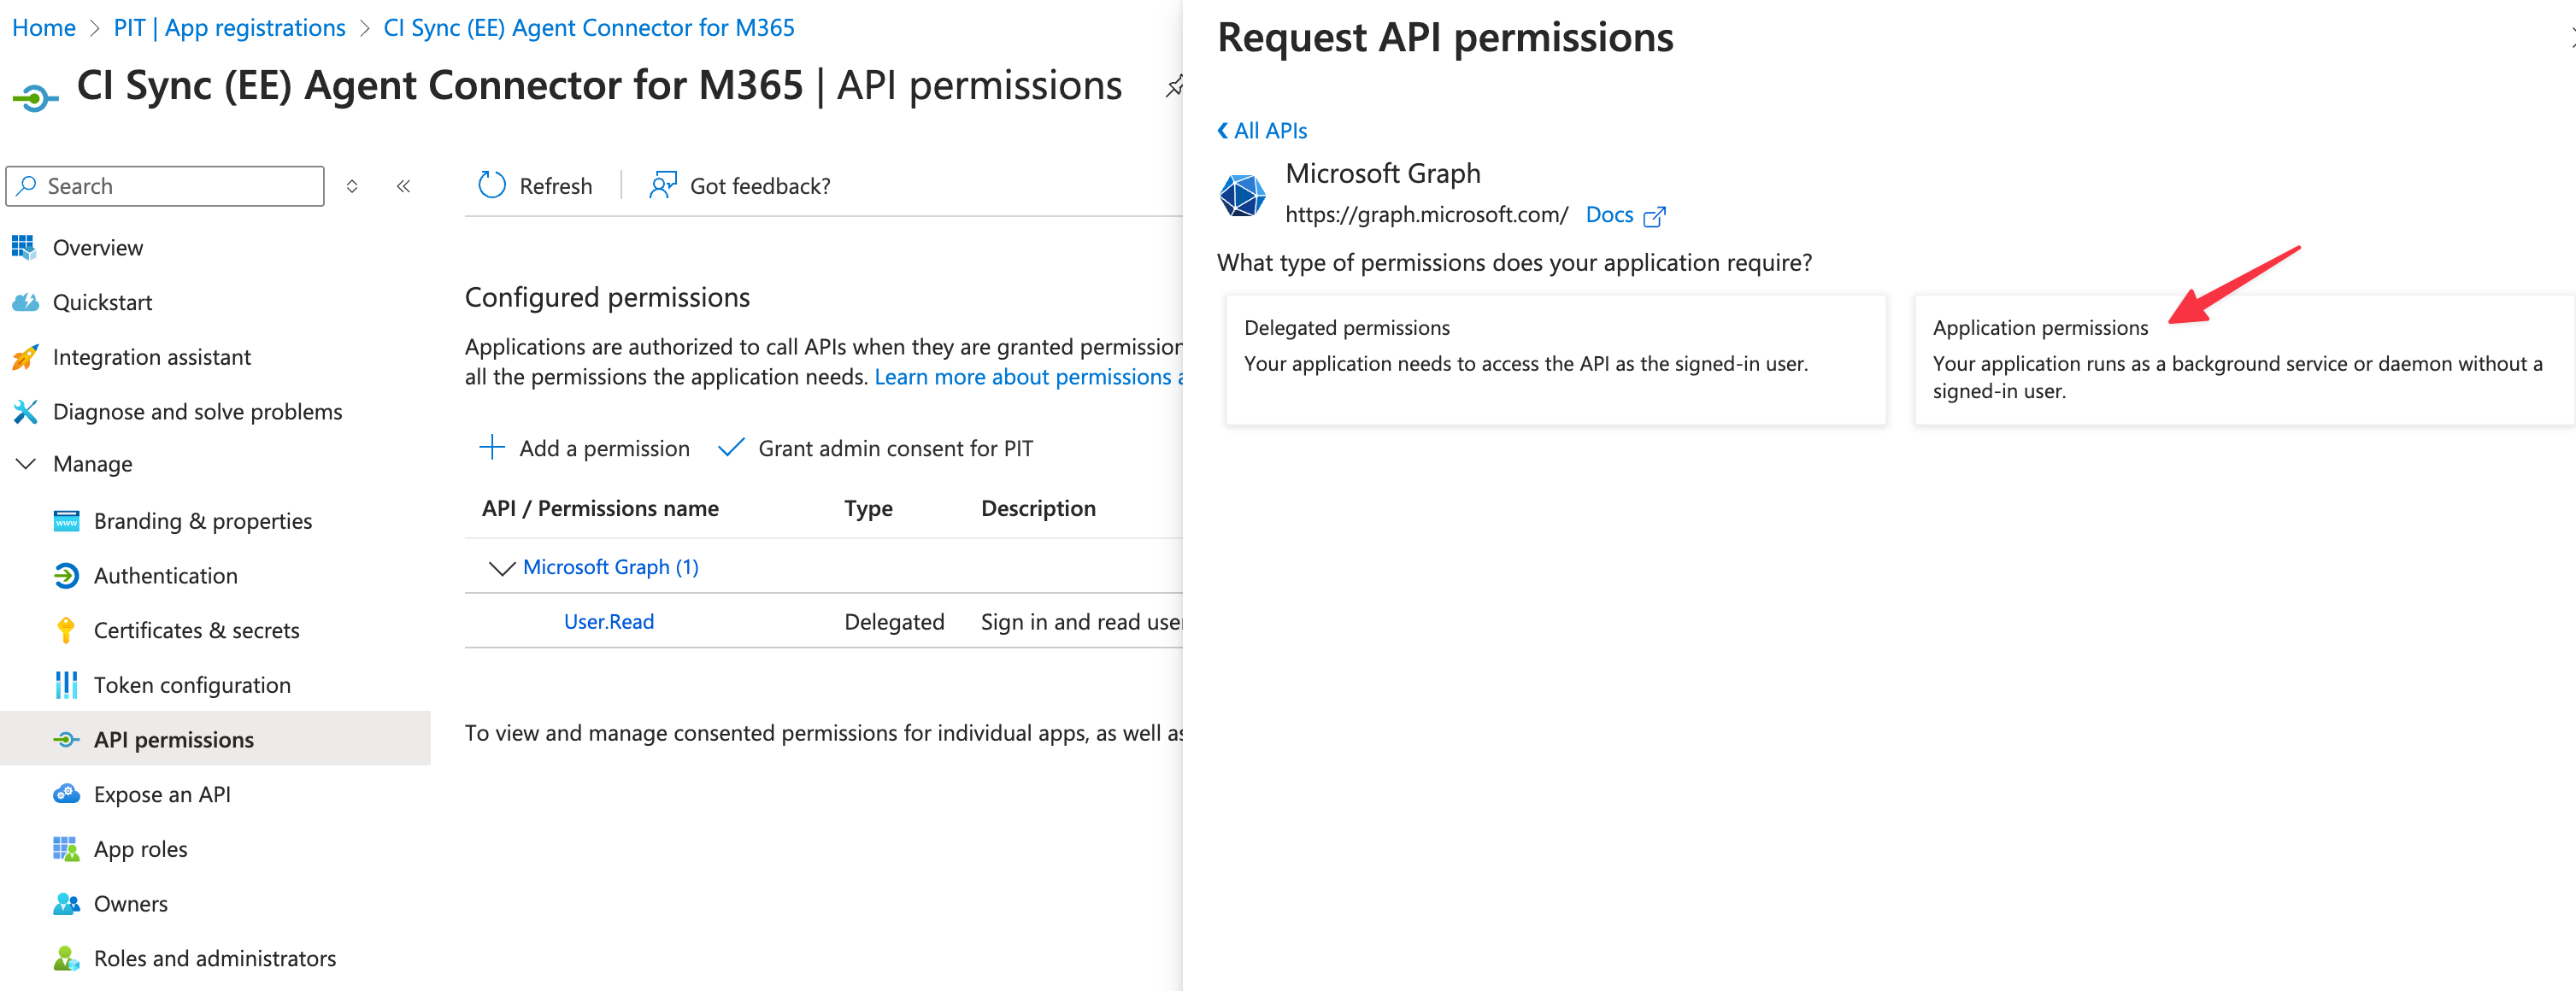
Navigate to API permissions and click Add Permission
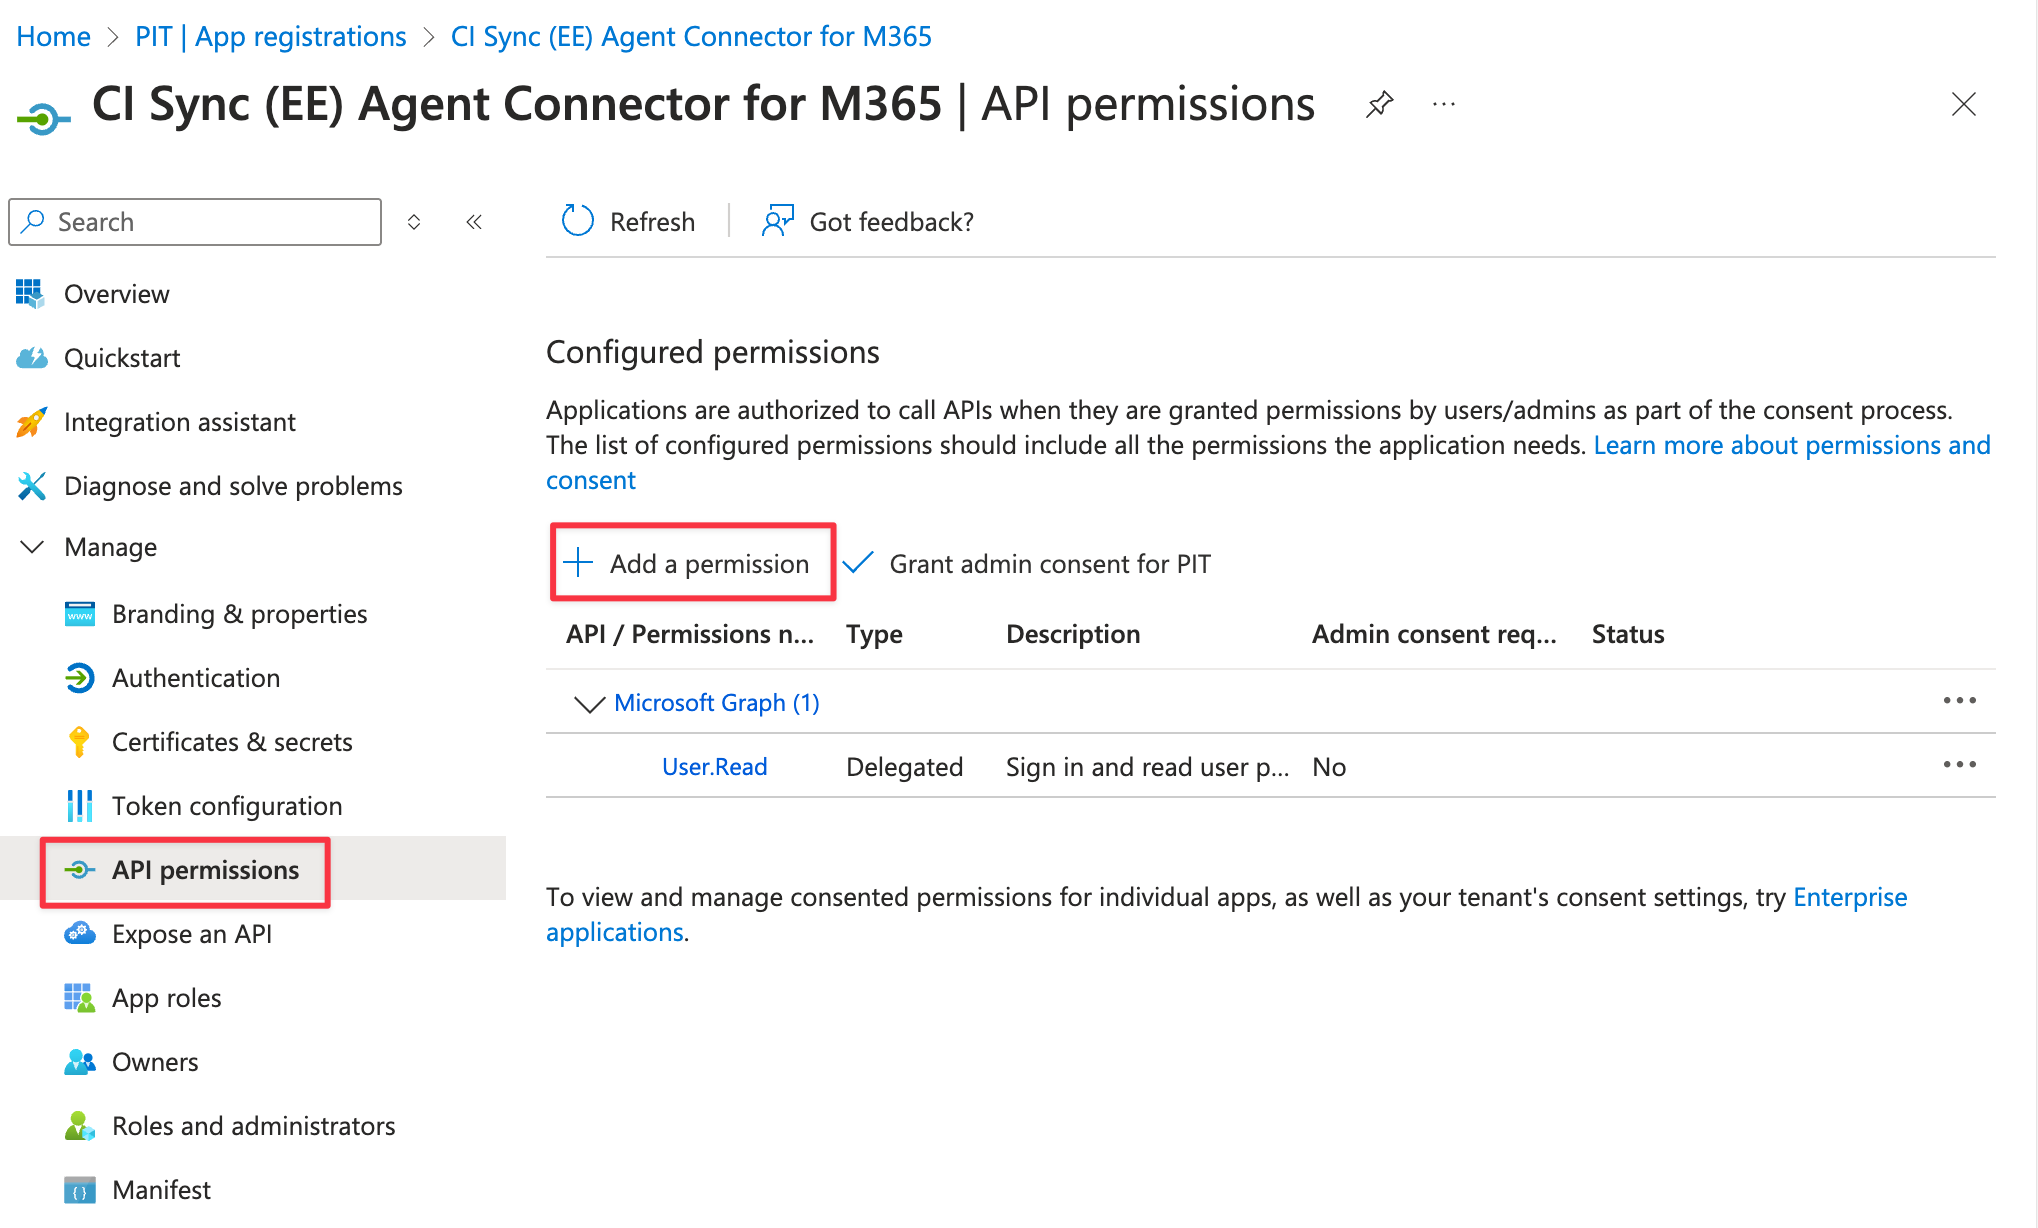
-
Click on Microsoft Graph
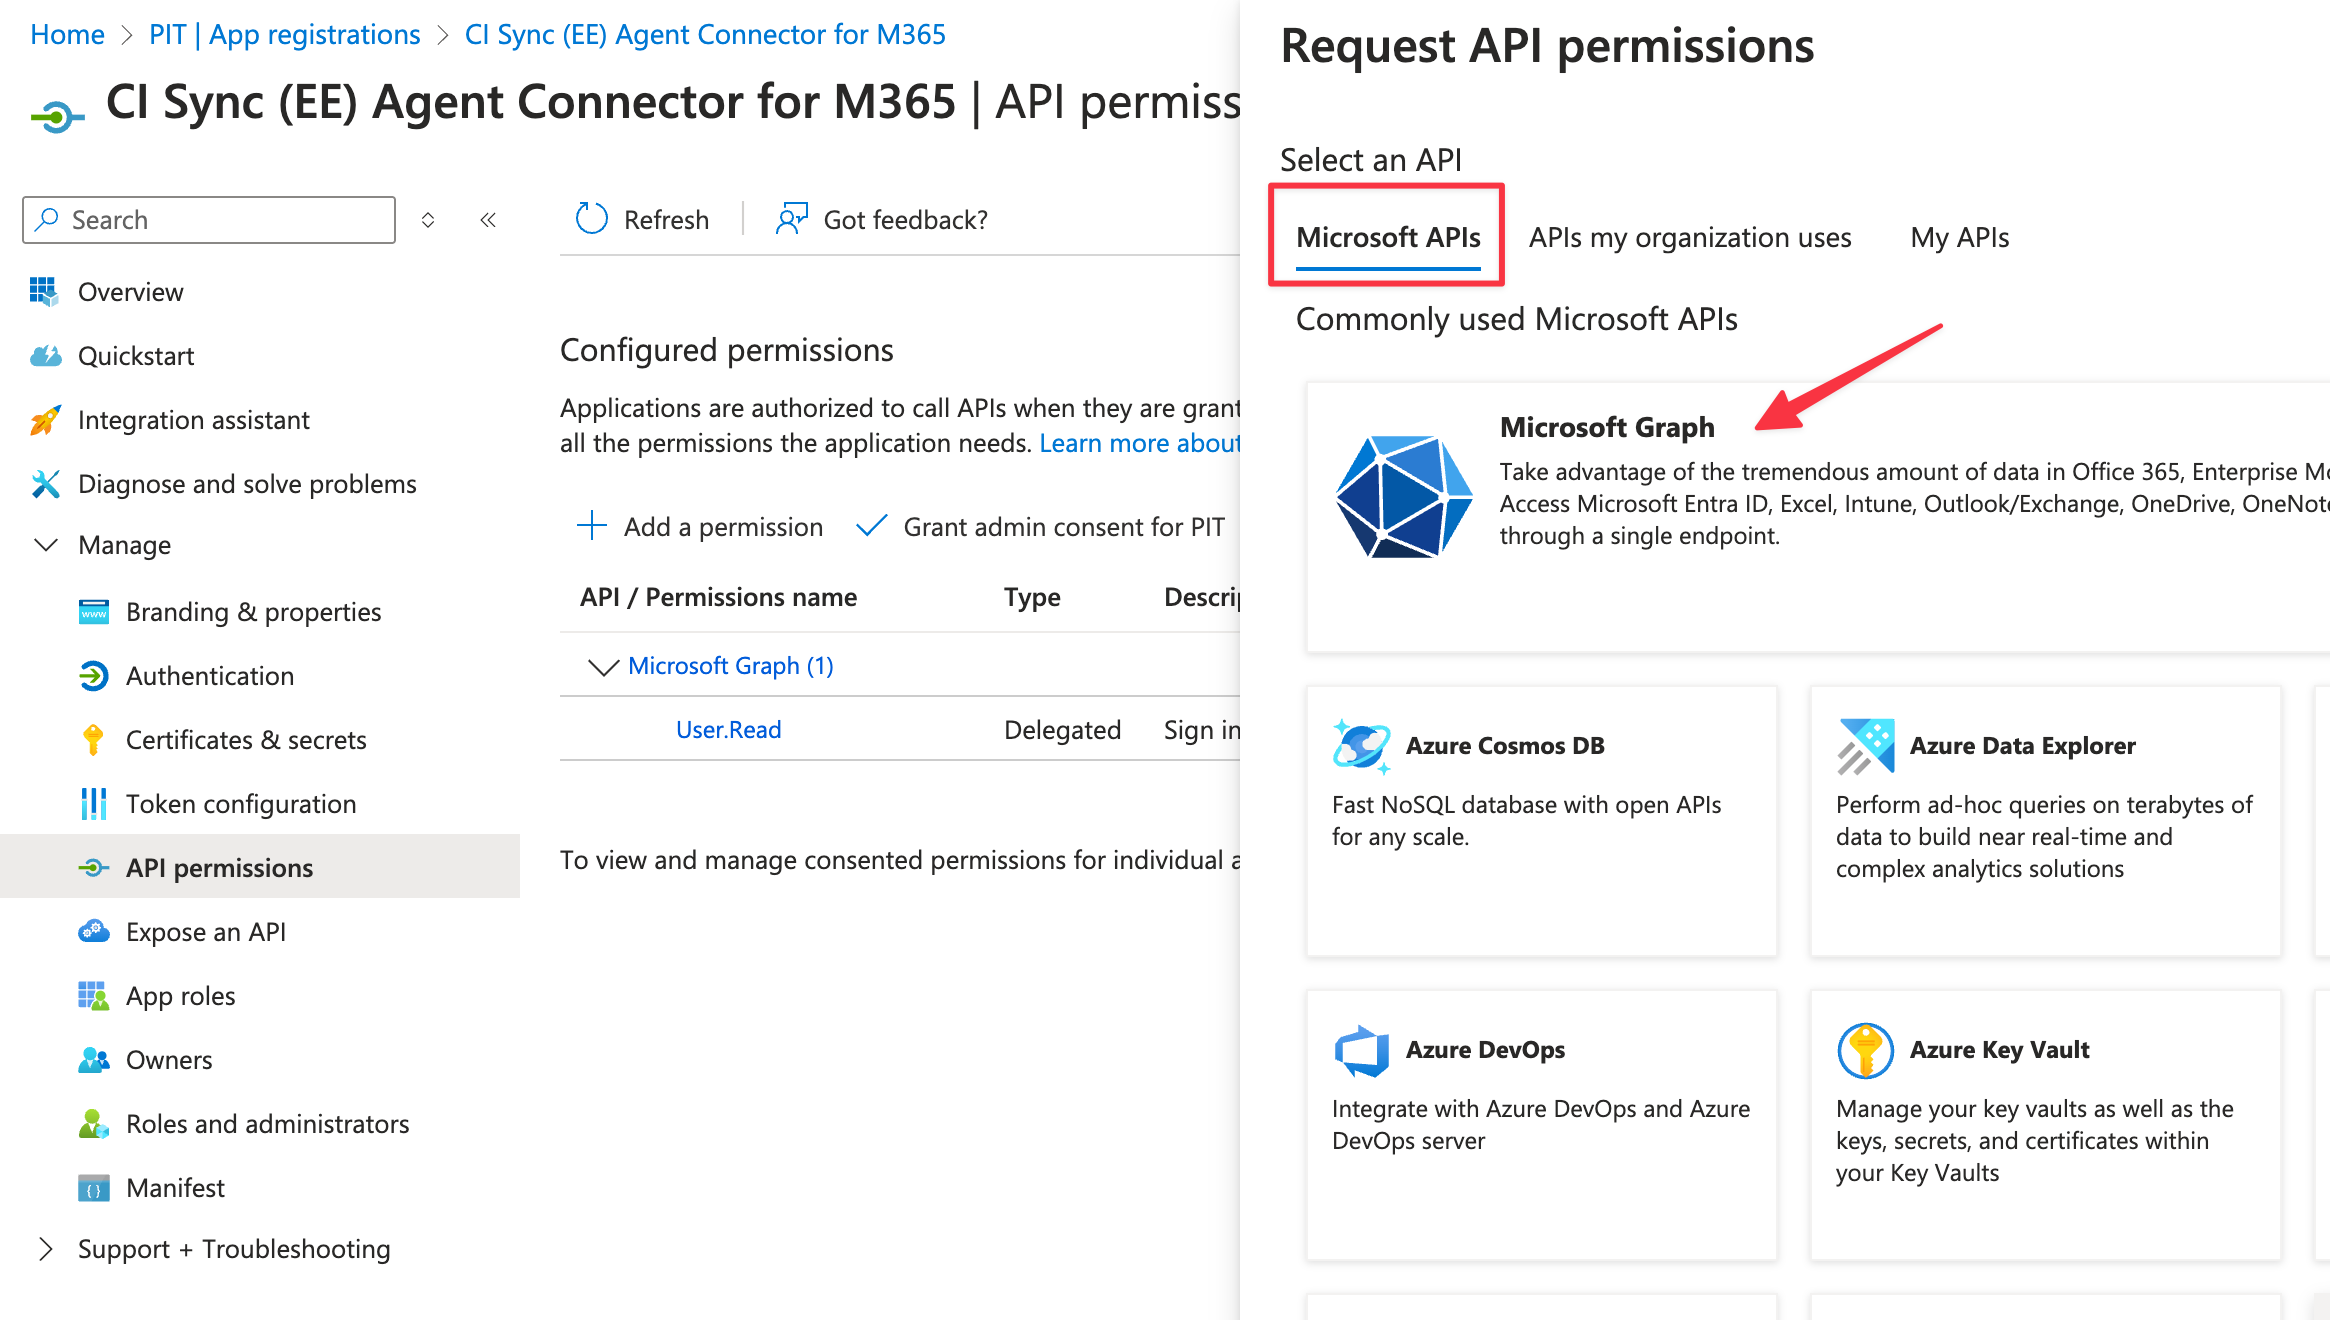
-
Click on Application permissions
-
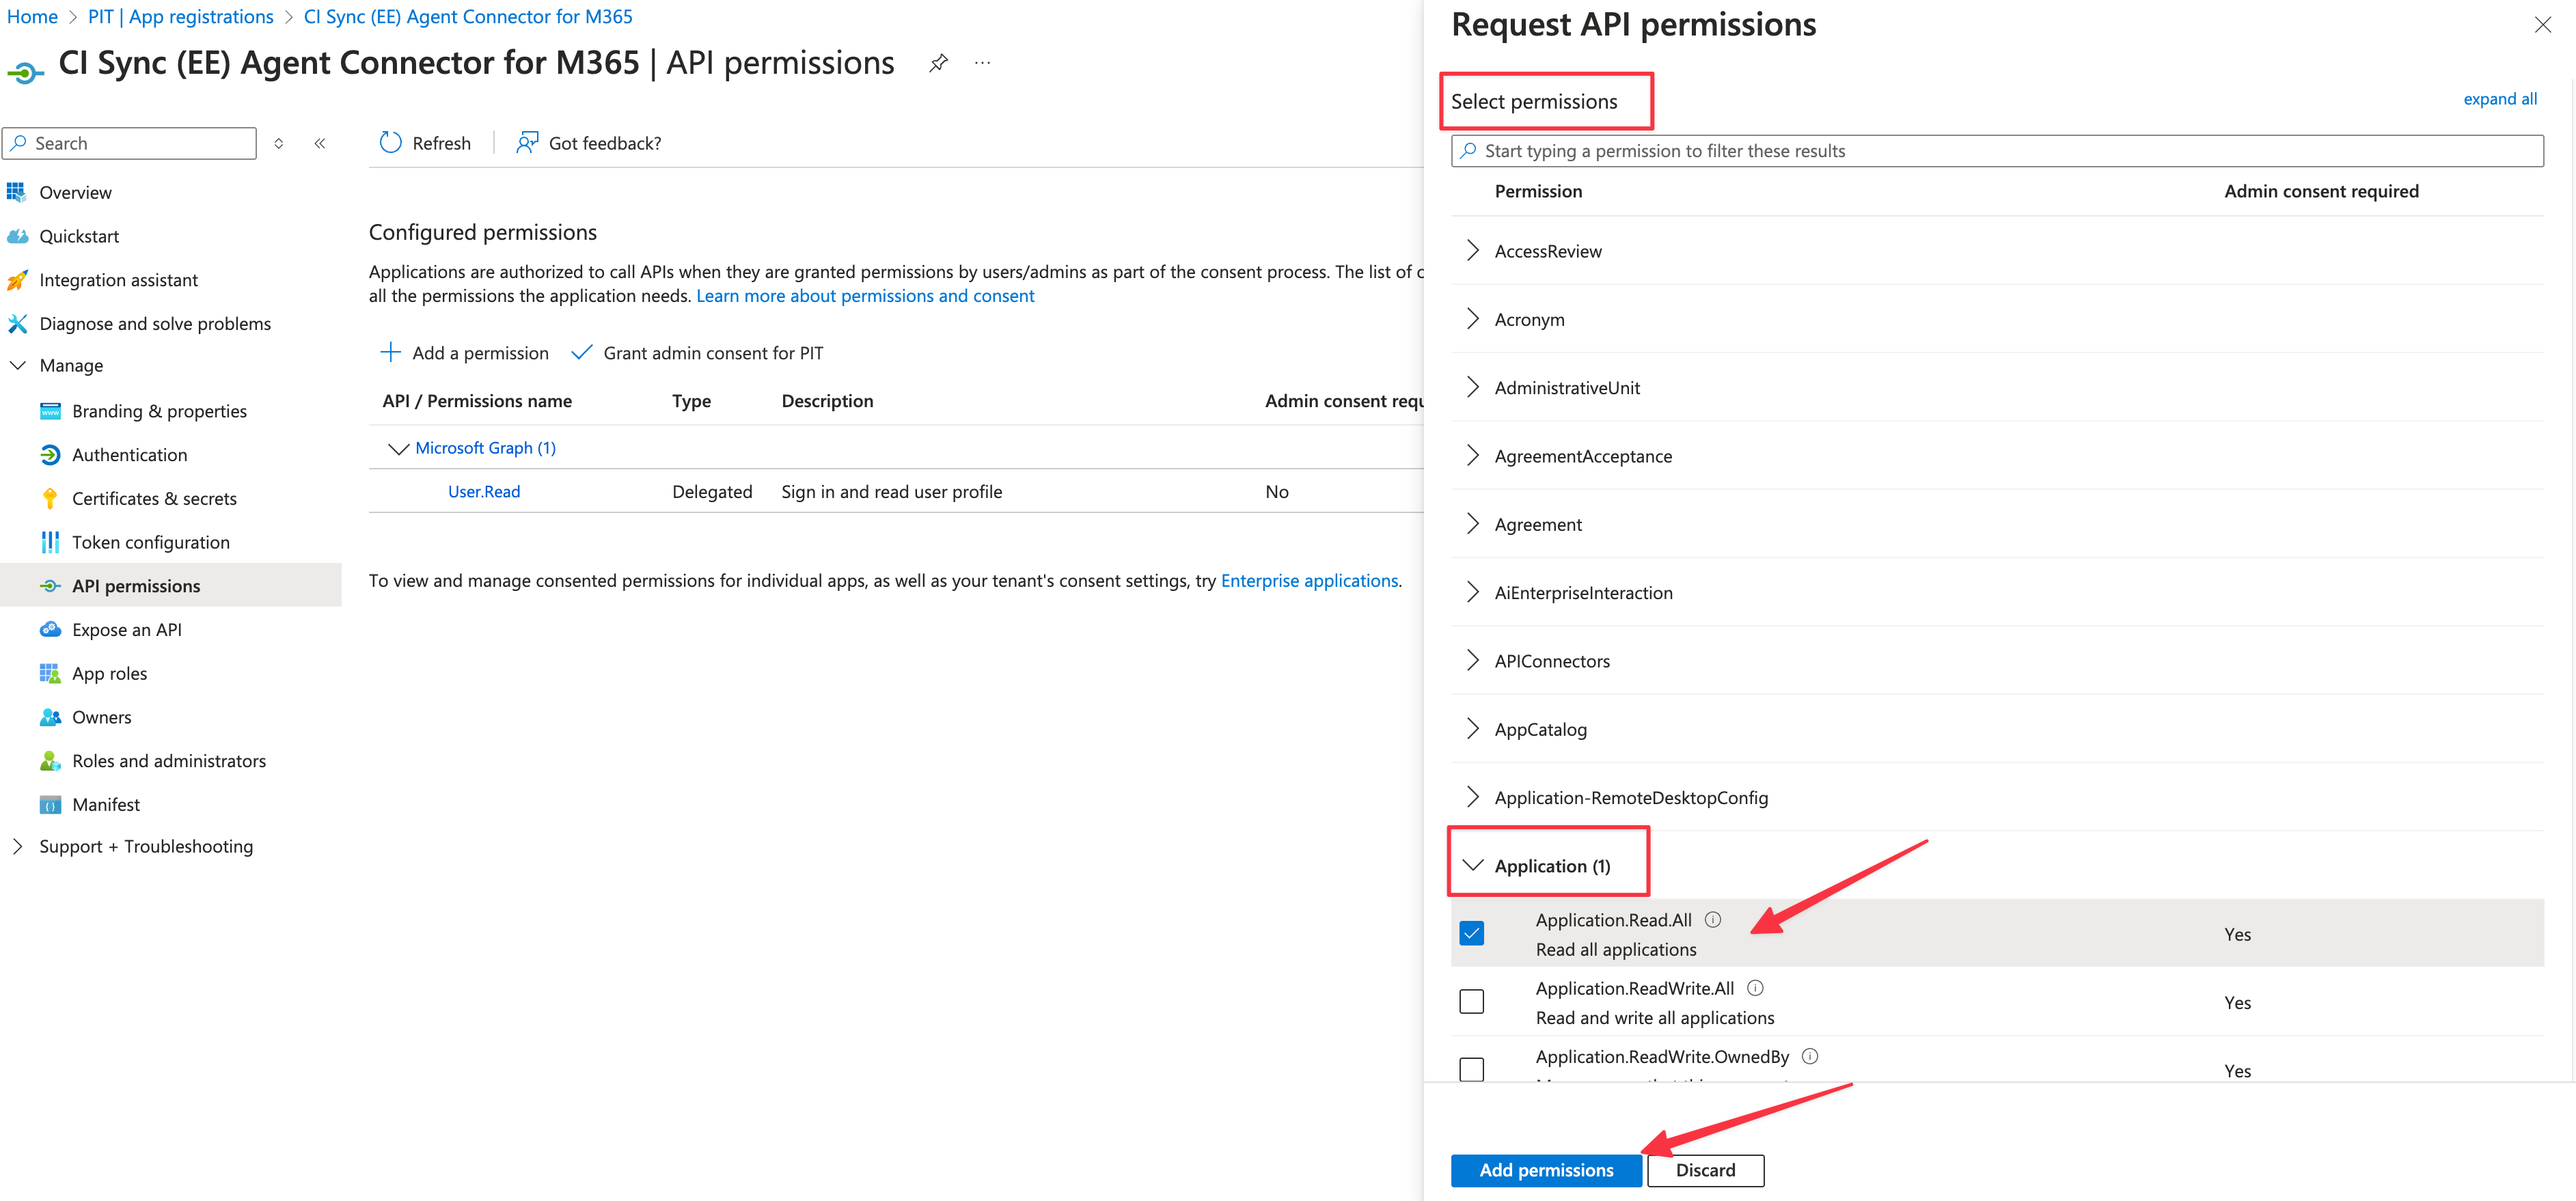
Use the Select permissions list to scroll down and select each of the following depending on which record types you will be synchronizing (see “Additional Information about required API Permissions” below):
-
First, find and expand the Calendars set, then tick/select
Calendars.Read.All -
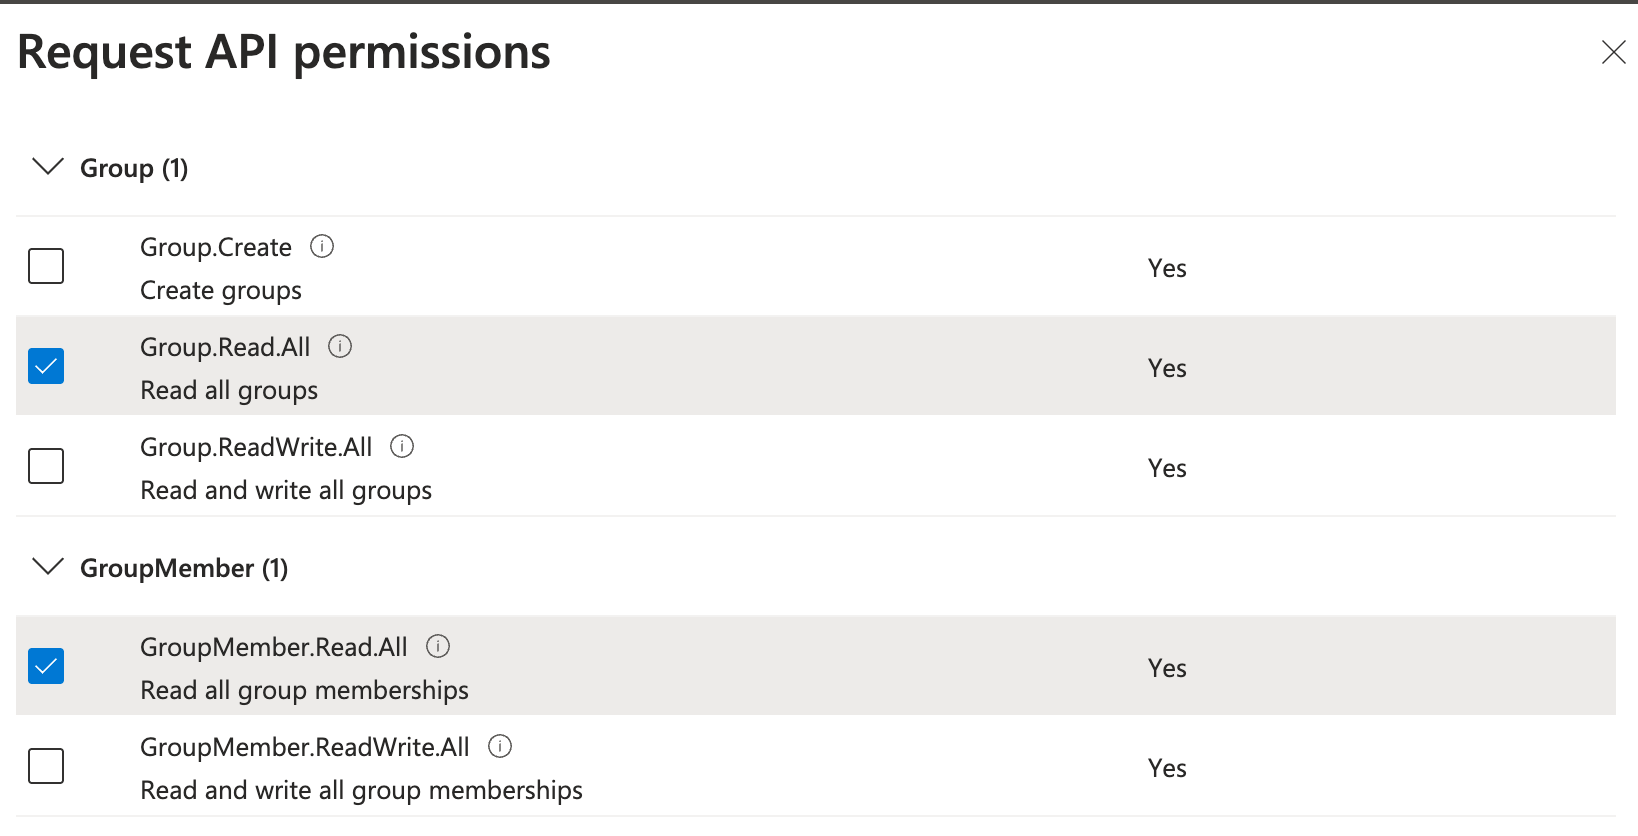
Next, find and expand the Group set, then tick/select
Group.Read.All -
Next, find and expand the GroupMember set, then tick/select
GroupMember.Read.All -
Next, find and expand the Sites set, then tick/select
Sites.Read.All -
Next, find and expand the User set, then tick/select
User.Read.All -
Next, find and expand the Mailboxes set, then tick/select
MailboxSettings.Read.All -
Next, find and expand the Calendars set, then tick/select
Calendars.Read.All -
Finally, click the Add permission button
-
Additional Information about required API Permissions
The following record sets are available for selection when creating a synchronization job with Microsoft 365 as the source system and ServiceNow as the destination system. CI Sync requires access permissions to the related Microsoft 365 objects (via the Microsoft Graph API).
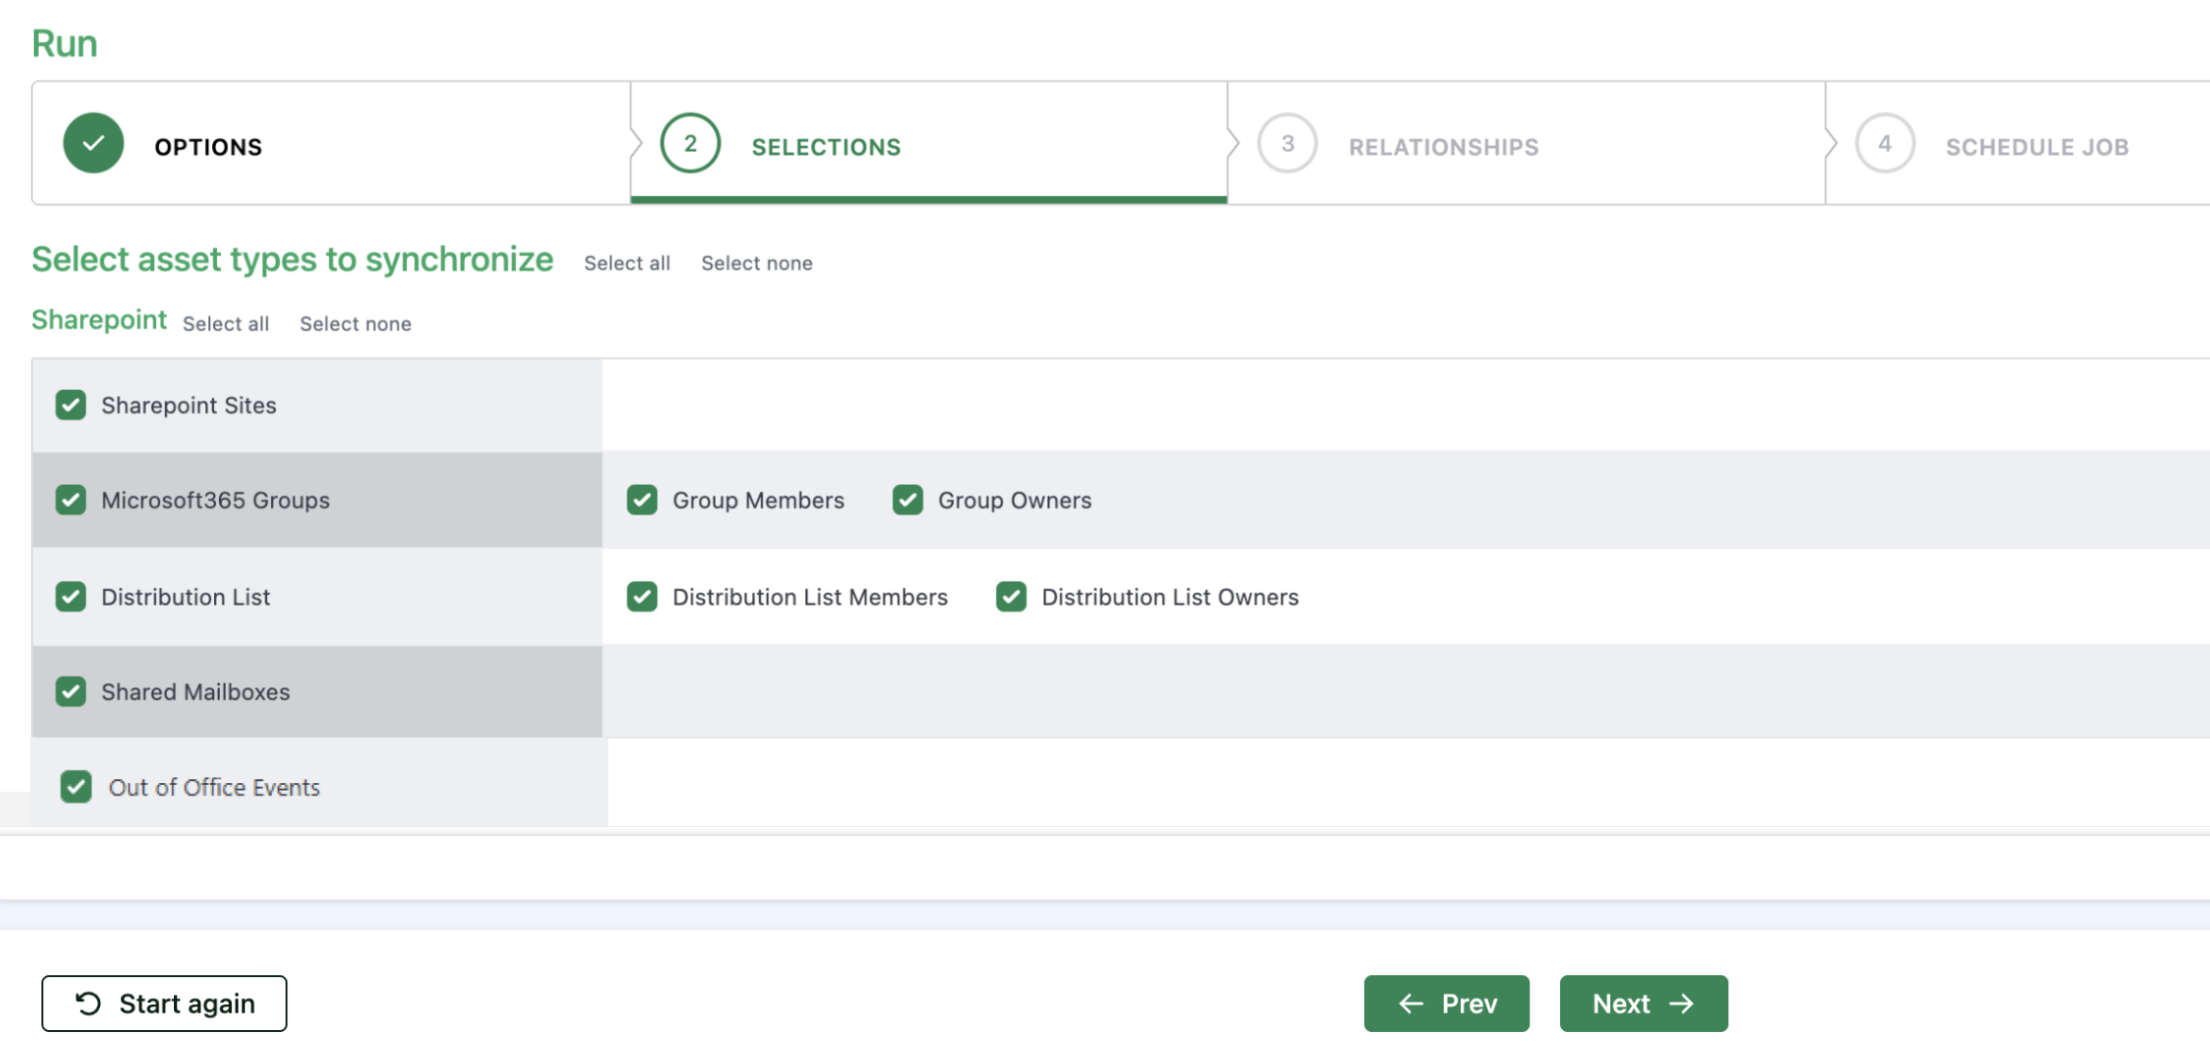
When selecting the API permissions you only need to select those resources/record sets you intend to synchronize via CI Sync. The table below shows which API permissions relate to each recordset.
|
API Permission |
SharePoint Sites |
M365 Groups, Members, Owners |
DLs, Members, Owners |
Shared Mailboxes |
OOO Events |
|---|---|---|---|---|---|
|
Group.Read.All |
X |
X |
X |
|
|
|
GroupMember.Read.All |
X |
X |
X |
|
|
|
Sites.Read.All |
X |
|
|
|
|
|
User.Read |
X |
X #1 |
X #1 |
|
|
|
User.Read.All |
X |
X #1 |
X #1 |
X |
|
|
MailboxSettings.Read |
|
|
|
X |
|
|
Calendars.Read |
|
|
|
X |
x |
#1 User.Read and User.Read.All only required for sync Members and/or Owners of M365 Groups or Distribution Lists.
Here are the Azure Portal UI instructions for selecting the various API permisssions.
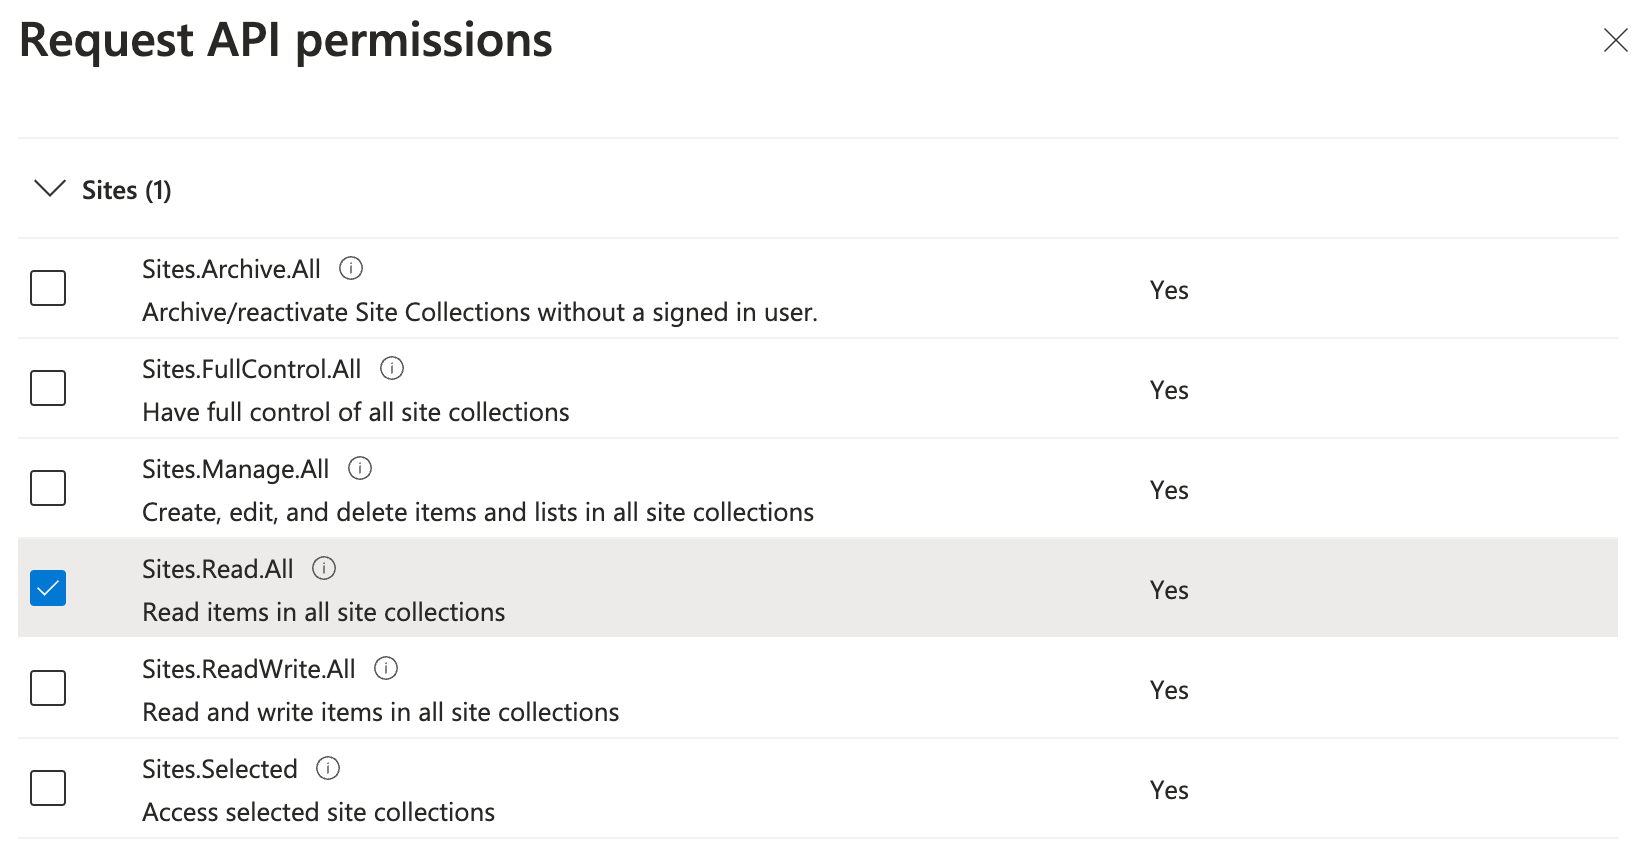
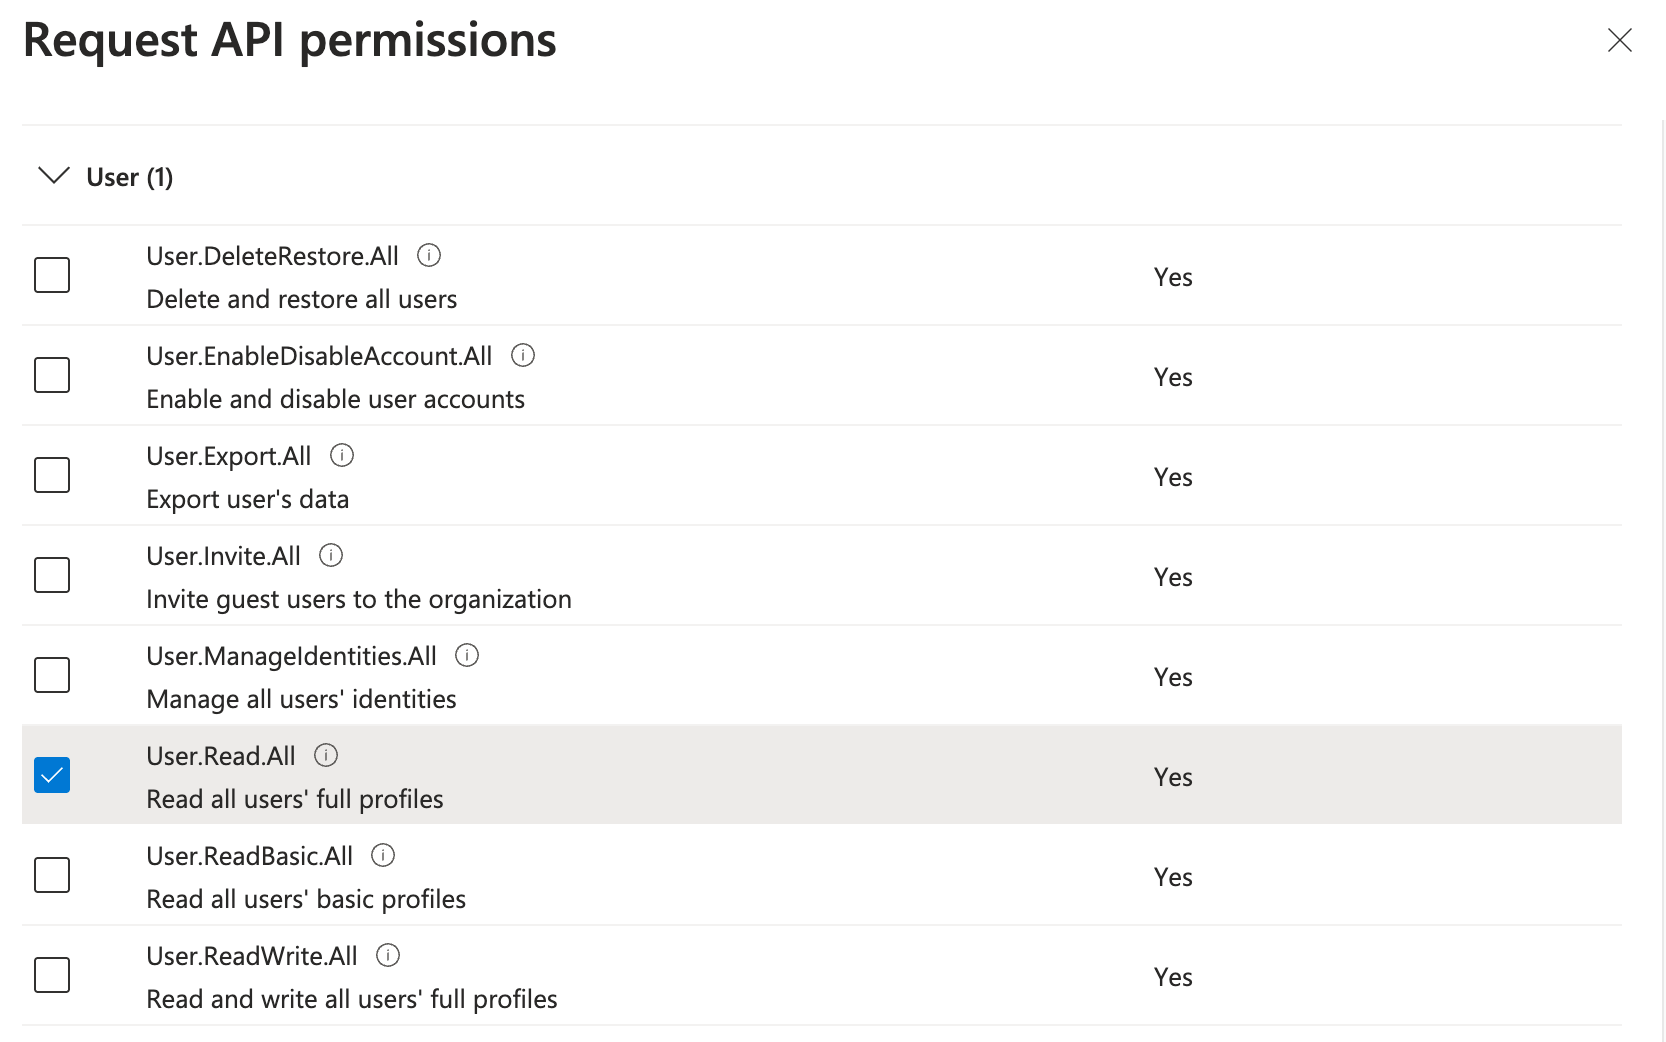
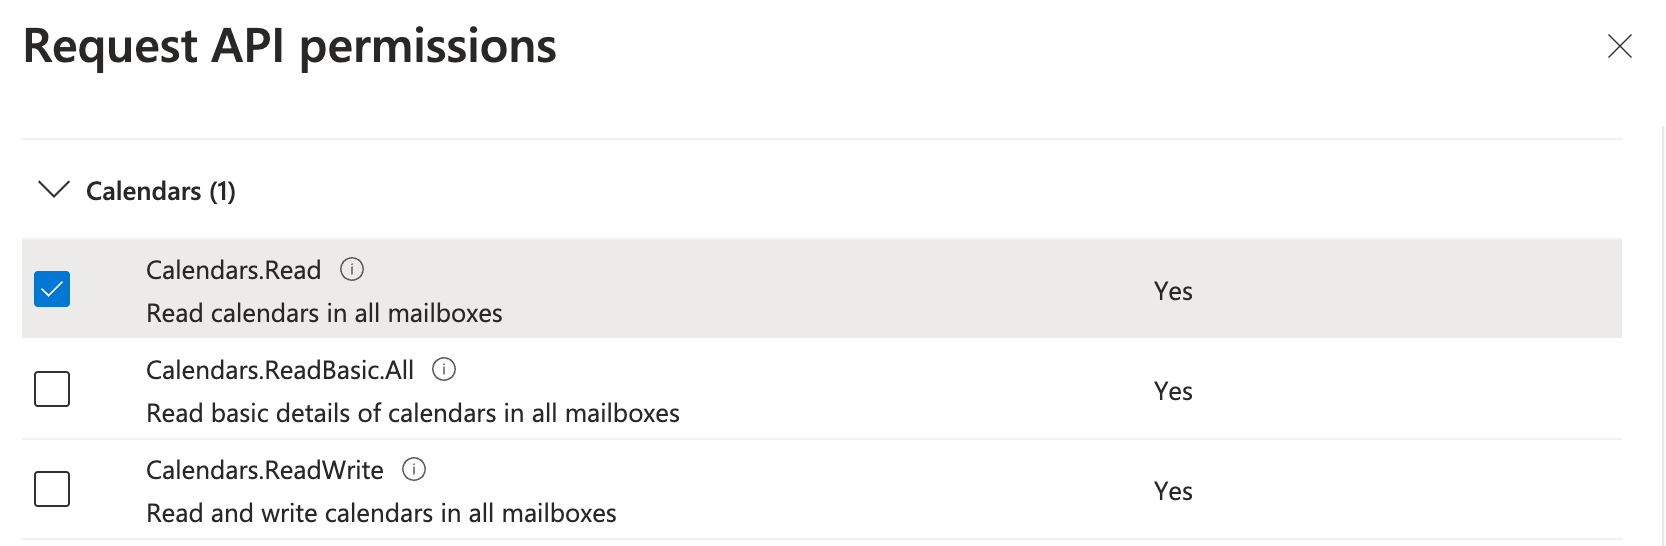
-
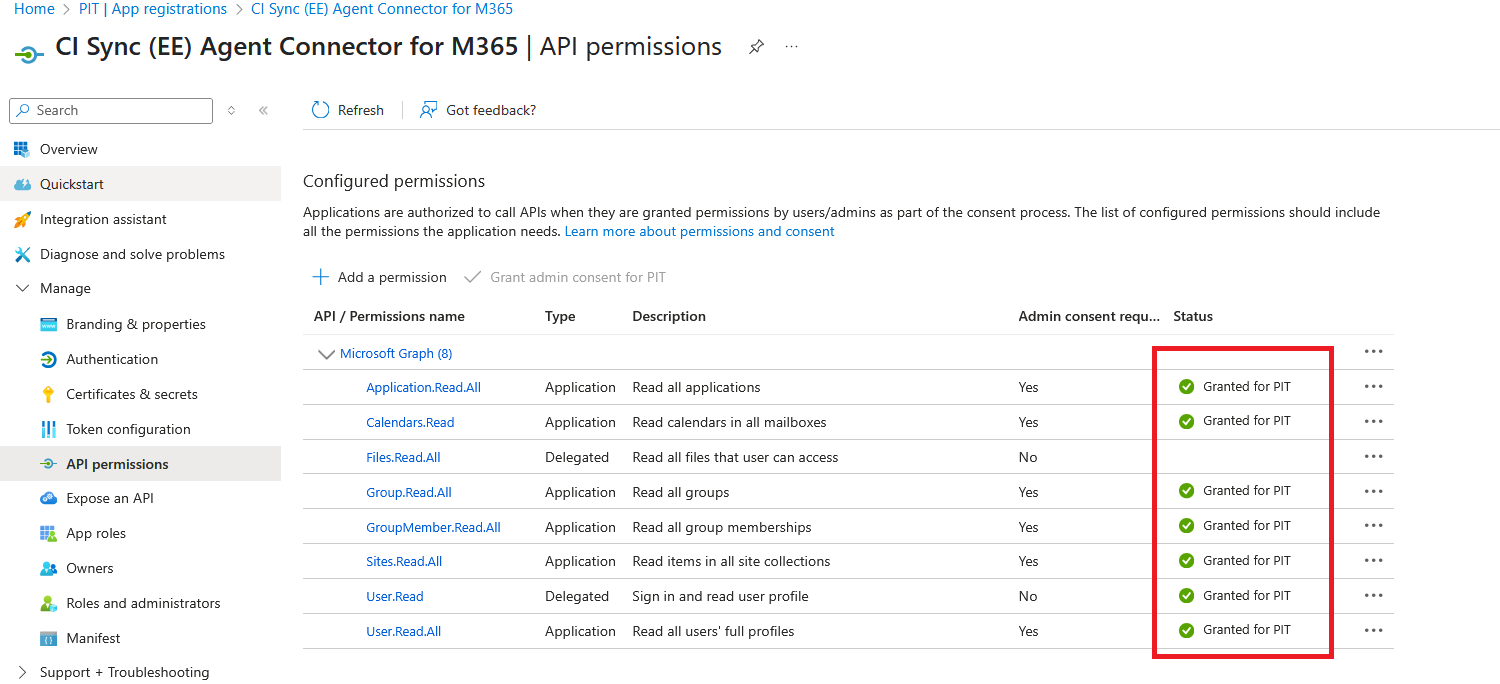
You should now be back on the API Permissions form showing the list of permissions you selected (see screen shot below to validate you have selected the required permissions).
-
Now, Click Grant admin consent for {Your Domain Name}
-
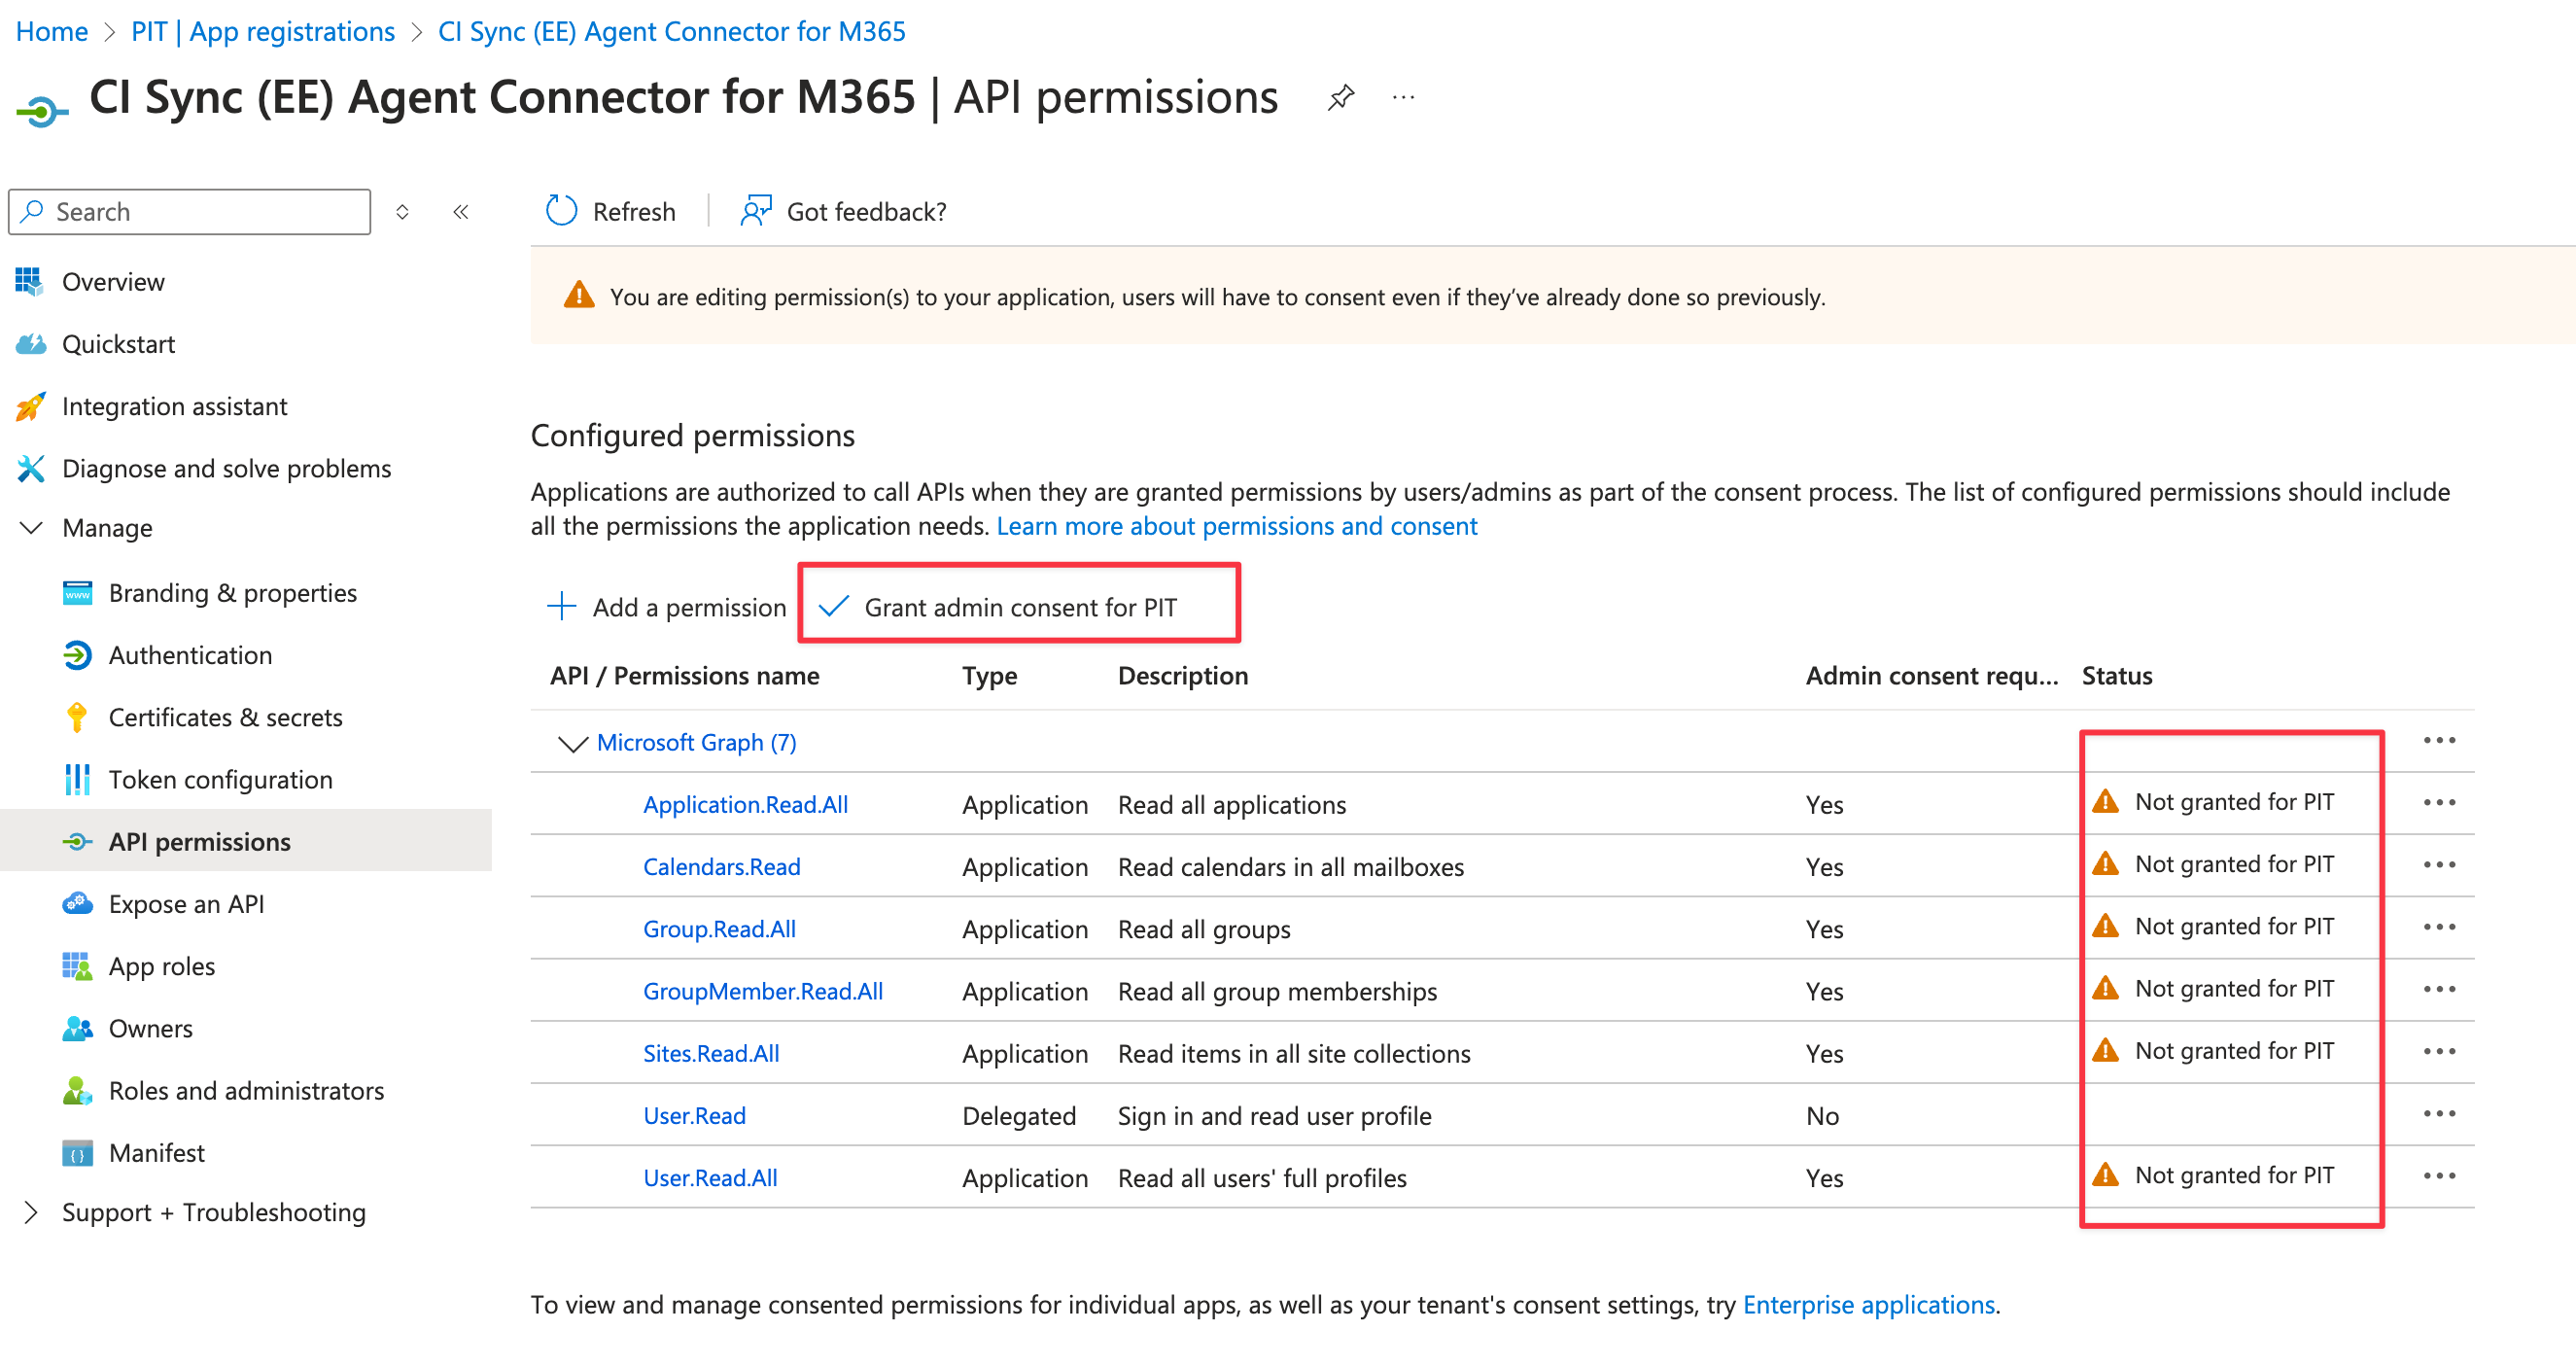
-
Click Yes to confirm granting Admin Consent. The resulting screen should look as shown below.
-
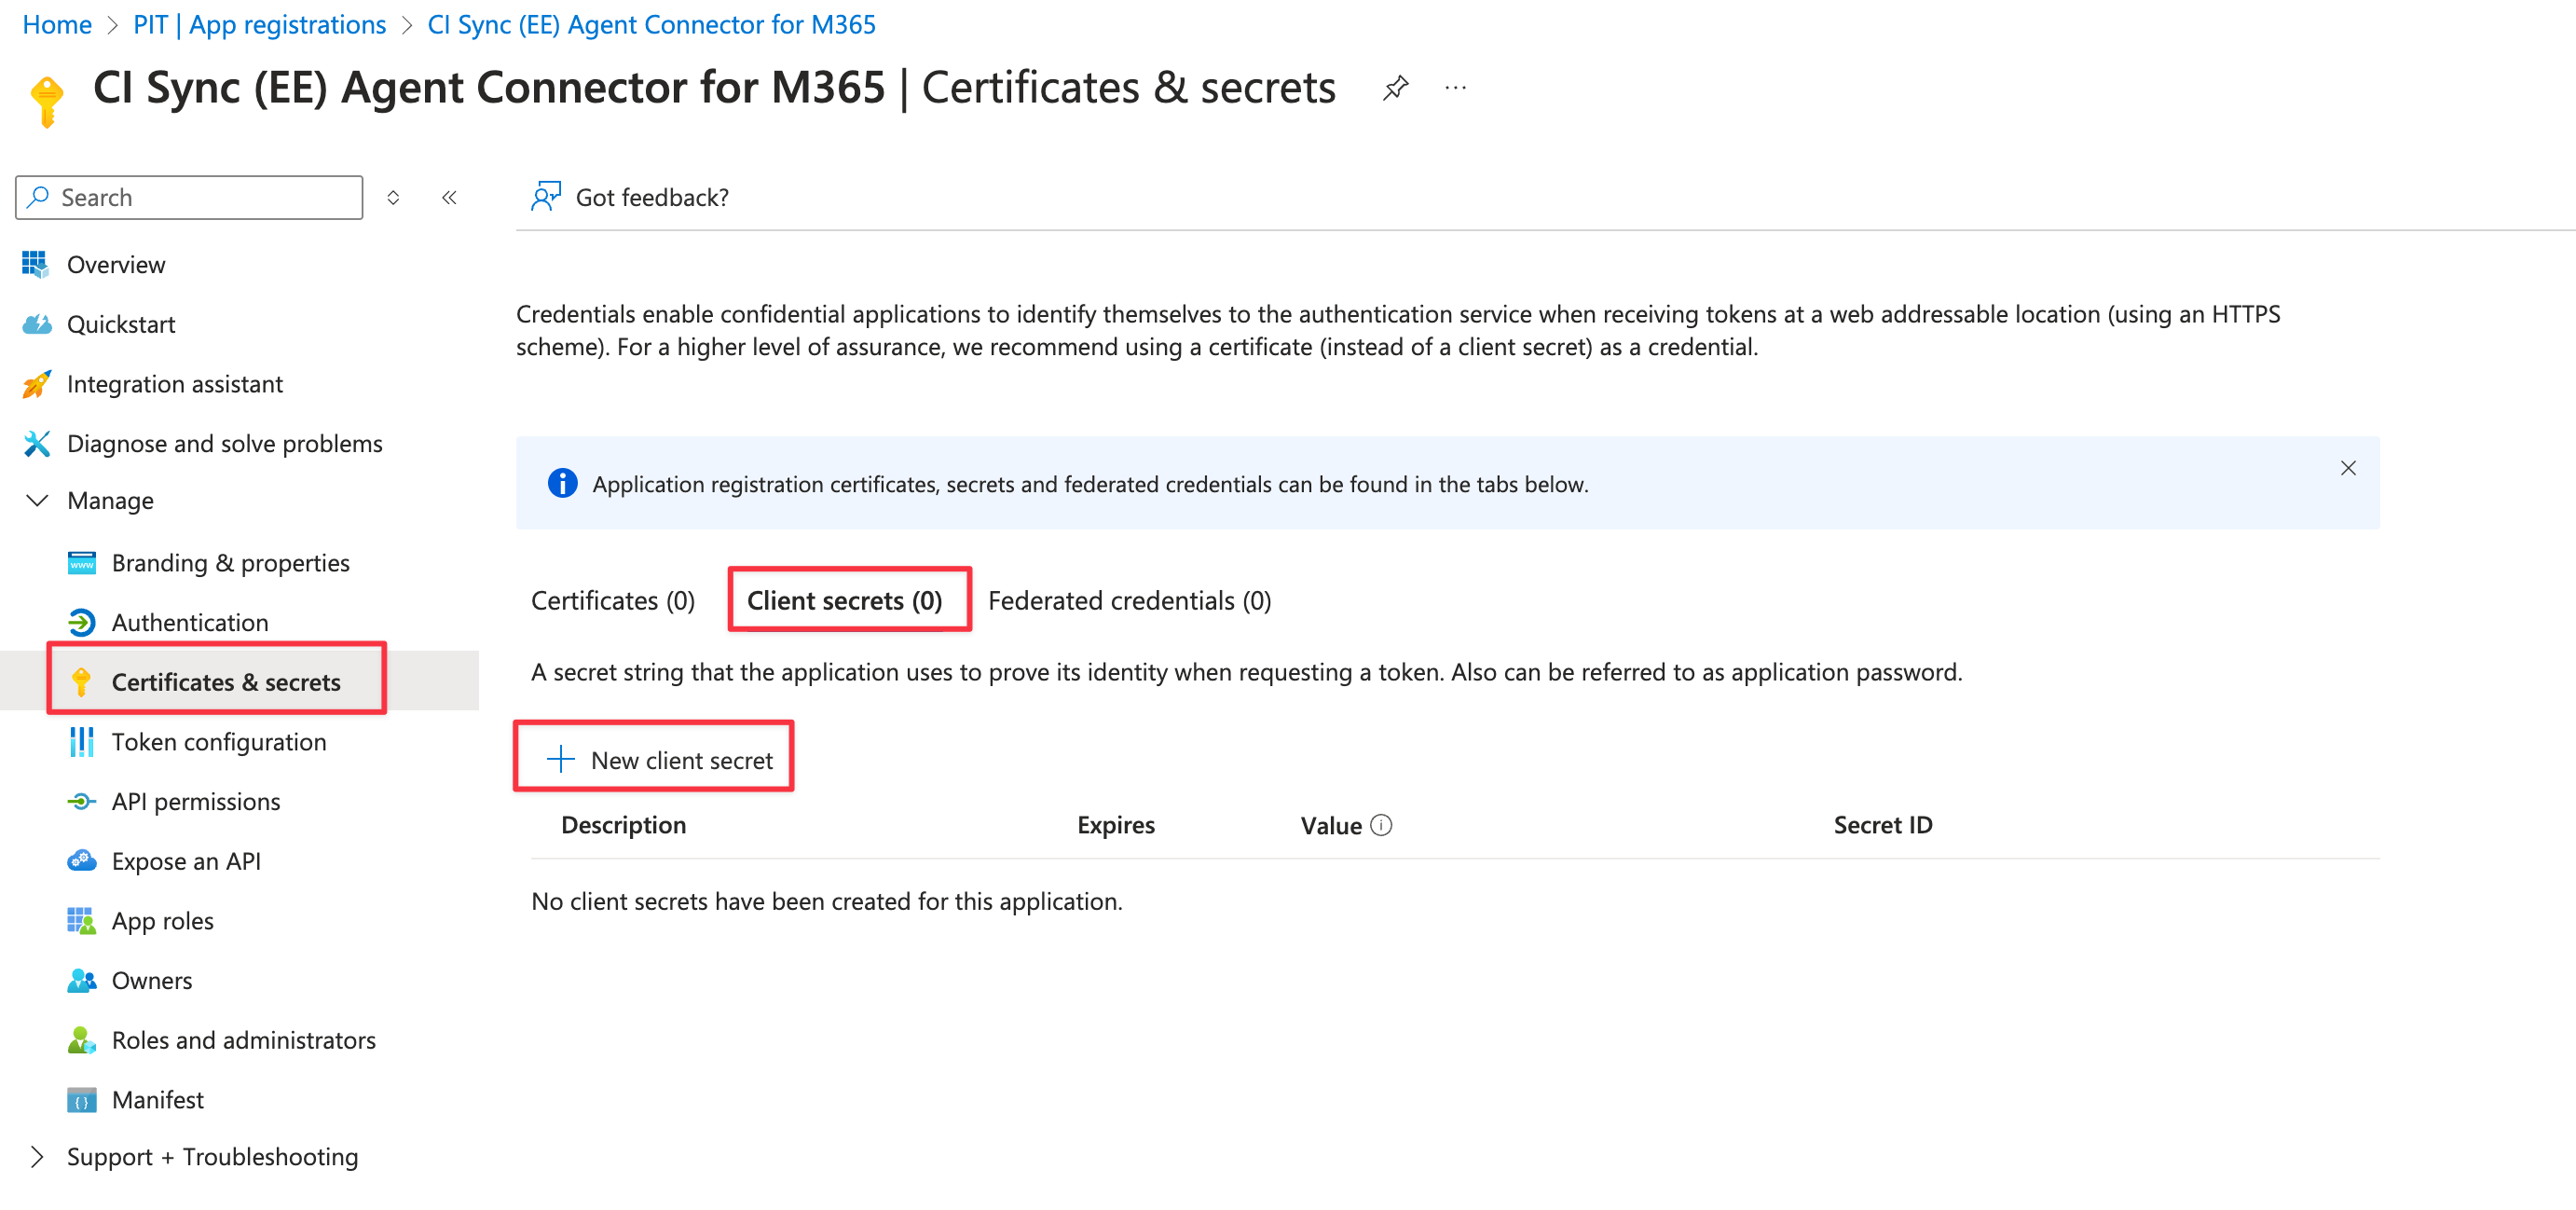
Using the left-hand menu, navigate and select Certificates & secrets. Select “Client secrets (0)” in the middle of the form and then click the “New client secret” button.
-
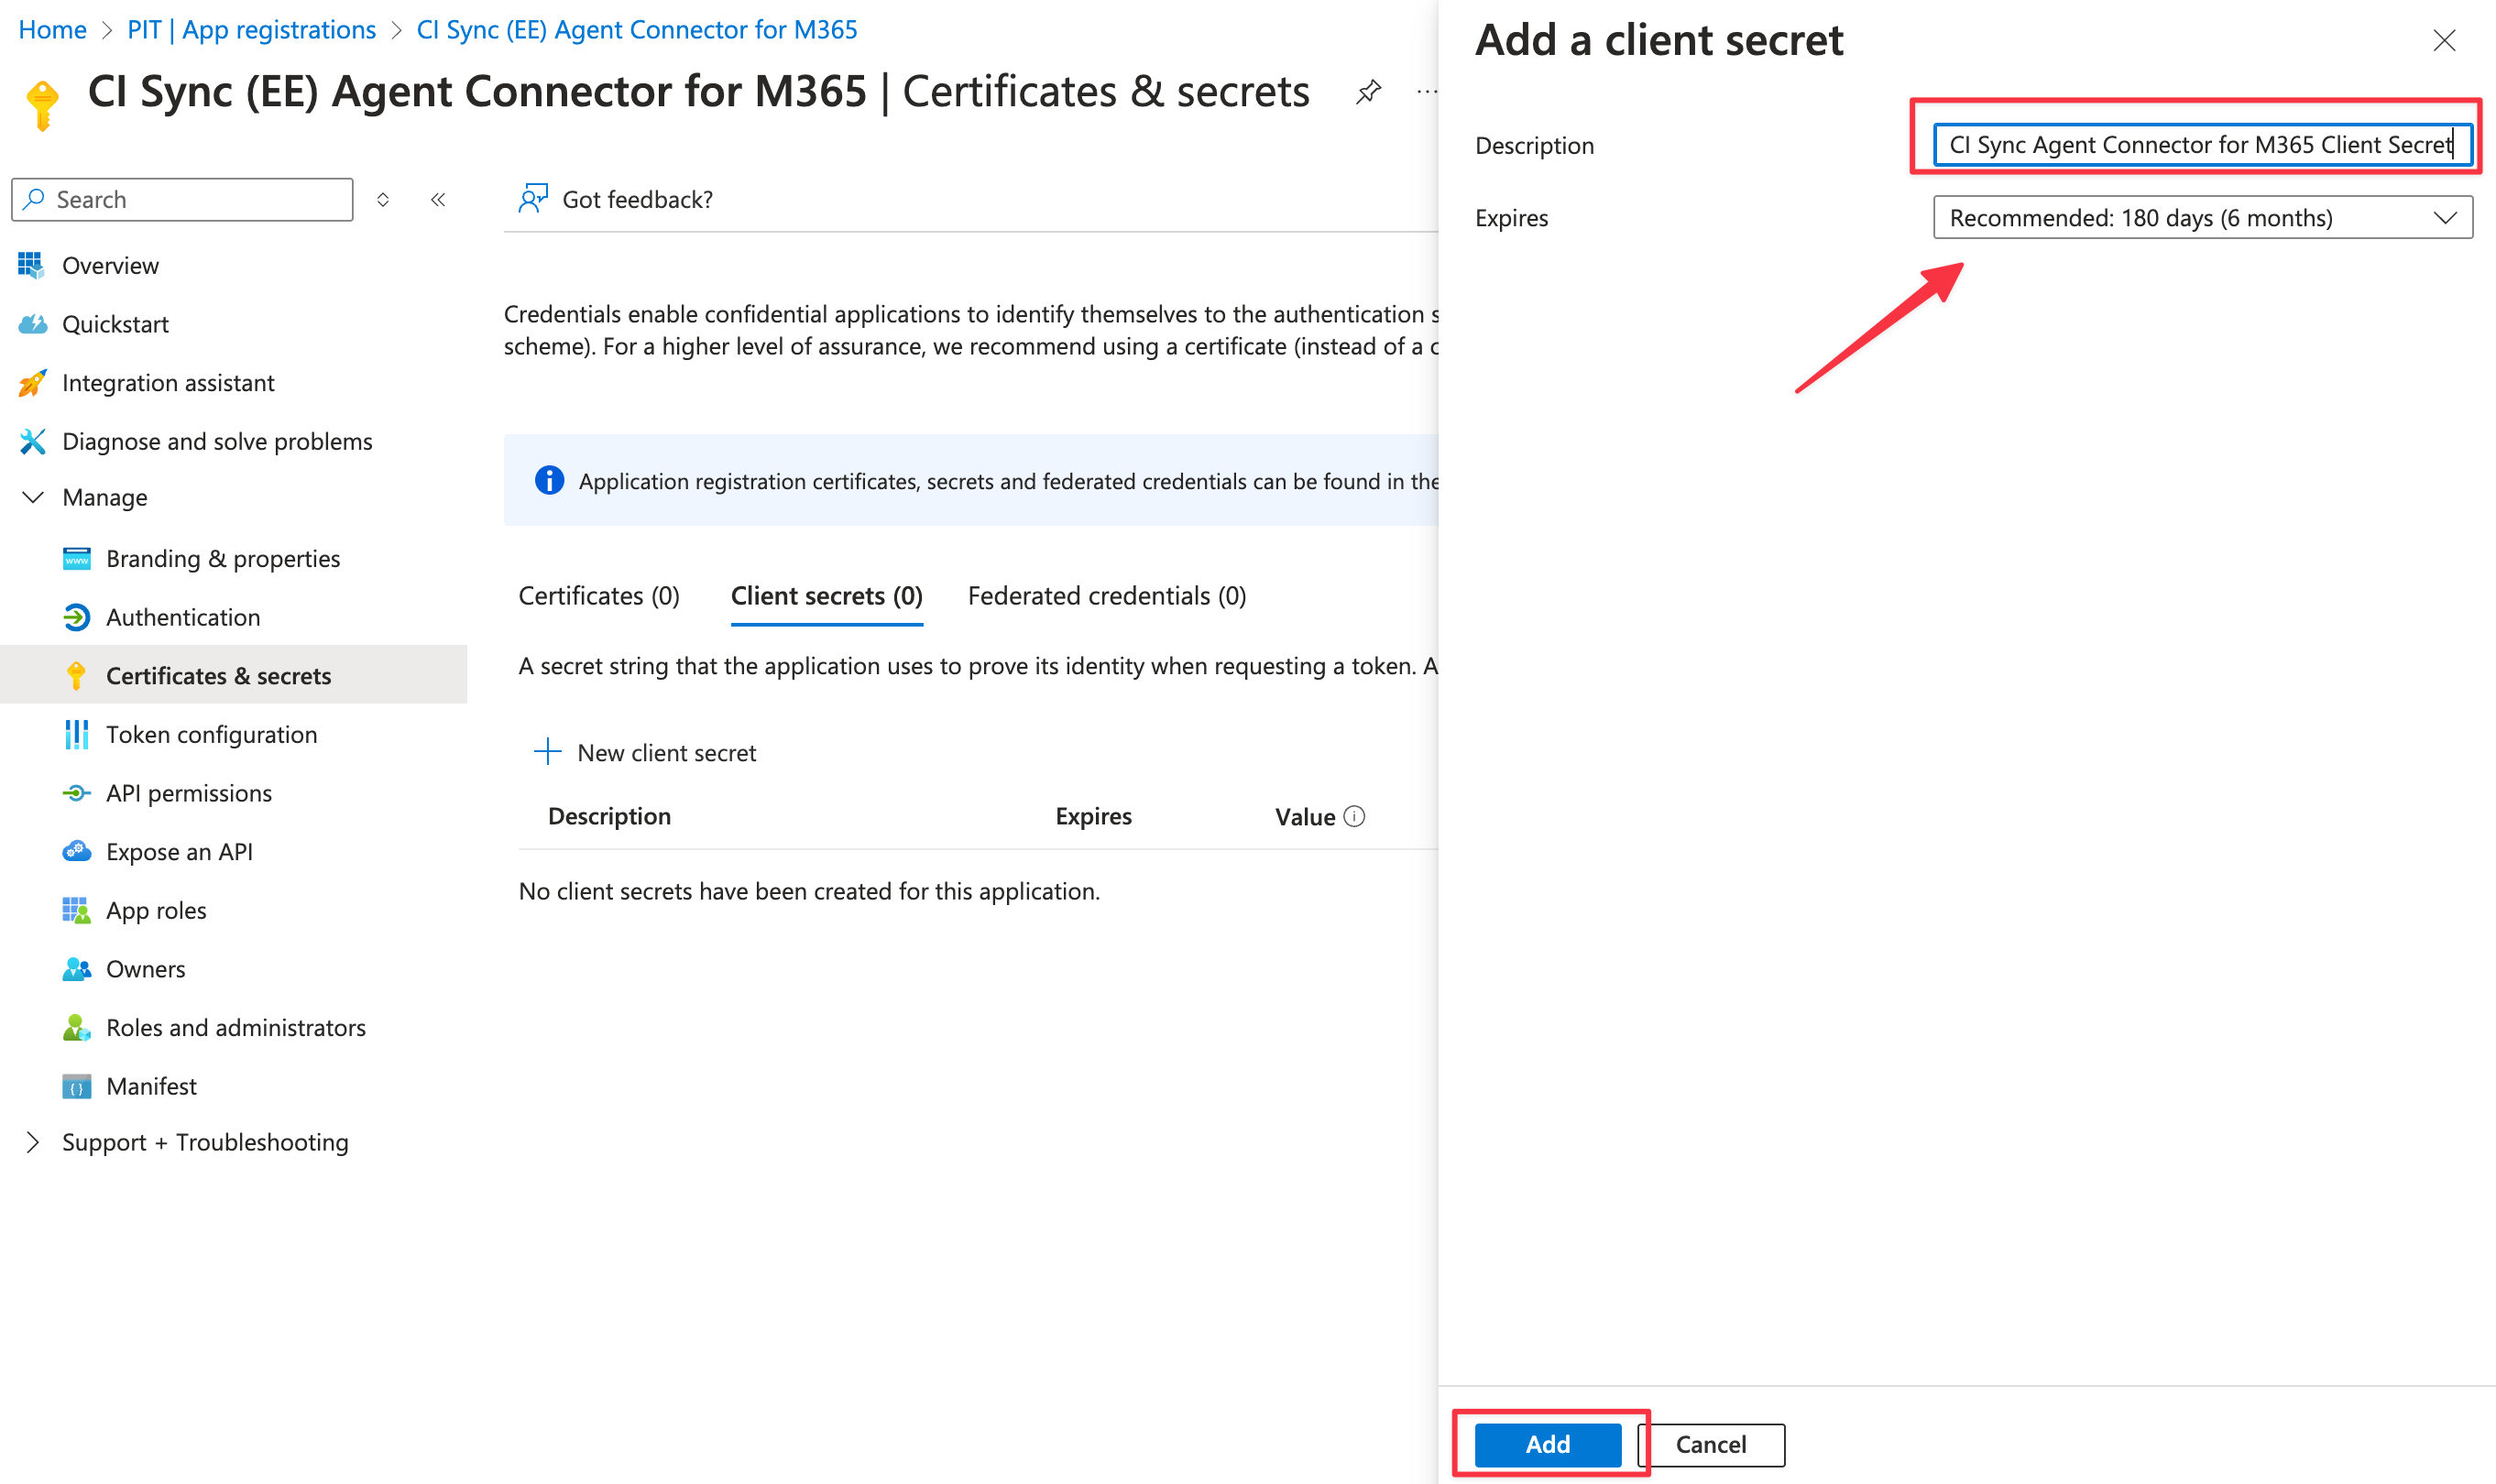
Enter a unique Description for the secret associated with this CI Sync Agent Connector for M365 App Registration (e.g. “CI Sync Agent Connector for M365 Client Secret”).
-
Then, select a suitable Expires duration based on your organisational policy. Finally click the Add button.
Guidance Note
It is recommended you set a reminder prior to the expiry date of the Secret (i.e. a reminder to regenerate in Azure and then update the secret in the CI Sync Agent Config Utility).
-
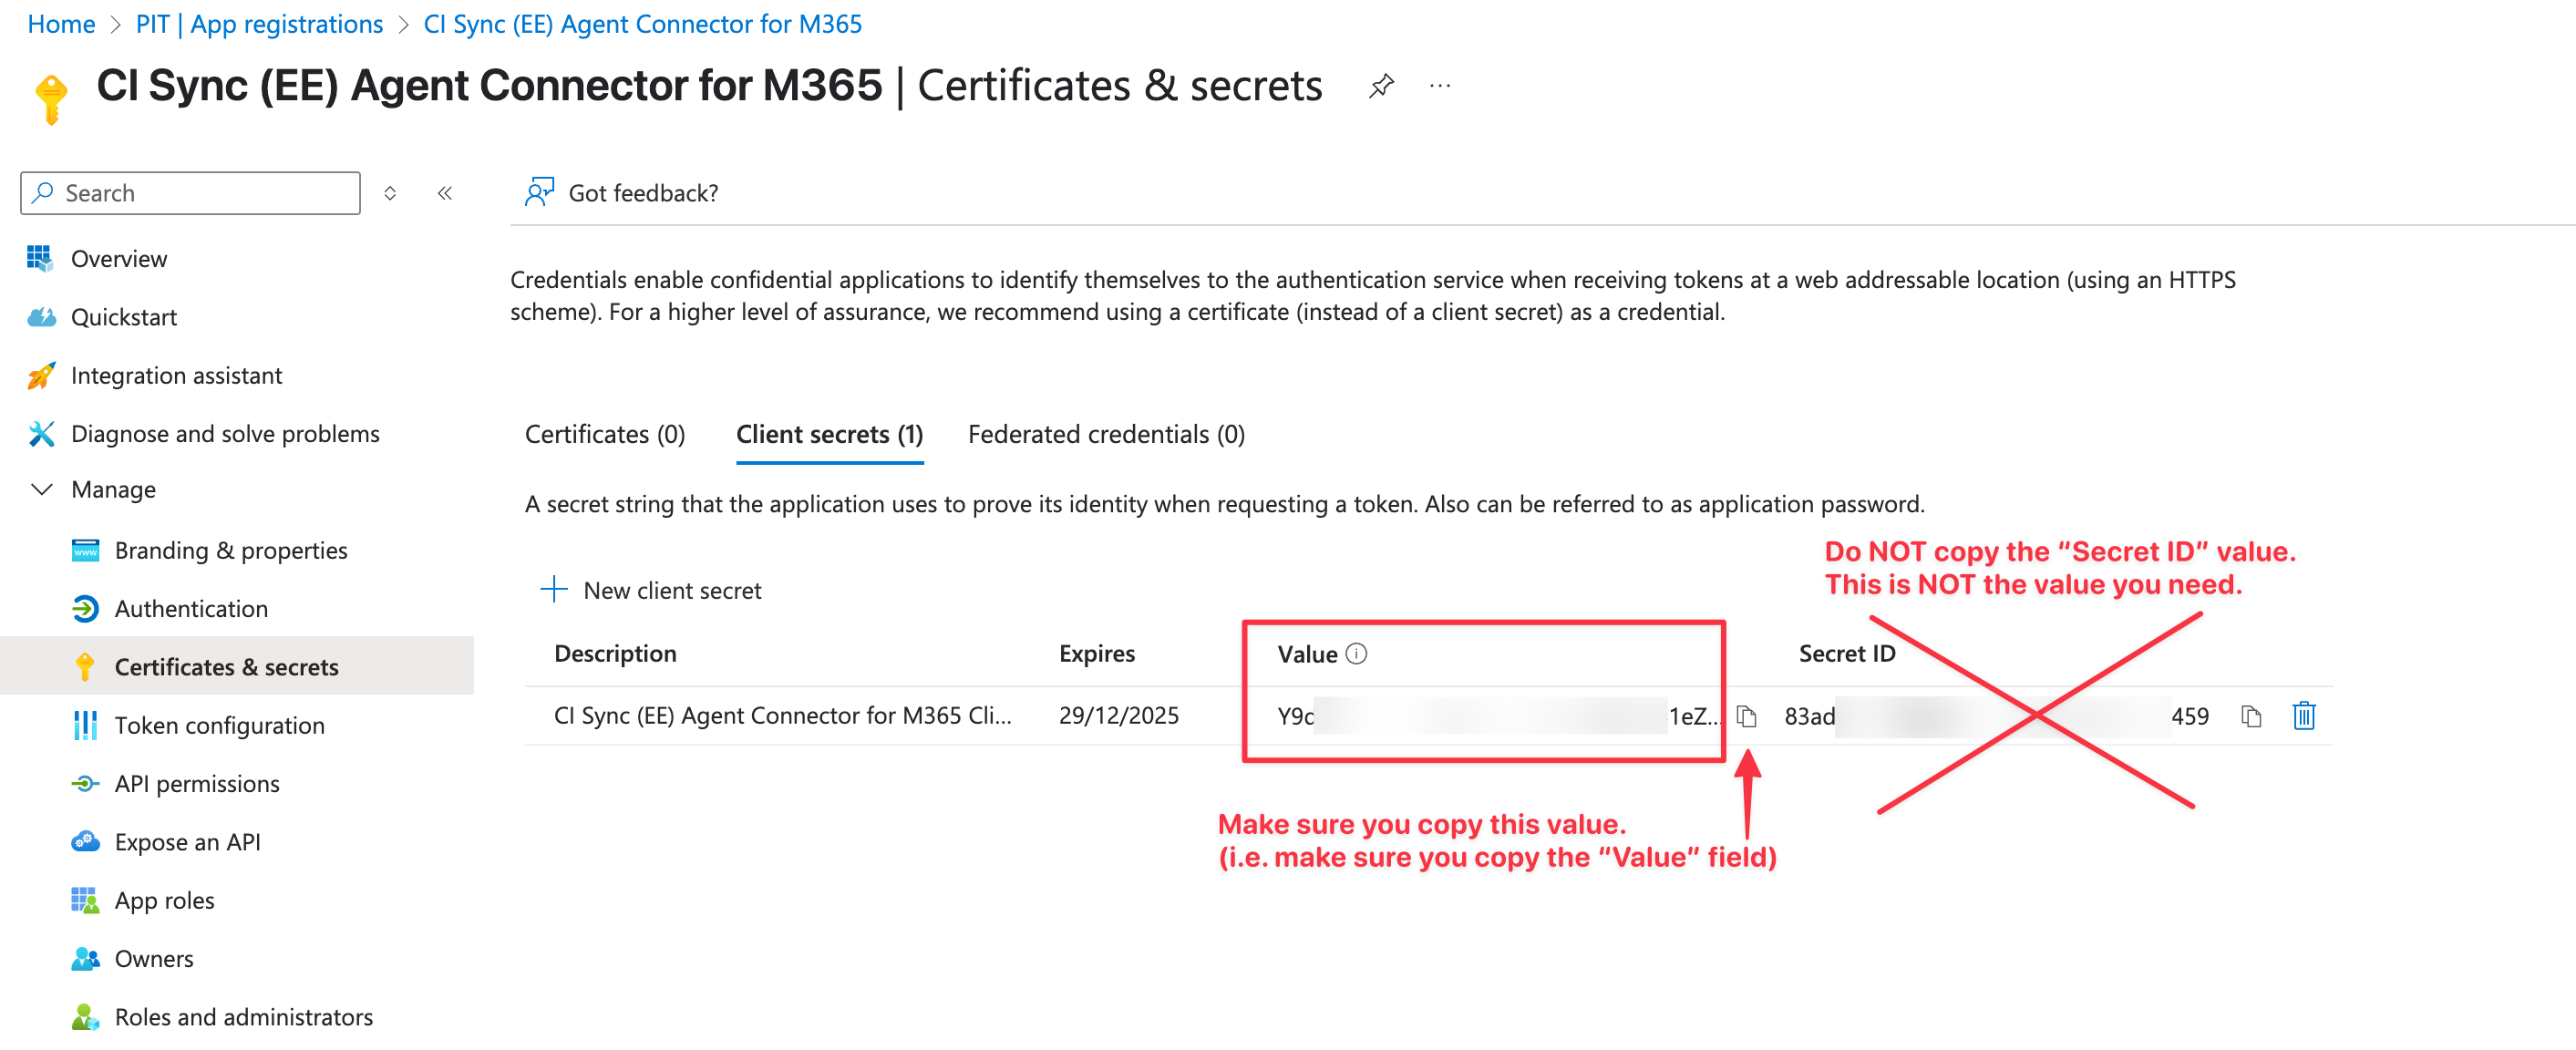
The form now displays the generated secret value (shown in the Value field)
-
Use the copy option to make a copy of the value in the Value field.
-
Data Capture Note
-
The Value is only available while you remain on this screen. You must make a copy of the Value before leaving this form.
-
Make sure you copy the “Value” and NOT the “Secret ID”.
Make sure the secret stored securely and in a way that can be shared with the CI Sync Admin so they can use it when the follow the instructions later in this page.
-
Return to the Overview page for the App Registration.
-
Use the copy option to make a copy of the “Application (client) ID” GUID value and the “Directory (tenant) ID” GUID value.
-
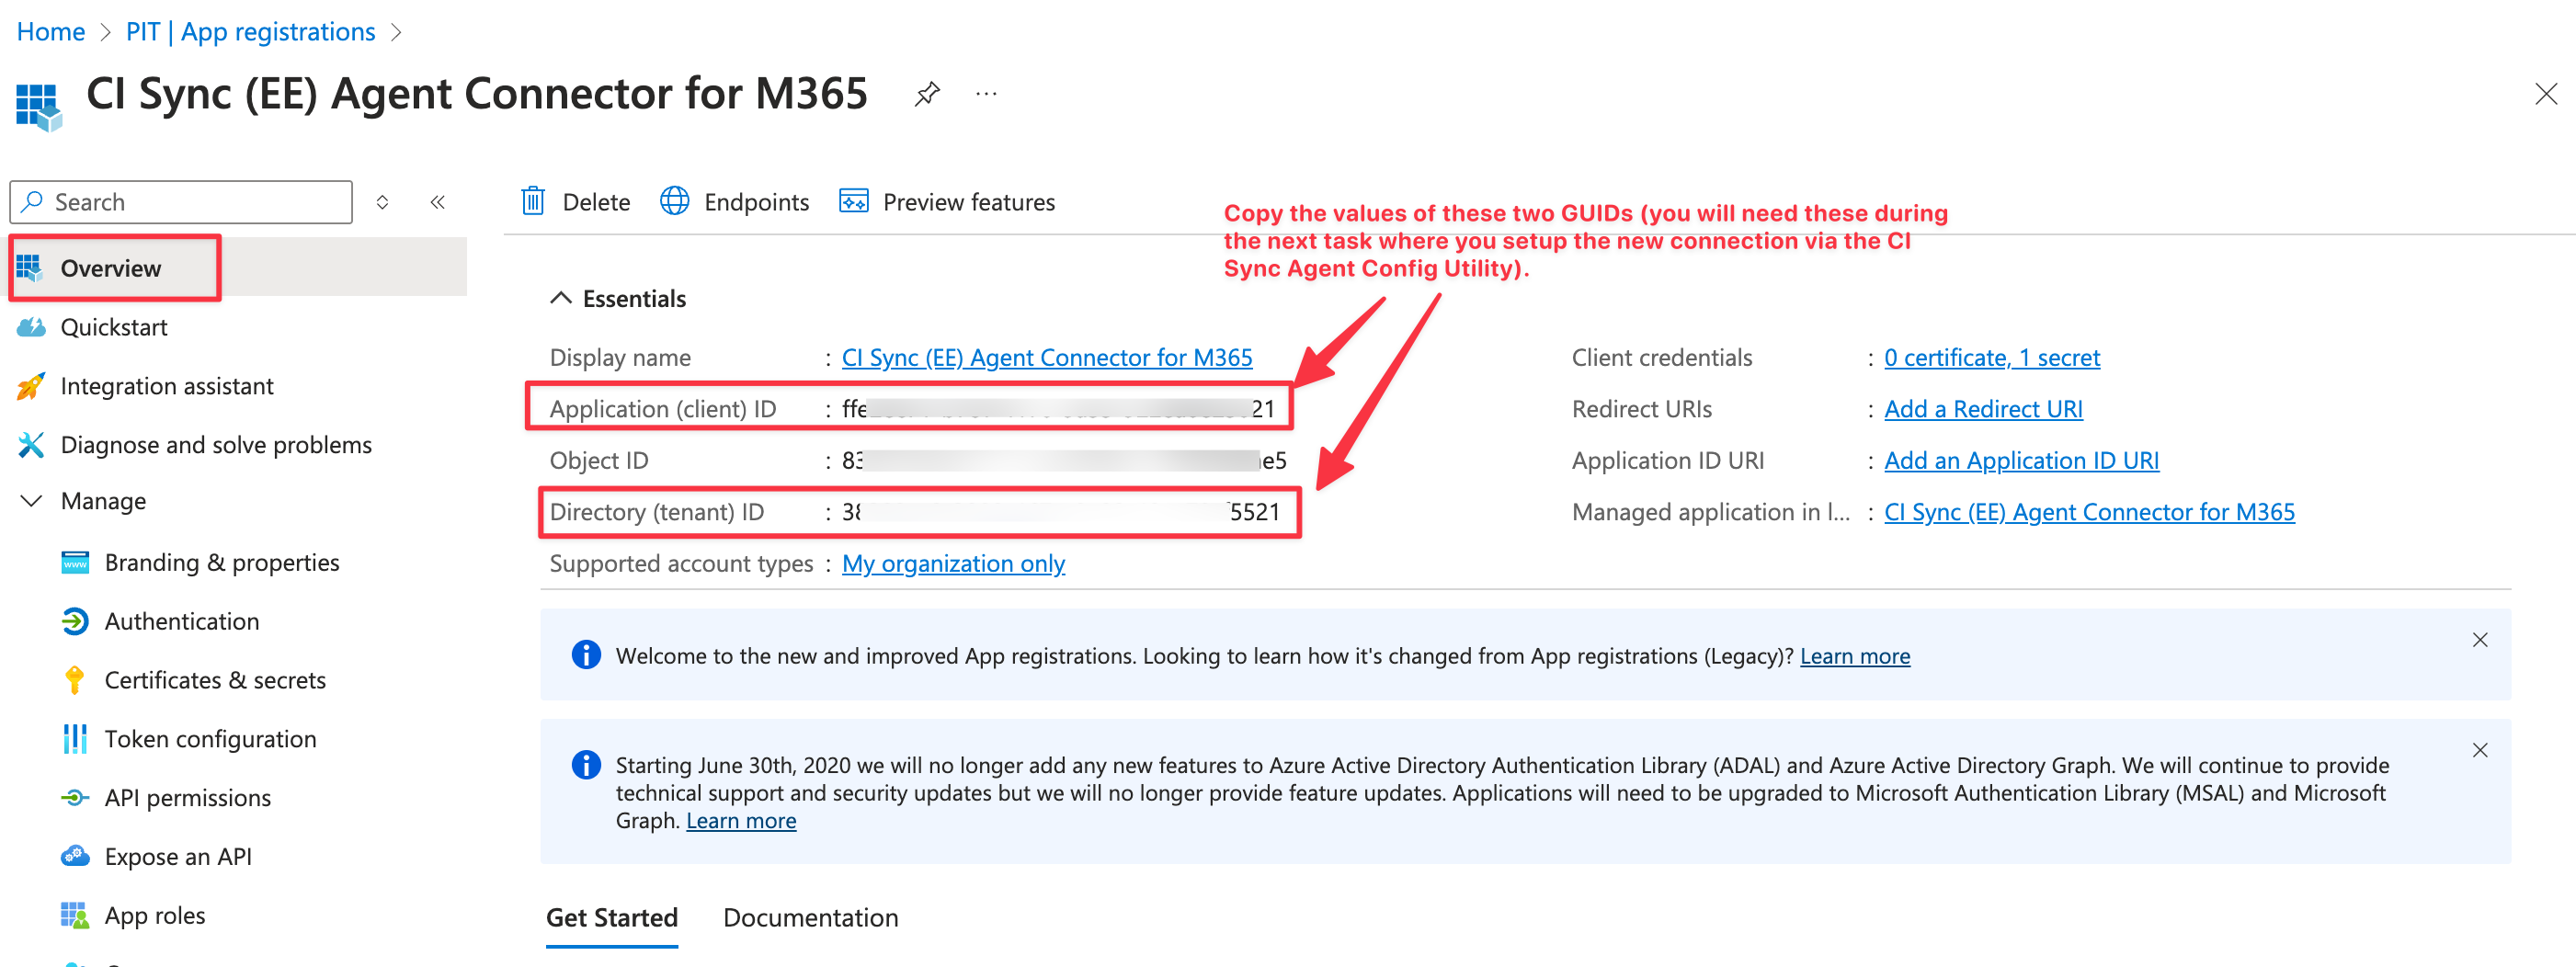
You have now granted the App Registration object (i.e. the CI Sync Agent Connector for M365) read permissions to Microsoft 365 which will allow you to use the CI Sync User Interface to schedule synchronization jobs using that same Microsoft 365 as a synchronization source.
Data Capture Summary
As a reminder, you should have captured the following information when completing the above steps.
-
The Secret Value (from Step 12 above). This is the Client Secret value.
-
The Application (client) ID (from Step 13 directly above).
-
The Directory (tenant) ID (also from Step 13 directly above).
Make sure any secrets or sensitive information is stored securely and in a way that can be shared with the CI Sync Admin.
These values will be used later by the person following the instructions in Task 2 immediately below.
Task 2: Add Microsoft 365 as a Source System using the CI Sync SaaS UI
-
Login to your CI Sync SaaS instance at https://YourCo.syncfish.app
-
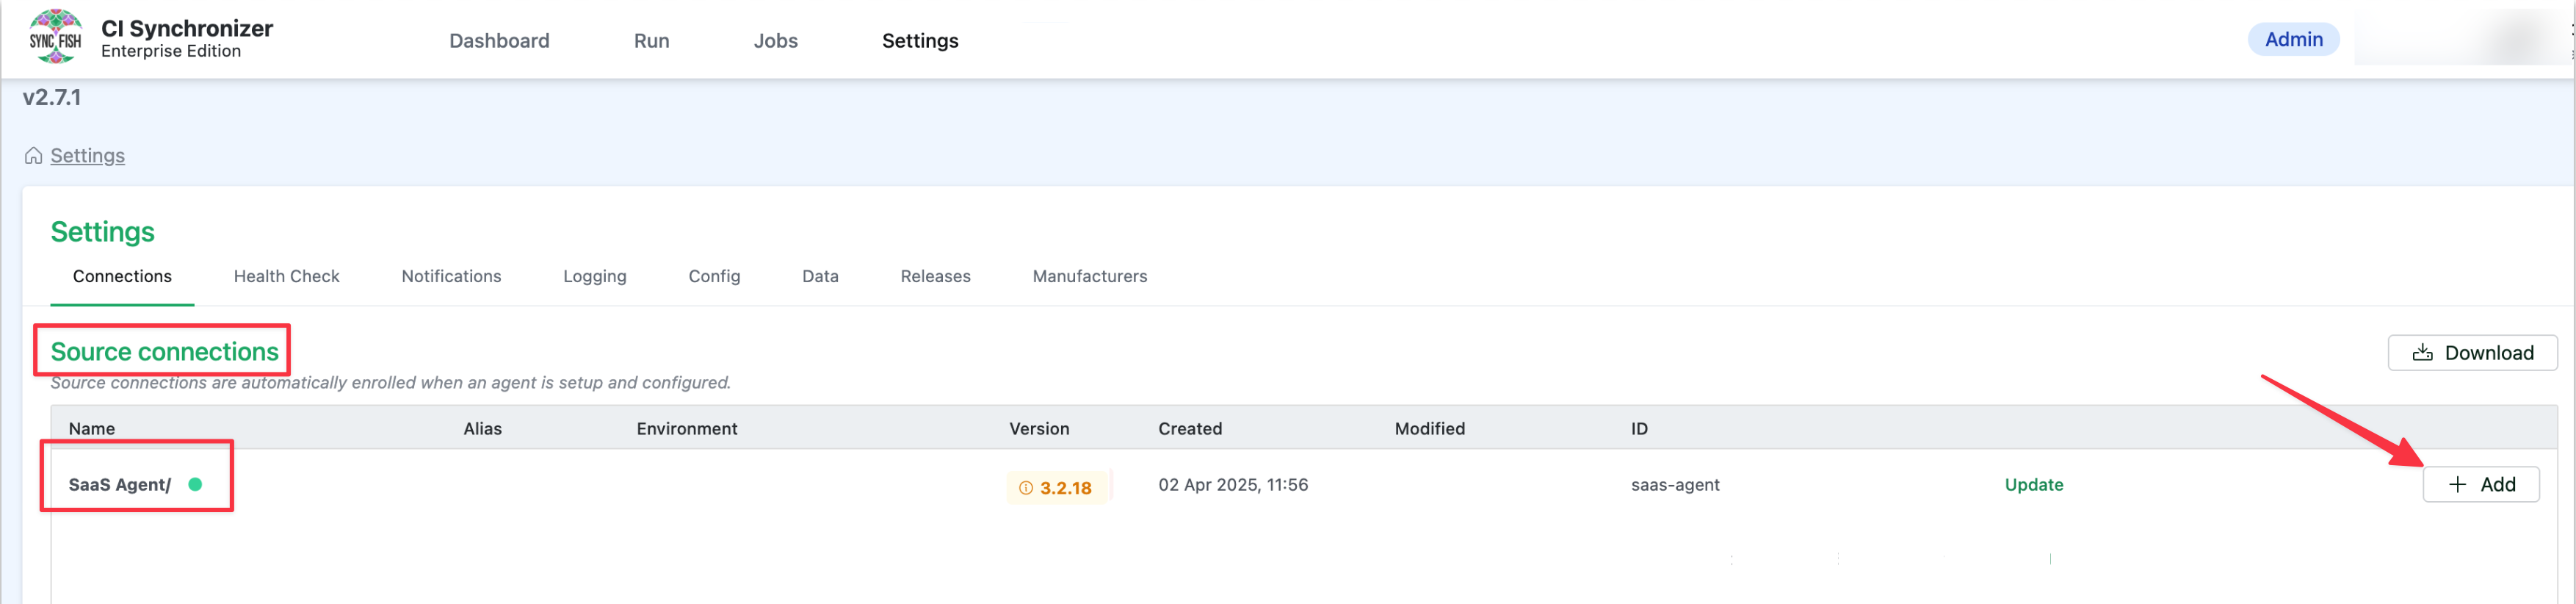
In the CI Sync UI, navigate to Settings > Connections.
-
Find the “SaaS Agent” sub-heading under the Source Connections section. If you don’t see “SaaS Agent” it means your CI Sync instance hasn’t been configured for this feature. Please contact your Sync representative to discuss.
-
On the right hand side of the form, click the +Add button.
-
The New Connection form now appears. Use the Connection Type drop down list to select the source system you wish to add (in this case Microsoft 365).

-
Update the fields using these instructions
-
Connection name
-
This is a friendly name that represents the source system connection.
-
The name you enter here will appear when you create a new sync job and are selecting from the available source system list.
-
Note: Syncfish recommend using a textual suffix on the connection name if for any reason you have setup multiple CI Sync Connections to Microsoft 365.
-
-
Alias: Please ingore this field (it is not used for the CI Sync Cloud Agent and is being deprecated).
-
Environments
-
Select from the available choices Production, Test, or Production/Test (the latter being both).
-
The selection you make for this field affects which source systems appear when you create a new sync job (i.e. when you are selecting the source system list based on the “Environment” you have chosen for the sync job). See this page for more details on creating a CI Sync job: Run a Small Initial Sync Job (then run more).
-
FYI: CI Sync allows a source system to be both Production/Test because CI Sync only reads from a source system (it doesn’t write to it). Destination systems can only be Test or Production (not both).
-
-
Directory (tenant) ID
-
Paste the Azure/Entra Directory (tenant) ID captured by your Azure Admin in Task 1 above.
-
-
Application (client) ID
-
Paste the App Registration Application (client) ID captured by your Azure Admin in Task 1 above.
-
-
Client Secret Value
-
Paste the Client Secret Secret Value captured by your Azure Admin in Task 1 above.
-
-
The click the Consent to update fields checkbox.
-
Finally click the Create connection button.
-
You will be returned to the main settings screen and your new source system connection will appear in the list as shown below.

Task 3: Check status of new Microsoft 365 Source System connection
-
To check the status of the newly added Microsoft 365 Source System connection click the green Check Status link. This will test whether your CI Sync Microsoft 365 connection can successfully reach and authenticate to the Azure Entra ID defined in the connection itself.
-

If the connection is successful, you will see a green dot next to the source connection name.
-

To test again in the future, you can click the green Refresh Status button.
-
If the test is unsuccessful, you will see a red dot next to the source connection name and an error message underneath. If you need assistance resolving an error, please contact Syncfish support.
This means you are ready to run a sync job using the new source connection using these high-level instructions: Run a Small Initial Sync Job (then run more).
Task 4: Assess if additional updates are required in ServiceNow
Guidance Note
Syncfish recommend the person setting up the source system described in this guide discusses this particular task with their ServiceNow system administrator.
A ServiceNow administrator will need to perform these steps.
Syncfish recommend following these instructions in your non-production ServiceNow environment for testing synchronization jobs.
Only once exhaustive testing in non-production is complete, repeat this process in your ServiceNow production environment.
In this section your ServiceNow SME will assess various updates to ServiceNow to support this CI Sync connector:
-
Task 4a: Assess if the CMDB CI Class Models plug-in is needed for this connector
-
Task 4b: Assess if any custom tables or attributes are needed for this connector
-
Task 4c: Assess if additional permissions are required for this connector
-
Task 4d: (Optional though recommended) Assess your ServiceNow CI forms and update to include additional Related Lists specific to this connector
-
Task 4e: Read and understand more about the data and functionality related to this connector
Task 4a: Assess if the CMDB CI Class Models plug-in is required for this connector
The recordsets supported by this CI Sync connector do not require the ServiceNow CMDB CI Class Models plug-in.
You can therefore ignore / skip this task.
Task 4b: Assess if custom tables or attributes are needed for this connector
No custom tables and no custom attributes are required in ServiceNow to support this CI Sync connector.
You can therefore ignore / skip this task.
Task 4b: Assess if additional permissions are required for this connector
Context
Depending on the options you choose when creating a sync job from Microsoft 365, CI Sync will create CI-to-CI relationships between objects such as Microsoft 365 Groups, the Group Members of those Groups, and the Group Owners of those Groups. Similar relationships are created for Distribution Lists and the members of those DLs.
CI Sync needs to define several allowed user relationship types (as distinct from the actual relationships themselves) within ServiceNow to support the CI-to-CI relationship examples noted above. The allowed user relationship types are stored in the cmdb_rel_user_type table.
The standard/out-of-the-box roles provided by ServiceNow (and recommended by Syncfish during S3 - Configure ServiceNow for CI Sync) do not provide access to the cmdb_rel_user_type table. Therefore, the CI Sync Integration User account created during S3 - Configure ServiceNow for CI Sync requires additional permissions to write to the cmdb_rel_user_type table.
Syncfish provides a ServiceNow updateset to prepare your ServiceNow instance for CI Sync. The updateset does the following:
-
Creates a read/write/create ACL on the cmdb_rel_user_type table.
-
Applies the ACL on the cmdb_rel_user_type table and assigns the ACL to the ServiceNow role called “Asset” (which is one of the roles granted to the CI Sync Integration Account created during S3 - Configure ServiceNow for CI Sync).
Instructions
Follow these steps to apply the updateset provided by Syncfish:
-
Download the update set from Syncfish at the below URL:
https://downloads.syncfish.app/servicenow/cisync-ms365-connector-permissions.xml -
Login to your ServiceNow instance with Admin permissions.
-
Open a browser and navigate to your ServiceNow instance
-
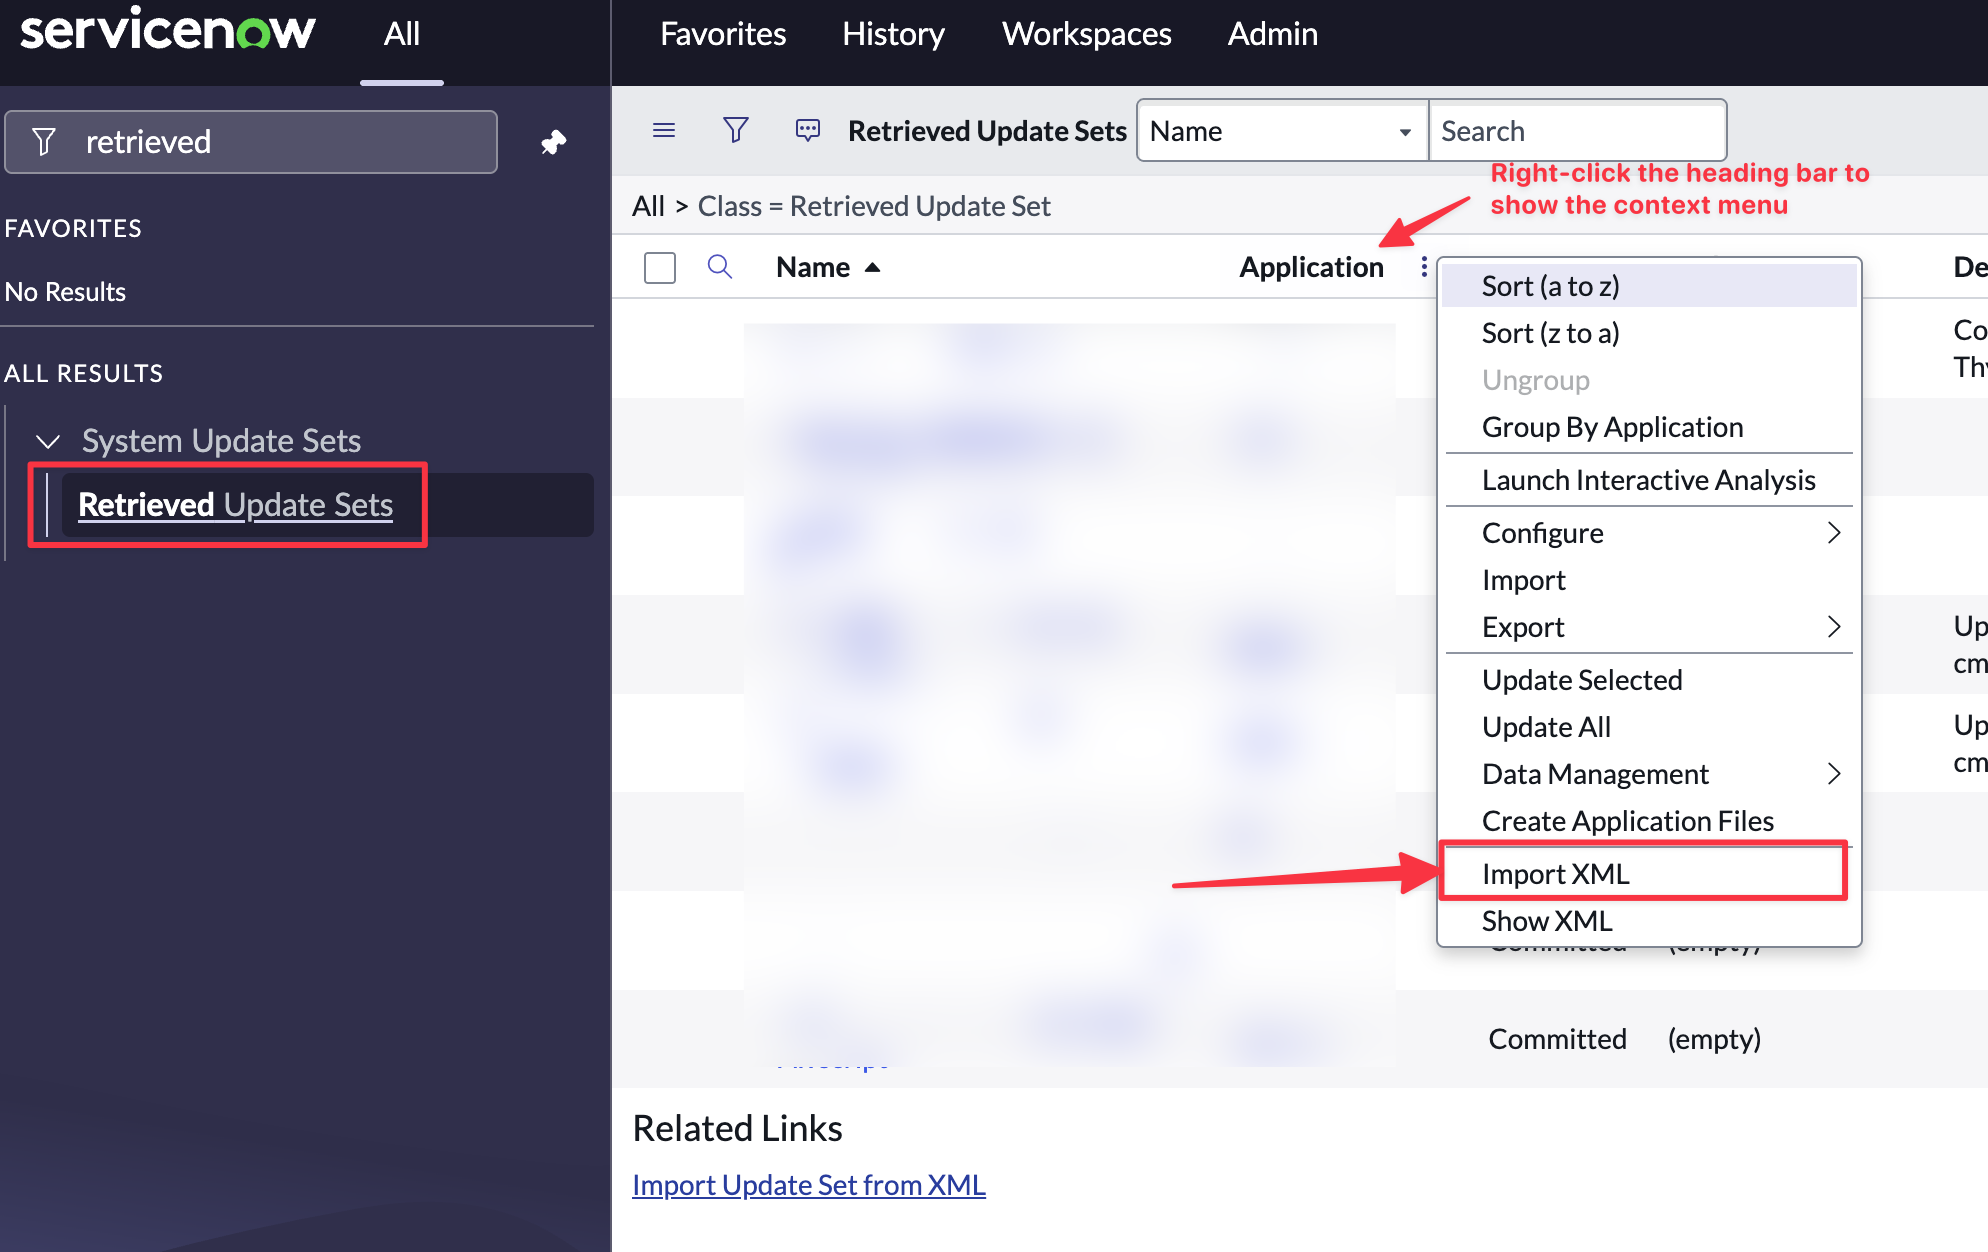
In the left nav menu search for “Retrieved Update Sets” and click to open
-
Right click on the column heading row and select “Import XML”
-
Select “Choose File”
-
Select the downloaded file “cisync-cmdb-key-value.xml”
-
Click to open the Update Set
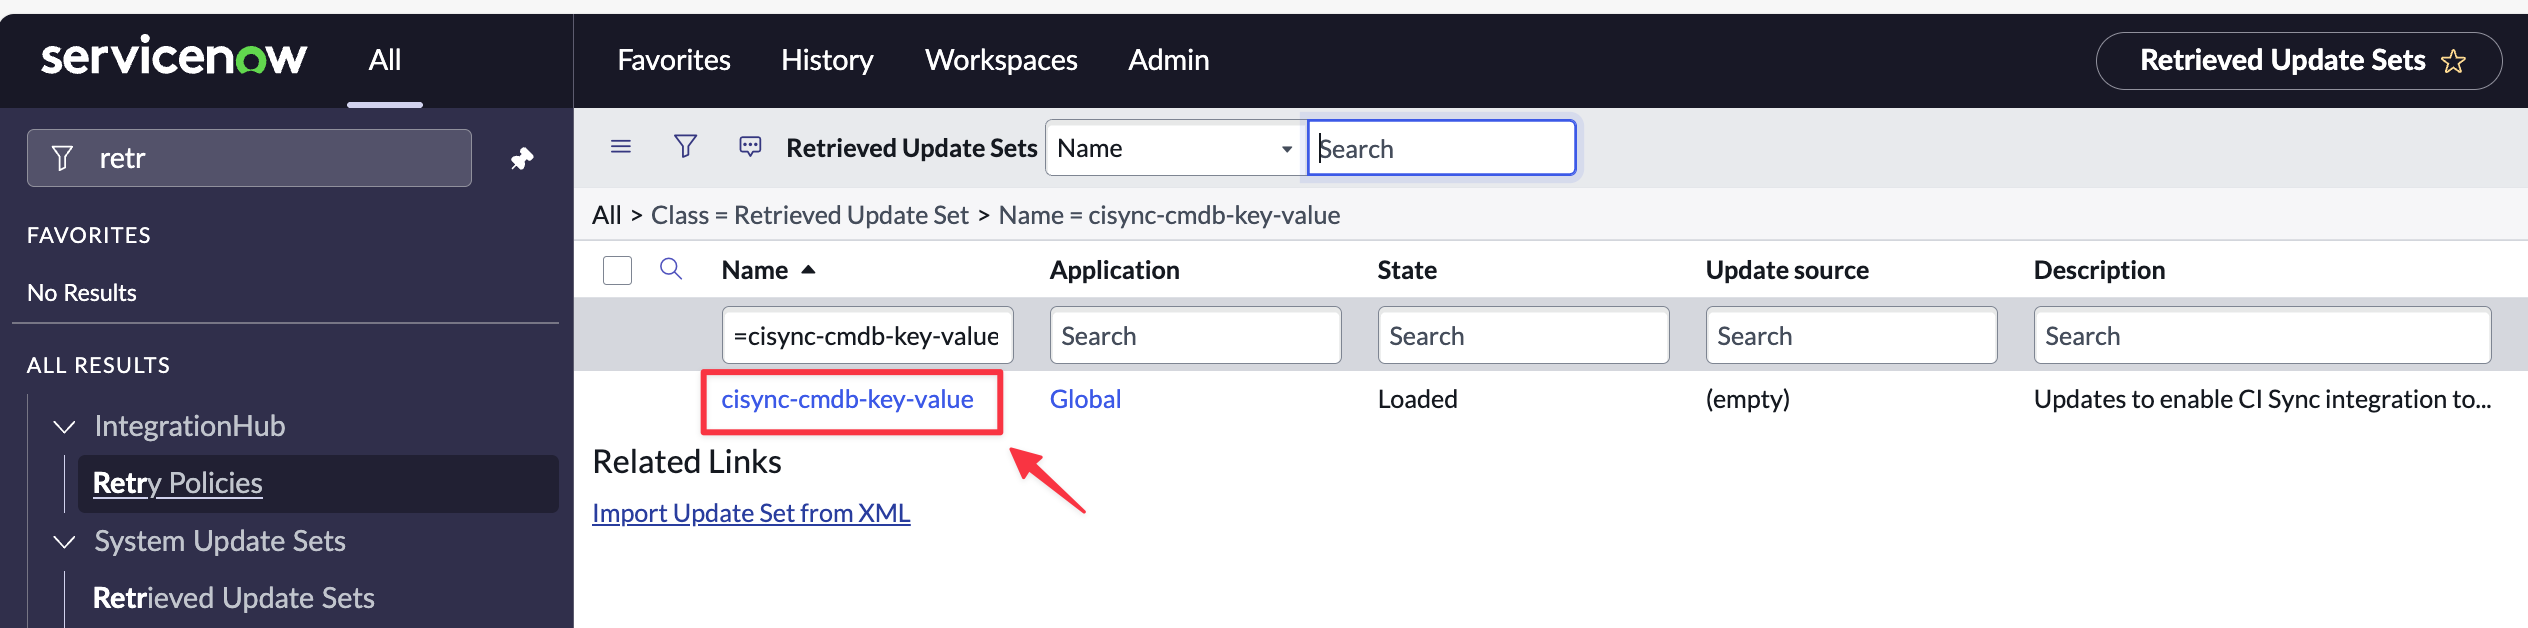
-
Click “Preview Update Set”
-
If there are no preview errors, Click “Close”.
-
Click “Commit Update Set”.
-
Your ServiceNow instance is now ready to receive Tag data from Azure via sync jobs from CI Sync.
Task 4d: (Optional though recommended) Assess your ServiceNow CI forms and update to include additional Related Lists specific to this connector
This task is not applicable as there are no additional related lists needed in ServiceNow for the source system connector described on this page.
Task 4e: Read and understand more about the data and functionality related to this connector
There are no additional data or functionality topics called out for this CI Sync connector.
You can therefore ignore / skip this task.